
리덕스에는 액션과 리듀서라는 개념이 있다.
하지만 리듀서는 순수함수이기때문에 부수적인 효과처리를 할 수 없다는 특징이 있다.
부수적 효과는 비동기처리 또한 포함이 된다.
그렇기 때문에 우리는 비동기 작업을 미들웨어인 리덕스 saga를 통해 전역 상태를 바꿀 수 있다.
목표
redux-saga를 이해하고, 로그인 과정에서 사용하기
Redux-Saga
redux-saga는 코드 생산성이 좋고, 큰 프로젝트에서는 많이 사용하는 경향이 있다. 제대로 코드 만들어 놓으면 복사 붙여넣기해서 코드를 작성할 수 있다. 많이 작성해야하지만 코드 안정성때문에 쓰는 거임. generator함수의 개념을 사용하기에 코드의 안정성이 높은 것이다.
generator을 통해서 내 코드가 어디에서 오류가 났는지 알기 쉬움.
thunk와 saga의 차이점
둘 다 미들웨어라는 공통점이 있지만, 차이점이 있다.
thunk는 바로 사용할 수 있지만, saga는 바로 사용할 수 없다. 왜냐하면 generator 함수의 개념을 이용함으로 인해서 함수로 감싸야하기 때문이다.
thunk는
dispatch>reducer
reducer>state
두 부분에서 자기가 선택하여 어떤 과정에 쓸 것인지 선택할 수 있는 반면,saga는 reducer>state에만 쓰게끔 코드가 정해져있다.
다만, 이미 만들어져 있는 코드들이 많기때문에 thunk를 사용할 때보다는 편하게 이용할 수 있다.
Redux-saga의 sideEffect
redux-saga에서 사이드이펙트는 많이 쓰인다.
종류
all / call / fork / take / takeEvery / takeLatest / put / throttle
sideeffect가 들어가는 것은 generator함수라고 보면 된다.
generator은 yield를 쓴다.
👉all
all은 배열 내에 있는 모든 함수를 실행한다는 것이다. 즉, 함수를 여러개 실행할 때 사용한다. 인잣값은 배열이다.
all([함수들....])
ex)
yield all([
fork(userSaga),
fork(postSaga),
])
👉call
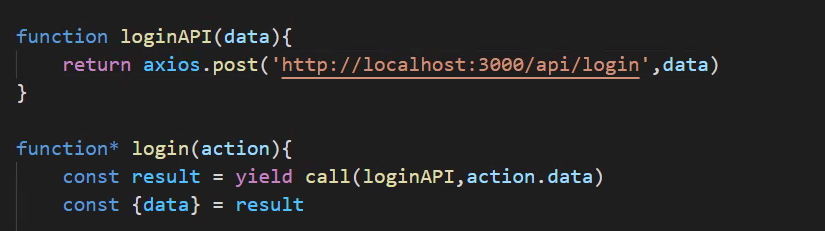
call: 함수를 하나만 실행하는 것(fork는 동기일때 쓰는 것이고 call은 비동기일때 쓰는 것임)->axios 나 fetch쓸 때 사용한다.
call(함수, 'url', 객체타입의 보낼 값)
ex)
const result = yield call(axios.post,'http://localhost:3000/api/login',action.data)
👉fork
fork는 함수를 하나만 실행하도록 한다.
ex)
yield all([
fork(userSaga),
])
👉take
take는 action값의 type에 따라 함수를 호출하는 역할을 한다.
takeEvery
👉takeLatest
action값 type에 따라 함수를 호출하는 역할을 한다.
중복되는 액션이 다발적으로 발생되었을 때 맨 마지막꺼 하나만 실행시킨다. 인자값 내용이 같아질 때까지 가만히 있다가 같아지면 함수를 실행함.
type이 될때까지 login함수를 가지고만 있고 실행시키지는 않는다.
기본적으로 next()가 포함되어 있다.
takeLatest(훔쳐올 type값,함수)
ex)
yield takeLatest("USER_LOGIN_REQUEST",login)
👉put
put:액션값을 실행시킨다. =>dispatch를 실행시킨다. 즉, saga의 put은 dispatch라고 생각해도 무관하다.
ex)
if(data.result =="OK"){
yield put({type:'USER_LOGIN_SUCCESS'})
} else{
yield put({type:'USER_LOGIN_FAIL'})
}
throttle
로그인 만들기
목적: 비동기 통신을 통해 data를 주고받고, 그에 따라 로그인 활성화하기
셋팅
일단 먼저 설치를 해준다.
$ npm i saga
아까도 말했듯이 saga는 세팅을 해주고 사용을 해야한다.
세팅을 store>configureStore.js에서 해준다.
[configureStore.js 전체파일]
import {createWrapper} from 'next-redux-wrapper'
import {compose, createStore , applyMiddleware} from 'redux'
import reducer from '../reducers'
import {composeWithDevTools} from 'redux-devtools-extension'
import createSaga from 'redux-saga'
import rootSaga from '../saga/index'

const loggerMiddleware=({dispatch,getState})=>(next)=>(action)=>{
    console.log(action)
    return next(action)
}
const configureStore = ()=>{
    const sagaMiddleware= createSaga()
    const middlewares=[sagaMiddleware]
    const enhancer = process.env.NODE_ENV==='production'
    ?compose(applyMiddleware(...middlewares))
    :composeWithDevTools(applyMiddleware(...middlewares))
    const Store=createStore(reducer,enhancer)
    Store.sagaTask = sagaMiddleware.run(rootSaga)
    return Store
}
const wrapper = createWrapper(configureStore,{
    debug:process.env.NODE_ENV==='development'
})
export default wrapper
configureStore의 함수 안에 saga를 쓰기 위해서 다음과 같이 선언해준다.

const sagaMiddleware= createSaga()
그리고 store을 선언한 후 다음과 같이 선언한다.
Store.sagaTask = sagaMiddleware.run(rootSaga)
여기서 rootSaga는 우리가 만들어줘야 한다.
rootSaga를 만들기 위해 front>saga폴더를 만든후 , saga폴더 안에 index.js를 생성한다.
saga를 활용해 함수 만들기
saga>index.js
[front>saga>index.js]
import {all, take, fork,takeLatest,call, put} from 'redux-saga/effects'
import axios from 'axios'

function* testAction(action){
    console.log(action)
    // call()
    // axios.post('http://localhost:3000/api/login',action.data)
    const result = yield call(axios.post,'http://localhost:3000/api/login',action.data)
    console.log(result)
    const data = result.data;
    if(data.result =="OK"){
        yield put({type:'USER_LOGIN_SUCCESS'})
    } else{
        yield put({type:'USER_LOGIN_FAIL'})
    }
    console.log('훔쳐오기!')
}

function* test(){
    console.log('테스트')
    yield takeLatest('USER_LOGIN_REQUEST',testAction)
    //USER_LOGIN_REQUEST가 action값으로 오면 testAction을 실행시킨다는 것임
}


export default function* rootSaga(){
    console.log('루트사가')
    yield all([
        fork(test)
    ])
}axios.post('http://localhost:3000/api/login',action.data)는 saga에서 다음과 같이 쓸 수 있다.
call(axios.post,'http://localhost:3000/api/login',action.data)
😕❓비동기 통신에 saga를 쓰는 이유
비동기통신은 context를 쓰면 useEffect까지 이용하면서까지 사용해야 함. 그러면 login.jsx페이지가 길어지게 됨.
saga는 thunk의 기능들을 라이브러리로 적용해줌.
thunk를 쓰면 async await 많이 씀.
fetch를 많이 쓰면
이렇게 써도 됨
reducers>user.js
[reducers>user.js]
const initialState={
    loadding:false,
    IsLogin:false
}

const USER_LOGIN_REQUEST="USER_LOGIN_REQUEST"
const USER_LOGIN_SUCCESS="USER_LOGIN_SUCCESS"
const USER_LOGIN_ERROR="USER_LOGIN_ERROR"
const USER_LOGOUT="USER_LOGOUT"

export const UserLogin_REQUEST=data=>{
    return{
        type:USER_LOGIN_REQUEST,data
    }
}

export const UserLogin_SUCCESS =()=>{
    return{
        type:USER_LOGIN_SUCCESS
    }
}

export const UserLogin_ERROR=()=>{
    return {
        type:USER_LOGIN_ERROR
    }
}
console.log('index-reducer');

const reducer =(state=initialState,action)=>{

    switch(action.type){
         case USER_LOGIN_REQUEST:
            return{
                ...state,
                    loadding:true,
                }

        case USER_LOGIN_SUCCESS:
            return{
                ...state,
                    IsLogin:true,
                    loadding:false
                }
        case USER_LOGIN_ERROR:
            return{
                ...state,
                    IsLogin:true,
                    loadding:false
                }
        case USER_LOGOUT:
            return{
                ...state,
                    IsLogin:false
                }
        default:
            return state
    }
}

export default reducer
reducers>index.js
import {combineReducers} from "redux"
import user from './user'
import category from './category'
import { HYDRATE } from "next-redux-wrapper"

console.log('인덱스 리듀서')
const reducer = combineReducers({

    index:(state={},action)=>{
        switch(action.type){
            case HYDRATE:
                return{
                    ...state,
                    ...action.payload
                }
            default:
                return state
        }
    },
    user,
    category,

    }
)
export default reducer
여기서 초기값을 선정해준다.
여기서 모든 값을 다 관리하는 것
왠만하면 컴포넌트는 화면에 그리는 것에 집중하고 값을 정리하는 것은 여기에 한다.
user>login.jsx
다음과 같이 작성하고 ,login.jsx 파일을 다음과 같이 작성하면
[login.jsx]
import FormLayout from '../../components/FormLayout'
import Router from 'next/router'
import useInput from '../../hooks/useInput'
import {useDispatch,useSelector} from 'react-redux'
import { UserLogin_REQUEST } from '../../reducers/user'
import {useEffect} from 'react'
const Login =()=>{
const dispatch = useDispatch();
const {loadding,IsLogin} = useSelector((state)=>state.user)
const userid = useInput(''); //Object
const userpw = useInput(''); //Object
console.log('props')
const handleSubmit =e=>{
e.preventDefault();
// console.log(userid.value,userpw.value)
// dispatch(USER_LOGIN_ACTION)
const data={
userid:userid.value,
userpw:userpw.value
}
dispatch(UserLogin_REQUEST(data))
/*
{type:'UserLogin_REQUEST',
data:{
userid:userid.value,
userpw:userpw.value
}
}
*/
}
useEffect(()=>{
IsLogin === true && Router.push('/')
},[loadding])
return (
<FormLayout>
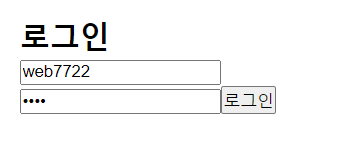
<h2>로그인</h2>
<form onSubmit={handleSubmit}>
<input type ="text" {...userid} placeholder = "아이디를 입력해주세요"/>
<input type ="password" {...userpw} placeholder = "패스워드를 입력해주세요"/>
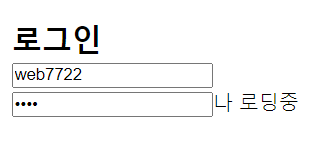
{loadding ? '나 로딩중':<button type ="submit">로그인</button>}
</form>
</FormLayout>
)
//로딩중이면 '나 로딩중'이 뜨고, 그렇지 않으면 로그인 버튼이 보이는 것임
}
export default Logindispatch(UserLogin_REQUEST(data))이 코드가 input으로 받은 값을 saga로 reducer로 넘기는 것이다.
에서 로그인을 넘기면 로그인 버튼이 사라지면서 '나 로딩중'이라는 글자가 뜬다.
import {all, take, fork,takeLatest,call} from 'redux-saga/effects'
import axios from 'axios'

//사이드 이펙트
//all call fork take takeEvery takeLatest put throttle


//testAction역할: 현재 상태를 체크하거나 요청을 보내거나 중간에서 할 수 있는 것들
//비동기로 data를 주고 받거나 하는 것임.
//로그인 성공과 실패를 미들웨어가 체크를 해주는 것임


/**fetch나 axtios로 요청을 날리고,
 * backend server는 결과값을 받은 다음, 결과값에 따른 action값을 내보낸다.
 *
 *
 */

function* testAction(action){
    console.log(action)
    // call()
    // axios.post('http://localhost:3000/api/login',action.data)
    const result = yield call(axios.post,'http://localhost:3000/api/login',action.data)
    //call (함수,url,data)
    console.log(result)
    console.log('훔쳐오기!')
    //saga에서는 async await 안쓰고 쓸 수 있음

}

function* test(){
    console.log('테스트')
    yield takeLatest('USER_LOGIN_REQUEST',testAction)
    //USER_LOGIN_REQUEST가 action값으로 오면 testAction을 실행시킨다는 것임
}


export default function* rootSaga(){
    console.log('루트사가')
    yield all([
        fork(test)
    ])//redux saga에 있음
}

//rootsaga는 dispatch가 reducer로 가기 전에 실행되는 것임.
server.js
백서버를 돌려보자.
[server.js]
const express = require('express')
const app = express()
const bodyParser = require('body-parser')
const cors = require('cors')
app.use(bodyParser.json())
app.use(bodyParser.urlencoded({extended:false}))
app.use(cors())
app.post('/api/login',(req,res)=>{
let result={};
console.log(req.body.userid);
console.log(req.body.userpw)
const {userid,userpw}=req.body
if(userid == 'web7722' && userpw == '1234'){
result={
result:'ok',
msg:'로그인에 성공했습니다.'
}
} else {
result={
result:'FAIL',
msg:'아이디와 패스워드가 다릅니다..'
}
}
res.json({
result
})
})
app.get('/',(req,res)=>{
res.send('hello world!')
})
app.listen(3000,()=>{
console.log('server start 3000')
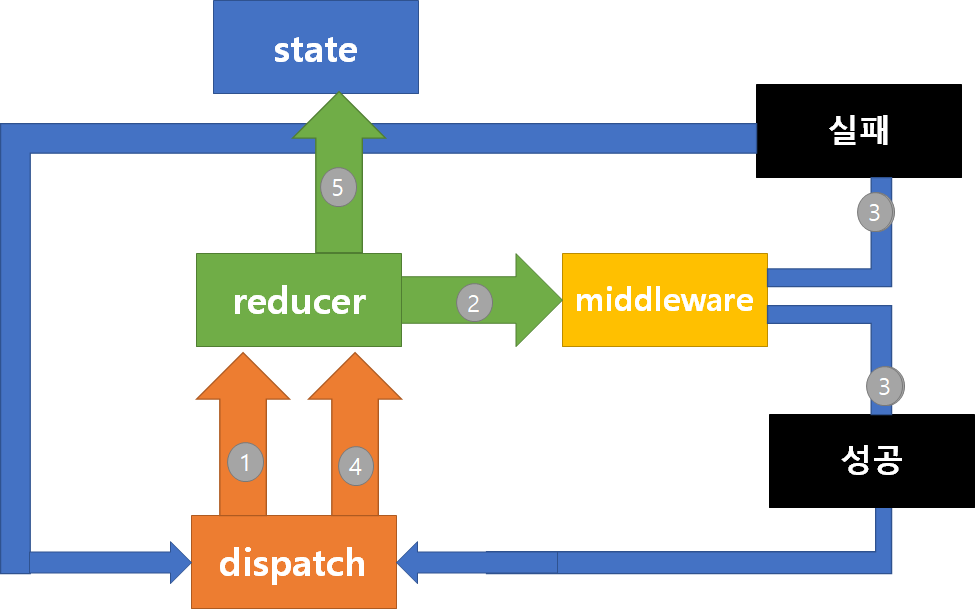
})redux-saga 코드의 전체적인 진행과정
reducer
[11:20분쯤]
redux에서도 reducer처럼 saga를 쪼개쓸 수 있다?!
정답은 네!😀입니다.
import {all,  fork} from 'redux-saga/effects'
import userSaga from './user'

export default function* rootSaga(){
    yield all([
        fork(userSaga)
    ])
}
위와 같이 user에 관한 코드들을 saga폴더에 user.js파일에 옮기고 import를 이용하면 index.js는 위의 코드로만 이루어집니다. 확 크기가 줄어든 걸 느낄 수 있습니다.
#가져온 곳
📌 회사에서 공부한 내용
app/configureStore.js
....
import rootSaga from './saga';
...

store.runSaga = sagaMiddleware.run(rootSaga);
예를 들어 home, loginPage에서 각각 saga를 사용한다면 각 페이지폴더에서 saga.js를 만들고 export를 한다.
그리고 상위폴더에서 saga.js를 만들어서
app/saga.js
import { all, fork } from 'redux-saga/effects';
import { appSaga } from './containers/Home/saga';
import { loginSaga } from './containers/LoginPage/saga';

export default function* rootSaga() {
  yield all([fork(loginSaga), fork(appSaga)]);
}
다음같이 rootSaga로 합친 후 export하여 configureStore.js에서 run을 해준다.
각 페이지의 action, reducer, saga를 만들어주자
Home/action.js
import {
  EXAMPLEACTION
  LOGIN_SUCCESS,
} from './constants';
// const LOAD_REPOS = "demasterpro/Login/LOAD_REPOS" 등 처럼 그냥 이름이다.

export function loginSuccess(result) {
//loginSuccess라는 액션을 정의. 새로운 액션 값을 return할 수 있다.
  return {
    type: LOGIN_SUCCESS,
    result,
  };
}
export function exampleAction(data){
	return {
    	type : EXAMPLEACTION,
        data
    }
}
Home/reducer.js
import produce from 'immer';
....
export const initialState = {
  loading: false,
  error: false,
  currentUser: false,
  userData: {
    repositories: false,
  },
  // authInfo: localstoreUtilites.getAuthFromLocalStorage(),
  authInfo: {
    isAuthed: false,
    accountType: TYPE_ACCOUNT.admin,
    token: '',
  },
};
...
const homeReducer = (state = initialState, action) =>
  produce(state, draft => {
    switch (action.type) {
      case LOGIN_SUCCESS:
        draft.authInfo.isAuthed = true;
        draft.authInfo.accountType = action.result.data.accountId;
        draft.authInfo.token = action.result.data.authToken;
        break;
    }
  });

export default homeReducer;
homeReducer를 만들어서 액션발생 시 액션타입에 따라 state의 값을 변경할 수 있도록 해주자.
app/reducers.js
여기서 다음처럼 데이터를 등록하자
........
export default function createReducer(injectedReducers = {}) {
  const rootReducer = combineReducers({
    global: globalReducer,
    language: languageProviderReducer,
    data: loginReducer,
    unidentified : UnidentifiedReducercer,
    // global, data, unidentified 추가
    router: connectRouter(history),
    ...injectedReducers,
  });

  return rootReducer;
}
Home/saga.js
.....

function* loginAction(action) {
  try {
    const result = yield call(
      axios.post,
      `${URL_DOMAIN}/account/login`,
      action.data,
    );
    const { statusText } = result;
    if (statusText === 'OK') {
      yield put(loginSuccess(result));
    }
  } catch (error) {
    alert(error.message);
    yield put(UserLogin_FAIL(error.message));
  }
}

export function* loginSaga(){
	yield takeLatest("EXAMPLEACTION",loginAction);
}
//"EXAMPLEACTION"이라는 액션타입이되면 loginAction함수를 실행시키고, 비동기통신을 진행하여 정상으로 값을 받아오면 아까 정의하였던 loginSuccess이라는 액션을 통해서 액션타입과 액션값을 변경해준다. 여기서 액션타입이 변경되면 reducer는 case에 따라 state의 값을 변경해준다.
Home/selectors.js
import { createSelector } from 'reselect';
import { initialState } from './reducer';

const selectGlobal = state => state.global || initialState;

export const makeAuthInfo = () =>
  createSelector(
    selectGlobal,
    globalState => globalState.authInfo,
  );
Home/index.js
....
export function Home(props){
	......
  const onSubmit = (event,data) => {
    event.preventDefault();
    const inputData = { data.username, data.password };
    await props.onLogin(inputData);
  };
   ......
   return(
   ...........
   )
}
const mapStateToProps = createStructuredSelector({
  authInfo: makeAuthInfo(),
  //makeAuthInfo는 위으 selector.js에서 import함
});

export function mapDispatchToProps(dispatch) {
  return {
    onLogin: inputData => {
      dispatch(exampleAction(inputData));
    },
    dispatch,
  };
}
export default connect(
  mapStateToProps,
  mapDispatchToProps,
)(Home);
페이지를 나타내는 컴포넌트에서 mapStateToProps를 통해서 컴포넌트에서 props.authInfo로 state의 값을 가져올 수 있다.
그리고 mapDispatchToProps를 통해 props.onLogin 이라는 함수를 사용할 수 있고, 함수가 실행되면 dispatch로 exampleAction 액션을 실행시키고, exampleAction액션의 결과에 따라 type을 EXAMPLEACTION로 바꾸고 action값에 data값을 추가한다. (여기서 type이 변경되면서 saga가 실행됨)
마지막으로 connect로 컴포넌트와 mapStateToProps, mapDispatchToProps를 묶어준다.
mapStateToProps는 함수이며, connect 함수의 첫번째 인수이다.
mapStateToProps는 store로부터 state를 가져와서, 컴포넌트의 props로 state를 보내주는 역할을 한다.
즉, mapStateToProps를 사용한다는 것은, store로부터 데이터를 가져와서
그 데이터를 컴포넌트의 props에 넣는다는 뜻이다.
mapStateToProps의 인자
첫번째 인자 state: store로부터 온 state
두번째 인자 ownProps: 생략가능. 컴포넌트가 현재 가지고 있는 모든 props를 보여준다
중요한 것은, mapStateToProps에서 return된 값이 컴포넌트의 props에 추가된다는 점이다.
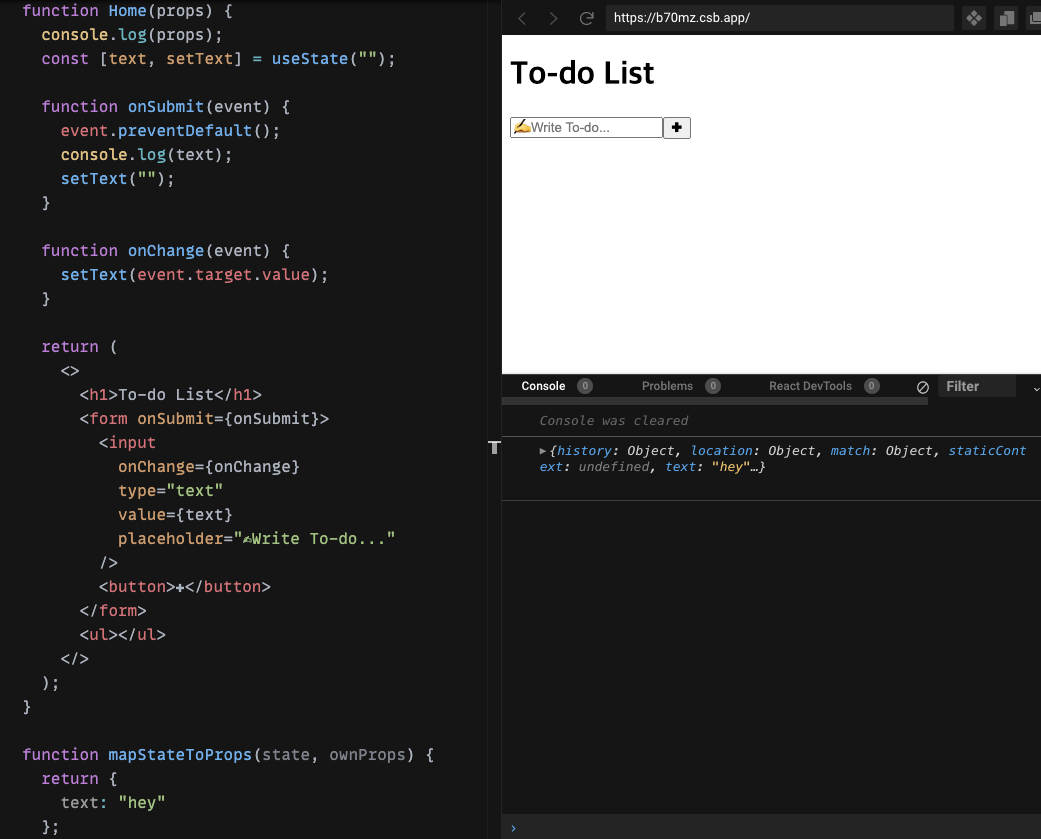
위의 그림을 보면, mapStateToProps 함수에서 text: "hey"라는 값을 가진 object(객체)를 return시켰다.
그리고 connect 함수에서 연결했었던 Home 컴포넌트의 props를 확인한 결과
text: "hey"라는 값을 받고 있는 것이 보인다.
(그 외의 값은 react-router로부터 받은 props이다)
여기서 알 수 있는 것은, mapStateToProps 함수에서 store로부터 가져온 state를 return시킨다면
컴포넌트에서 state를 props로 받아서 사용할 수 있다는 것이다.
자, 그러면 우리의 To-do List 앱으로 돌아와서
store에서 받은 state를 컴포넌트에서 props로 받을 수 있도록
다음과 같이 코드를 작성한다.
// routes/Home.js
import React, { useState } from "react";
import { connect } from "react-redux";

function Home({ toDos }) {
  console.log(toDos);
  const [text, setText] = useState("");

  function onSubmit(event) {
    event.preventDefault();
    console.log(text);
    setText("");
  }

  function onChange(event) {
    setText(event.target.value);
  }

  return (
    <>
      <h1>To-do List</h1>
      <form onSubmit={onSubmit}>
        <input
          onChange={onChange}
          type="text"
          value={text}
          placeholder="✍️Write To-do..."
        />
        <button>✚</button>
      </form>
      <ul></ul>
    </>
  );
}

function mapStateToProps(state) {
  return {
    toDos: state
  };
}

function mapDispatchToProps() {}

export default connect(mapStateToProps, mapDispatchToProps)(Home);