CRN 사용시
npx create-next-app@latest 혹은 yarn create next-app 를 통해 설치가 가능하다.
CRN을 사용하면 다음과 같은 package.json이 나온다.
{
  "name": "my-app",
  "version": "0.1.0",
  "private": true,
  "scripts": {
    "dev": "next dev",
    "build": "next build",
    "start": "next start",
    "lint": "next lint"
  },
  "dependencies": {
    "@next/font": "13.1.1",
    "@types/node": "18.11.18",
    "@types/react": "18.0.26",
    "@types/react-dom": "18.0.10",
    "eslint": "8.30.0",
    "eslint-config-next": "13.1.1",
    "next": "13.1.1",
    "react": "18.2.0",
    "react-dom": "18.2.0",
    "typescript": "4.9.4"
  }
}
폴더 구조는 아래와 같다.
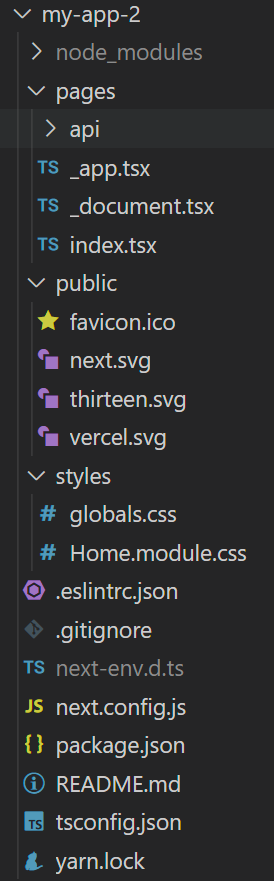
만일 src 폴더를 사용하도록 하면 아래와 같은 폴더구조가 된다.
$ tree
.
|-- README.md
|-- next-env.d.ts
|-- next.config.js
|-- package.json
|-- public
|   |-- favicon.ico
|   |-- next.svg
|   |-- thirteen.svg
|   `-- vercel.svg
|-- src
|   |-- pages
|   |   |-- _app.tsx
|   |   |-- _document.tsx
|   |   |-- api
|   |   |   `-- hello.ts
|   |   `-- index.tsx
|   `-- styles
|       |-- Home.module.css
|       `-- globals.css
|-- tsconfig.json
`-- yarn.lock
퍼블릭 폴더와 src 폴더가 구분된 것을 볼 수 있다.
crn 없이 시작하기
- 비어있는 폴더에 먼저 pakage.json을 만들자.
yarn init -y
{
  "name": "my-app",
  "version": "0.1.0",
  "main": "index.js"
  "license": "MIT"
}- 필요한 모듈을 설치하자.
yarn add next react react-dom
  "dependencies": {
    "next": "13.1.2",
    "react": "18.2.0",
    "react-dom": "18.2.0",
}- 실행할 명령어를 만들자
{
  "name": "my-app",
  "version": "0.1.0",
  "main": "index.js"
  "license": "MIT"
  "scripts": {
    "dev": "next",
    "build": "next build",
    "start": "next start"
  },
  "dependencies": {
    "next": "13.1.2",
    "react": "18.2.0",
    "react-dom": "18.2.0"
  }
}- pages 폴더를 만들고
yarn dev로 잘 작동되는지 확인해보자
//pages/index.jsx
const App = () => <div>Hello World</div>
export default App;
import react from "react"를 하지 않아도 리액트 앱이 잘 실행되는 것을 볼 수 있다.
ESLint 설치하기
ES린트가 설치되어 있지 않다면 npm install -g eslint 로 설치할 수 있다.
ES린트가 설치되어 있다면 eslint --init을 하자
? How would you like to use ESLint? ...
  To check syntax only
  To check syntax and find problems
> To check syntax, find problems, and enforce code style

? What type of modules does your project use? ...
> JavaScript modules (import/export)
  CommonJS (require/exports)
  None of these

? Which framework does your project use? ...
> React
  Vue.js
  None of these

? Does your project use TypeScript? » "No" / Yes

? Where does your code run? ...  (Press <space> to select, <a> to toggle all, <i> to invert selection)
√ Browser
   Node

? How would you like to define a style for your project? ...
> Use a popular style guide
  Answer questions about your style

? Which style guide do you want to follow? ...
> Airbnb: https://github.com/airbnb/javascript
  Standard: https://github.com/standard/standard
  Google: https://github.com/google/eslint-config-google
  XO: https://github.com/xojs/eslint-config-xo

? What format do you want your config file to be in? ...
> JavaScript
  YAML
  JSON

Local ESLint installation not found.
The config that you've selected requires the following dependencies:

eslint-plugin-react@^7.28.0 eslint-config-airbnb@latest eslint@^7.32.0 || ^8.2.0 eslint-plugin-import@^2.25.3 eslint-plugin-jsx-a11y@^6.5.1 eslint-plugin-react-hooks@^4.3.0
? Would you like to install them now? » No / "Yes"

? Which package manager do you want to use? ...
> npm
  yarn
  pnpm
이렇게 설치된 ESLint는 pakage.json의 devDependencies에 추가된다.
설치된 .eslintrc.js에 새로운 규칙들을 추가해보자.
module.exports = {
  env: {
    browser: true,
    es2021: true,
  },
  extends: ["plugin:react/recommended", "airbnb"],
  overrides: [],
  parserOptions: {
    ecmaVersion: "latest",
    sourceType: "module",
  },
  plugins: ["react"],
  rules: {
    quotes: ["error", "double"], //더블 쿼터 사용
    "@typescript-eslint/quotes": ["error", "double"], //더블 쿼터 사용
    "no-unused-vars": "off", //사용안한 변수 경고 중복
    "@typescript-eslint/no-unused-vars": "warn", //사용안한 변수는 경고
    "jsx-a11y/control-has-associated-label": "off", // 상호작용하는 엘리먼트에 label을 넣는다
    "react/no-array-index-key": "off", // key값으로 index를 사용할수 있다.
    "comma-dangle": "off", // 마지막에 , 을 넣어주지 않는다.
    "arrow-body-style": "off", //화살표 함수 안에 return을 사용 할 수 있다.
    "react/no-unescaped-entities": "off", //문자열 내에서 " ' > } 허용
    "react/prop-types": "off", //proptypes를 사용하지 않는다.
    "object-curly-newline": "off", // { 다음 줄 바꿈을 강제로 사용하지 않는다.
    "react/jsx-one-expression-per-line": "off", //한라인에 여러개의 JSX를 사용 할 수 있다.
    "implicit-arrow-linebreak": "off", // 화살표 함수 다음에 줄 바꿈을 사용할 수 있다.
    "no-shadow": "off", //파일 내에서 중복 이름을 사용 할 수 있다.
    "spaced-comment": "off", //주석을 뒤에 달 수 있다.
    "operator-linebreak": "off", //연산자 다음 줄 바꿈을 사용 할 수 있다.
    "react/react-in-jsx-scope": "off", // jsx를 사용하여도 React를 꼭 import 하지 않아도 된다.
    "react/jsx-props-no-spreading": "off", //props를 스프래드 할 수 있다.
    "jsx-a11y/anchor-is-valid": "off", // next js에서는 a에 href없이 사용
    "global-require": "off", //함수 내에서 require 사용가능
    "jsx-a11y/label-has-associated-control": "off", //label htmlFor을 사용하지 않아도 된다.
    "import/prefer-default-export": "off", //export default 를 사용하라.
    "no-param-reassign": "off",
    "react/jsx-curly-newline": "off", // jsx안에 }를 새로운 라인에 사용할 수 있다.
    "react/jsx-filename-extension": [
      1,
      { extensions: [".js", ".jsx", ".tsx"] }, //jsx사용가능한 확장자 설정
    ],
    "import/extensions": [
      "error",
      "ignorePackages",
      {
        js: "never",
        jsx: "never",
        ts: "never",
        tsx: "never",
      }, //import 시 확장자명은 사용하지 않는다.
    ],
  },
  settings: {
    "import/resolver": {
      node: {
        extensions: [".js", ".jsx", ".ts", ".tsx", ".d.ts"],
      },
    },
  },
};
prettier를 사용하려면 .prettierrc 파일을 생성한다.
아래와 같은 규칙을 추가해준다.
{
    "singleQuote": false,
    "semi": true,
    "useTabs": false,
    "tabWidth": 2,
    "trailingComma": "all",
    "endOfLine": "lf"
}
수정
해당 ESLint 규칙이 지나치게 복잡하다.
eslint파일을 지우고 pakage.json에서 아래와 같이 설정한다.
  "devDependencies": {
	...
  },
  "eslintConfig": {
    "extends": [
      "next/core-web-vitals",
      "airbnb",
      "prettier"
    ],
    "rules": {
      "react/jsx-filename-extension": 0,
      "no-unused-vars": 1
    }
  }
.prettierrc는 아래와 같다.
{
    "singleQuote": false,
    "semi": true,
    "useTabs": false,
    "tabWidth": 2,
    "trailingComma": "all",
    "endOfLine": "lf"
}
필요한 경우 eslint-config-prettier를 설치한다.
VSCode의 settings.json에 아래의 내용을 추가한다.
{
  ...
  "editor.formatOnSave": true,
  ...
  "[javascript]": {
    "editor.defaultFormatter": "esbenp.prettier-vscode",
    "editor.tabSize": 2,
    "files.eol": "\n"
  },
  ...
}
웹팩 설정하기
웹팩을 설정하기 위해 eject를 해야 했던 리액트와는 달리,
next js에서 웹팩을 커스텀하려면 아래와 같이 루트 디렉토리에 next.config.js 파일을 아래와 같이 작성하여 웹팩을 import하고 필요한 설정을 export하여 오버라이딩 할 수 있다.
웹팩 설정 예시
// next.config.js 파일
import webpack from 'webpack';
module.exports = {
  distDir: 'myNextAppBuild', // 빌드 파일을 저장할 디렉토리 지정. 기본 값은 .next
  webpack: (config, { dev }) => { // Webpack 설정값 (webpack.config.js)
    config.plugins.push(new webpack.optimize.UglifyJsPlugin({
      compress: { warnings: false }
    }));
    return config;
  },
  webpackDevMiddleware: (config) => { // 개발 모드에서 사용되는 Webpack Dev Middleware에 사용되는 설정 값
    // BLAHBLAH!
    return config;
  },
  exportPathMap: () => ({ // Next Export 에서 사용하는 값
    "/": { page: "/" },
    "/about": { page: "/about" },
    "/p/hello-nextjs": { page: "/post", query: { title: "hello-nextjs" } },
    "/p/learn-nextjs": { page: "/post", query: { title: "learn-nextjs" } },
    "/p/deploy-nextjs": { page: "/post", query: { title: "deploy-nextjs" } }
  })
};
웹팩의 수정은 프론트엔드의 성능 최적화에 유용하게 쓰인다. (예시)
next.config.js는 차후 적용할 예정.
타입 스크립트 설정하기
아래와 같이 타입스크립트를 개발자 환경의 디펜던시로 넣을 수 있다. react와 node의 타입 라이브러리도 설치한다.
yarn add -d typescript @types/react @types/node
{
  "name": "next-without-crn",
  "version": "1.0.0",
  "main": "index.js",
  "license": "MIT",
  "scripts": {
    "dev": "next",
    "build": "next build",
    "start": "next start"
  },
  "dependencies": {
    "@types/node": "^18.11.18",
    "@types/react": "^18.0.26",
    "eslint": "^8.31.0",
    "eslint-config-prettier": "^8.6.0",
    "next": "^13.1.2",
    "react": "^18.2.0",
    "react-dom": "^18.2.0"
  },
  "devDependencies": {
    "eslint-config-airbnb": "^19.0.4",
    "eslint-plugin-import": "^2.27.4",
    "eslint-plugin-jsx-a11y": "^6.7.1",
    "eslint-plugin-react": "^7.32.0",
    "eslint-plugin-react-hooks": "^4.6.0"
  },
  "eslintConfig": {
    "extends": [
      "react-app",
      "airbnb",
      "prettier"
    ],
    "rules": {
      "react/jsx-filename-extension": 0,
      "no-unused-vars": 1
    }
  }
}
설치 후 yarn dev를 입력하면, pages/index.jsx가 실행되며 아래와 같이 tsconfig.json 파일이 생성된다.
{
  "compilerOptions": {
    "lib": [
      "dom",
      "dom.iterable",
      "esnext"
    ],
    "allowJs": true,
    "skipLibCheck": true,
    "strict": false,
    "forceConsistentCasingInFileNames": true,
    "noEmit": true,
    "incremental": true,
    "esModuleInterop": true,
    "module": "esnext",
    "moduleResolution": "node",
    "resolveJsonModule": true,
    "isolatedModules": true,
    "jsx": "preserve"
  },
  "include": [
    "next-env.d.ts",
    "**/*.ts",
    "**/*.tsx"
  ],
  "exclude": [
    "node_modules"
  ]
}
현재 설정 정리
책에서 설명된 esLint 구성은 지나치게 충돌이 많다. 아래와 같이 재설정해주었다.
.eslintrc.js
타입 스크립트의 기본적인 기능을 적용한 .eslintrc.js의 기본 상태이다.
.prettierrc
나의 설정을 적용한 prettier의 상태이다.
{
    "singleQuote": false,
    "semi": true,
    "useTabs": false,
    "tabWidth": 2,
    "trailingComma": "all",
    "endOfLine": "lf"
}
tsconfig.json
최초 실행시 만들어진 tsconfig.json 의 상태이다.
{
  "compilerOptions": {
    "lib": [
      "dom",
      "dom.iterable",
      "esnext"
    ],
    "allowJs": true,
    "skipLibCheck": true,
    "strict": false,
    "forceConsistentCasingInFileNames": true,
    "noEmit": true,
    "incremental": true,
    "esModuleInterop": true,
    "module": "esnext",
    "moduleResolution": "node",
    "resolveJsonModule": true,
    "isolatedModules": true,
    "jsx": "preserve"
  },
  "include": [
    "next-env.d.ts",
    "**/*.ts",
    "**/*.tsx"
  ],
  "exclude": [
    "node_modules"
  ]
}
package.json
airbnb에서 권장하는 "eslint-config-airbnb-typescript"를 적용한 상태이다.
여기에 리액트의 규칙들과 충돌을 방지한 next의 eslint config인 "next/core-web-vitals"를 적용하였다.
eslintrc는 삭제하고 아래와 같이 pakage.json에 통합하였다.
eslint extends를 작성할 때에는 순서에 유의하자.
최우선으로 적용되어야 하는 것이 가장 아래에 온다.
airbnb-typescript가 가장 엄격한 문법 규칙을 가지고 있고, 가장 권장되기에 아래로 왔다.
이후 prettier에서 autoformatting한 내용과 충돌이 나지 않도록 prettier를 그 밑에 두었다.
추가로 styled-componets를 설치했다. 자동완성이 되기 위해서는 '@types/styled-components'를 추가로 설치해주어야 한다.
{
  "name": "next-without-crn",
  "version": "1.0.0",
  "main": "index.js",
  "license": "MIT",
  "scripts": {
    "dev": "next",
    "build": "next build",
    "start": "next start"
  },
  "dependencies": {
    "next": "^13.1.2",
    "react": "^18.2.0",
    "react-dom": "^18.2.0"
    "styled-components": "^5.3.6"
  },
  "devDependencies": {
    "@types/node": "^18.11.18",
    "@types/react": "^18.0.26",
    "@types/react-dom": "18.0.10",
    "@types/styled-components": "^5.1.26",
    "eslint": "^8.32.0",
    "eslint-config-next": "13.1.1",
    "eslint-config-airbnb": "^19.0.4",
    "eslint-config-prettier": "^8.6.0",
    "eslint-config-airbnb-typescript": "^17.0.0",
    "typescript": "4.9.4"
  },
  "eslintConfig": {
    "extends": [
      "next/core-web-vitals",
      "airbnb",
      "airbnb-typescript",
      "prettier"
    ]
  }
}