
ui테스트 사이트
http://uitestingplayground.com/
https://demoqa.com/
https://the-internet.herokuapp.com/
https://www.globalsqa.com/angularjs-protractor-practice-site/
테스트를 위해 직접 ui를 개발하지 않아도 기본적인 ui가 있어서 테스트 연습을 해 볼 수 있다.
기본 구조
describe("empty spec", () => {
  before(() => {
    cy.log("hello from the before hook");
  });
  after(() => {
    cy.log("hello from the before after");
  });
  beforeEach(() => {
    cy.log("hello from the before each hook");
  });
  afterEach(() => {
    cy.log("hello from the after each hook");
  });
  it("testcase #1", () => {
    cy.log("hello world");
  });
  it("testcase #2", () => {
    cy.log("hello world");
  });
  it.only("testcase #3", () => {
    cy.log("hello world");
  });
  it.skip("testcase #4", () => {
    cy.log("hello world");
  });
});
basic
describe: 어떤 테스트 코드인지 기술 하고 묶어주는 함수 역할
it: 하나의 테스트 단위
it.only: 다른 it는 실행하지 않고 only가 적용된 것만 실행, 여러 it에 붙일 수 있음
it.skip | describe.skip: 실행하지 않고 넘어감
hook
before: describe 안에서 맨처음 한번만 실행
after: describe 안에서 맨 마지막 한번만 실행
beforeEach: it가 실행 될 때마다 처음 맨처음 항상 실행
afterEach: it가 실행 될 때마다 맨 마지막 항상 실행
commands
- visit: url 주소로 이동
cy.visit(url) or cy.visit({url, option})

ex>
describe("basic", () => {
  it("visit", () => {
    cy.visit("http://uitestingplayground.com/textinput")
    // cy.visit({
    //   url: "http://uitestingplayground.com/textinput",
    //   method: 'POST'
    // })
  })
})

// 로딩시간이 오래 걸릴경우 기다릴 시간을 지정 할 수 있다. 기본값은 60000 m/s
// 보통은 60초가 기본이기 때문에 수정할 일은 없지만 수정 가능하다.
cy.visit("/textinput", { timeout: 70000})
- url: 현재 활성상태인 현재 url을 가져옴
  it("visit explanation text input", () => {
    cy.url().then((url) => {
      cy.log(`Printing the URL: ${url}`);
      expect(url).to.contains("/textinput");
      // expect는 기대한다는 뜻, contains()=> 포함되어있는지
      // https://docs.cypress.io/api/commands/contains#Syntax
    });
});- type: DOM 요소를 입력
특수키와 함꼐 사용 할 수도 있다. ex> {moveToEnd}, {moveToStart}, or {selectAll}.
cy.get("#newButtonName").type("aaa") // 버튼에 aaa 라고 입력// 특수키
{{} Types the literal { key
{backspace} Deletes character to the left of the cursor
{del} Deletes character to the right of the cursor
{downArrow} Moves cursor down
{end} Moves cursor to the end of the line
{enter} Types the Enter key
{esc} Types the Escape key
{home} Moves cursor to the start of the line
{insert} Inserts character to the right of the cursor
{leftArrow} Moves cursor left
{moveToEnd} Moves cursor to end of typeable element
{moveToStart} Moves cursor to the start of typeable element
{pageDown} Scrolls down
{pageUp} Scrolls up
{rightArrow} Moves cursor right
{selectAll} Selects all text by creating a selection range
{upArrow} Moves cursor up
{alt} Activates the altKey modifier. Aliases: {option}
{ctrl} Activates the ctrlKey modifier. Aliases: {control}
{meta} Activates the metaKey modifier. Aliases: {command}, {cmd}
{shift} Activates the shiftKey modifier.
// 사용

// shift+a => A
cy.get('input:first').type('{shift}a')

// 전체선택 텍스트 지우고 hello world 입력
cy.wrap($body).find("p").type("{selectAll}{del}Hello World");

// execute a SHIFT + click on the first <li>
// {release: false} is necessary so that
// SHIFT will not be released after the type command
// SHIFT를 실행하고 첫 번째 <li>를 클릭합니다.
// 다음을 수행하려면 {release:false}이(가) 필요합니다.
// Type 명령 후 SHIFT가 해제되지 않습니다.
cy.get('body').type('{shift}', { release: false }).get('li:first').click()- contains: 텍스트가 들어있는DOM 요소를 가져옴
// "Button with Dynamic ID" 텍스트를 가지고있는 DOM을 가져옴
cy.contains("Button with Dynamic ID").should(
  "have.text",
  "Button with Dynamic ID"
);- find: 특정 선택기의 하위 DOM 요소를 가져옴
cy.get("div").find("button").should("have.text", "Button with Dynamic ID");- hover: 마우스오버
https://docs.cypress.io/api/commands/hover#Workarounds
일반적인 마우스 오버에 효과가있지만 마우스 오버시 DOM 객체가 변한다거나 스크립트로 마우스오버효과를 준경우는 이것이 효과가 없을 수 있다.
그럴경우에는 플러그인을 사용해야 한다.
cypress real event 라는 플러그인을 사용한다.
cy.get(".text-primary").trigger("mouseover");- each: Array 형식을 반복한다. map 이나 forEach 와 비슷하다.
https://docs.cypress.io/api/commands/each
	cy.get('ul>li').each(() => {...}) // Iterate through each 'li'
	cy.getCookies().each(() => {...}) // Iterate through each cookie

    it("Chrome CPU Test", () => {
      cy.get('div[role="row"] span').each($cell => {

        if($cell.text() === 'Chrome') {
          let array: string[] = []
          // $cell.text()
          array.push($cell.next().text())
          array.push($cell.next().next().text())
          array.push($cell.next().next().next().text())
          array.push($cell.next().next().next().next().text())

          array.forEach(list => {
            if(list.includes('%')) {
              cy.get('.bg-warning').should('have.text', `Chrome CPU: ${list}`)
            }
          })
        }
      })
})- viewport: viewport 설정
cy.viewport("samsung-s10")
cy.viewport(500, 600);- 클릭 관련
cy.get("#doubleClickBtn").click()		// 클릭
cy.get("#doubleClickBtn").dblclick()    // 더블클릭
cy.get("#doubleClickBtn").rightclick() // 오른쪽클릭- invoke(): 함수를 실행 할 수 있다.
const fn = () => {
  return 'bar'
}
cy.wrap({ foo: fn }).invoke('foo').should('eq', 'bar') // true

//---
cy.get("#simpleLink").invoke("removeAttr", "target").click();
cy.get("#simpleLink").invoke("hide")- wrap(): 전달될 객체를 생성한다.
https://docs.cypress.io/api/commands/wrap#Usage
cy.wrap({ name: 'Jane Lane' })

const getName = () => {
  return 'Jane Lane'
}

cy.wrap({ name: getName }).invoke('name').should('eq', 'Jane Lane') // true

cy.get('form').within(($form) => {
  // ... more commands

  cy.wrap($form).should('have.class', 'form-container')
})- intercept: API 등을 호출 할 때 사용, 네트워크 요청 응답
https://docs.cypress.io/api/commands/intercept#Matching-with-RouteMatcher
interception으로 요청을 가로챌 준비를 하고
wait나 get 등으로 사용할때 interception에서 준비한 요청이 사용되면 데이터를 가로채 테스트를 할 수 있다.
// API
// spying only
// url , method 및 routeMatcher 인수 참조
cy.intercept(url)
cy.intercept(method, url)
cy.intercept(routeMatcher)

// spying and response stubbing
// staticResponse 인수 참조
cy.intercept(url, staticResponse)
cy.intercept(method, url, staticResponse)
cy.intercept(routeMatcher, staticResponse)
cy.intercept(url, routeMatcher, staticResponse)

// spying, dynamic stubbing, request modification, etc.
// routeHandler 인수 참조
cy.intercept(url, routeHandler)
cy.intercept(method, url, routeHandler)
cy.intercept(routeMatcher, routeHandler)
cy.intercept(url, routeMatcher, routeHandler)
// 사용
// spying
cy.intercept('/users/**')
cy.intercept('GET', '/users*')
cy.intercept({
method: 'GET',
url: '/users*',
hostname: 'localhost',
})
// spying and response stubbing
cy.intercept('POST', '/users*', {
statusCode: 201,
body: {
name: 'Peter Pan',
},
})
// spying, dynamic stubbing, request modification, etc.
cy.intercept('/users*', { hostname: 'localhost' }, (req) => {
/* do something with request and/or response */
})// 요청대기
cy.intercept('http://example.com/settings').as('getSettings')
// once a request to get settings responds, 'cy.wait' will resolve
cy.wait('@getSettings')// 샘플
describe("Incercepting API(SPYING) requests after clicking on a button", () => {
beforeEach(() => {
cy.visit(`/links`);
cy.intercept("GET", `${Cypress.env("demoQA")}/created`).as("linkStatus");
});
it("First approach, not click on the link", () => {
cy.get("a#created").click();
cy.wait("@linkStatus").then((request) => {
cy.log("This is the request intercepted", request);
expect(request.response.statusCode).to.be.equal(201);
expect(request.response.statusMessage).to.be.equal("Created");
});
});
});설정
- 기본 url 세팅
1번째 방법
cypress.config.ts 파일을 수정
baseUrl을 추가
export default defineConfig({
  e2e: {
    baseUrl: "http://uitestingplayground.com", // 추가
    setupNodeEvents(on, config) {
      // implement node event listeners here
    },
  },
});
이렇게 설정하면
// cy.visit("http://uitestingplayground.com/textinput")
cy.visit("/textinput") // 이렇게 설정 할 수 있다.
2번째 방법
package.json 의 scripts 코드 변경
{
  ...
  "scripts": {
  	"test": "cypress open --e2e --browser chrome --config baseUrl=http://uitestingplayground.com"
  }
  ...
}- 기본 대기시간 설정
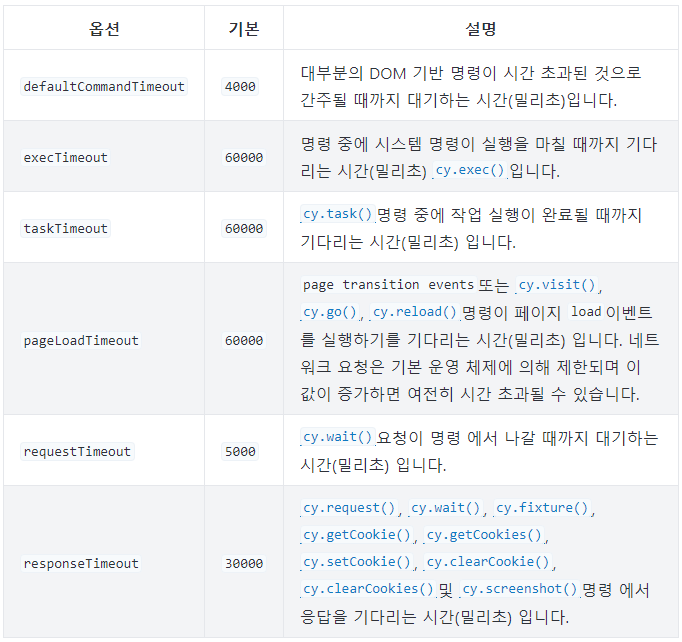
로딩대기 시간을 각 it 별로 조절 할 수있지만 전체적으로 기본 대기시간을 바꿀 수있다.
// ts에 추가하는 방법
// config 옵션들을 여기에서 병경 할 수있다.
Cypress.config("defaultCommandTimeout", 16000);	// 기본 command 대기시간 설정
Cypress.config("pageLoadTimeout", 30000) // 페이지 로딩 대기시간 설정

describe("Retry ability demo", () => {
	...
    it('', () => {
    	cy.visit('/aasd', {timeout: 30000}),
        cy.get('.bg-success', {timeout: 30000})
    })
    ...
})
// config에 추가하는 방법
export default defineConfig({
e2e: {...},
pageLoadTimeout: 60000, // 설정 변경
...
})
- 공통 환경 변수 설정
환경 변수는 config파일 또는 package.json의 스크립트 실행시 넣을 수있다.
// cypress.config.ts에 설정
export default defineConfig({
  e2e: {
	...
    env: {
      demoVar: "Hello from the Cypress.Config.Ts",
    },
    ...
  },
});

// package.json 에 설정
"test": "cypress open --e2e --browser chrome --config baseUrl=http://uitestingplayground.com --env demoVar=Hello_From_Package_File",

// package.json 에 여러개 입력시 ,컴마로 여러개를 설정 할 수있다.
--env demo1=aaa,demo2=demo2
// 사용
cy.log(`Printing Environment Variable Value: ${Cypress.env("demoVar")}`);
beforeEach(() => {
cy.visit(`${Cypress.env("Angular")}/angularjs-protractor-practice-site/`)
})- 뷰포트 사이즈 지정
cypress 실행시 보이는 뷰포트의 사이즈를 기본적으로 설정 할 수있다.
// cypress.config.te
export default defineConfig({
  ...
  viewportHeight: 1000,
  viewportWidth: 1200,
  ...
})- exception 처리 설정
https://www.globalsqa.com/angularjs-protractor-practice-site/ 와 같이 테스트접속시 예외 상황이 발생하여 이런 에러가 발생하는경우 설정하는 방법이 있다.
// 콘솔에서 확인 가능한 에러
Event:      uncaught exception
index.b2772887.js:99329 Caught by:  "error" handler
index.b2772887.js:99329 Error:      Error: Script error.

Cypress detected that an uncaught error was thrown from a cross origin script.

We cannot provide you the stack trace, line number, or file where this error occurred.

Check your Developer Tools Console for the actual error - it should be printed there.

It's possible to enable debugging these scripts by adding the `crossorigin` attribute and setting a CORS header.
// /support/exceptions.ts
Cypress.on("uncaught:exception", (err, runnable) => {
return false;
})
// /support/e2e.ts 에서 불러오기
import './exceptions'기타
- cypress는 헥사코드를 확인 할 수없다.
컬러를 확인하기위해서는 HEX 코드가 아닌 rgb로 변환하여 확인하여야 한다.
플러그인 (플러그인포스트로 옮길예정)
XPath
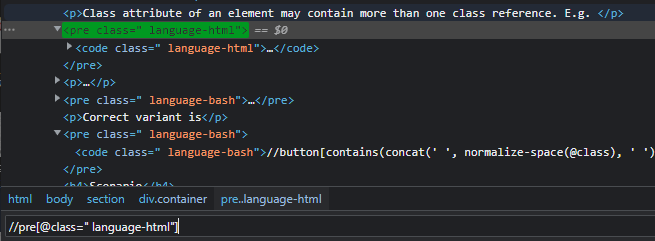
XPath를 왜 사용해야 하는지 이해할 수가 없었다. css selector로 모든 것 들을 선택 할 수있다고 생각했기때문이다. 그런데 생각해보니 css selector가 못잡는게 있더라...
원하는 범위의 값을 선택 할 수가 없다. 물론 스크립트로 선택 할 수도 있긴하지만 css만으로 선택하는것은 못한다.
예를들어 'value가 50이상인 input태그를 선택' 한다고하면 할 수 없다.
XPath로는 간단하게 //input[value>=50] 이런식으로 사용 할 수 있다.
- 설치
npm install -D cypress-xpath- support>e2e.ts 에 추가
// Import commands.js using ES2015 syntax:
import './commands'
require('cypress-xpath'); // 추가- tsconfig.json 수정
{
  "compilerOptions": {
    "types": ["cypress", "cypress-xpath"]
  }
}- 사용
it('finds list items', () => {
  cy.xpath('//ul[@class="todo-list"]//li').should('have.length', 3);
});

it('finds list items', () => {
  cy.xpath('//ul[@class="todo-list"]').xpath('./li').should('have.length', 3);
});

it('finds list items', () => {
  cy.xpath('//ul[@class="todo-list"]').within(() => {
    cy.xpath('./li').should('have.length', 3);
  });
});-
XPath cheatsheet
https://devhints.io/xpath
XPath 브라우져에서 테스트 방법
- DevTools DOM 검색에서 XPath 명력어로 검색이 가능
Cypress Real Events
https://github.com/dmtrKovalenko/cypress-real-events
hover등 이벤트를 테스트 할 때 DOM 이 바뀌거나 스크립트로 이벤트를 준 경우 테스트가 원할하지 않을수도있다. 이때 실제 마으스 이벤트를 준것처럼 할 수있는 cypress 플러그인이다.
- 설치:
npm install cypress-real-events - Register new commands by adding this to your
cypress/support/index.{js,ts}file.
내 cpress 10.x 에는cypress/support/e2e.ts에 적용한다.
import "cypress-real-events/support";- If you are using typescript, also add the following to
cypress/tsconfig.json
{
  "compilerOptions": {
    "types": ["cypress", "cypress-real-events"]
  }
}- 사용방법
cy.get("button").realClick()
cy.get("button").realClick({ position: "topLeft" }); // click on the top left corner of button
cy.get("body").realClick({ x: 100, y: 1240 }); // click by the x & y coordinates relative to the whole window

cy.get("button").realHover()
cy.get("button").realHover({ position: "bottomLeft" }); // hovers over the bottom left corner of button

cy.realPress("Tab"); // switch the focus for a11y testing
cy.realPress(["Alt", "Meta", "P"]); // Alt+(Command or Control)+P

cy.realType("type any text"); // type any text on the page

cy.get("input").focus();
cy.realType("some text {enter}"); // type into focused field

cy.get("button").realMouseDown({ position: "topLeft" }); // click on the top left corner of button

cy.get("button").realMouseUp({ position: "topLeft" }); // click on the top left corner of button

cy.get("sector").realMouseMove(50, 50, { position: "center" }); // moves by 50px x and y from center of sector
cypress-file-upload
cypress에서 파일 업로드를 테스트 하기 위해서 필요하다.
https://www.npmjs.com/package/cypress-file-upload
-
설치
npm i -D cypress-file-upload -
tsconfig.json 설정
"compilerOptions": {
  "types": ["cypress", "cypress-file-upload"]
}- cypress/support/commands.ts 설정
import 'cypress-file-upload';- cypress/support/e2e.ts 설정
import './commands'- 사용
// html5
cy.get('[data-cy="file-input"]')
  .attachFile('myfixture.json');

// Drag-n-drop component
cy.get('[data-cy="dropzone"]')
  .attachFile('myfixture.json', { subjectType: 'drag-n-drop' });

// Attaching multiple files
cy.get('[data-cy="file-input"]')
  .attachFile(['myfixture1.json', 'myfixture2.json']);

// encodings
cy.get('[data-cy="file-input"]')
  .attachFile({ filePath: 'test.shp', encoding: 'utf-8' });
cy-verify-downloads
https://www.npmjs.com/package/cy-verify-downloads
파일이 다운로드 된 파일을 대기하고 확인할 수있음
파일은 cypress > downloads에 다운로드된다.
- 설치
npm i -D cy-verify-downloads- cypress/support/e2e.ts 설정
require('cy-verify-downloads').addCustomCommand();- cypress.config.ts 설정
const { verifyDownloadTasks } = require('cy-verify-downloads');

module.exports = defineConfig({
  e2e: {
    setupNodeEvents(on, config) {
      on('task', verifyDownloadTasks);
    },
  },
});- tsconfig.json 설정
{
  "compilerOptions": {
    "types": ["cypress", "cy-verify-downloads"]
  }
}- 사용
cy.verifyDownload('picture.png');

// verify download by file extension or partial filename
cy.verifyDownload('.png', { contains: true });
cy.verifyDownload('pic', { contains: true });

// or increase timeout
cy.verifyDownload('archive.zip', { timeout: 25000 });

// or increase timeout and interval pooling
cy.verifyDownload('archive.zip', { timeout: 25000, interval: 600 });
팁
- 클릭 후 새창이 열리는 페이지의 경우 테스트
cypress는 새창이 열리면 테스트를 진행 할 수가 없다. 그래서 테스트 시 새창을 막고 현재페이지가 변하도록 하여 테스트를 한다.
describe("Dealing with links that opens a new tab", () => {
  beforeEach(() => {
    cy.visit(`${Cypress.env("demoQA")}/links`);
  });
  it("First approach, not click on the link", () => {
    cy.get("#simpleLink").should("have.attr", "href", "https://demoqa.com");
    cy.get("#simpleLink").should("have.attr", "target", "_blank");
  });
  it("Second approach, remove the target", () => {
    cy.get("#simpleLink").invoke("removeAttr", "target").click();
    cy.url().then((url) => {
      expect(url).to.be.equal("https://demoqa.com/");
    });
  });
});
작성중 ...