
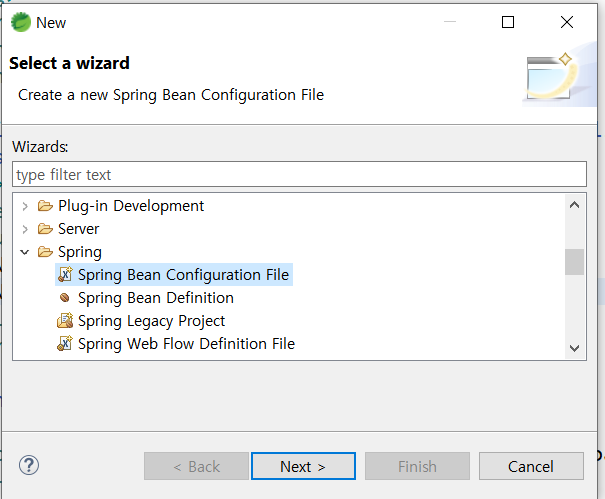
참고 : https://shxrecord.tistory.com/161?category=662711
https://to-dy.tistory.com/70?category=720806
1. pom.xml에 의존성 추가하기
<properties>
  <java-version>1.8</java-version>
  <org.springframework-version>4.3.26.RELEASE</org.springframework-version>
  <org.aspectj-version>1.6.10</org.aspectj-version>
  <org.slf4j-version>1.6.6</org.slf4j-version>
  <spring.security.version>4.2.20.RELEASE</spring.security.version>
</properties>
<dependency>
  <groupId>org.springframework.security</groupId>
  <artifactId>spring-security-core</artifactId>
  <version>${spring.security.version}</version>
</dependency>
<dependency>
  <groupId>org.springframework.security</groupId>
  <artifactId>spring-security-web</artifactId>
  <version>${spring.security.version}</version>
</dependency>
<dependency>
  <groupId>org.springframework.security</groupId>
  <artifactId>spring-security-config</artifactId>
  <version>${spring.security.version}</version>
</dependency>
처음 security 버전을 5.대로 해서인지 자꾸 404 에러가 나서 4.2로 다시 변경 후 서버를 돌리니 404 없이 잘 돌아갔다.
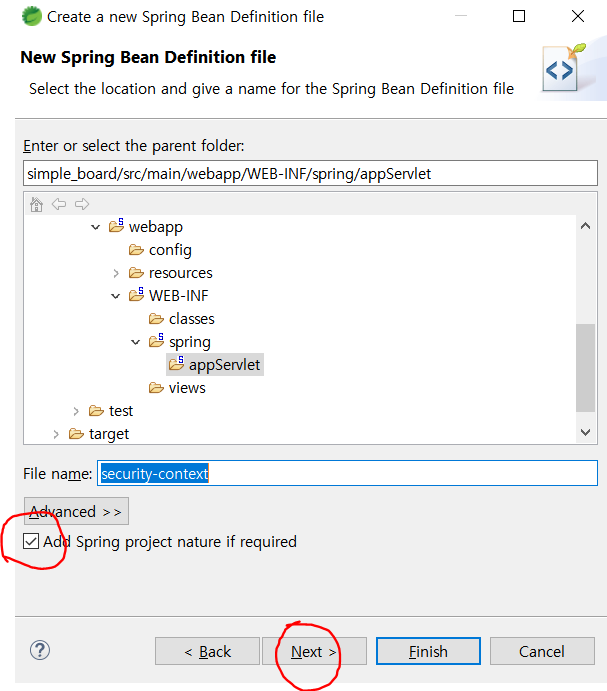
2. web.xml에 filter 추가하기
<filter>
  <filter-name>springSecurityFilterChain</filter-name>
  <filter-class>
    org.springframework.web.filter.DelegatingFilterProxy
  </filter-class>
</filter>
<filter-mapping>
  <filter-name>springSecurityFilterChain</filter-name>
  <url-pattern>/*</url-pattern>
</filter-mapping>
<context-param>
  <param-name>contextConfigLocation</param-name>
  <param-value>
    /WEB-INF/spring/root-context.xml
    /WEB-INF/spring/appServlet/security-context.xml
  </param-value>
</context-param>
3. security-context file 생성 후 작성
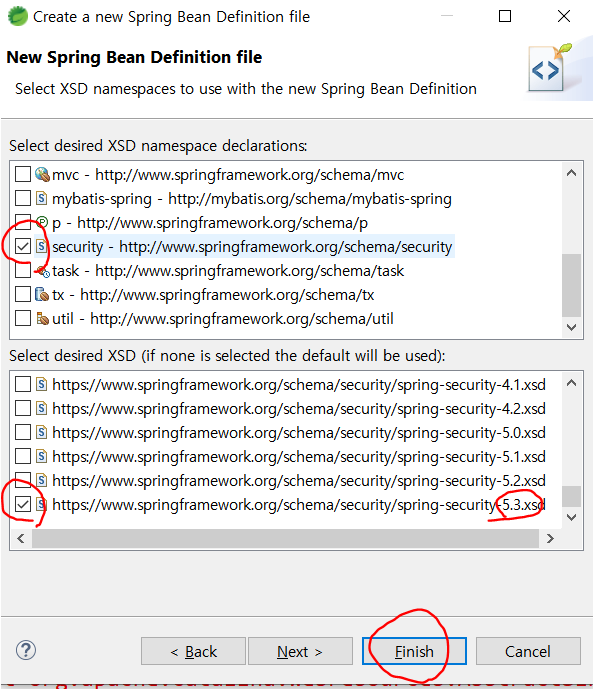
<?xml version="1.0" encoding="UTF-8"?>
<beans:beans
	xmlns="http://www.springframework.org/schema/security"
	xmlns:beans="http://www.springframework.org/schema/beans"
	xmlns:xsi="http://www.w3.org/2001/XMLSchema-instance"
	xsi:schemaLocation="http://www.springframework.org/schema/beans
                                 http://www.springframework.org/schema/beans/spring-beans.xsd
                                 http://www.springframework.org/schema/security
                                 http://www.springframework.org/schema/security/spring-security.xsd">

	<http auto-config="true" use-expressions="true">
		<intercept-url pattern="/**" access="ROLE_ADMIN" />
	</http>

	<authentication-manager>
		<authentication-provider>
			<user-service>
				<user name="admin" password="adminPw" authorities="ROLE_ADMIN" />
				<user name="user" password="userPw" authorities="ROLE_USER" />
			</user-service>
		</authentication-provider>
	</authentication-manager>
</beans:beans>
참고한 블로그에서 가르쳐준대로 했으나 자꾸 http 태그에 에러가 나서 기존에 있던 servlet-context.xml file에 있는 태그들을 복사해서 사용했다.
4. Test
위와 같이 작성 후 톰캣을 돌리면 아래와 같이 내가 만든 적 없는 로그인 화면을 만날 수 있다.
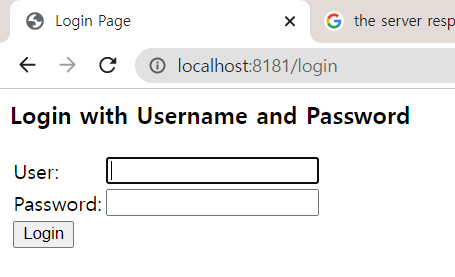
security xml에서 설정한 name과 password로 로그인을 해보자.
권한이 있는 경우
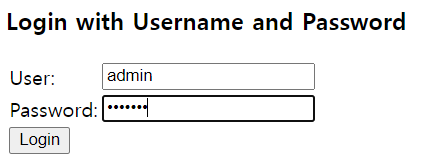
결과
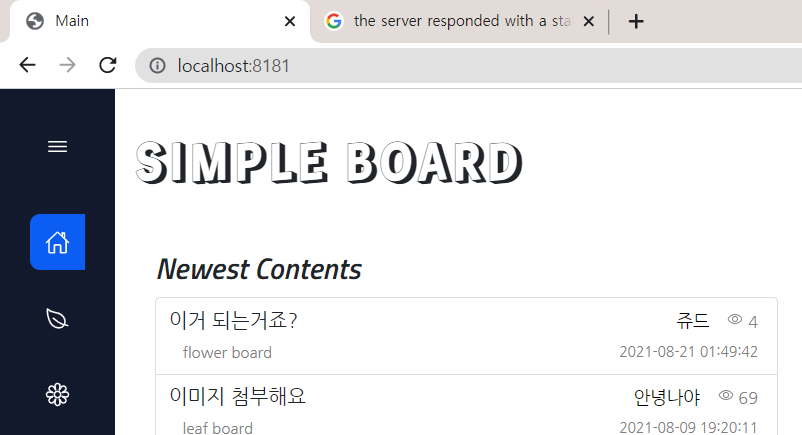
<intercept-url pattern="/**" access="ROLE_ADMIN" />위와 같이 admin으로 권한을 주었기 때문에 기존에 내가 만들었던 홈화면으로 넘어간다.
권한이 없는 경우
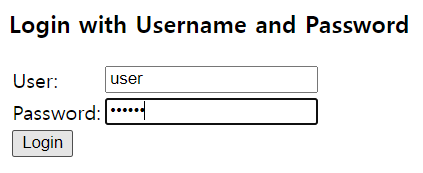
결과
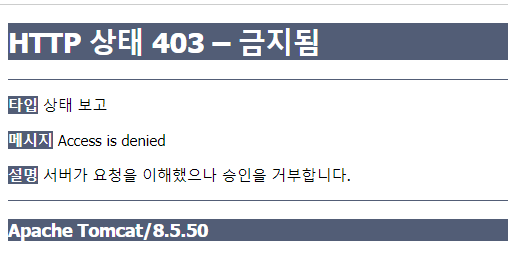
접근 권한이 없는 사용자이기 때문에 403 에러를 만나게 된다.
마무리
처음부터 spring-security로 진행했어야 했는데^^,,,사실 이렇게 본격적으로 만들 프로젝트가 아니어서 대충 만든게 지금 이렇게 다시 큰 과제로 돌아왔다.....😂
이래서 한번 할 때 제대로 했어야 했는데 내 자신이 대충대충 가볍게 프로젝트를 진행할 수 있을거라 믿은 탓이다.
인간의 욕심은 끝이 없고,,,,,쥬륵,,,,
이제 기존에 만들어 두었던 로그인 페이지를 최대한 활용할 수 있도록 커스텀 하는 방법을 찾아봐야겠다.
ajax로 처리한게 많은데,,,끝까지 힘내서 마무리 해봐야겠다!!

괴발🐱개발🐶