Amazon SageMaker란?
Amazon SageMaker는 AWS 완전 관리형 Machine learning 서비스입니다. 통합된 Jupyter Notebook 인스턴스를 제공하여 데이터 탐색 및 분석에 필요한 데이터 소스 접근을 용이하게 하며 완전 관리형 서비스이기 때문에 Notebook 인스턴스 서버를 관리할 필요가 없습니다.
SageMaker는 하기 4개의 Machine learning environment를 제공합니다.
- SageMaker Studio
- SageMaker Studio Lab
- SageMaker Canvas
- RStudio on Amazon SageMaker
저는 이번에 SageMaker의 Studio에 대한 테스트를 진행해 보았습니다.
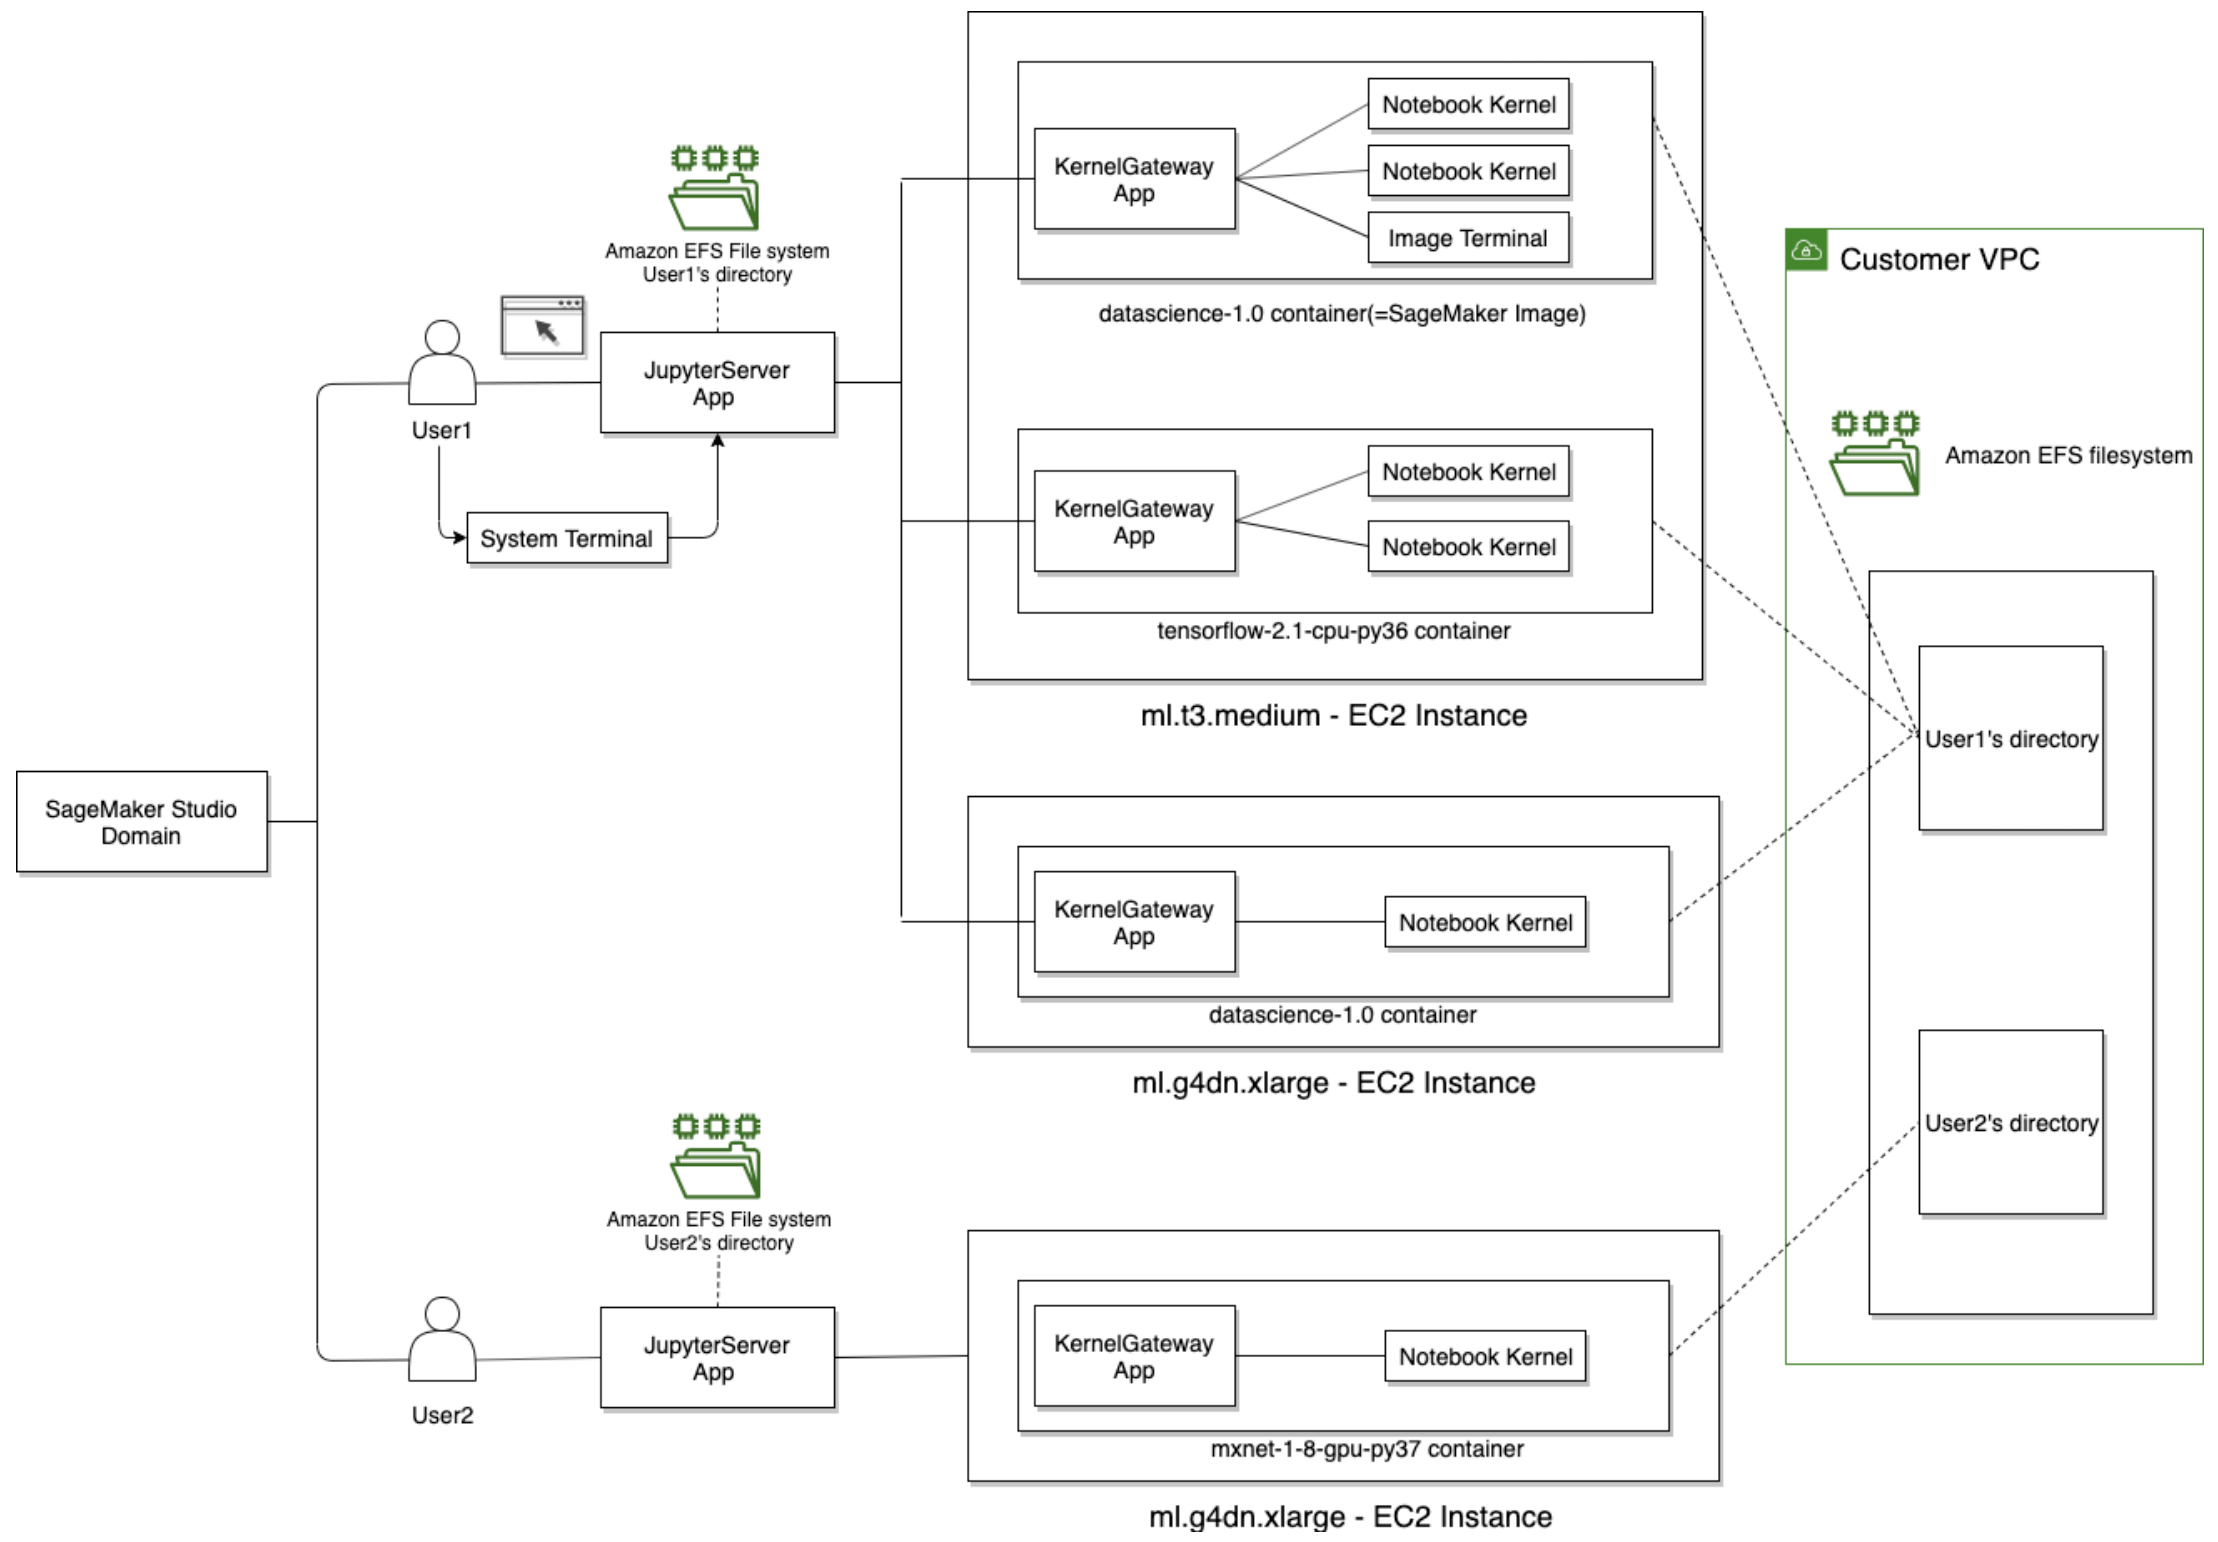
Studio Notebook 구성
SageMaker Studio Notebook은 컴퓨팅 인스턴스와 파일 스토리지를 따로 설정할 필요가 없는 협업 Notebook입니다. 파일 스토리지로 EFS를 사용하기 때문에 Notebook이 생성되는 인스턴스가 종료되더라도 데이터는 사라지지 않습니다.
Studio Notebook 환경은 하기 항목들로 정의됩니다.
- Amazon EC2 instance type (Notebook이 실행되는 HW)
- SageMaker image (Studio와 호환되는 컨테이너 이미지, 한 인스턴스에 여러 이미지가 있을 수 있음)
- KernelGateway app (SageMaker image는 KernelGateway app으로 실행됨, SageMaker image와 KernelGateway app은 일대일 대응)
- Kernel (Notebook에 포함된 코드를 검사하고 실행하는 프로세스)
Lifecycle 설정
Lifecycle 설정은 Studio와 Notebook Instance에 대해 설정이 가능합니다. 제가 이번에 생성한 환경은 Studio이기 때문에 SageMaker Studio의 수명주기 설정에 대해 알아보겠습니다.
Extension 참고 링크: https://github.com/aws-samples/sagemaker-studio-auto-shutdown-extension
1. Lifecycle 생성하기
1-1. S3에 extension 저장
extension 파일은 상기 Extension 참고 링크에 있습니다. (sagemaker_studio_autoshutdown-0.1.5.tar.gz)
extension을 다운로드 받은 뒤 S3 경로에 업로드합니다.
예시) s3://brillog-test-s3/lifecycle_configuration/sagemaker_studio_autoshutdown-0.1.5.tar.gz1-2. Lifecycle 생성
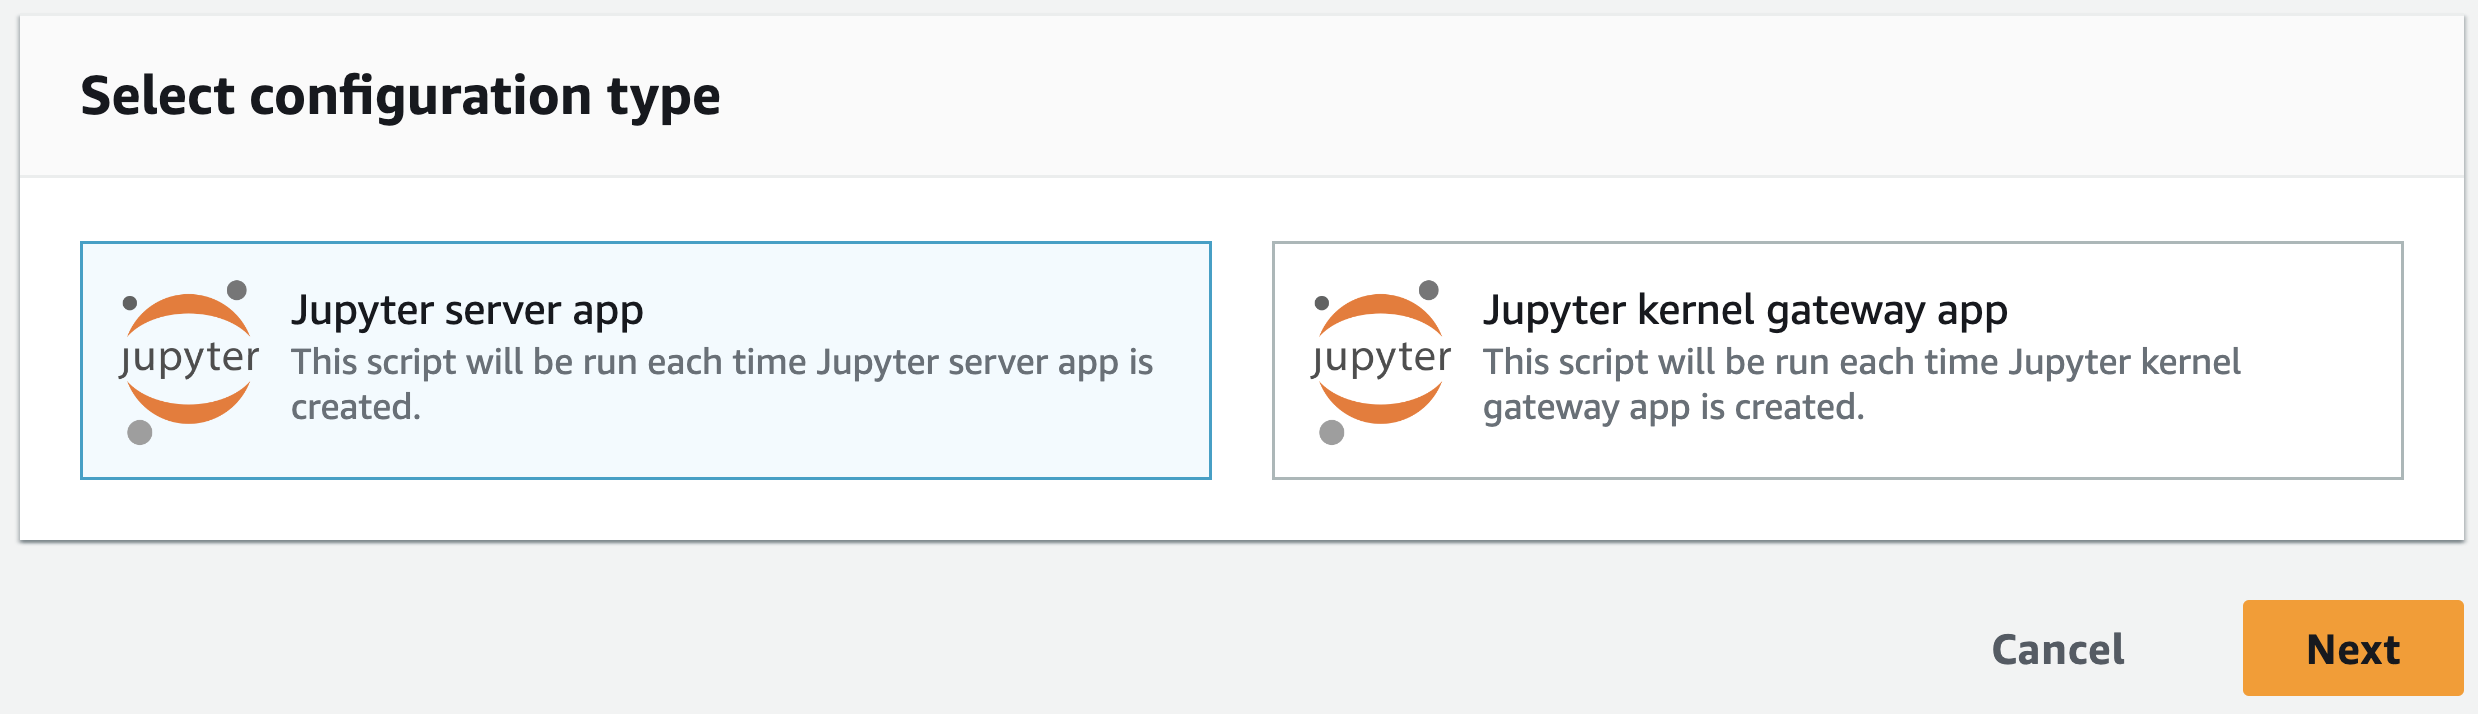
Amazon SageMaker > Lifecycle configuration > Studio > Create configurtaion을 선택한 뒤, Congirutation type으로는 Jupyter server app을 선택합니다.
'Script'는 상기 Script 참고 링크를 참고하여 아래 두 부분만 변경하였습니다.
# timeout in minutes
export TIMEOUT_IN_MINS=60  # Timeout 설정 (분)
# "wget" is not part of the base Jupyter Server image, you need to install it first if needed to download the tarball
# sudo yum install -y wget
# You can download the tarball from GitHub or alternatively, if you're using VPCOnly mode, you can host on S3
# wget -O .auto-shutdown/extension.tar.gz https://github.com/aws-samples/sagemaker-studio-auto-shutdown-extension/raw/main/sagemaker_studio_autoshutdown-0.1.5.tar.gz
# Or instead, could serve the tarball from an S3 bucket in which case "wget" would not be needed:
aws s3 cp s3://brillog-test-s3/lifecycle_configuration/sagemaker_studio_autoshutdown-0.1.5.tar.gz .auto-shutdown/extension.tar.gz작성한 Script의 전문은 다음과 같습니다.
#!/bin/bash
# This script installs the idle notebook auto-checker server extension to SageMaker Studio
# The original extension has a lab extension part where users can set the idle timeout via a Jupyter Lab widget.
# In this version the script installs the server side of the extension only. The idle timeout
# can be set via a command-line script which will be also created by this create and places into the
# user's home folder
#
# Installing the server side extension does not require Internet connection (as all the dependencies are stored in the
# install tarball) and can be done via VPCOnly mode.
echo '***LIFECYCLE-CONF-START***' # 로그 확인을 위한 표시
set -eux
# timeout in minutes
export TIMEOUT_IN_MINS=60
# Should already be running in user home directory, but just to check:
cd /home/sagemaker-user
# By working in a directory starting with ".", we won't clutter up users' Jupyter file tree views
mkdir -p .auto-shutdown
# Create the command-line script for setting the idle timeout
cat > .auto-shutdown/set-time-interval.sh << EOF
#!/opt/conda/bin/python
import json
import requests
TIMEOUT=${TIMEOUT_IN_MINS}
session = requests.Session()
# Getting the xsrf token first from Jupyter Server
response = session.get("http://localhost:8888/jupyter/default/tree")
# calls the idle_checker extension's interface to set the timeout value
response = session.post("http://localhost:8888/jupyter/default/sagemaker-studio-autoshutdown/idle_checker",
json={"idle_time": TIMEOUT, "keep_terminals": False},
params={"_xsrf": response.headers['Set-Cookie'].split(";")[0].split("=")[1]})
if response.status_code == 200:
print("Succeeded, idle timeout set to {} minutes".format(TIMEOUT))
else:
print("Error!")
print(response.status_code)
EOF
chmod +x .auto-shutdown/set-time-interval.sh
# "wget" is not part of the base Jupyter Server image, you need to install it first if needed to download the tarball
# sudo yum install -y wget
# You can download the tarball from GitHub or alternatively, if you're using VPCOnly mode, you can host on S3
# wget -O .auto-shutdown/extension.tar.gz https://github.com/aws-samples/sagemaker-studio-auto-shutdown-extension/raw/main/sagemaker_studio_autoshutdown-0.1.5.tar.gz

# Or instead, could serve the tarball from an S3 bucket in which case "wget" would not be needed:
aws s3 cp s3://brillog-test-s3/lifecycle_configuration/sagemaker_studio_autoshutdown-0.1.5.tar.gz .auto-shutdown/extension.tar.gz
# Installs the extension
cd .auto-shutdown
tar xzf extension.tar.gz
cd sagemaker_studio_autoshutdown-0.1.5
# Activate studio environment just for installing extension
export AWS_SAGEMAKER_JUPYTERSERVER_IMAGE="${AWS_SAGEMAKER_JUPYTERSERVER_IMAGE:-'jupyter-server'}"
if [ "$AWS_SAGEMAKER_JUPYTERSERVER_IMAGE" = "jupyter-server-3" ] ; then
eval "$(conda shell.bash hook)"
conda activate studio
fi;
pip install --no-dependencies --no-build-isolation -e .
jupyter serverextension enable --py sagemaker_studio_autoshutdown
if [ "$AWS_SAGEMAKER_JUPYTERSERVER_IMAGE" = "jupyter-server-3" ] ; then
conda deactivate
fi;
# Restarts the jupyter server
nohup supervisorctl -c /etc/supervisor/conf.d/supervisord.conf restart jupyterlabserver
# Waiting for 30 seconds to make sure the Jupyter Server is up and running
sleep 30
# Calling the script to set the idle-timeout and active the extension
/home/sagemaker-user/.auto-shutdown/set-time-interval.sh
echo '***LIFECYCLE-CONF-FINISH***' # 로그 확인을 위한 표시1-3. Domain에 Lifecycle 설정
미리 생성한 SageMaker Domain을 클릭한 뒤 'Environment' 탭을 선택합니다. 'Lifecycle configurations for personal Studio apps' 항목의 'Attach'를 클릭하여 위에서 생성한 Lifecycle을 선택한 뒤 'Attach to domain'을 클릭합니다.
Attach한 Lifecycle을 'Set as default' 설정해 두면 Studio app이 뜰 때 자동으로 해당 Lifecycle이 적용되게 됩니다.
2. Lifecycle 정상 동작 확인하기
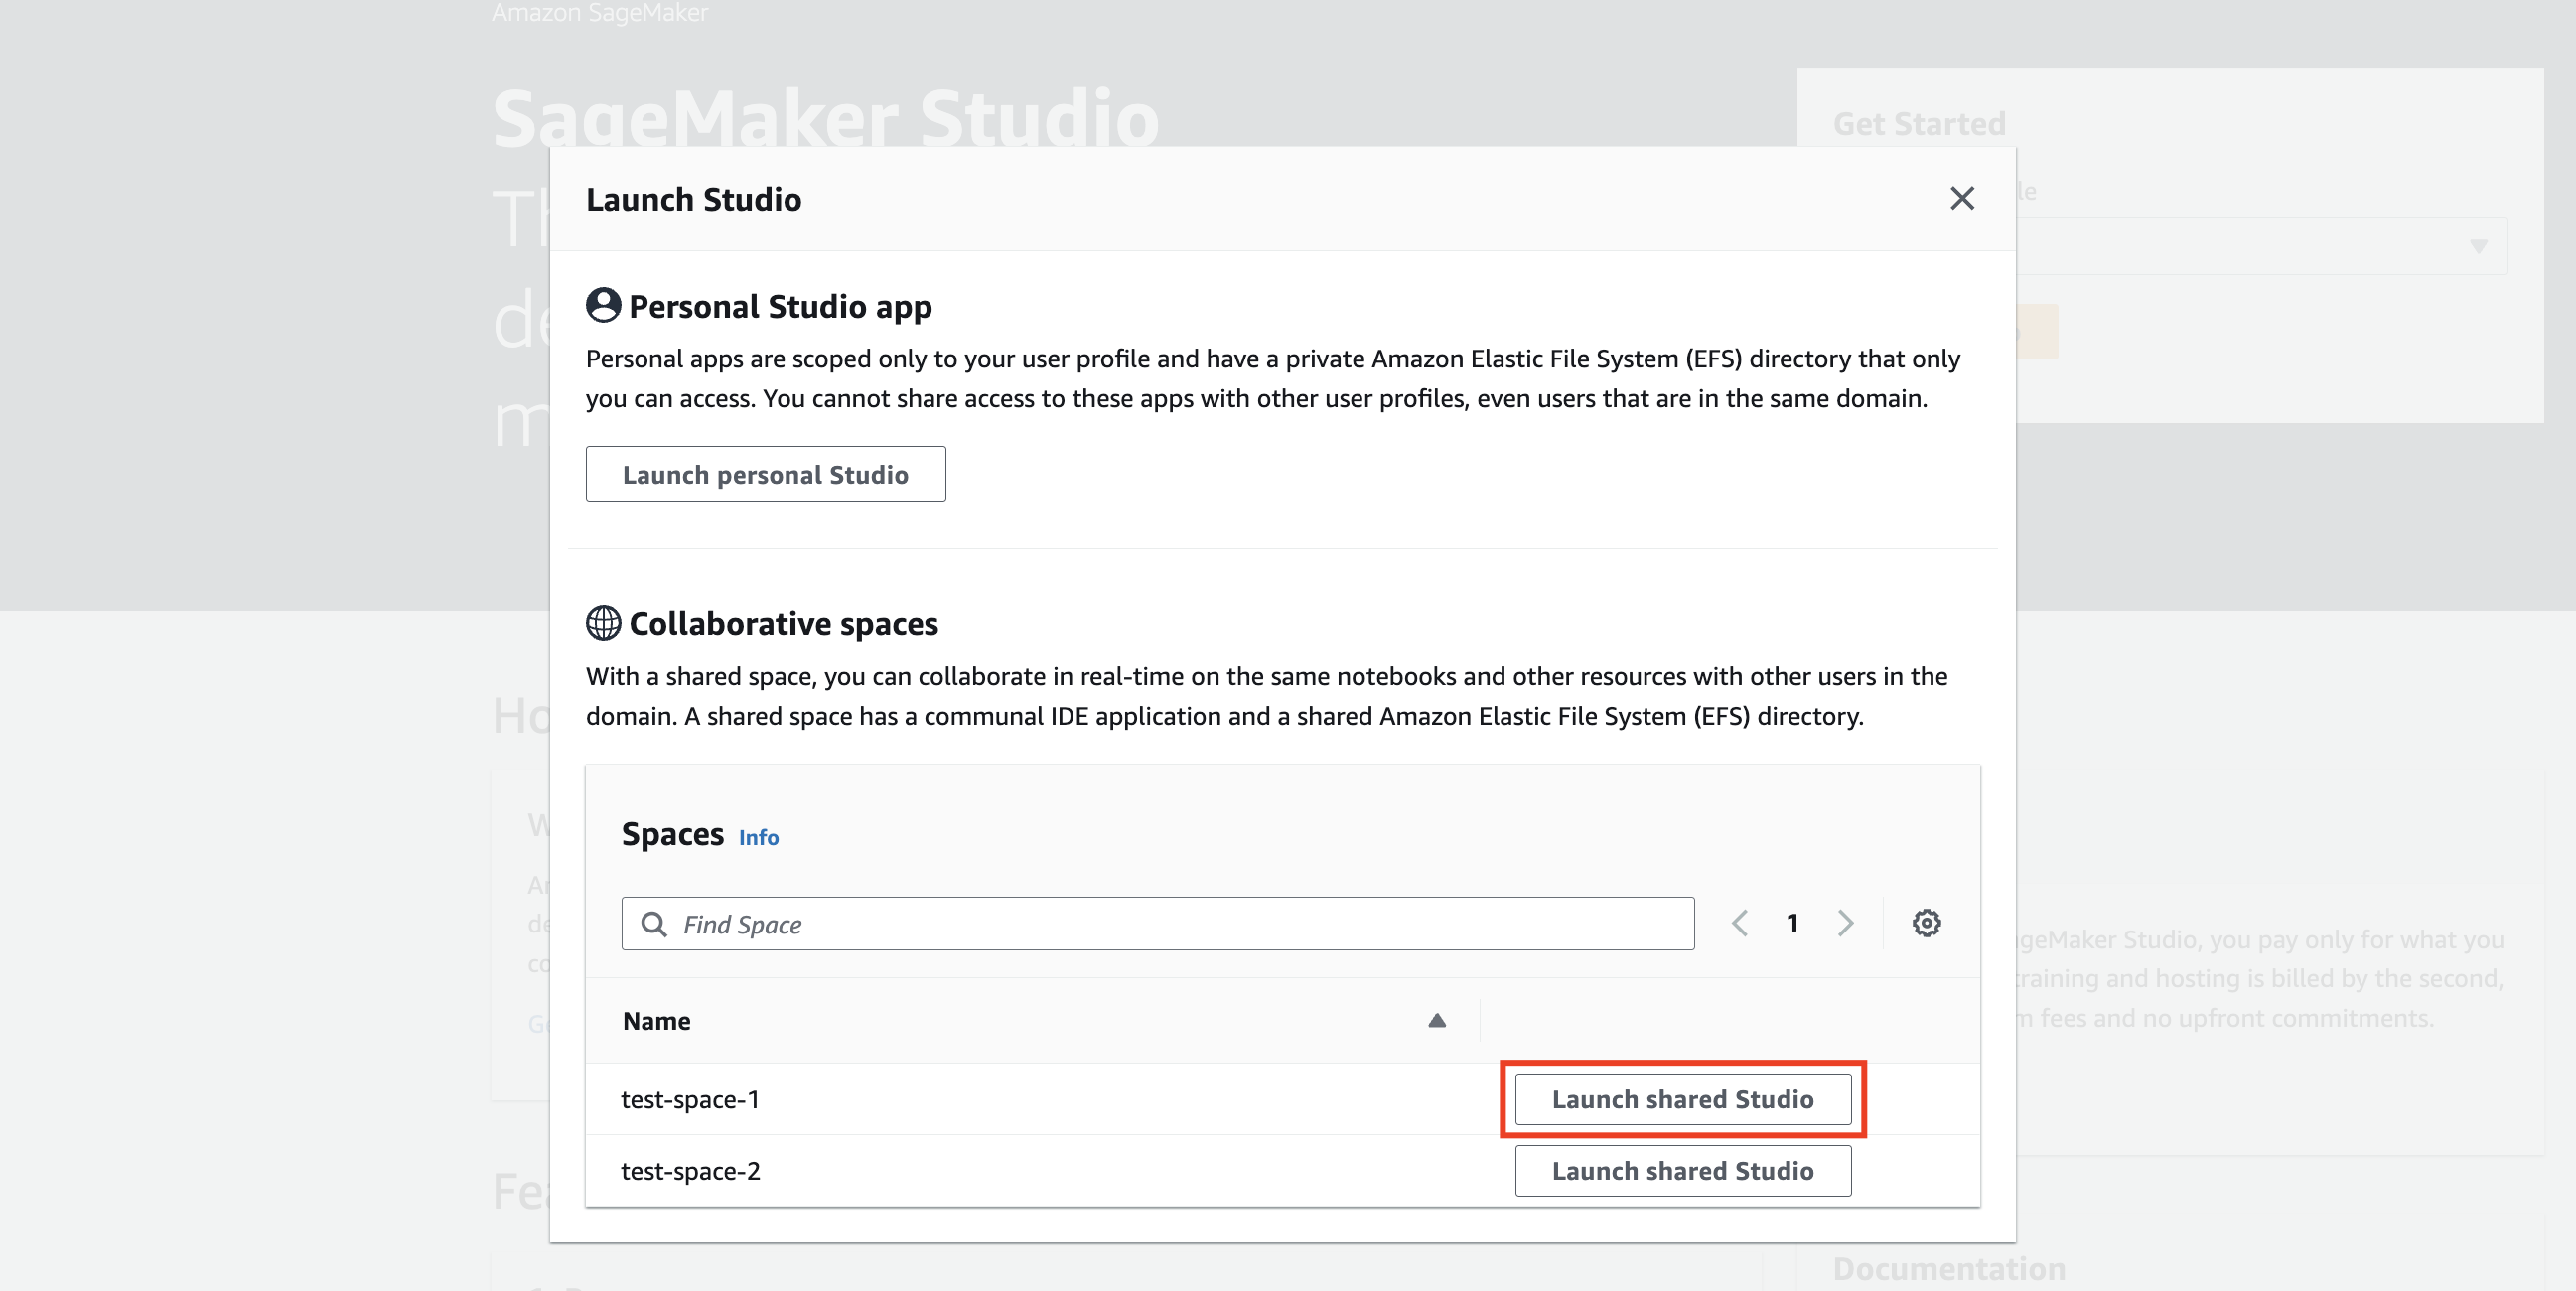
테스트를 위해 SageMaker Domain에 User(user-1)와 Space(test-space-1)를 생성해 두었으며 'user-1' 유저로 'test-space-1'에 Studio app을 launch 시켜 보겠습니다.
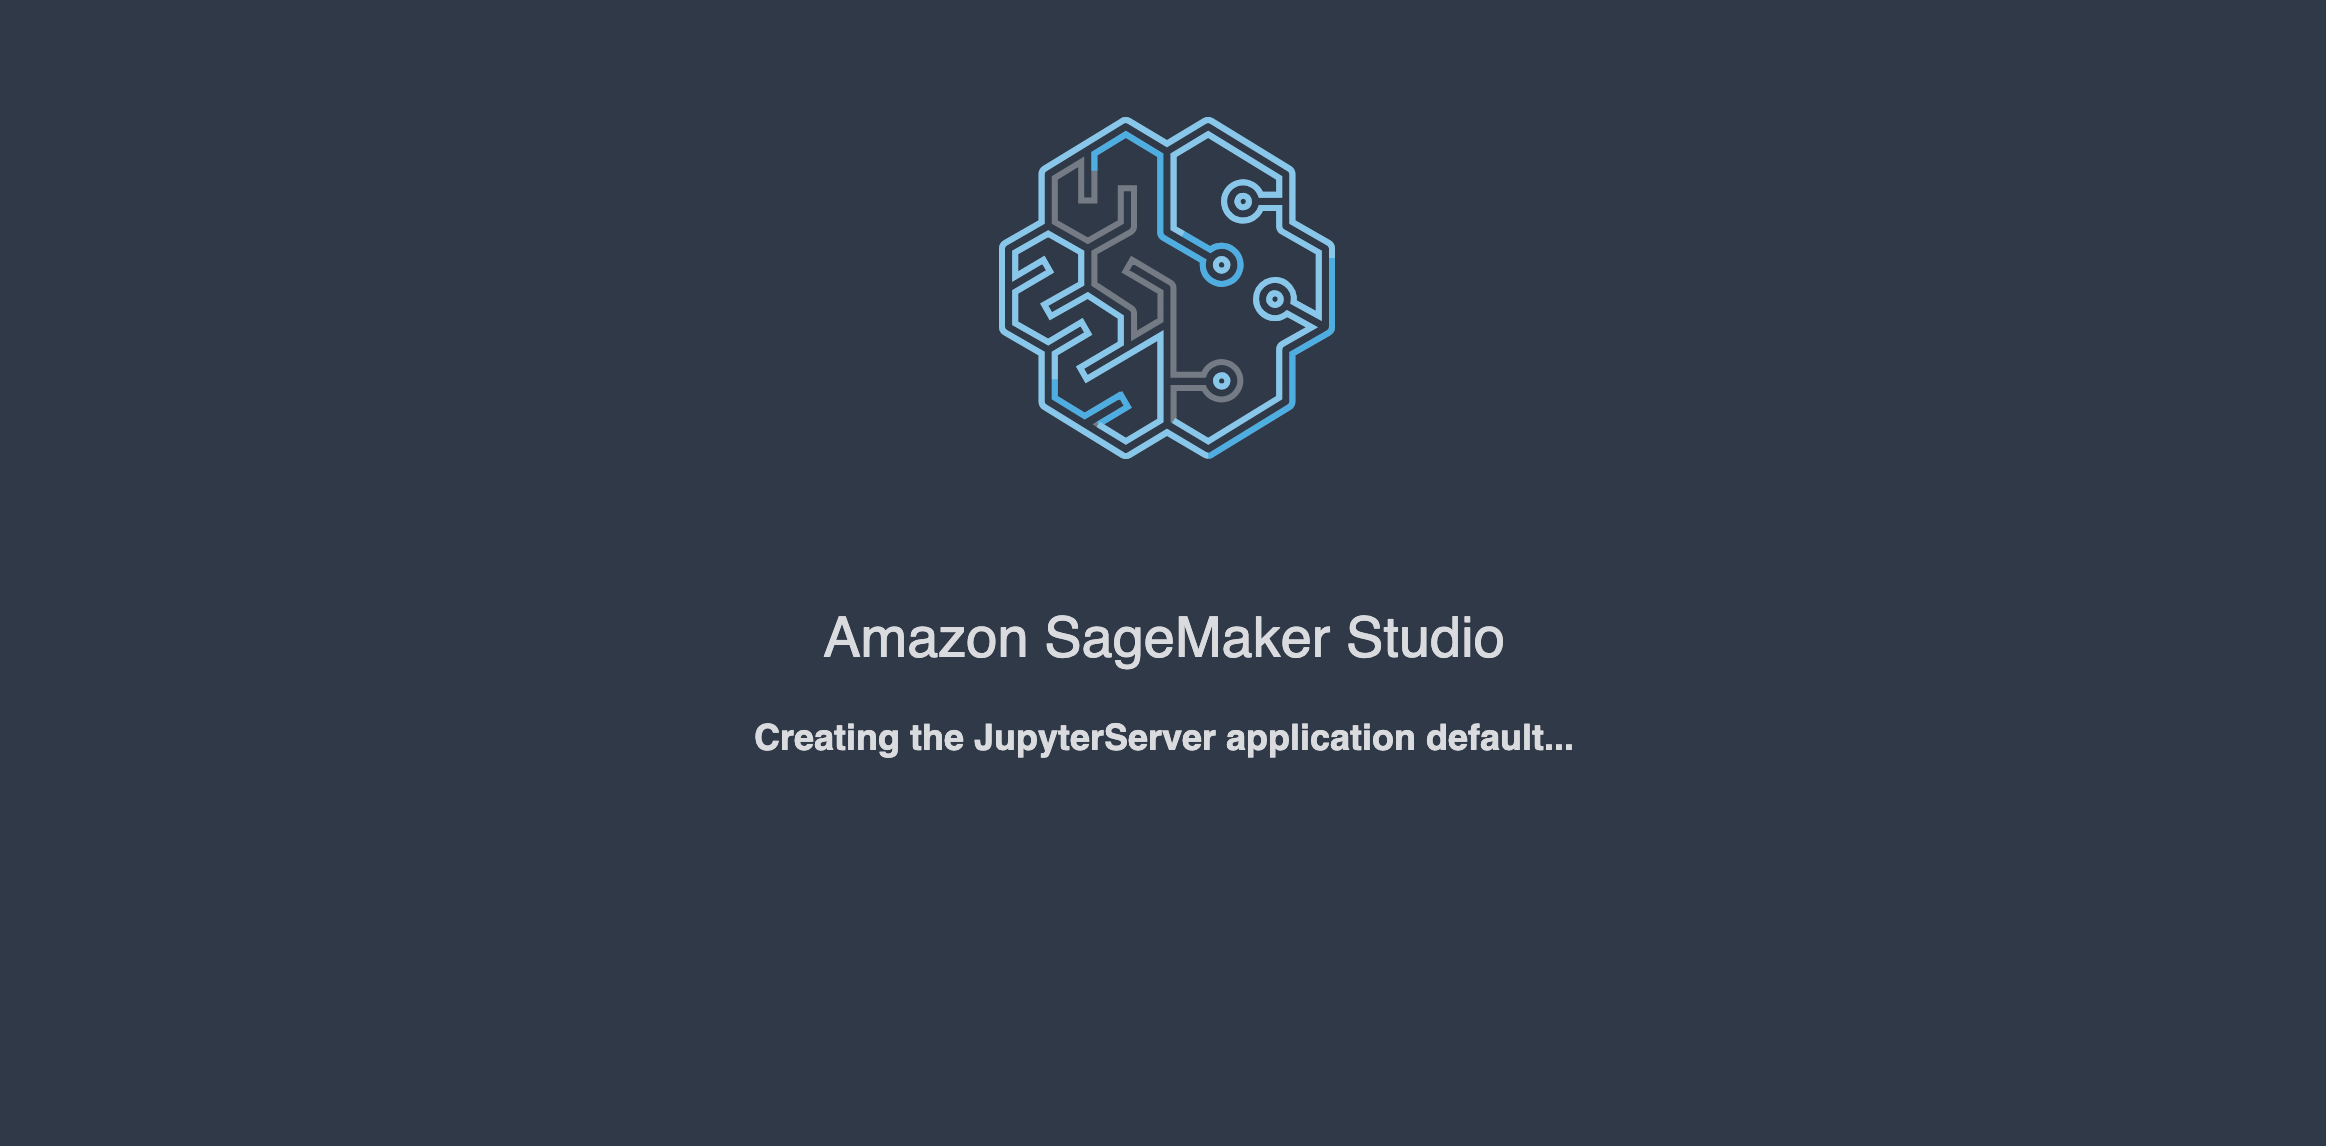
아래와 같이 Studio app이 launch 되며 default JupyterServer가 떠있지 않았다면 서버가 생성되는데 약 2~5분정도 소요됩니다.
'test-space-1' Space 내에서 JupyterServer가 생성되고 있는 것은 콘솔에서 확인이 가능합니다. Studio app을 launch 시키면 default JupyterServer가 Pending 상태로 생성되고, 생성이 완료되면 Ready 상태가 됩니다.

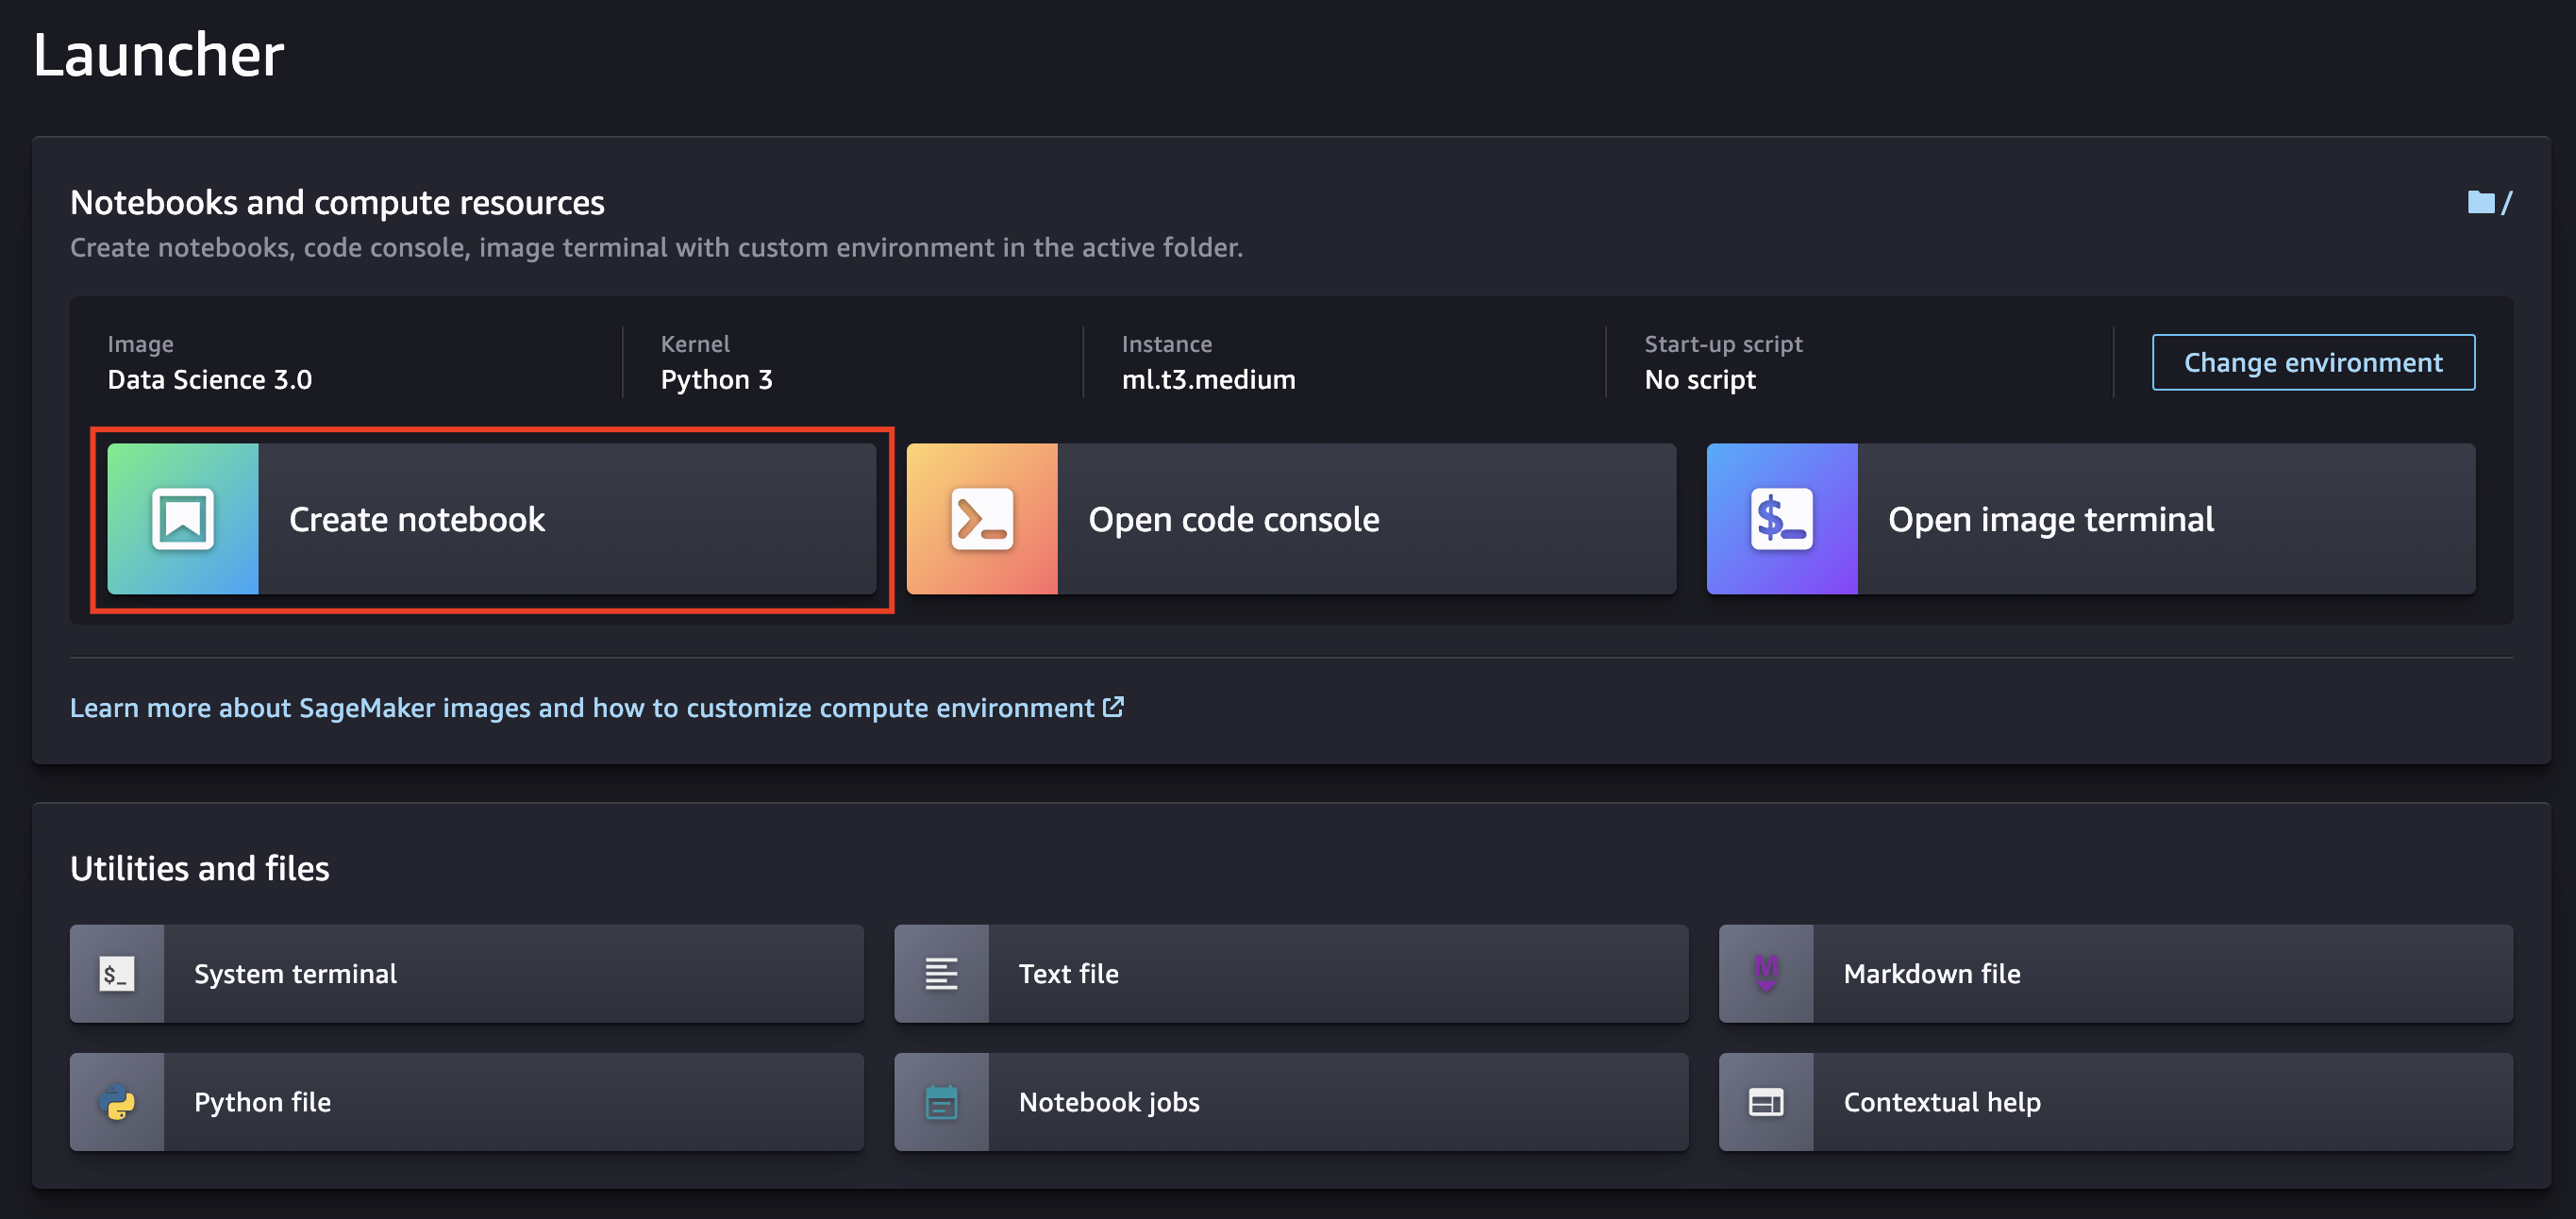
Studio 메인 페이지가 열렸다면 Launcher에서 'Create notebook'을 클릭해 KernelGateway app을 생성해 보겠습니다.
'Starting notebook kernel...' 이라는 메시지가 뜨며, 'test-space-1' Space에서는 KernelGateway app이 생성되는 것을 확인할 수 있습니다.

JupyterServer app에 적용한 Lifecycle은 해당 app 내 모든 KernelGateway app에 적용됩니다. 적용한 Lifecycle script는 설정한 idle timeout(분)을 넘기면 자동으로 해당 KernelGateway app을 삭제합니다. (KernelGateway app이 삭제되는 것이지 JupyterServer app이 삭제되는 것은 아닙니다.)
3. 로그 확인하기
SageMaker 로그는 CloudWatch에서 확인할 수 있습니다.
CloudWatch Log group명:
/aws/sagemaker/studio
Lifecycle 설정에 관한 로그는 /aws/sagemaker/studio Log group 내 <DomainID>/<SpaceName>/JupyterServer/default/LifecycleConfigOnStart Log stream에서 확인 가능합니다.
Reference
- Amazon SageMaker란 무엇입니까?
- 아마존 사용 SageMaker 스튜디오 노트북
- Amazon SageMaker Features
- https://github.com/aws-samples/sagemaker-studio-lifecycle-config-examples/blob/main/scripts/install-autoshutdown-server-extension/on-jupyter-server-start.sh
- https://github.com/aws-samples/sagemaker-studio-auto-shutdown-extension
개인적으로 공부하며 작성한 글로, 내용에 오류가 있을 수 있습니다.