vue 이벤트처리 연습
클릭이벤트 활용
이벤트처리함수에서 데이터 뽑아오는 연습
e.target.textContent, e.target.innerText로 이벤트메서드에서 html태그 text 사용
<template>
  <div>
    <h1>이벤트 실습</h1>
      값1: <input type="text" v-model="num1"><br>
      값2: <input type="text" v-model="num2"><br>
      <button @click="sum">+</button>
      <button @click="sum">-</button>
      <button @click="sum">*</button>
      <button @click="sum">/</button><br>
      결과값:
      {{ total }}
  </div>
</template>

<script>
export default {
  props:{

  },
  data: function(){
    return {
      num1:"",
      num2:"",
      total:""
    };
  },
  methods:{
    sum: function(e){
      console.log(e.target.textContent, e.target.innerText);

      switch (e.target.innerText) {
        case "+":
          this.total= parseInt(this.num1)+parseInt(this.num2);
          break;

        case "-":
        this.total= this.num1-this.num2;
          break;

        case "*":
        this.total= this.num1*this.num2;
          break;

        case "/":
        this.total= (this.num1/this.num2).toFixed(2);
          break;

        default:
        this.total= "계산할 수 없음";
          break;
      }
    }
  }
}
</script>

<style>

</style>
vue 이벤트처리 연습2
<template>
  <div>
    가격:<input type="text" v-model="price" @keyup="getResult"><br>
    갯수:
    <select v-model="amount" @change="getResult">
      <option>1</option>
      <option>2</option>
      <option>3</option>
      <option>4</option>
      <option>5</option>
      <option>6</option>
    </select><br>
    결과: {{ result }}

  </div>
</template>

<script>
export default {
  props:{

  }, data: function(){
    return {
      price:0,
      amount:0,
      result:0
    };
  }, methods:{
    getResult:function(){
      this.result=this.price*this.amount;
    }
  }
}
</script>

<style>

</style>
(난이도 상) 책목록에서 선택삭제와 전체삭제 구현
splice를 이용하여 개별삭제를 구현
이중순회 로직과 splice를 이용하여 전체삭제를 구현.
콜백함수에서의 this 차이
DeleteList메서드에서
map에 콜백함수로 람다함수를 사용했다. 이 경우 this가 정상작동하는 반면,
만약 일반 함수로 콜백함수를 사용할 경우 this가 undefiend를 갖는다.
그래서 일반 함수를 사용할 경우 밖에서 변수로 설정해주고 사용해야하는 작업을 거쳐야한다는 점을 알아두자.
강사님이 보라고 하신 링크 : https://velog.io/@daybreak/function-declaration
일반 함수의 this는 함수가 호출되는 방식에 따라 달라집니다.
화살표 함수의 this는 함수가 생성될 때의 컨텍스트를 가리키며, 이후 어떻게 호출되든 그 값을 유지합니다.
이러한 차이는 특히 이벤트 핸들러, 비동기 콜백, 객체의 메서드 등 다양한 상황에서 중요하게 작용할 수 있습니다. 화살표 함수의 렉시컬 this는 종종 코드를 더 간결하고 이해하기 쉽게 만들어 줍니다.
일반 함수를 단독으로 호출하면, this는 전역 객체(브라우저에서는 window, Node.js에서는 global)를 가리키거나, 엄격 모드('use strict')에서는 undefined가 됩니다.
<template>
  <div>
    <H1>{{ mesg }}</H1>
    <div v-for="(v, i) in bookList" :key="i">
      <input type="checkbox" v-model="books" :value="v.name">{{ v.name }}, {{ i }}번, 가격: {{ v.price }}
      <input type="button" value="삭제" v-on:click="DeleteOne" v-bind:data-index="i">
    </div>
    <hr>
    <button @click="DeleteList">전체삭제</button>
  </div>
</template>

<script>
export default {
  props:{
    mesg: String
  }, data: function(){
    return {
      bookList:[
        {name:"자바의 정석", price:3000},
        {name:"jsp 정석", price:4000},
        {name:"spring 정석", price:5000},
        {name:"jquery 정석", price:6000},
        {name:"angular 정석", price:7000},
      ],
      books:[]
    };
  }, methods:{
    DeleteOne:function(e){
      var i = e.target.dataset.index
      console.log(i);
      this.bookList.splice(i, 1);
    },
    DeleteList: function(){
      this.books.map((e, i)=>{
        this.bookList.map((e2, i2)=>{
          if(e2.name==e){
            this.bookList.splice(i2, 1);
          }
        })
      })
    }
  }
}
</script>
기본 이벤트처리 방지
이벤트 맥락에서 eventDefault메서드 사용
e.preventDefault();
<template>
  <div>
    <h1>{{ mesg }}</h1>
    <a href="https://www.daum.net" @click="prevent">
    다음-preventDefault</a><br>
    <a href="https://www.google.net" target="_blank"></a>

    <form action="target.html" @submit="prevent"><button>전송</button></form>
  </div>
</template>

<script>
export default {
  props:{
    mesg: String
  }, data: function(){
    return {

    };
  }, methods:{
    prevent:function(e){
      console.log("함수요청됨");
      e.preventDefault();
    }

  }, watch: {

  }
}
</script>
이벤트 전파방지
이벤트 전파 : propagation
하위 태그에서 발생한 이벤트가 상위 태그로 타고 올라가는 현상
아래 예에서 form 안의 button에 클릭이벤트가 발생하면,
form에서도 click이벤트가 발생한다.
    <!-- 이벤트의 전달방지 -->
    <form style="background-color: yellow;" @click="aaa">
      aaa
      <button style="background-color: red;" @click="bbb">bbb</button>
    </form>
전파 방지 방법
- 태그 이벤트 디렉터리에 stop수식어 추가
@click.stop - 메서드에서 이벤트를 인자로 받아 stopPropagation 메서드 사용
event.stopPropagation();
이벤트 수식어
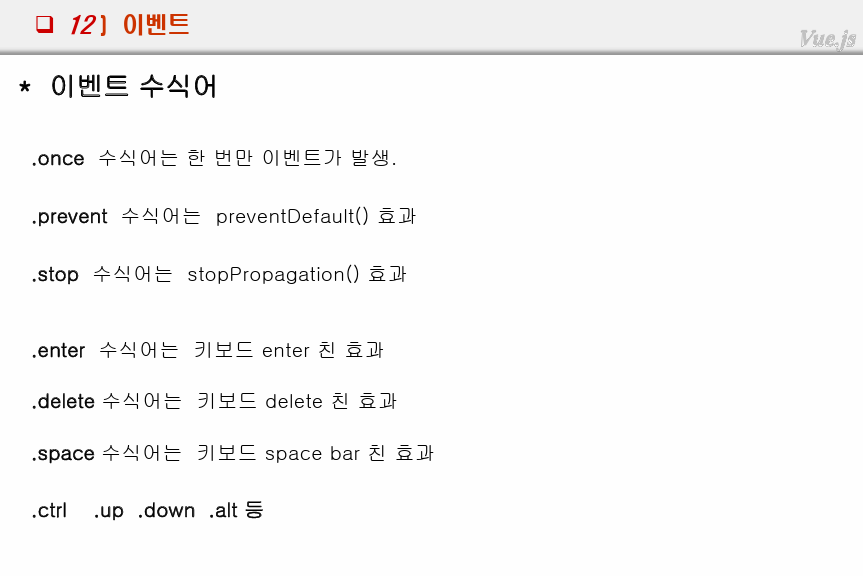
여러가지 수식어가 있다.
<template>
  <div>
    <!-- .once가 붙으면 한번만 호출 -->
    <h1>1. once 이벤트 수식어</h1>
    <button @click="x">x()</button><br>
    <button v-on:click.once="x">x() once</button><br>

    <h1>2. preventDefault() 이벤트 수식어</h1>
    <a href="https://www.daum.net" @click="y">다음1 y</a><br>
    <a href="https://www.daum.net" v-on:click="y2" target="_blank">다음2 y2</a><br>
    <a href="https://www.daum.net" v-on:click.prevent="y2" target="_blank">다음3 prevent</a><br>
    <!-- 호출되지만 preventDefault 됨 -->


    <h1>3. stop이벤트 수식어</h1>
    <!-- 이벤트의 전달방지 -->
    <form style="background-color: yellow;" @click="aaa">
      aaa
      <button style="background-color: red;" @click="bbb">bbb</button>
    </form>
    <hr>
    <!-- 이벤트의 전달방지 수식어 사용 -->
    <form style="background-color: yellow;" @click="aaa">
      aaa
      <button style="background-color: red;" @click.stop="bbb">bbb</button>
    </form>

    <h1>4. 이벤트 수식어</h1>
    <input type="text" @keyup="xyz">keyup<br>
    <input type="text" @keyup.enter="xyz">keyup.enter<br>
    <h1>5. ctrl</h1>
    <input type="text" @keyup.ctrl.enter="xyz">keyup.ctrl.enter<br>
    <input type="text" @keyup.ctrl.up="xyz">keyup.ctrl.up<br>
  </div>
</template>

<script>
export default {
  props:{

  }, data: function(){
    return {

    };
  }, methods:{
    aaa:function(e){
      console.log("aaa");

    },
    bbb:function(e){
      console.log("bbb");
    },
    x:function(){
      console.log("x 호출==");
    },
    y:function(){

    },
    y2:function(){

    },
    xyz: function(){
      console.log("xyz");
    }
  }
}
</script>

<style>

</style>
이벤트 (자식->부모) (중요)
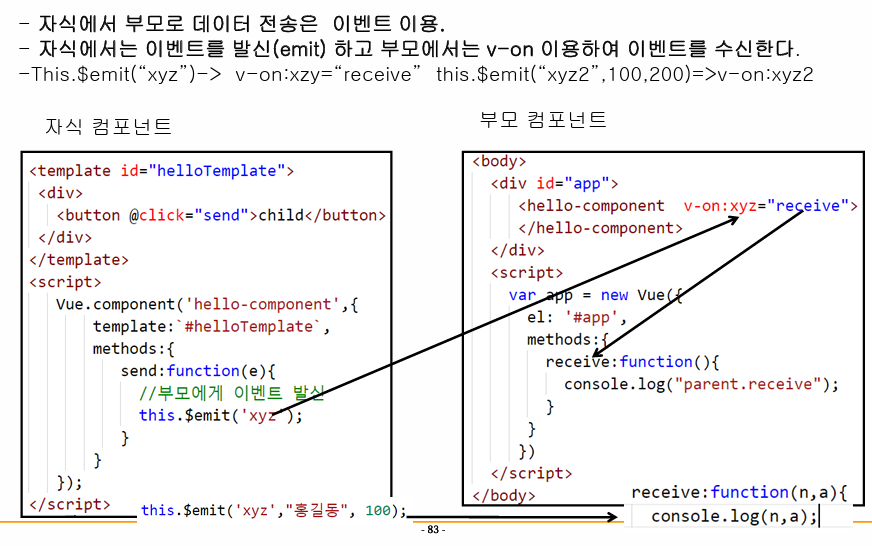
-
자식은 부모에 이벤트를 발신(emit)해주고
-
부모는 이벤트를 처리한다.
발신은 뷰컴포넌트(this).$emit("이벤트명")을 이용한다.
이벤트 처리는 v-on:이벤트="처리함수"의 형식을 이용한다.
참고로 $emit은 자바스크립트에서도 사용되며, 채팅 기능에 사용되기도 한다고 한다.
자식
<template>
  <div>
    <!-- 자식에서 부모로 데이터를 전송하기 위해서는 이벤트를 이용한다. -->
    <!-- 자식에서 이벤트를 발신emit 해주고 부모는 이벤트를 v-on으로 감지하여 수신한다. -->
    <!-- this.$emit("이벤트명") : 이벤트명으로 이벤트를 발신 -> v-on:이벤트명="처리함수" -->
    <button v-on:click="send">this.emit("hmm")</button>
    <button v-on:click="send2">this.emit("hmm")</button>
  </div>
</template>

<script>
export default {
  props:{

  }, data: function(){
    return {

    };
  }, methods:{
    send:function(e){
      console.log("자식컴포에서 hmm 이벤트 발신");
      this.$emit("hmm");
    },
    send2:function(e){
      console.log("자식컴포에서 hmm2 이벤트 발신");
      this.$emit("hmm2");
    }
  }
}
</script>
부모
<template>
  <div>
    <HelloWorld  v-on:hmm="receive" @hmm2="receive2"/>
  </div>
</template>

<script>
import HelloWorld from './components/HelloWorld';
export default {
  name: 'App',
  components: {
    HelloWorld
  }, methods:{
    receive:function(){
      console.log("parent.receive");
    },
    receive2:function(){
      console.log("parent.receive");
    }
  }

}
</script>
부모에서 이벤트를 통해 데이터 수신
자식에서 emit("이벤트명", 데이터1, 데이터2 ...)`
부모에서 처리함수의 인자로 데이터를 수신받아 사용
자식 - 이벤트 발신 메서드
    send2:function(e){
      console.log("자식컴포에서 hmm2 이벤트 발신");
      this.$emit("hmm2", 100, "홍길동");
      // 2. 부모에서 전달될 이벤트명칭 xyz2+데이터 전달
    }
부모 - 이벤트 처리(수신) 메서드
    receive2:function(v1, v2){
      console.log("parent.receive2");
      console.log(v1, v2);
    }
실습 - 책리스트 부모<->자식 데이터 전달
자식
<template>
  <div>
    <ul>
      <li v-for="(v, i) in bookList" :key="i">
        <a @click="xyz">
          <img :src="require(`../assets/image/${v.img}.jpg`)"
          width="100" height="100"
          v-bind:data-xxx="v.name">
        </a>
        {{ v.name }}
      </li>
    </ul>
  </div>
</template>
<script>
export default {
  props:{
    msg: String,
    bookList: Array
  },
  data: function(){
    return {

    };
  },
  methods:{
    xyz:function(e){
      var data = e.target.dataset.xxx
      this.$emit("xyz", data)
    }
  }
}
</script>

<style>

</style>
부모
<template>
  <div>
    선택된 도서:<input type="text" id="selectedBook" v-model="bookName">
    <BookList msg="BookList exam" v-bind:bookList="list"
    @xyz="receive"/>
  </div>
</template>

<script>
import BookList from './components/BookList';
export default {
  name: 'App',
  components: {
    BookList
  },
  methods:{
    receive:function(data1){
      this.bookName = data1;
      // document.getElementById("selectedBook").setAttribute("value", data1)
    }
  },
  data:function(){
    return {
      bookName: "",
      list:[
        {
          id: "p01",
          name: "위험한 식탁",
          price: 2000,
          date: "20170401",
          img: "a",
        },
        {
          id: "p02",
          name: "공부의 비결",
          price: 3000,
          date: "20170402",
          img: "b",
        },
        {
          id: "p03",
          name: "오메르타",
          price: 2500,
          date: "20170401",
          img: "c",
        },
        {
          id: "p04",
          name: "행복한 여행",
          price: 4000,
          date: "20170401",
          img: "d",
        },
        {
          id: "p05",
          name: "해커스 토익",
          price: 2000,
          date: "20170401",
          img: "e",
        },
        {
          id: "p06",
          name: "도로 안내서",
          price: 2000,
          date: "20170401",
          img: "f",
        },
      ]
    }
  }

}
</script>

<style>

</style>
형제간의 데이터 교환 - 이벤트버스 이용
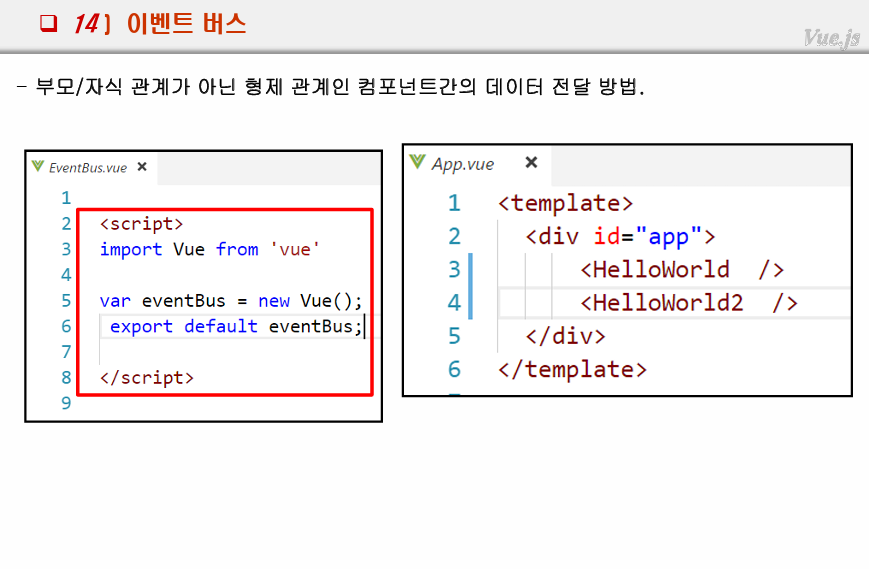
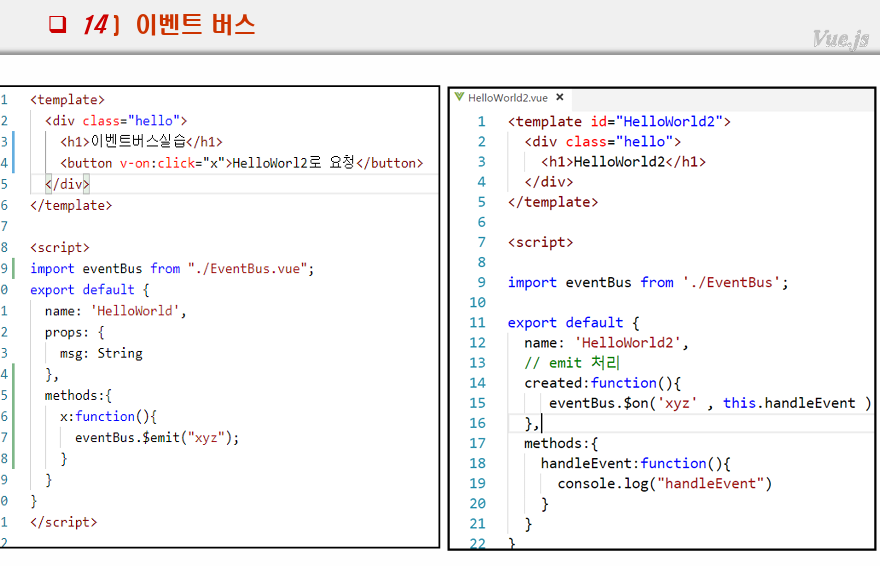
- 이벤트버스 생성
- 형제 두 곳에서 각각 임포트
- 발신자- 이벤트 발생-메서드-발신
4-1. 수신자 - created:function(){}키워드로 이벤트 감지
4-2. 수신자- eventBus.$on('이벤트명', 처리함수)
EventBus.vue
<template>

</template>

<script>
import Vue from 'vue';

var eventBus = new Vue();
export default eventBus;
</script>

<style>

</style>
HelloWorld.vue
<template>
  <div>
    <h1>{{ mesg }} HelloWorld</h1>
    <button @click="x">HelloWorld2로 이벤트 전달</button>
  </div>
</template>

<script>
import eventBus from './EventBus';
export default {
  props:{
    mesg:String
  },
  data: function(){
    return {

    };
  },
  methods:{
    x:function(){
      console.log("x 호출됨");
      eventBus.$emit("xyz");
    }
  }
}
</script>
HelloWorld2.vue
<template>
  <div>
    <h1>{{ mesg }} HelloWorld2</h1>
    <input type="text" :value="receiveData">
    {{ receiveData }}
  </div>
</template>

<script>
import eventBus from './EventBus';
export default {
  props:{
    mesg:String
  },
  data: function(){
    return {
      receiveData:""
    };
  },
  //emit 처리 : 수신키워드 created
  created:function(){
    console.log("create호출됨=======");
    eventBus.$on("xyz", this.receive);
  },
  methods:{
    receive:function(){
      console.log("receive 호출됨");
      this.receiveData="형제가 호출완료";
    }
  }
}
</script>