자바 I/O
- 자바의 I/O 개요
- 표준 입출력
- node 계열과 filter 계열
- File API , Path 및 Files API
- 파일 입출력
- 객체 직렬화
큰 개념
입력 / 출력
입력
- 콘솔 : byte로 받아서 char로 변환해서 한라인씩 읽을 수 있게하여 반환
- 파일 : 파일경로로 탐색하여 파일을 char로 받아서 한라인씩 읽을 수 있게하여 반환
출력
- 콘솔
- 파일
자바의 I/O 개요
자바 I/O 용어 정리
자바의 I/O 데이터 종류
처리 가능 데이터 설명
byte 자바의 입력 및 출력 데이터로 byte 처리가 가능하다. 이미지 파일 등과 같은 바이너리 위주의 데이터 입출력시 사용 가능하다. char 자바의 입력 및 출력 데이터로
char 자바의 입력 및 출력 데이터로 char 처리가 가능하다. 텍스트 위주의 데이터 입출력시 사용 가능하다.
자바의 I/O API 계층구조
byte로 처리하는 클래스의 계층구조
byte로 처리하는 클래스중에서 입력을 담당하는 최상위 클래스는 java.io.InputStream 이며
출력을 담당하는 최상위 클래스는 java.io.OutputStream 이다. 두 개의 클래스는 모두 추상
클래스이기 때문에 직접 사용하지 않고 일반적으로 하위 클래스를 이용한다. 다음의 계층구
조에서 보듯이 입력과 출력은 항상 쌍으로 제공된다. 많은 하위클래스가 제공되지만 사용빈
도가 높은 클래스 위주로 설명하기로 하며 하위 클래스의 세부적인 내용은 실습을 통해서
정리하기로 한다.
char로 처리하는 클래스의 계층구조
char로 처리하는 클래스들 중에서 입력을 담당하는 최상위 클래스는 java.io.Reader 클래스
이고 출력을 담당하는 최상위 클래스는 java.io.Writer 클래스이다. 두 개의 클래스는 모두
추상 클래스이기 때문에 직접 사용하지 않고 하위 클래스를 통해서 이용된다.
InputStreamReader : byte단위로 읽어온 것을 char로 변환
BufferedReader : readline()메소드가 제공됨. 줄단위 읽기가 가능함
PrintWriter : println()로 변환
표준 입출력
-
System.in
표준 입력으로서 키보드에서 데이터를 읽어 들일 때 사용한다.
in 변수의 데이터형은 InputStream 이다. 이것은 키보드에서 읽어 들이는 데이터의 종류가
기본적으로 byte로 처리된다는 의미이다.
byte로 처리 : 1바이트 = 영어1글자 -
System.out
표준 출력으로서 모니터로 데이터를 출력할 때 사용한다. out 변수의 데이터형은
PrintStream 이다. PrintStream 클래스의 출력 메서드로 print 및 println 오버로딩 메서드
가 제공된다. 대표적으로 많이 사용했던 System.out.println(값) 이다.
read() 메서드를 이용한 키보드 입력 처리
read()
read(byte배열)
import java.io.IOException;
import java.io.InputStream;

public class IOTest2 {
	public static void main(String[] args) {

		InputStream is = System.in;
		try {
			System.out.println("데이터 입력 ");
			byte[] b = new byte[5];
			int n = is.read(b);
			for (byte c : b) {
				System.out.println((char)c);
			}
			System.out.println((char)n);
		} catch (IOException e) {
			e.printStackTrace();
		} finally {
			try {
				is.close();
			} catch (IOException e) {
				e.printStackTrace();
			}
		}
	}
}
InputStreamReader (필터클래스 : 변환작업을 한다.) 래스를 추가한 키보드
입력 처리
InputStreamReader 클래스를 이용하여 키보드 입력을 처리하는 방법으로서
byte가 아닌 char로 처리하기 때문에 한글처리가 가능하다. 따라서 앞서 실습했던 byte 처
리 방법보다 향상된 처리 방법이다. 한글은 2byte 이기 때문에 byte로 처리하는 것보다는 char로 처리하는 것이 효율적이다. 따라서 byte로 읽은 데이터를 char로 변경해주는 InputStreamReader 클래스를 추가로 사용하면 훨씬 키보드 입력처리가 쉬워진다. InputStreamReader 클래스의 read 메서드는 char 단위로 처리된다. 그러나 전보다는 향상되었지만 char 변환을 해야 되며 한 글자만 처리가능하기 때문에 이 방법 또한 저수준의 입력처리방법이다.
import java.io.IOException;
import java.io.InputStream;
import java.io.InputStreamReader;

public class IOTest3_inputStreamReader {
	public static void main(String[] args) {
		System.out.println("데이터 입력: ");
		InputStream is = System.in;
		InputStreamReader reader = null;
		try {
			reader = new InputStreamReader(is);
			int n = reader.read();
			System.out.println((char)n);
		} catch (IOException e) {
			e.printStackTrace();
		}finally {
			try {
				if(reader!=null) reader.close();
				if(is!=null) is.close();
			} catch (IOException e) {
				e.printStackTrace();

			}
		}
	}
}
BufferedReader 클래스를 추가한 키보드 처리
Filter 계열 I/O 클래스
앞서 실습했던 예제를 살펴보면 효율적으로 입력을 처리하는 경우도 있고 비효율적으로 처
리되는 예제도 있다. 비효율적으로 처리되는 경우는 InputStream 으로 처리하는 경우이며
효율적으로 처리된 경우는 InputStreamReader 또는 BufferedReader 클래스를 추가로 사
용한 경우이다. 자바의 I/O 처리는 다음 2가지 계열 클래스를 이용해서 작업을 한다.
§ Node 계열
원시 데이터를 직접 처리하는 클래스 계열이다. 원시데이터란 자바 I/O의 기본 처리 데이터
인 byte 또는 char로 가공되지 않은 데이터를 의미한다. 대표적으로 자바 I/O 상위 클래스들인 InputStream, OutputStream , Reader, Writer 클래
스들이며, 이러한 Node 계열 클래스들의 특징은 비효율적으로 입출력을 처리한다. 예를 들어 1byte 씩만 처리하거나 지정된 배열크기까지만 처리 가능하거나 char로 형변환
시켜야 사용 가능하거나 등이다. 또한 반드시 byte 또는 char로 데이터를 처리해야 되는 경
우에도 사용될 수 있는 클래스들이다.
§ Filter 계열
Node 계열만 사용해서는 비효율적으로 처리가 되기 때문에 데이터를 효율적으로 처리하기
위해서 byte을 char로 변환시키거나 한 라인씩 데이터를 처리하는 클래스들이 제공되는데
이러한 클래스 계열을 의미한다. 대표적으로 InputStreamReader 와 BufferedReader , PrintWriter 클래스들이다. 이렇게 기본적인 Node계열 클래스에 추가로 다양한 Filter계열 클래스들을 사용하여 원활
한 I/O작업을 할 수 있으며 이러한 방법으로 프로그램을 구현하는 패턴을 ‘데코레이션 패
턴(decoration pattern)’이라고 한다. 원하는 작업에 따라서 여러 가지 Filter 계열을 사용하
는 것이 가능하기 때문에 꾸미는 작업을 의미하는 데코레이션으로 표현한 것이다
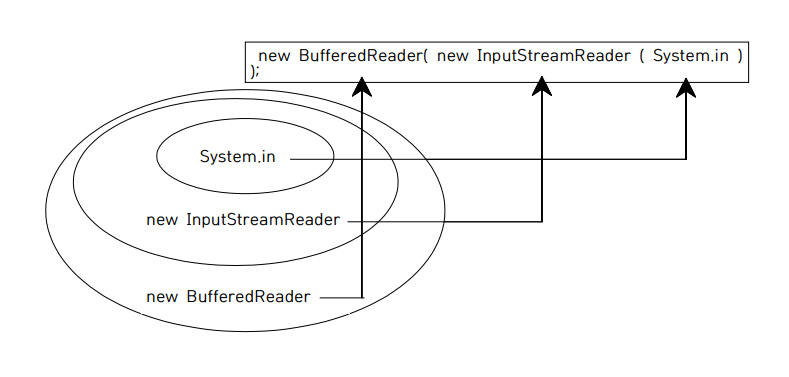
다음은 Filter계열을 사용한 키보드에서 데이터를 입력받아 처리하는 실습예제를 그림으로
도식화한 것이다. 데코레이션 패턴의 적용은 사용하고자하는 Filter계열의 클래스를 생성자 인자로 지정하여
적용 시킬수 있다. InputStream 형의 System.in을 InputStreamReader 생성자의 인자로 지
정하여 byte 처리를 char 처리로 변경시켰으며, 다시 BufferedReader를 사용하여 한 라인
씩 입력데이터를 처리할 수 있도록 데코레이션을 적용시켰다. 이런 형태의 데코레이션 패턴
은 자바 I/O에서는 빈번하게 사용되는 방식이므로 잘 알아두기 바란다.
파일 처리
자바에서는 물리적인 파일 및 디렉토리와 관련된 정보(메타 데이터)를 관리하는 방법으로
다음과 같이 2가지 클래스를 사용할 수 있다.
§ java.io.File 클래스
§ java.nio.file.Path 클래스
예를 들어 파일명, 파일크기, 읽기모드, 쓰기모드, 디렉토리 생성등과 같은 처리작업을 담당
한다. 실제 파일내의 접근은 자바 I/O 클래스를 이용한다.
java.io.File 클래스
< File 클래스의 생성자들 >
생성자 설명
File(String fileName) 파일명을 인자로 지정하여 File 객체를 생성한다.
File(File dir, String fileName) dir의 파일객체와 파일명을 이용하여 File객체를 생
성한다.
File(String dir, String fileName) dir의 파일경로와 파일명을 이용하여 File 객체를
생성한다.
주의할 점은 File 클래스의 생성이 실제 물리적으로 파일을 생성하는 것이 아니고 기존에
존재하는 파일의 메타정보를 알아보기 위한 객체를 생성하는 것이다.
다음은 File 클래스의 메서드들이다.
메서드 설명
String getName() 파일이나 디렉토리 이름을 리턴
String getParent() 위 디렉토리 경로명을 리턴
long length() 파일의 크기를 리턴
boolean canRead() 가능여부 리턴
boolean canWrite() 쓰기 가능여부 리턴
boolean exists() 경로에 해당하는 파일이나 디렉토리 존재 여부 리턴
boolean isFile() 파일 여부 리턴
boolean isDirectory() 디렉토리 여부 리턴
boolean mkdir() 디렉토리 생성 & 성공 여부 리턴
boolean delete() 파일 삭제 & 성공 여부 리턴
String [] list() 디렉토리내의 서브 디렉토리 및 파일 정보 리턴
java.nio.file.Path 클래스
Path 클래스는 java.io.File 클래스파일의 단점을 보완하기 위해서 Java 7버전에 추가된 클
래스이다.
java.io.File 클래스의 대표적인 단점은 다음과 같다. - 대부분의 메서드가 실패시 예외발생이 안되기 때문에 디버깅 처리가 어렵다. - 파일 복사 및 이동등 빈번하게 사용되는 기능을 지원하지 않는다. - 파일 메타데이터 접근이 비효율적이다. - 파일 및 디렉토리와 관련된 보안속성이 누락
Path 객체를 이용한 파일의 메타정보 알아보기
import java.net.URI;
import java.nio.file.Path;
import java.nio.file.Paths;

public class IOTest7_1_path {
	public static void main(String[] args) {
		Path path = Paths.get("c:\\upload\\IOTest.java");
		System.out.println(path.getFileName());
		System.out.println(path.getParent());
		System.out.println(path.getRoot());
		System.out.println(path.isAbsolute());

		URI uri = path.toUri();
		System.out.println("uri: "+ uri);

		System.out.println();
		Path xxx = Paths.get("IOTest2");
		Path xxx2 = xxx.toAbsolutePath();
		System.out.println(xxx);
		System.out.println(xxx2);

		System.out.println();
		Path s1 = Paths.get("c:\\temp\\aaa");
		Path s2= Paths.get("test.txt");
		Path s3 = s1.resolve(s2);  // 2개의 경로를 하나로 연결
		System.out.println(s3);
	}
}
java.nio.file.Files 클래스
java.nio.file.Files 클래스는 디렉토리 생성 및 삭제, 파일 복사,이동 , 디렉토리 목록보기 등 다양한 기능을 제공한다.
Files 객체를 이용한 파일 및 디렉토리 관리
Files 객체는 Path객체로 Path path = Paths.get("c:\\upload\\IOTest.java");경로를 메소드의 인자로 받아서 주로 사용한다.
import java.io.IOException;
import java.nio.file.Files;
import java.nio.file.Path;
import java.nio.file.Paths;

public class IOTest7_2_Files {
	//java.nio.file.files
	public static void main(String[] args) {
		Path path = Paths.get("c:\\upload\\IOTest.java");
		System.out.println(Files.exists(path));
		System.out.println(Files.isReadable(path));
		System.out.println(Files.isExecutable(path));
		System.out.println(Files.isWritable(path));

		Path newDir = Paths.get("c:\\temp\\ccc");
		try {
			Path xx = Files.createDirectories(newDir);
			System.out.println(xx);
		} catch (IOException e) {
			e.printStackTrace();
		}
	}
}
파일 입출력
물리적인 파일에 접근해서 파일의 내용을 실제로 읽거나 출력하기 위해서는 자바의 I/O를
사용해야 된다. 접근하려는 파일의 종류에 따라서 다음과 같이 사용되는 클래스가 달라진
다.
§ 일반 텍스트 파일
일반적인 텍스트 파일인 txt 확장자를 가진 파일 접근은 char 단위로 처리하는 것이 효율적
이다. 따라서 FileReader 및 FileWriter 같은 Node 계열 클래스를 사용하여 처리할 수 있
으며 BufferedReader 및 PrintWriter 같은 Filter 계열 클래스를 데코레이션하여 구현하면
더욱 효율적인 파일 입출력을 구현할 수 있다.
§ 바이너리 파일
이미지 파일과 같은 바이너리 파일접근은 byte단위로 처리만 가능하기 때문에
FileInputStream 및 FileOutputStream을 사용하여 처리한다.
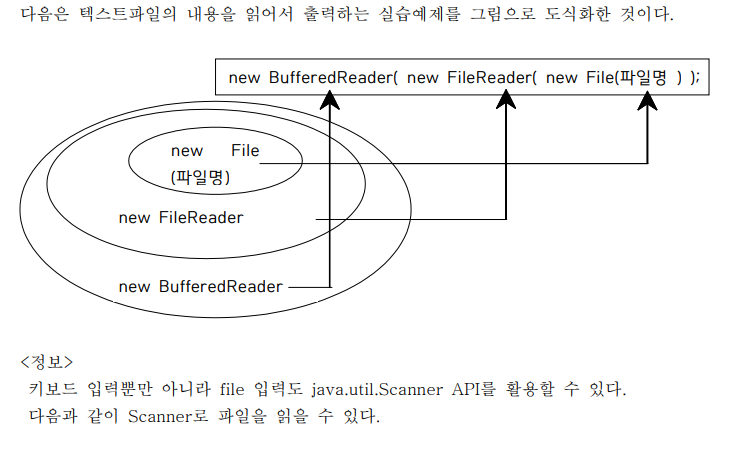
FileReader 이용한 텍스트 파일 내용 출력
import java.io.BufferedReader;
import java.io.File;
import java.io.FileNotFoundException;
import java.io.FileReader;
import java.io.IOException;

public class IOTest7_6_Read {
	public static void main(String[] args) {
		File f = new File("C:\\upload\\IOTest.java");
		BufferedReader buffer = null;
		try {
			FileReader reader = new FileReader(f);
			buffer = new BufferedReader(reader);
			String data = buffer.readLine();
			while (data != null) {
				System.out.println(data);
				data = buffer.readLine();
			}
		} catch (FileNotFoundException e) {
			System.out.println("not found========");
			e.printStackTrace();
		} catch (IOException e) {
			e.printStackTrace();
		} finally {
			try {
				buffer.close();
			} catch (IOException e) {
				e.printStackTrace();
			}
		}
	}
}
FileWriter 이용한 텍스트 파일에 저장
다음은 키보드로 입력받은 데이터를 파일로 저장하는 실습예제이다. 파일에 저장할 때 만약
파일이 존재하지 않으면 자동으로 파일이 생성된다. 실습후에 c:\temp 폴더에 가서
output.txt 파일이 생성된 것을 확인하고 파일내용도 확인하도록 한다. FileWriter 클래스의
두 번째 값으로 true을 지정하면 파일에 추가되는 방식으로 동작하고 false 이면 매번 덮어
쓰기된다. 기본은 fasle 이다.
FileWriter(f,true) true 는 append : 내용추가
FileWriter(f,false) false 는 overwrite : 덮어쓰기
아래 코드는 파일 생성 및 작성 예제다.
import java.io.File;
import java.io.FileWriter;
import java.io.IOException;
import java.io.PrintWriter;

public class IOTest8_Write {
	public static void main(String[] args) {

		// write는 없으면 자동생성된다.
		File f = new File("C:\\upload\\xyz.txt");

		// 데이터 쓰기 : FileWriter, FileOutputStream
		PrintWriter out = null;

		try {
			FileWriter writer = new FileWriter(f, true); //append
			//필터
			out = new PrintWriter(writer);
			out.print("happy");
			out.print("world");
            //out.flush(); //강제 버퍼 비우고 저장
		} catch (IOException e) {
			// TODO Auto-generated catch block
			e.printStackTrace();
		} finally {
			out.close(); //반드시 close 하자
		}
	}
}
PrintWriter객체.close()를 하지 않았을 시 문제점
기본적으로 데이터의 입출력 성능을 향상시키기 위하여 내부적으로 버퍼(Buffer)라는 특별
한 메모리를 사용하는데, 버퍼가 꽉 차야 데이터가 출력되어 버퍼가 비워지게 구현되어 있
다. 필요시 버퍼를 명시적으로 비워주기 위해서는 flush() 메서드를 사용하거나 close() 해야 된다. 따라서 위의 실행에서는 버퍼에 데이터가 꽉 차지 않았기 때문에 출력이 안된 것
이다. 따라서 close() 하면 버퍼가 비워져서 파일에 저장될 수 있다.
close()
flush()
습관적으로 finally에 close()해주자.
문자열을 byte타입의 배열로 변경하여 FileOutputStream으로 파일에 작성해보기
import java.io.File;
import java.io.FileNotFoundException;
import java.io.FileOutputStream;
import java.io.IOException;

public class IOTest8_Write2 {
	public static void main(String[] args) {
		File f = new File("C:\\upload\\xyz.txt");

		//데이터 쓰기 : FileWriter, FileOutputStream
		FileOutputStream fos = null;

		try {
			fos = new FileOutputStream(f); // true,false를 추가적으로 전달해주지 않으면 overwrite가 기본값으로 설정된다.

			String mesg = "world";
			// String --> byte[]
			byte[] b = mesg.getBytes();

			fos.write(b);
		} catch (IOException e) {
			// TODO Auto-generated catch block
			e.printStackTrace();
		} finally {
			try {
				fos.close();
			} catch (IOException e) {
				// TODO Auto-generated catch block
				e.printStackTrace();
			}
		}
	}
}
콘솔입력 -> 자바코드 -> 파일생성 및 입력
연습 해보기
import java.io.BufferedReader;
import java.io.File;
import java.io.FileWriter;
import java.io.IOException;
import java.io.InputStreamReader;
import java.io.PrintWriter;

public class IOTest8_Write3 {
	public static void main(String[] args) {

		File f = new File("C:\\upload\\output2.txt");
		System.out.println("데이터를 입력하세요.");

		BufferedReader buffer = null;
		PrintWriter out = null;

		try {
			buffer = new BufferedReader(new InputStreamReader(System.in));
			FileWriter writer = new FileWriter(f, true);
			out = new PrintWriter(writer);
			out.println(buffer.readLine());
		} catch (Exception e) {
			// TODO Auto-generated catch block
			e.printStackTrace();
		} finally {
			try {
				buffer.close();
				out.close();
			} catch (IOException e) {
				// TODO Auto-generated catch block
				e.printStackTrace();
			}

		}

	}
}
FileInputStream과 FileOutputStream 이용한 이미지 파일 복사하기
< 진행순서 >
a.png input -> 자바코드 -> b.png output (copy없이) (어떤 방식으로 하는게 좋을까?)
byte로 읽고 byte로 쓰는 방법
- FileInputStream객체의 read()메소드는 해당 객체의 파일 내용을 1byte씩 내용을 읽어 정수로 반환한다.
- 또한
객체.read(byte[] b)는 객체의 파일 내용을 한번에 모두 읽어서 인자로 전달된 byte형 배열에 저장해주고나서 int타입으로 마지막에 읽은 1byte씩 내용을 읽어 정수로 반환한다.
아래는 read(byte[] b)를 이용하여 이미지파일을 읽고 쓰는 코드다.
import java.io.File;
import java.io.FileInputStream;
import java.io.FileNotFoundException;
import java.io.FileOutputStream;
import java.io.IOException;

public class IOTest8_Write4 {
	public static void main(String[] args) {

		FileInputStream fis = null;
		FileOutputStream fos = null;


		try {
			File readFile = new File("C:\\upload\\a.png");
			File writeFile = new File("C:\\upload\\b.png");

			fis = new FileInputStream(readFile);
			fos = new FileOutputStream(writeFile, false);

			int size = (int) readFile.length();
			byte[] readByte = new byte[size];

//			int n = fis.read(readByte);
			fis.read(readByte);
			fos.write(readByte);
//			System.out.println(n);
		} catch (Exception e) {
			e.printStackTrace();
		} finally {
			try {
				if(fis!=null)fis.close();
				if(fos!=null)fos.close();
			} catch (IOException e) {
				e.printStackTrace();
			}


		}


	}
}
아래는 'read()'를 이용하여 다른 방식으로 이미지파일을 읽고 쓰는 코드다.
import java.io.File;
import java.io.FileInputStream;
import java.io.FileNotFoundException;
import java.io.FileOutputStream;
import java.io.IOException;

public class IOTest8_Write4 {
	public static void main(String[] args) {

		File f = new File("C:\\upload\\a.png");

		FileInputStream fis = null;
		FileOutputStream fos = null;


		try {
			File readFile = new File("C:\\upload\\a.png");
			File writeFile = new File("C:\\upload\\c.png");

			int size = (int) readFile.length();
			byte[] readByte = new byte[size];
			fis = new FileInputStream(readFile);
			fos = new FileOutputStream(writeFile, false);
//			int n = fis.read(readByte);
			for (int i = 0; i < size; i++) {
				fos.write(fis.read());
			}
//			fos.write(readByte);
//			System.out.println(n);

		} catch (Exception e) {
			e.printStackTrace();
		} finally {
			try {
				if(fis!=null)fis.close();
				if(fos!=null)fos.close();
			} catch (IOException e) {
				e.printStackTrace();
			}


		}
	}
}
첫번째 코드는 read(byte[] b) 메소드로 미리 선언된 byte배열에 한번에 값을 저장해주고 write로 배열들의 값을 입력해주었다.
두번째 코드는 read()메소드의 반환값을 이용하여 1바이트씩 write로 입력해주었다.
객체 직렬화 ( Object Serialization )
객체 직렬화 : 멤버변수값의 저장
Serializable 인터페이스 : 추상함수가 없고 멤버변수만 있어서 implement받아서 별다른 오버라이딩없이 멤버변수만 쓸 수 있음
ObjectOutputStream 과 ObejctInputStream은 각각 객체를 직렬화, 역직렬화하는 메소드를 제공하는 스트림이다.
- 자바에서 객체 안에 저장되어 있는 내용을 파일로 저장하거나 네트워크를 통하여 다른 곳으로 전송하려면 객체를 바이트 형태로 일일이 분해해야 한다. 이를 위하여 객체를 직접 입출력 할 수 있도록 해주는 객체 스트림이다.
즉 ObejctStream을 사용하기 위해서 객체가 직렬화(Serialization) 가 되어 있어야 한다는 것이다.
일반적으로 클래스를 객체생성해서 힙(heap) 메모리에 생성된 객체의 인스턴스는 비영속성
을 갖는다. 즉, 프로그램 실행이 종료되면 메모리에서 제거된다는 것이다. 파일이나 데이터베이스에 저장된 데이터처럼 영속성을 가지기 위해서 자바에서는 ‘객체 직
렬화(Object Serialization)' 기능을 제공한다. 객체 직렬화를 적용하면 메모리에 생성된 인
스턴스 정보를 파일에 저장하거나 네트워크를 통해서 전달하는 방법으로 영속성을 유지할
수 있다. 객체 직렬화를 위해서 java.io.Serializable 인터페이스가 사용된다. 다음은 영속성을 유지시키기 위한 객체 직렬화를 명시하는 방법이다.
public class 클래스명 implements Serializable{ }
java.io.Serializable 인터페이스를 구현한 클래스 파일은 객체 직렬화가 가능하다. 일반적으
로 인터페이스에는 추상 메서드가 있어서 구현한 클래스파일에서 반드시 메서드를 오버라이
딩해야 하지만 Serializable 인터페이스는 추상 메서드가 없다. 단지 객체 직렬화가 가능한
클래스임을 알려주는 마킹 기능을 가지는 용도로 사용하는 마커(marker)인터페이스이다. 이
것은 클래스의 인스턴스 변수에 저장된 데이터의 영속성을 위해서 파일이나 네트워크로 전
송할 수 있다는 것이다. 시스템에서 제공된 대부분의 API는 모두 직렬화가 가능한 클래스들이다. 이것은 미리
Serializable 인터페이스를 구현했다는 것이며 대표적으로 String, ArrayList 등이다. 이런
이유로 문자열을 파일에 저장하거나 채팅 같이 네트워크로 문자를 전송할 수 있는 것이다.
객체 직렬화를 위해서 다음과 같은 I/O 클래스를 사용한다.
ObjectInputStream 클래스
ObjectOutputStream 클래스
다음은 객체 직렬화의 특징이다.
§ Serializable 인터페이스를 사용한다.
§ 메모리에 생성된 인스턴스를 내부적으로 byte로 처리한다.
§ byte단위로 처리되기 때문에 반드시 ObjectInputStream과 ObjectOutputStream을 사용
해야 된다.
§ 연쇄적으로 발생된다. 이것은 직렬화 될 인스턴스 변수가 참조하는 객체까지도 연쇄적으
로 객체 직렬화된다는 의미이다.
§ 대부분의 API는 모두 객체 직렬화 가능한 클래스들이다.
§ 필요시 객체 직렬화에서 제외시키는 방법은 transient 키워드로 명시하면 된다
ObjectOutputStream 저장(파일로 데이터를 출력)
import java.io.File;
import java.io.FileNotFoundException;
import java.io.FileOutputStream;
import java.io.IOException;
import java.io.ObjectOutputStream;

public class IOTest10_Serial_Out {
	public static void main(String[] args) {
		ObjectOutputStream oos = null;

		try {
			Person p = new Person("홍길동", 20, "서울");
			File f = new File("c:\\upload", "serial.dat");
			FileOutputStream fos = new FileOutputStream(f);
			oos = new ObjectOutputStream(fos);
			oos.writeObject(p);
			System.out.println("저장완료");

		} catch (IOException e) {
			e.printStackTrace();
		} finally {
			try {
				oos.close();
			} catch (IOException e) {
				e.printStackTrace();
			}
		}
	}
}
ObjectInputStream() 파일에서 객체를 읽어옴
import java.io.File;
import java.io.FileInputStream;
import java.io.IOException;
import java.io.ObjectInputStream;

public class IOTest10_Serial_Input {
	public static void main(String[] args) {
		ObjectInputStream ois = null;

		try {

			File f = new File("c:\\upload", "serial.dat");

			FileInputStream fis = new FileInputStream(f); //파일 읽어오기
			ois= new ObjectInputStream(fis); // 객체로 변환하기
			Person p =(Person)ois.readObject(); // 객체 반환
			System.out.println(p.getName() + "\t" + p.getAge() + "\t" + p.getAddress());

		} catch (IOException e) {
			// TODO Auto-generated catch block
			e.printStackTrace();
		} catch (ClassNotFoundException e) {
			// TODO Auto-generated catch block
			e.printStackTrace();
		} finally {
			try {
				ois.close();
			} catch (IOException e) {
				// TODO Auto-generated catch block
				e.printStackTrace();
			}
		}
	}
}
Object래스 : Srializable인터페이스를 임플먼트 받아야함. transient를 멤버변수에 붙이면 저장에서 제외시킬 수 있음
import java.io.Serializable;

public class Person implements Serializable{
	private String name;
    private int age;
    private transient String address;

    public Person(String name, int age, String address){
		super();
		this.name = name;
		this.age = age;
		this.address = address;
	}
	public Person() {
		super();
		// TODO Auto-generated constructor stub
	}

	public String getName() {
		return name;
	}
	public void setName(String name) {
		this.name = name;
	}
	public int getAge() {
		return age;
	}
	public void setAge(int age) {
		this.age = age;
	}
	public String getAddress() {
		return address;
	}
	public void setAddress(String address) {
		this.address = address;
	}

	@Override
	public String toString() {
		return "Person [name=" + name + ", age=" + age + ", address=" + address + "]";
	}
}
main 에서 Test클래스 함수 호출
함수간 데이터 넘기고 받는 연습
JDBC
정의:
JDBC는 자바언어에서 데이터베이스에 접근할 수 있는 프로그래밍 API 이
다.
특징:
JDBC는 대부분이 인터페이스로 되어있으며 이 인터페이스를 구현한 클래
스 파일들의 묶음을 드라이버(driver)라고 한다. JDBC는 자바에서 제공하고
드라이버는 데이터베이스를 만드는 회사(벤더)에서 제공하며, 오라클에서
만든 드라이버를 ‘오라클 드라이버’라고 한다.
오라클 드라이버는 오라클 데이터베이스를 설치하면 다음 경로에 자동 생성
된다.
JDBC용 드라이버 파일
- Eclipse파일에 있는 파일
- mybatis-3.5.5
- ojdbc6_g (C:\oraclexe\app\oracle\product\11.2.0\server\jdbc\lib 에 있음)
프로젝트 -> 빌드패쓰 -> Library -> add external에서 ojdbc6_g 선택
-
jdbc : 각 db에 맞는 driver 필요 oracle은 oracle6_g.jar 필요
-
jcbc기술의 종류 : db 연동 기술
- Statement 이용 - 사용에 상당히 짜증남
- PreparedStatement 이용 - 사용, 짜증나는 점 등장
- MyBatis Framework 이용 - 최종사용 목적지
ㄴ
JDBC 실행순서 (7가지) (외워야함) -
오라클 데이터베이스 연동을 위한 4가지 정보를 저장한다.
String driver = "oracle.jdbc.driver.OracleDriver";
String url = "jdbc:oracle:thin:@localhost:1521:orcl";
String userid = "scott";
String passwd = "tiger";
-
드라이버 로딩
Class.forName( driver ); -
Connection 맺기
Connection con = DriverManager.getConnection( url, userid , passwd );
PPT에 적힌 4,5번은 약간 다름
4.
package stmtTest;

import java.sql.Connection;
import java.sql.DriverManager;
import java.sql.ResultSet;
import java.sql.SQLException;
import java.sql.Statement;

public class stmtTest2 {
	public static void main(String[] args) {
		// 1. db 연동에 필요한 4가지 정보 입력
		String driver = "oracle.jdbc.driver.OracleDriver";
		String url = "jdbc:oracle:thin:@localhost:1521:xe";
		String userid = "scott";
		String passwd = "tiger";

		Connection con = null;
		Statement stmt = null;
		ResultSet rs = null;


		try {
			// 2. 드라이버 로딩
			Class.forName(driver);

			// 3. 접속 얻기
			con = DriverManager.getConnection(url, userid, passwd);

			// 4. sql 작성
			String sql = "select * from dept";

			// 5. Statement 객체 생성
			stmt = con.createStatement();

			// 6. sql 결과 출력
			rs = stmt.executeQuery(sql);  // // select -executeQuery, DML - executeUpdate
			while(rs.next()) {
				int deptno = rs.getInt(1);
				String dname = rs.getString(2);
				String loc = rs.getString(3);

				System.out.println(deptno + "\t" + dname + "\t" + loc);
			}

		} catch (ClassNotFoundException | SQLException e) {
			// TODO Auto-generated catch block
			e.printStackTrace();
		} finally {
				try {
                	// 7. 자원의 반납
					if(rs!=null)rs.close();
					if(stmt!=null)stmt.close();
					if(con!=null)con.close();
				} catch (SQLException e) {
					// TODO Auto-generated catch block
					e.printStackTrace();
				}
		}


	}
}
