🎈 URLSession이란?
: HTTP/HTTPS를 통해 콘텐츠(데이터)를 주고받는 API를 제공하는 클래스
이 API는 인증 지원을 위한 많은 델리게이트 메서드를 제공하며,
애플리케이션이 실행 중이지 않거나 일시 중단된 동안 백그라운드 작업을 통해 콘텐츠를 다운로드하는 것을 수행하기도 한다.
URLSession API를 사용하기 위해 애플리케이션은 세션을 생성한다. 해당 세션은 관련된 데이터 전송작업 그룹을 조정한다.
예를 들면, 웹 브라우저를 사용 중인 경우 탭 당 하나의 세션을 만들 수 있다.
각 세션 내에서 애플리케이션은 작업을 추가하고, 각 작업은 특정 URL에 대한 요청을 나타낸다.
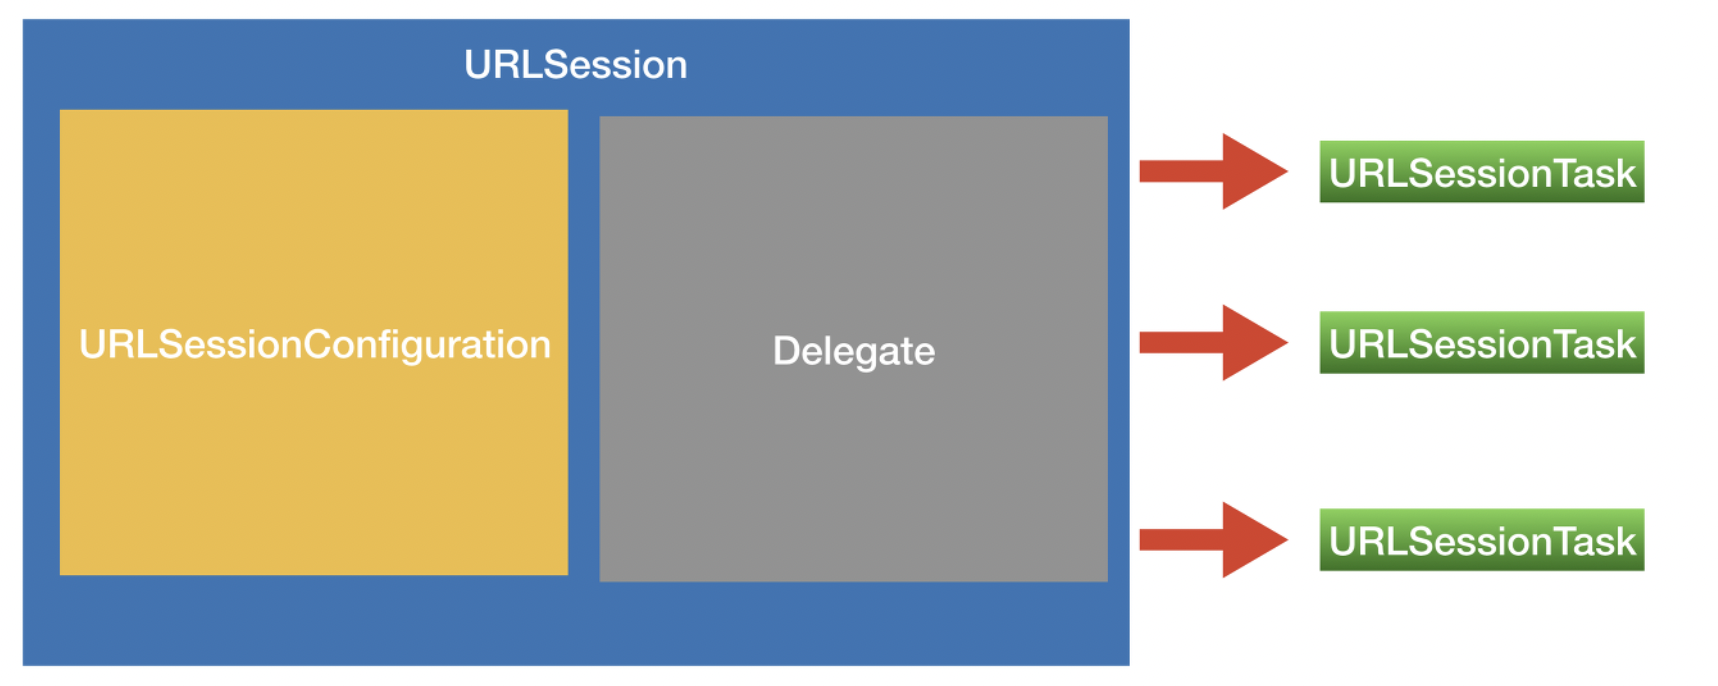
🎈 URLSession의 유형
URLSession 객체가 소유한 configuration 프로퍼티 객체에 의해 결정된다.
1. 기본 세션 (Default Session)
기본 세션은 URL 다운로드를 위한 다른 Foundation 메소드와 유사하게 동작한다. 디스크에 저장하는 방식이다.
2. 공유 세션(Shared Session)
기본 요청을 위한 세션이고 configuration 객체가 없다. 사용자 정의가 불가능하다.
3. 임시 세션 (Ephemeral Session)
기본 세션과 유사하지만, 디스크에 어떤 데이터도 저장하지 않고, 메모리에 올려 세션과 연결한다.
따라서 애플리케이션이 세션을 만료시키면 세션과 관련한 데이터가 사라진다.
4. 백그라운드 세션 (Background Session)
백그라운드 세션은 별도의 프로세스가 모든 데이터 전송을 처리한다는 점을 제외하고는 기본 세션과 유사하다.
🎈 URLSessionTask
: 세션 작업 하나를 나타내는 추상 클래스
하나의 세션 내에서 URLSession 클래스는 세 가지 작업 유형 (Data Task, Upload Task, Download Task)을 지원한다.
1. URLSessionDataTask
HTTP의 각종 메서드를 이용해 서버로부터 응답 데이터를 받아서 Data 객체를 가져오는 작업을 수행한다.
2. URLsessionUploadTask
애플리케이션에서 웹 서버로 Data 객체 또는 파일 데이터를 업로드하는 작업을 수행한다. 주로 HTTP의 POST 혹은 PUT 메서드를 이용한다.
3. URLSessionDownloadTask
서버로부터 데이터를 다운로드 받아서 파일의 형태로 저장하는 작업을 수행한다. 애플리케이션의 상태가 대기 중이거나 실행 중이 아니라면 백그라운드 상태에서도 다운로드가 가능하다.
⇒ JSON, XML, HTML 데이터 등 단순한 데이터의 전송에는 주로 DataTask을 사용하며, 용량이 큰 파일의 경우 애플리케이션이 백그라운드 상태인 경우에도 전달할 수 있도록 UploadTask DownloadTask 작업을 주로 사용한다.
🍄 URLSessionDataTask 예제
random 유저 데이터를 요청해서 받아오는 UserProfile 이라는 이름의 예제를 구현해 볼것이다.
오픈 API: https://randomuser.me/api/?results=20&inc=name,email,picture
이 예제의 주요 기능은 json 형식의 데이터를 비동기적으로 받아오고, 디코딩 해서 데이터를 뿌려준다.
1. Storyboard 구성
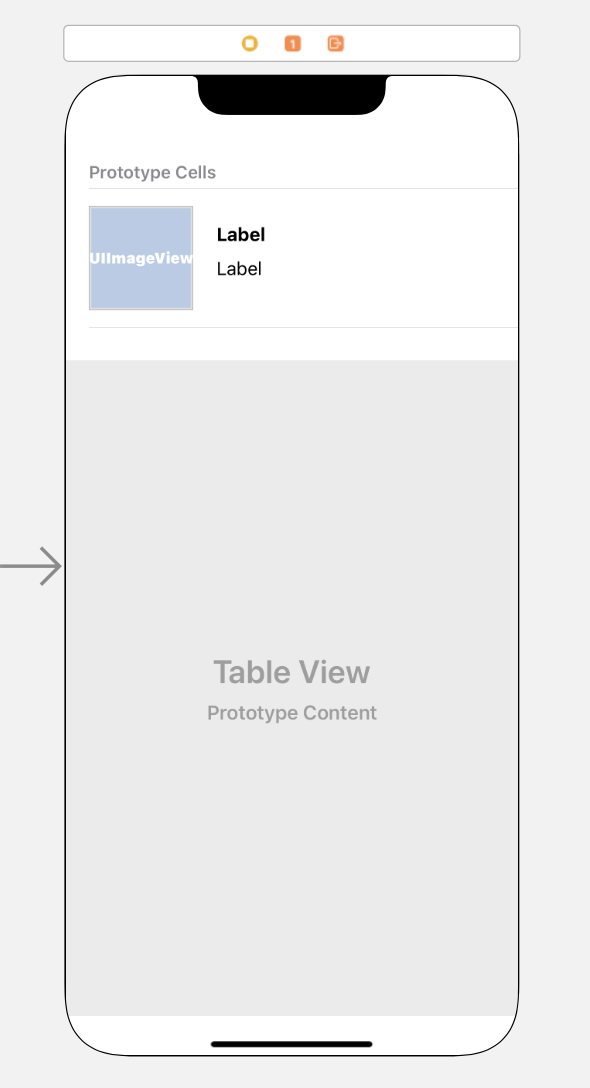
TableView 안에 TableViewCell을 하나 넣고,
imageView 1개와 Label 2개가 있는 형태로 만들었다.
2. Model (User)
import Foundation

struct UserResponse: Codable {
    var results: [User]
}

struct User: Codable {
    let name: Name
    let email: String
    let picture: Picture

    struct Name: Codable {
        let title: String
        let first: String
        let last: String

        var full: String {
            return "\(title.capitalized). \(first.capitalized) \(last.capitalized)"
        }
    }

    struct Picture: Codable {
        let large: String
        let medium: String
        let thumbnail: String
    }
}
3. ViewController
- tableView 연결
datasSourcedelegate를 self로 지정getUsers()를 통해서 서버와 통신URLSession.shared
: URLSession의 싱글톤 객체를 제공Sharedsession은 delegate가 없고, 커스터마이징된 configuration도 없기 때문에 한계점이 있다.
• 서버로 부터 데이터를 받아올 때 data를 점차 증가시면서 받아올 수 없다.
• connection behavior를defualt에서 더 이상 커스터마이즈 할 수 없게 된다.
•authentication(인증)을 수행하는 기능은 사용할 수 없다.
• 앱이 실행되지 않을 때,background에서 download나 upload를 수행할 수 없다.
import UIKit

class ViewController: UIViewController {

    @IBOutlet weak var tableView: UITableView!

    private var users: [User] = []
    private let url = "https://randomuser.me/api/?results=20&inc=name,email,picture"

    override func viewDidLoad() {
        super.viewDidLoad()

        tableView.delegate = self
        tableView.dataSource = self

        getUsers()
    }

    private func getUsers() {
        //URLSession의 싱글턴 객체
        let session = URLSession.shared
        guard let requestURL = URL(string: url) else {return}

        // 네트워킹 시작
        session.dataTask(with: requestURL) { data, response, error in
            guard error == nil else {
                print(error?.localizedDescription)
                return
            }

            if let data = data, let response = response as? HTTPURLResponse, response.statusCode == 200 {
                do {
                    //Json타입의 데이터를 디코딩
                    let userResponse = try JSONDecoder().decode(UserResponse.self, from: data)
                    self.users = userResponse.results
                    DispatchQueue.main.async {
                        //UI작업은 꼭 main 스레드에서 !!
                        self.tableView.reloadData()
                    }
                } catch(let err) {
                    print("Decoding Error")
                    print(err.localizedDescription)
                }
            }
        }.resume()      //모든 task()는 일시정지 상태로 시작하기 때문에 resume()으로 task()를 시작해야 한다
    }

}
4. UITableViewCell (UserProfileCell.swift)
imageView,nameLabel,emailLabel연결mainstoryboard에서 Table View Cell의custom class명과identifier"UserProfileCell"로 지정DispatchQueue.global
: 전체 시스템에서 공유되는 Concurrent Queue.QoS를 통해서 작업의 우선순위를 결정한다.QoS(Quality of Service)란?
• DispatchQueue에서 수행할 작업을 분류하기 위해 사용
• 해당 QoS를 지정해줘서 중요도를 표시하고, 시스템이 우선순위를 정하고 이에 따라 스케쥴링
import UIKit

class UserProfileCell: UITableViewCell {

    @IBOutlet weak var profileImageView: UIImageView!
    @IBOutlet weak var nameLabel: UILabel!
    @IBOutlet weak var emailLabel: UILabel!

    override func awakeFromNib() {
        super.awakeFromNib()
        // Initialization code
    }

    override func setSelected(_ selected: Bool, animated: Bool) {
        super.setSelected(selected, animated: animated)

        // Configure the view for the selected state
    }

    func setupView(user: User) {
        //이미지 리소스 받아오는 부분
        DispatchQueue.global(qos: .userInitiated).async {
            guard let imageURL = URL(string: user.picture.thumbnail) else {
                return
            }

            let request = URLRequest(url: imageURL)
            // 역시나 싱글턴 이용
            URLSession.shared.dataTask(with: request, completionHandler: { (data, response, error) in
                if let data = data, let response = response, ((response as? HTTPURLResponse)?.statusCode ?? 500) < 300, let image = UIImage(data: data) {
                    // 테이블뷰 리로드 하는 것과 마찬가지로 UI작업은 main 스레드에서 해줍니다
                    DispatchQueue.main.async {
                        self.transition(toImage: image)
                    }
                }
            }).resume()
        }

        nameLabel.text = user.name.full
        emailLabel.text =  user.email
    }

    // 이미지로딩이 자연스럽도록 설정
    func transition(toImage image: UIImage?) {
        UIView.transition(with: self, duration: 0.3,
                          options: [.transitionCrossDissolve],
                          animations: {
                            self.profileImageView.image = image
        },
                          completion: nil)
    }
}
5. ViewController - Datasource, Delegate Extension
ViewController class 하단에 tableView 내부를 구현하는 코드를 추가한다.
extension ViewController: UITableViewDelegate, UITableViewDataSource {
    func tableView(_ tableView: UITableView, numberOfRowsInSection section: Int) -> Int {
        return users.count
    }

    func tableView(_ tableView: UITableView, heightForRowAt indexPath: IndexPath) -> CGFloat {
        return 120
    }

    func tableView(_ tableView: UITableView, cellForRowAt indexPath: IndexPath) -> UITableViewCell {
        guard let cell = tableView.dequeueReusableCell(withIdentifier: "UserProfileCell", for: indexPath) as? UserProfileCell else {
            return UITableViewCell()
        }

        cell.setupView(user: users[indexPath.row])
        return cell
    }
}
결과

전체 코드
참고자료
https://k-elon.tistory.com/30
https://eunjin3786.tistory.com/120