
⚡ Spring DI
📌 Spring Framework
🔷 프레임워크 (Framework)
- 사전적 의미: (건물 등의) 뼈대, (판단/결정 등을 위한) 틀
- SW에서의 의미: SW 특정 문제를 해결하기 위해서 상호 협력하는 클래스와 인터페이스의 집합
🔷 프레임워크를 사용하는 이유
- 웹 어플리케이션을 개발하기 위해서 많은 기본 기능을 설계, 작성해야 한다. 이때 공통으로 사용되는 기본기능들을 일관되게 사용할 수 있으면 개발자는 웹 어플리케이션 기능 자체 개발에만 신경을 쓰면 되기 때문에 생산성이 높아진다.
- 개발자 입장에서는 완성된 구조에 맡은 기능을 개발하여 넣어주면 되기 때문에 개발 시간을 단축할 수 있다.
⭐ Spring Framework의 등장
- 90년대 말부터, 웹 사이트가 복잡해지면서 엔터프라이즈 급 서비스가 필요하게 되었다.
💡 엔터프라이즈(EnterPrise): 복잡한 구조, 많은 사용자 등 규모가 매우 커진 형태
- 자바에서는
EJB(Enterprise JavaBeans)를 이용한 엔터프라이즈 급 애플리케이션 제작이 유행하였다. - 하지만,
EJB를 기반으로 한 애플리케이션은 EJB 스펙에 따른 객체를 작성해야 하거나, 간단한 기능을 작성하고 테스트 할 때도 EJB 서버가 필요해서 개발 효율성이 떨어지는 단점이 있었다. - 복잡한 구동환경과 하드웨어 구성이 필요하지 않은 경량 프레임워크(
light-wight Framework)를 지향하는 방법론이 제시되었고 이는 Spring Framework에 토대가 되었다.
Rod Johnson 'Expert One-on-One J2EE Development without EJB'
💡 당시에는 경량이었지만 지금은 경량이라기에 애매하다. 이를 보완하기 위해
Spring Boot가 등장하였다.
⭐ Spring Framework의 특징
1) POJO(Plain Old Java Object) 방식의 프레임워크
2) 의존성 주입(Dependency Injection)을 통한 객체관계 구성
3) 관점지향 프로그래밍(AOP, Aspect Oriented Programming)
4) 제어 역전(IoC, Inversion of Control)
5) 높은 확장성과 다양한 라이브러리
⭐ Spring Framework의 장점
1) Spring is everywhere
- 전세계 많은 개발자들이 스프링을 사용하고 있다.
💡 한국의 전자정부 프레임워크도 스프링을 기반으로 만들어져있다. 한국이 자바와 스프링을 선호하는 이유이다.
2) Spring is flexible
- 유연하고 포괄적인 외부 라이브러리 확장을 통해 다양한 형태의 애플리케이션 개발가능
3) Spring is Fast
- 기본적으로 빠른 시작 / 종료 / 최적화된 실행을 확인할 수 있다.
4) Spring is productive
- Spring boot는 프로그래밍 접근 방식을 변환하여 작업량을 줄여준다. 또한 애플리케이션 컨텍스트 및 웹서버 등을 결합하여 간단한 프로그래밍을 쉽게 해준다.
5) Spring is secure
- 업계 표준 보안 체계와 쉽게 통합할 수 있고, 기본적으로 신뢰할 수 있는 솔루션을 제공한다.
6) Spring is supportive
- 커뮤니티가 잘 발달해 있으며, 빠른 시작, 가이드, 자습서 등의 리소스를 지원하고 있다.
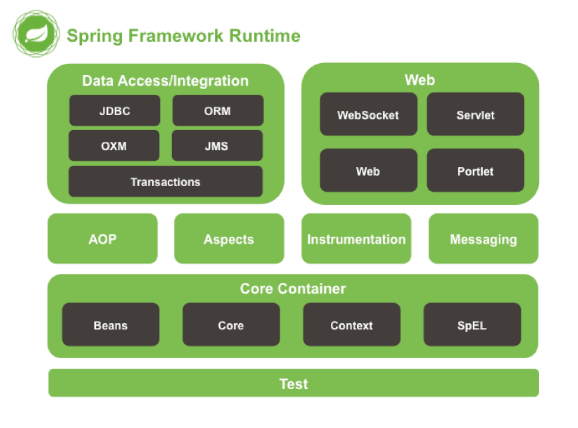
⭐ Spring Framework 구조
📌 의존관계
🔷 class A 객체가 어떤 일을 처리하기 위해서 class B 의 객체의 도움을 받아야만 일을 처리할 수 있다면 'class A는 class B에 의존한다.' 라고 표현한다.
⭐ 의존 관계 역전
🖥 Desktop
package com.Bzeromo.di1;

public class Desktop {
	public String getInfo() {
		return "데스크탑";
	}
}
🖥 Laptop
package com.Bzeromo.di1;

public class Laptop {
	public String getInfo() {
		return "노트북";
	}
}
🖥 Programmer
package com.Bzeromo.di1;

public class Programmer {
	private Desktop computer;

	public Programmer() {
		computer = new Desktop();
	}

	public void coding() {
		System.out.println(computer.getInfo()+"으로 개발해요.");
	}
}
🖥 Test
package com.Bzeromo.di1;

public class Test {
	public static void main(String[] args) {
		Programmer p = new Programmer();
		p.coding();
	}
}
🔷 현재 Programmer와 Desktop&Laptop 사이에 객체 생성과 타입 의존성이 발생했다. 테스트에서 프로그래머 인스턴스를 생성하려면 반드시 프로그래머 클래스 내에서 데스크탑 인스턴스가 생성되어야만 하고 데스크탑을 생성할지 노트북을 생성할지 유동적으로 정하기 힘든 강한 결합 관계가 발생하였다.
🔷 객체 생성 의존성 제거
🖥 Programmer
package com.Bzeromo.di2;

public class Programmer {
	private Desktop computer;

	// 객체 생성 의존성 제거
	public Programmer(Desktop computer) {
//		computer = new Desktop();
		this.computer = computer;
	}

	public void coding() {
		System.out.println(computer.getInfo()+"으로 개발해요.");
	}
}
🖥 Test
package com.Bzeromo.di2;

public class Test {
	public static void main(String[] args) {
		// 제어의 역전
		Desktop computer = new Desktop();
		Programmer p = new Programmer(computer);
		p.coding();
	}
}
💡 제어의 역전(IoC)
클래스 간의 결합을 느슨하게 해 테스트와 유지 관리를 더 쉽게 하는 설계(design) 원칙
🔷 타입 의존성 제거
🖥 Computer 인터페이스 생성
package com.Bzeromo.di3;

// 느슨한 결합을 위한 인터페이스
public interface Computer {
	String getInfo();
}
🖥 Desktop
package com.Bzeromo.di3;

public class Desktop implements Computer {
	public String getInfo() {
		return "데스크탑";
	}
}
🖥 Laptop
package com.Bzeromo.di3;

public class Laptop implements Computer {
	public String getInfo() {
		return "노트북";
	}
}
🖥 Test
package com.Bzeromo.di3;

public class Test {
	public static void main(String[] args) {
		// 느슨한 결합으로 타입 의존성 제거
		Desktop computer = new Desktop();
		Laptop computer2 = new Laptop();
		Programmer p = new Programmer(computer2);
		p.coding();
	}
}
💡 강한 결합과 느슨한 결합
어떠한 객체가 다른 객체를 구현한 클래스를 직접 참조하여 강한 의존성을 가지고 있으면 강한 결합, 인터페이스를 거쳐 약한 의존성을 가지고 있으면 느슨한 결합(약한 결합)이라고 한다.
⭐ 의존성 주입
🔷 의존성을 주입하는 방식은 다양하다. 이번엔 설정자(setter) 주입과 팩토리 패턴을 동시에 실습해보자.
아까 사용한 기존의 코드를 이용한다.
🖥 computerFactory
package com.Bzeromo.di4;

public class computerFactory {
	public static Computer getComputer(String type) {
		if(type.equals("D"))
			return new Desktop();
		else if(type.equals("L"))
			return new Laptop();

		return null;
	}
}
🖥 Programmer
package com.Bzeromo.di4;

public class Programmer {
	private Computer computer;

	public Programmer() {}

	public Programmer(Computer computer) {
		this.computer = computer;
	}

	public Computer getComputer() {
		return computer;
	}

	//설정자(setter)주입
	//필드 이름에 set을 붙이고 첫글자를 대문자로 바꾼 형태
	public void setComputer(Computer computer) {
		this.computer = computer;
	}

	public void coding() {
		System.out.println(computer.getInfo()+"으로 개발해요.");
	}
}
🖥 Test
package com.Bzeromo.di4;
import java.util.*;
public class Test {
public static void main(String[] args) {
Scanner sc = new Scanner(System.in);
Programmer p = new Programmer();
//설정자 주입 시
// p.setComputer(computerFactory.getComputer("D"));
// p.coding();
// p.setComputer(computerFactory.getComputer("L"));
// p.coding();
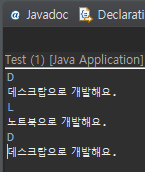
// factory 활용
while(true) {
p.setComputer(computerFactory.getComputer(sc.next()));
p.coding();
}
}
}
📌 Spring Container Build
⭐ Spring IoC Container
🔷 스프링에서 핵심적인 역할을 하는 객체를 Bean이라고 하며, Container는 Bean의 인스턴스화 조립, 관리의 역할, 사용 소멸에 대한 처리를 담당한다.
💡
Bean
자바의 클래스, 객체
1) interface BeanFactory
- 프레임워크 설정과 기본 기능을 제공하는 컨테이너
- 모든 유형의 객체를 관리할 수 있는 메커니즘 제공
2) interface ApplicationContext
- BeanFactory 하위 인터페이스
- 이벤트 처리, 국제화용 메시지 처리, AOP 통합 기능 제공
3) interface WebApplicationContext
- 웹 환경에서 Spring을 사용하기 위한 기능이 추가됨
- 대표적인 구현 클래스로 XmlWebApplicationContext가 있음
🔷 스프링 설정 정보(Spring configuration metadata)
- 애플리케이션 작성을 위해 생성할 Bean과 설정 정보, 의존성 등의 방법을 나타내는 정보
- 설정정보를 작성하는 방법은 XML 방식, Annotation 방식, Java 방식이 있다.
⭐ Spring Container 빌드
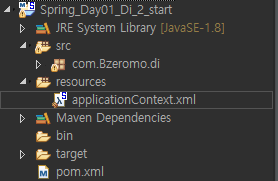
프로젝트 생성 후 Maven 프로젝트로 변경한다. 이후
pom.xml에 mvn레퍼지토리에 스프링을 검색하여 나온Spring Context의 의존성을 추가한다. resource(Source Folder) 생성 및 스프링 설정파일 생성을 하면 준비 끝!
- 빈(Bean) 등록
🖥 applicationContext.xml
<?xml version="1.0" encoding="UTF-8"?>
<beans xmlns="http://www.springframework.org/schema/beans"
	xmlns:xsi="http://www.w3.org/2001/XMLSchema-instance"
	xsi:schemaLocation="http://www.springframework.org/schema/beans http://www.springframework.org/schema/beans/spring-beans.xsd">

	<bean class="com.Bzeromo.di.Desktop" id="desktop" scope="prototype"></bean>
	<bean class="com.Bzeromo.di.Programmer" id="programmer"></bean>
</beans>- 풀패키지 명을 작성하며 별 다른 설정이 없다면 알아서 기본 생성자를 통해 넣는다.
scope설정에 따라 인스턴스의 생성을 조절할 수 있다.
💡 Bean Scope
Bean 정의를 작성하는 것은 Bean 객체를 생성하는 것과 다르며 Bean 범위(Scope)를 정의해서 객체의 범위를 제어할 수 있다.
| Scope | 설명 |
|---|---|
| singleton | 기본값, Spring IoC 컨테이너에 대한 단일 객체 인스턴스 |
| prototype | 빈을 요청할 때마다 새로운 인스턴스 생성 |
| request | HTTP Request 주기로 bean 인스턴스 생성 |
| session | HTTP Session 주기로 bean 인스턴스 생성 |
- 스프링 컨테이너를 이용하여 객체 가져오기
팩토리 사용 이전 코드를 사용한다.
🖥 Test
package com.Bzeromo.di;

import org.springframework.context.ApplicationContext;
import org.springframework.context.support.GenericXmlApplicationContext;

public class Test {
	public static void main(String[] args) {
		ApplicationContext context = new GenericXmlApplicationContext("applicationContext.xml");

        // getBean 사용 시 자료형을 맞춰줄 필요가 있다.
        // 직접 변환 혹은 Class.class 매개변수를 활용한다.
		Programmer p = (Programmer)context.getBean("programmer");

		Desktop desktop = context.getBean("desktop", Desktop.class);

		p.setComputer(desktop);
		p.coding();

		Desktop desktop2 = context.getBean("desktop", Desktop.class);
		Desktop desktop3 = context.getBean("desktop", Desktop.class);

		System.out.println(desktop2 == desktop3);
	}
}
💡 만약 Bean Scope 설정을 하지 않았다면 getBean()을 통해 가져오는 인스턴스는 한번만 생성되기 때문에 동일한 것(싱글턴)이 되어 출력 값이 true로 바뀐다.
📌 Spring DI
⭐ XML 방식
🔷 의존성 주입(생성자)
-
constructor-arg를 이용하여 의존성 주입
-
\, \와 같이 하위태그를 이용하여 설정 or 속성을 이용하여 설정
🖥 applicationContext.xml
<?xml version="1.0" encoding="UTF-8"?>
<beans xmlns="http://www.springframework.org/schema/beans"
	xmlns:xsi="http://www.w3.org/2001/XMLSchema-instance"
	xsi:schemaLocation="http://www.springframework.org/schema/beans http://www.springframework.org/schema/beans/spring-beans.xsd">

	<!-- 생성자를 이용한 DI -->
	<bean class="com.Bzeromo.di.Desktop" id="desktop" scope="prototype"></bean>
	<bean class="com.Bzeromo.di.Programmer" id="programmer">
		<constructor-arg ref="desktop"></constructor-arg>
	</bean>
</beans>
🖥 Test
package com.Bzeromo.di;

import org.springframework.context.ApplicationContext;
import org.springframework.context.support.GenericXmlApplicationContext;

public class Test {
	public static void main(String[] args) {
		ApplicationContext context = new GenericXmlApplicationContext("applicationContext.xml");

		Programmer p = (Programmer)context.getBean("programmer");

		p.coding();
	}
}
🔷 의존성 주입(설정자)
- setter를 이용하여 의존성 주입
- \, \와 같이 하위태그를 이용하여 설정 or 속성을 이용하여 설정
🖥 Test
<?xml version="1.0" encoding="UTF-8"?>
<beans xmlns="http://www.springframework.org/schema/beans"
	xmlns:xsi="http://www.w3.org/2001/XMLSchema-instance"
	xsi:schemaLocation="http://www.springframework.org/schema/beans http://www.springframework.org/schema/beans/spring-beans.xsd">

	<!-- 접근자를 이용한 DI -->
	<bean class="com.Bzeromo.di.Laptop" id="laptop"/>
	<bean class="com.Bzeromo.di.Programmer" id="programmer">
		<!-- setter 메서드에서 set을 빼고 대문자를 소문자로 바꾼 것이 프로퍼티의 name -->
		<property name="computer" ref="laptop"></property>
	</bean>

</beans>
🖥 applicationContext.xml
package com.Bzeromo.di;

import org.springframework.context.ApplicationContext;
import org.springframework.context.support.GenericXmlApplicationContext;

public class Test {
	public static void main(String[] args) {
		ApplicationContext context = new GenericXmlApplicationContext("applicationContext.xml");

		Programmer p = (Programmer)context.getBean("programmer");

		p.coding();
	}
}
💡 그 외에 ref 대신 value를 이용한 Inner bean 방식, Collection(list, set, map, props)을 이용한 의존관계 설정 등이 있다. 여기서는 일단 생략한다.
⭐ Annotation 방식
- 빈(Bean) 생성 및 설정 (
@Component)
🖥 Desktop
package com.Bzeromo.di;

import org.springframework.stereotype.Component;

@Component
public class Desktop implements Computer {
	public String getInfo() {
		return "데스크탑";
	}
}- Bean 생성:
@Component - 생성되는 bean의 이름은 첫 글자를 소문자로 바꾼 것이다.
💡 @Component(value="bean-name")으로 이름 지정 가능
- 스프링은
@Component,@Service,@Controller,@Repogitory의 Stereotype Annotation을 제공한다.
🖥 applicationContext.xml
<?xml version="1.0" encoding="UTF-8"?>
<beans xmlns="http://www.springframework.org/schema/beans"
	xmlns:xsi="http://www.w3.org/2001/XMLSchema-instance"
	xmlns:context="http://www.springframework.org/schema/context"
	xsi:schemaLocation="http://www.springframework.org/schema/beans http://www.springframework.org/schema/beans/spring-beans.xsd
		http://www.springframework.org/schema/context http://www.springframework.org/schema/context/spring-context-4.3.xsd">
	<!-- 애너테이션 방식으로 Bean을 등록, 의존성 설정을 위해서 대상 패키지를 지정 -->
	<context:component-scan base-package="com.Bzeromo.di"></context:component-scan>

</beans>
🖥 Programmer
package com.Bzeromo.di;

import org.springframework.beans.factory.annotation.Autowired;
import org.springframework.beans.factory.annotation.Qualifier;
import org.springframework.stereotype.Component;

// 의존성 주입 방법에는 3가지가 있다.
@Component("p")
public class Programmer {
	// 1. 필드에 주입 (애너테이션을 통해 컴포넌트 지정을 한 클래스가 겹칠 경우 오류가 터질수 있으니 Qualifier로 지정)
//	@Autowired
//	@Qualifier("laptop")
	private Computer computer;

	public Programmer() {}

	// 2. 생성자에 주입
	// 생성자를 하나만 정의한다면 @Autowired 생략이 가능하다!
//	@Autowired
	public Programmer(Computer computer) {
		this.computer = computer;
	}

	public Computer getComputer() {
		return computer;
	}

	// 3. 설정자(setter)에 주입
	@Autowired
	public void setComputer(@Qualifier("laptop")Computer computer) {
		this.computer = computer;
	}

	public void coding() {
		System.out.println(computer.getInfo()+"으로 개발해요.");
	}
}
🖥 Test
package com.Bzeromo.di;
import org.springframework.context.ApplicationContext;
import org.springframework.context.support.GenericXmlApplicationContext;
public class Test {
public static void main(String[] args) {
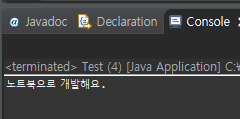
ApplicationContext context = new GenericXmlApplicationContext("applicationContext.xml");
Programmer p = (Programmer)context.getBean("p");
p.coding();
}
}
오래전에 스터디했던 그 스프링이 맞나 싶을 정도로 가물가물하다...
앞으로의 배움에서 얼마나 고난이 펼쳐질지 모르겠다.