
⚡ Vue Basic Syntax (1)
📌 Templet Syntax
🔷 DOM을 기본 구성 요소 인스턴스 데이터에 선언적으로 바인딩할 수 있는 HTML 기반 템플릿 구문을 사용
⭐ Template Syntax 종류
1. Text Interpolation
<p>Message: {{ msg }}</p>- 데이터 바인딩의 가장 기본적인 형태
- 이중 중괄호 구문 (콧수염 구문)을 사용
- 콧수염 구문은 해당 구성 요소 인스턴스의 msg 속성 값으로 대체
- msg 속성이 변경될 때마다 업데이트 됨
2. Raw HTML
<div v-html="rawHtml"></div>const rawHtml = ref('<span style="color:red">This should be red.</span>')- 콧수염 구문은 데이터를 일반 텍스트로 해석하기 때문에 실제 HTML을 출력하려면 v-html을 사용해야 함
❗ 웹사이트에서 임의의 HTML을 동적으로 렌더링하면 XSS 취약점이 쉽게 발생할 수 있다. 이는 매우 위험하기 때문에 사용자가 제공한 컨텐츠에서의 사용은 금지한다.
3. Attribute Bindings
<div v-bind:id="dynamicId"></div>const dynamicId = ref('my-id')- 콧수염 구문은 HTML 속성 내에서 사용할 수 없기 때문에 v-bind를 사용
- HTML의 id 속성 값을 vue의 dynamicId 속성과 동기화 되도록 함
- 바인딩 값이 null 이나 undefind 인 경우 렌더링 요소가 제거됨
4. JavaScript Expressions
{{ number + 1 }}
{{ ok ? 'YES' : 'NO’ }}
{{ message.split('').reverse().join('') }}
<div :id="`list-${id}`"></div>- Vue는 모든 데이터 바인딩 내에서 JavaScript 표현식의 모든 기능을 지원
- Vue 템플릿에서 JavaScript 표현식을 사용할 수 있는 위치
- 콧수염 구문 내부
- 모든 directive의 속성 값 (v-로 시작하는 특수 속성)
❗표현식 주의사항❗
각 바인딩에는 하나의 단일 표현식만 포함될 수 있다.
표현식이 아닌 선언식이나 if 같은 흐름제어도 작동하지 않는다.
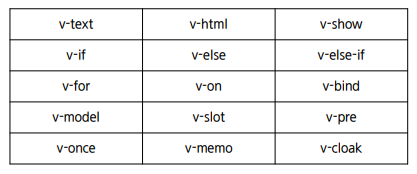
⭐ Directive
🔷 v- 접두사가 있는 특수 속성
<p v-if="seen">Hi There</p>- Directive의 속성 값은 단일 JavaScript 표현식이어야 함 (v-for, v-on 제외)
- 표현식 값이 변경될 때 DOM에 반응적으로 업데이트를 적용
ex) v-if 는 seen 표현식 값의 T/F 를 기반으로 \요소를 제거 / 삽입
🔷 Directive 전체 구문

🔷 Arguments
<a v-bind:href="myUrl">Link</a>- 일부 directive 는 directive 뒤에 콜론(:) 으로 표시되는 인자를 사용할 수 있음
- 위 예시의 href는 HTML <a> 요소의 href 속성 값을 myUrl 값에 바인딩 하도록 하는 v-bind 인자
<button v-on:click="doSomething">Button</button>- 위 예시의 click은 이벤트 수신할 이벤트 이름을 작성하는 v-on 의 인자
🔷 Modifiers
- . (dot) 로 표시되는 특수 접미사로, directive가 특별한 방식으로 바인딩 되어야 함을 나타냄
- 예를 들어 .prevent는 발생한 이벤트에서
event.preventDefault()를 호출하도록
v-on에 지시하는 modifier
<form @submit.prevent="onSubmit">...</form>🔷 Built-in Directives
(참고 링크) Vue 공식 페이지 중
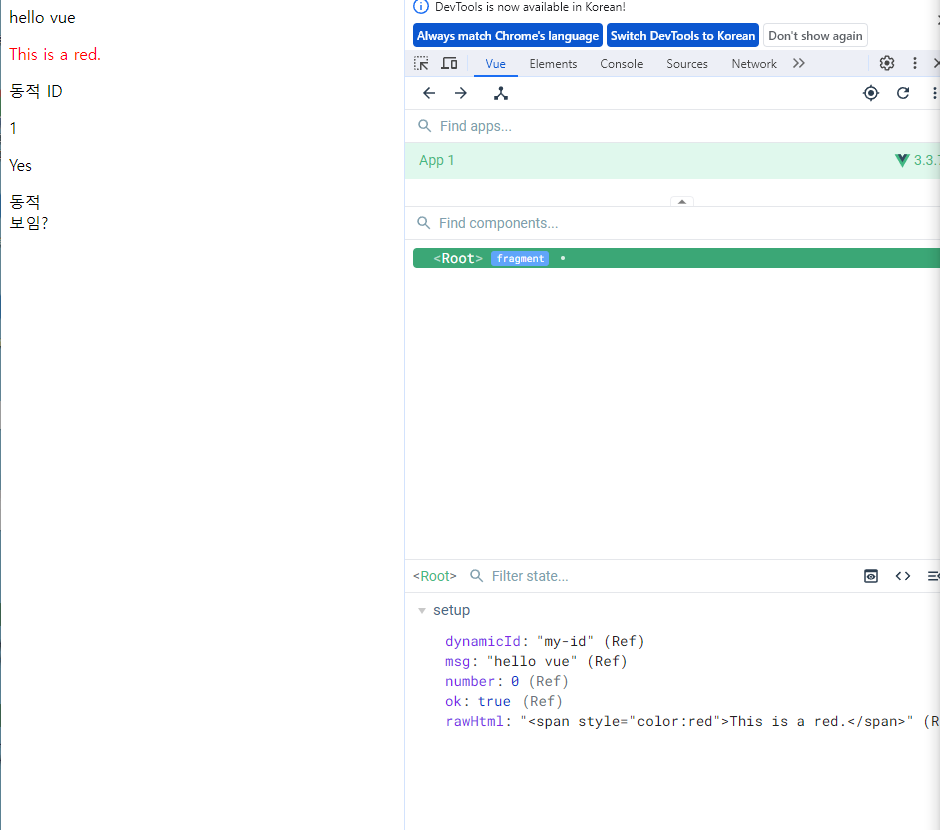
🖥 template-syntax.html
<!DOCTYPE html>
<html lang="ko">
  <head>
    <meta charset="UTF-8" />
    <title>Vue</title>
    <script src="https://unpkg.com/vue@3/dist/vue.global.js"></script>
  </head>

  <body>
    <div id="app">
      <!-- 기본 구문 콧수염 방식으로 꺼내오기 -->
      <p>{{msg}}</p>
      <!-- html 요소 v-html로 가져오기 -->
      <p v-html="rawHtml"></p>
      <!-- 동적 Id 부여 -->
      <div v-bind:id="dynamicId">동적 ID</div>
      <!-- JS expressions -->
      <p>{{number+1}}</p>
      <p>{{ok ? 'Yes' : 'No'}}</p>
      <div :id="`list-${number}`">동적</div>
      <div v-if="ok">보임?</div>
    </div>
    <script>
      const { createApp, ref } = Vue;

      const app = createApp({
        setup() {
          const msg = ref("hello vue");
          const rawHtml = ref('<span style="color:red">This is a red.</span>');
          const dynamicId = ref("my-id");
          const number = ref(0);
          const ok = ref(false);
          return {
            msg,
            rawHtml,
            dynamicId,
            number,
            ok,
          };
        },
      });
      app.mount("#app");
    </script>
  </body>
</html>
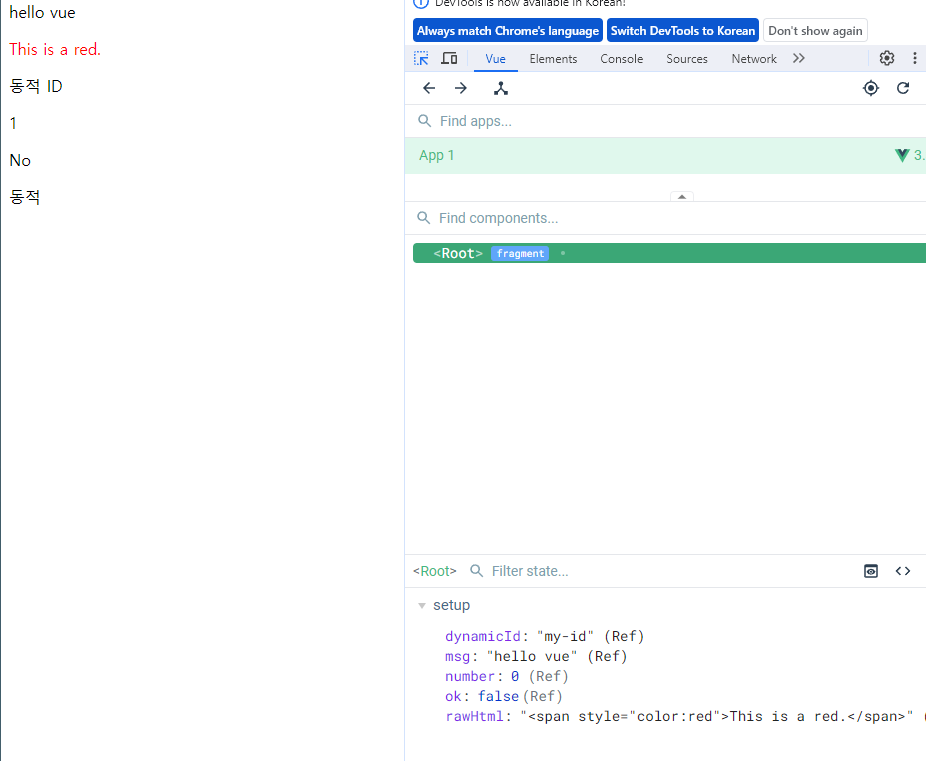
setup을 통해 ok를 true로 설정하면 변화한다.
📌 Dynamically data binding
⭐ v-bind
🔷하나 이상의 속성 또는 컴포넌트 데이터를 표현식에 동적으로 바인딩
1. Attribute Bindings
- HTML 의 속성 값을 Vue의 상태 속성 값과 동기화 되도록 함
<!-- v-bind.html -->
<img v-bind:src="imageSrc">
<a v-bind:href="myUrl">Move to url</a>- v-bind shorthand (약어) →
: (colon)
<img :src="imageSrc">
<a :href="myUrl">Move to url</a>- Dynamic attribute name (동적 인자 이름)
- 대괄호로 감싸서 directive argument에 JavaScript 표현식을 사용할 수도 있음
- JavaScript 표현식에 따라 동적으로 평가된 값이 최종 argument 값으로 사용됨
<button :[key]="myValue"></button>🖥 V-bind.html
<!DOCTYPE html>
<html lang="ko">
  <head>
    <meta charset="UTF-8" />
    <title>Vue</title>
    <script src="https://unpkg.com/vue@3/dist/vue.global.js"></script>
  </head>

  <body>
    <div id="app">
      <img :src="imageSrc" />
      <a :href="myUrl">MyUrl 이동</a>
      <p :[dynamicattr]="dynamicValue">...</p>
    </div>
    <script>
      const { createApp, ref } = Vue;

      const app = createApp({
        setup() {
          const imageSrc = ref("https://picsum.photos/200");
          const myUrl = ref("https://www.google.com");
          const dynamicattr = ref('title')
          const dynamicValue = ref('Hello Vue.js')

          return {
            imageSrc,
            myUrl,
            dynamicattr,
            dynamicValue,

          };
        },
      });
      app.mount("#app");
    </script>
  </body>
</html>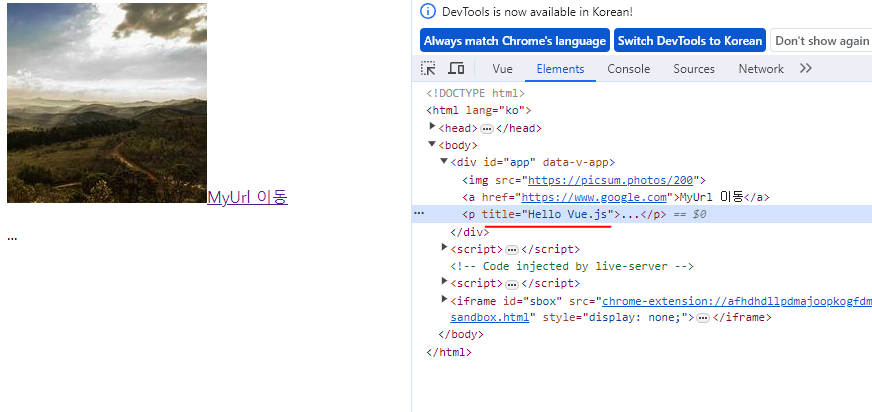
2. Class and Style Bindings
🔷 클래스와 스타일은 모두 속성이므로 v-bind를 사용하여 다른 속성과 마찬가지로 동적으로 문자열 값을 할당할 수 있음
- 그러나 단순히 문자열 연결을 사용하여 이러한 값을 생성하는 것은 번거롭고 오류가 발생하기가 쉬움
- Vue는 클래스 및 스타일과 함께 v-bind를 사용할 때 객체 또는 배열을 활용한 개선 사항을 제공
1) Binding HTML Classes
🔷 Binding to Objects: 객체를 :class 에 전달하여 클래스를 동적으로 전환할 수 있음
예시) isActive 의 T/F에 의해 active 클래스의 존재가 결정됨
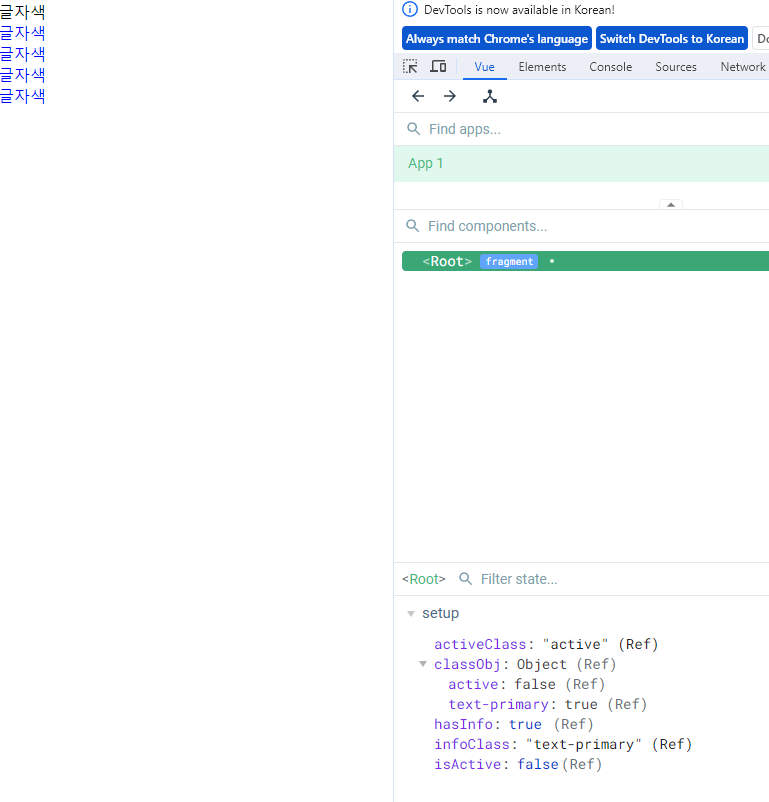
const isActive = ref(false)<div :class="{ active: isActive }">Text</div>- 객체에 더 많은 필드를 포함하여 여러 클래스를 전환할 수 있음
예시) :class directive를 일반 클래스 속성과 함께 사용 가능
const isActive = ref(false)
const hasInfo = ref(true)<div class="static" :class="{ active: isActive, 'text-primary': hasInfo }">Text</div>- 반드시 inline 방식으로 작성하지 않아도 됨
const isActive = ref(false)
const hasInfo = ref(true)
// ref는 반응 객체의 속성으로 액세스되거나 변경될 때 자동으로 unwrap
const classObj = ref({
  active: isActive,
  'text-primary': hasInfo
})<div class="static" :class="classObj">Text</div>🔷 Binding to Arrays
:class를 배열에 바인딩하여 클래스 목록을 적용할 수 있음
const activeClass = ref('active')
const infoClass = ref('text-primary')<div :class="[activeClass, infoClass]">Text</div>- 배열 구문 내에서 객체 구문 사용
<div :class="[{ active: isActive }, infoClass]">Text</div>🖥 binding-html-classes.html
<!DOCTYPE html>
<html lang="ko">
  <head>
    <meta charset="UTF-8" />
    <title>Vue</title>
    <style>
      .active {
        color: crimson;
      }

      .text-primary {
        color: blue;
      }
    </style>
    <script src="https://unpkg.com/vue@3/dist/vue.global.js"></script>
  </head>

  <body>
    <div id="app">
      <div :class="{active: isActive}">글자색</div>
      <div class="static" :class="{active: isActive, 'text-primary': hasInfo}">글자색</div>
      <div :class="classObj">글자색</div>
      <div :class="[activeClass, infoClass]">글자색</div>
      <div :class="[{active: isActive}, infoClass]">글자색</div>
    </div>
    <script>
      const { createApp, ref } = Vue;

      const app = createApp({
        setup() {
          const isActive = ref(false);
          const hasInfo = ref(true);

          //ref는 반응 객체의 속성으로 액세스되거나 변경될 때 자동으로 unwrap
          const classObj = ref({
            active: isActive,
            'text-primary': hasInfo,
          });

          const activeClass = ref('active');
          const infoClass = ref('text-primary');

          return {
            isActive,
            hasInfo,
            classObj,
            activeClass,
            infoClass,
          };
        },
      });
      app.mount("#app");
    </script>
  </body>
</html>
isActive와 hasInfo의 true, false에 따라 이리저리 바뀐다.
2. Binding Inline Styles
🔷 Binding to Objects
:style은 JavaScript 객체 값에 대한 바인딩을 지원 (HTML style 속성에 해당)
const activeColor = ref('crimson')
const fontSize = ref(50)<div :style="{ color: activeColor, fontSize: fontSize + 'px' }">Text</div>- 실제 CSS에서 사용하는 것처럼
:style은 kebab-cased 키 문자열도 지원 (단, camelCase 작성 권장)
<div :style="{ 'font-size': fontSize + 'px' }">Text</div>- 템플릿을 더 깔끔하게 작성하려면 스타일 객체에 직접 바인딩하는 것을 권장
const styleObj = ref({
  color: activeColor,
  fontSize: fontSize.value + 'px'
})<div :style="styleObj">Text</div>🔷 Binding to Arrays
- 여러 스타일 객체의 배열에
:style을 바인딩할 수 있음 - 작성한객체는 병합되어 동일한 요소에 적용
const styleObj2 = ref({
  color: 'blue',
  border: '1px solid black'
})<div :style="[styleObj, styleObj2]">Text</div>🖥 binding-inline-styles.html
<!DOCTYPE html>
<html lang="ko">
  <head>
    <meta charset="UTF-8" />
    <title>Vue</title>
    <script src="https://unpkg.com/vue@3/dist/vue.global.js"></script>
  </head>

  <body>
    <div id="app">
      <div :style="{color: activeColor, fontSize: fontSize+'px'}">글자</div>
      <!-- kebap 케이스로도 가능하다 (하지만 카멜 케이스 권장) -->
      <div :style="{'font-size': fontSize+'px'}">글자</div>
      <div :style="styleObj">글자</div>
      <div :style="[styleObj, styleObj2]">글자</div>
    </div>
    <script>
      const { createApp, ref } = Vue;

      const app = createApp({
        setup() {
          const activeColor = ref("crimson");
          const fontSize = ref(50);
          const styleObj = ref({
            color: activeColor,
            fontSize: fontSize.value + "px",
          });
          const styleObj2 = ref({
            color: "blue",
            border: "1px solid black",
          });

          return {
            activeColor,
            fontSize,
            styleObj,
            styleObj2,
          };
        },
      });
      app.mount("#app");
    </script>
  </body>
</html>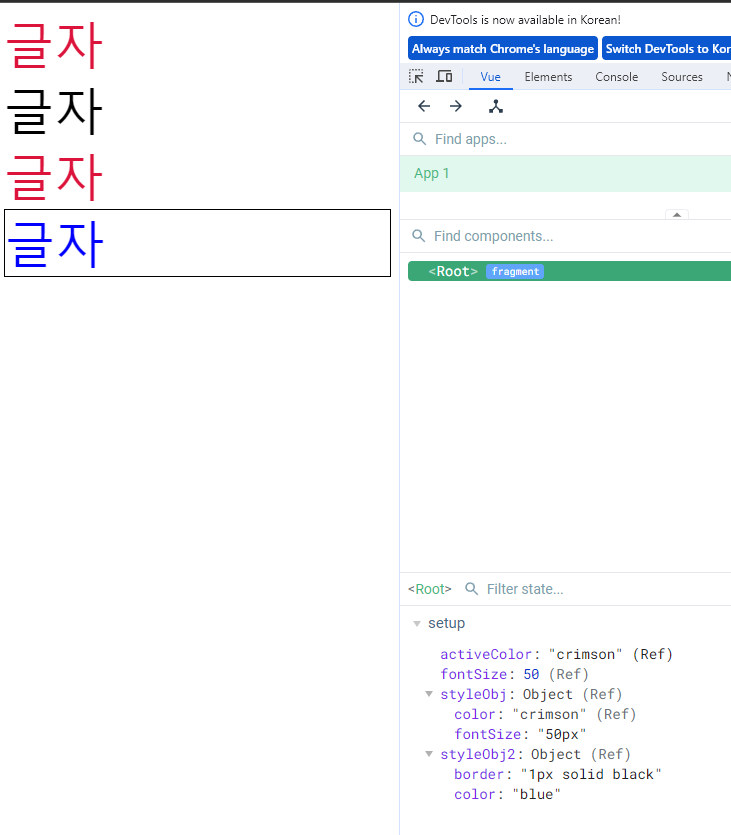
📌 Event Handling
🔷 v-on: DOM 요소에 이벤트 리스너를 연결 및 수신
🔷 v-on shorthand (약어) → @
v-on:event="handler"
//or
@event="handler"
🔷 handler 종류
1. Inline handlers : 이벤트가 트리거 될 때 실행 될 JavaScript 코드
- 주로 간단한 상황에 사용
const count = ref(0)<button @click="count++">Add</button>
<p>Count: {{ count }}</p>2. Method handlers : 컴포넌트에 정의된 메서드 이름
- Inline Handlers로는 불가능한 대부분의 상황에서 사용
const name = ref('Alice')
const myFunc = function (event) {
  console.log(event)
  console.log(event.target)
  console.log(`Hello ${name.value}!`)
}<button @click="myFunc">Hello</button>- Method Handlers는 이를 트리거 하는 기본 DOM Event 객체를 자동으로 수신
- 메서드 이름에 직접 바인딩 하는 대신 Inline Handlers에서 메서드를 호출할 수도 있는데 기본 이벤트 대신 사용자 지정 인자를 전달할 수 있음
const greeting = function (message) {
  console.log(message)
}<button @click="greeting('hello')">Say hello</button>
<button @click="greeting('bye')">Say bye</button>🔷 Inline Handlers에서의 event 인자에 접근하기
- $event 변수를 사용하여 메서드에 전달
const warning = function (message, event) {
  console.log(message)
  console.log(event)
}<button @click="warning('경고입니다.', $event)">Submit</button>🔷 Event Modifiers
- Vue는 v-on에 대한 Event Modifiers를 제공해
event.preventDefault()와 같은 구문을 메서드에서 작성하지 않도록 함 - stop, prevent, self 등 다양한 modifiers를 제공
- 메서드는 DOM 이벤트에 대한 처리보다는 데이터에 관한 논리를 작성하는 것에 집중할 것
<form @submit.prevent="onSubmit">...</form>
<a @click.stop.prevent="onLink">...</a>
❗ Modifiers는 chained 되게끔 작성할 수 있으며 이때는 작성된 순서로 실행되기 때문에 작성 순서에 유의한다.
🔷 Key Modifiers
- Vue는 키보드 이벤트를 수신할 때 특정 키에 관한 별도 modifiers를 사용할 수 있음
예시) key가 Enter 일 때만 onSubmit 이벤트를 호출하기
<input @keyup.enter="onSubmit">🖥 event-handling.html
<!DOCTYPE html>
<html lang="ko">
  <head>
    <meta charset="UTF-8" />
    <title>Vue</title>
    <script src="https://unpkg.com/vue@3/dist/vue.global.js"></script>
  </head>

  <body>
    <div id="app">
      <!-- inline -->
      <p>Count: {{count}}</p>
      <button @click="count++">증가</button>
      <button @click="count--">감소</button>
      <!-- 메서드 -->
      <button @click="myFunc">메서드 동작</button>
      <button @click="greeting('해윙~')">해윙~</button>
      <button @click="warning('보', $event)">보</button>
      <a @click.stop.prevent="onLink" href="https://www.google.com">링크</a>

      <input type="text" @keyup.enter="onSubmit" />
    </div>
    <script>
      const { createApp, ref } = Vue;

      const app = createApp({
        setup() {
          const count = ref(0);
          const name = ref("Alice");

          const myFunc = (event) => {
            alert(event);
            console.log(event.target);
            console.log(`Hello ${name.value}`);
          };

          const greeting = (message) => {
            console.log(message)
          };

          const warning = (message, event) => {
            console.log(message);
            console.log(event);
          };

          const onLink = () => {
            console.log("link click")
          };

          const onSubmit = () => {
            console.log("onSubmit");
          };

          return {
            count,
            name,
            myFunc,
            greeting,
            warning,
            onLink,
            onSubmit,
          };
        },
      });
      app.mount("#app");
    </script>
  </body>
</html>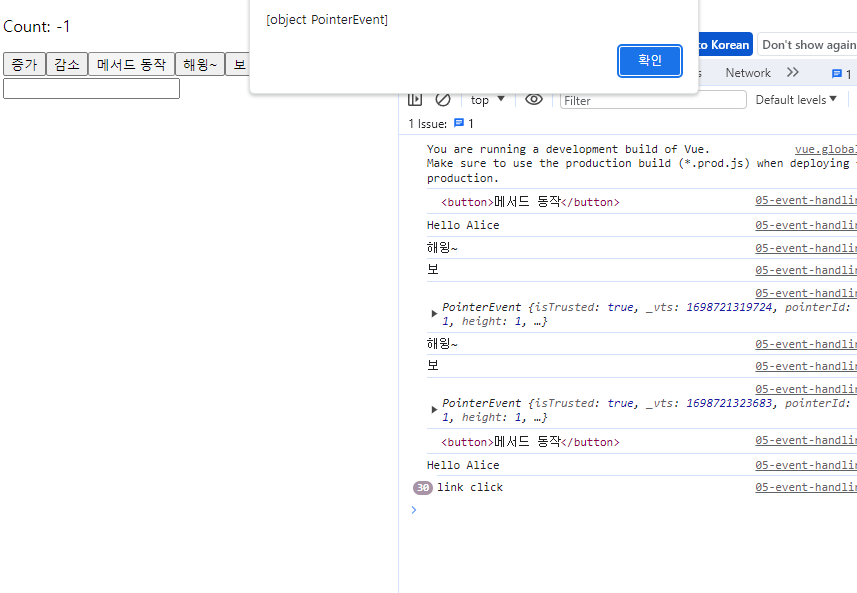
다양한 메서드를 동작시켜볼 수 있다.
📌 Form Input Bindings
🔷 form을 처리할 때 사용자가 input에 입력하는 값을 실시간으로 JavaScript 상태에 동기화해야 하는 경우, 양방향 바인딩을 필요로 한다.
🔷 양방향 바인딩 방법
1. v-bind와 v-on을 함께 사용
v-bind를 사용하여 input 요소의 value 속성 값을 입력 값으로 사용v-on을 사용하여 input 이벤트가 발생 할 때마다 input 요소의 value 값을
별도 반응형 변수에 저장하는 핸들러 호출
const inputText1 = ref(‘’)
const onInput = function (event) {
	inputText1.value = event.currentTarget.value
}<p>{{ inputText1 }}</p>
<input :value="inputText1" @input="onInput">2. v-model 사용
v-model: form input 요소 또는 컴포넌트에서 양방향 바인딩을 만듦v-model을 사용하여 사용자 입력 데이터와 반응형 변수를 실시간 동기화
const inputText2 = ref('')<p>{{ inputText2 }}</p>
<input v-model="inputText2">- 단점으로, IME(입력기)가 필요한 언어 (한국어, 중국어, 일본어 등)의 경우 v-model이 제대로 업데이트 되지 않음
- 해당 언어에 대해 올바르게 응답하려면 v-bind와 v-on 방법을 사용해야 함
💡 IME (Input Method Editor)
사용자가 입력 장치에서 기본적으로 사용할 수 없는 문자(비영어권 언어)를 입력할 수 있도록 하는 운영체제 구성 프로그램으로 일반적으로 키보드 키보다 자모가 더 많은 언어에서 사용해야 한다. IME가 동작하는 방식과 Vue의 V-model 동작 방식이 상충하여 한국어 입력 시 예상대로 동작하지 않게 된다.
🖥 form-input-bindings.html
<!DOCTYPE html>
<html lang="ko">
  <head>
    <meta charset="UTF-8" />
    <title>Vue</title>
    <script src="https://unpkg.com/vue@3/dist/vue.global.js"></script>
  </head>

  <body>
    <div id="app">
      <input type="text" @input="onInput"/>
      <p>{{inputText1}}</p>
      <hr>
      <input type="text" v-model="inputText2"/>
      <p>{{inputText2}}</p>
    </div>
    <script>
      const { createApp, ref } = Vue;

      const app = createApp({
        setup() {
          const inputText1 = ref("");
          const inputText2 = ref("");

          const onInput = () => {
            inputText1.value = event.currentTarget.value;
          };

          return {
            inputText1,
            inputText2,
            onInput,
          }
        },
      });
      app.mount("#app");
    </script>
  </body>
</html>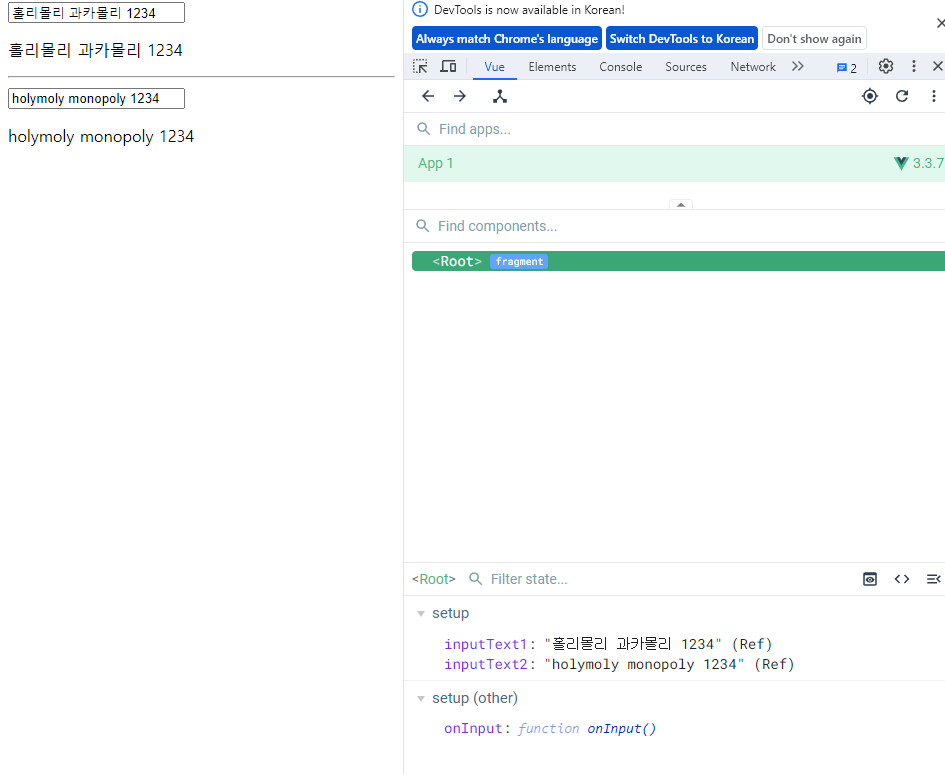
실시간으로 input 안의 텍스트에 맞춰 output이 변화한다.
🔷 v-model과 다양한 입력(input) 양식
- v-model은 단순 text input 뿐만 아니라 Checkbox, Radio, Select 등
다양한 타입의 사용자 입력 방식과 함께 사용 가능
🖥 v-model.html
<!DOCTYPE html>
<html lang="ko">
  <head>
    <meta charset="UTF-8" />
    <title>Vue</title>
    <script src="https://unpkg.com/vue@3/dist/vue.global.js"></script>
  </head>

  <body>
    <div id="app">
      <input type="checkbox" v-model="checked" id="check"/>
      <label for="check">{{checked}}</label>
      <hr>
      <div>Checkednames : {{checkedNames}}</div>
      <input type="checkbox" id="alice" value="alice" v-model="checkedNames" />
      <label for="alice">Alice</label>

      <input type="checkbox" id="bella" value="bella" v-model="checkedNames" />
      <label for="bella">bella</label>

      <input type="checkbox" id="Bzeromo" value="Bzeromo" v-model="checkedNames" />
      <label for="Bzeromo">Bzeromo</label>

      <hr>
      <select v-model="selected" multiple>
        <option value="" disabled>선택 해보소</option>
        <option>Alice</option>
        <option>Bella</option>
        <option>Bzeromo</option>
        <option>Kevin</option>
      </select>
      <div>{{selected}}</div>
    </div>
    <script>
      const { createApp, ref } = Vue;

      const app = createApp({
        setup() {
          const checked = ref(false);
          const checkedNames = ref([]);
          const selected = ref("");

          return {
            checked,
            checkedNames,
            selected,
          };
        },
      });
      app.mount("#app");
    </script>
  </body>
</html>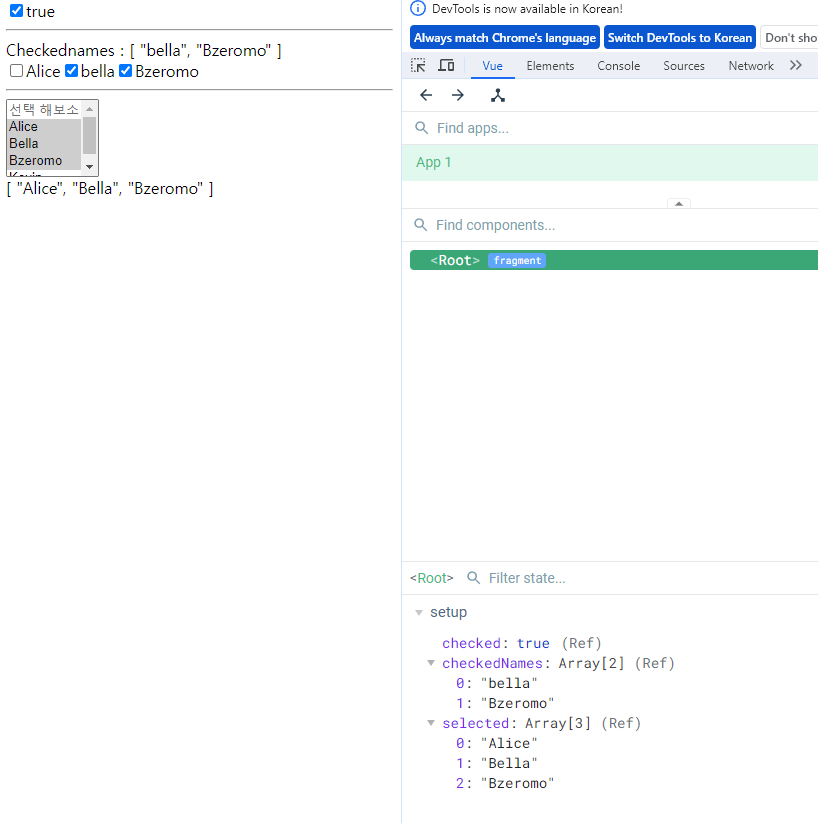
리액트보다 이해하기 쉬운건 기분탓?
아니면 리액트와 비슷하기 때문에 이해하기 쉬운 것?