
⚡ 자바스크립트의 각종 비동기 작업 제어 방식
📌 Promise
🔷 비동기 작업을 제어하기 위해 나온 개념이자 함수
- 콜백지옥에서 어느정도 벗어날 수 있게 해준다.
- Promise로 정의된 작업끼리는 연결할 수 있으며, 이를 통해 코드의 depth가 크게 증가하지 않는 효과가 있다.
function asyncPromiseWork() {
    // 이런저런 코드들
    //
    const promise = new Promise((resolve, reject) => {
        // promise 내부에서 비동기 상황이 종료될 때, resolve 함수 호출
        // promise 내부에서 오류 상황일 때, reject 함수 호출
        return resolve('complete')
    })
}
// then의 result에는 resolve를 호출하며 넘긴 complete가 들어있음
asyncPromiseWork().then(result => console.log(result))- then을 이용해 비동기 작업 이후 실행할 작업을 지정한다.
- Promise의 then 내에서 promise를 return할 경우 이어진다.
- Promise chain 중 작업이 실패했을 경우, .catch로 잡을 수 있다.
- 성공과 실패 여부와 상관없이 호출해야하는 코드가 있다면 finally에서 처리한다.
promiseWork()
    .then(result => {
        return promiseNextWork(result)
    }).then(result => {
        return promiseThirdWork(result)
    }).then(result => {
        return promiseFinalWork(result)
    }).catch(e => {
        alert('Error!')
    }).finally(() => {
        alert('에러와 상관 없이 작업 종료')
    })
❗ catch를 안 넣을 경우 promise chain 중 에러가 발생했을 때 chain이 멈추니 넣는 것이 좋다.
- 기존의 콜백함수를 promise 형태로 만들 수 있다.
- resolve를 작업이 끝나는 순간에 호출한다.
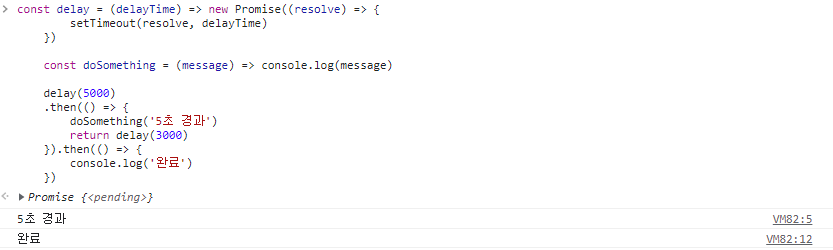
// 기존의 callback 함수를 promise 형태로 만들기
const delay = (delayTime) => new Promise((resolve) => {
    setTimeout(resolve, delayTime)
})

const doSomething = (message) => console.log(message)

delay(5000)
    .then(() => {
        doSomething('5초 경과')
        return delay(3000)
    }).then(() => {
        console.log('완료')
    })
🖨 출력 결과
🔷 Promise 내장 함수들
1) Promise.all(iterable)
- 여러 promise를 동시에 처리할 때 유용하다.
const promise1 = delay(1000)
const promise2 = delay(2000)
const promise3 = delay(3000)

Promise.all([promise1, promise2, promise3]).then(() => {
    // promise 1,2,3이 모두 처리된 후 호출
})
2) Promise.race(iterable)
- 여러 promise중 하나라도 resolve 혹은 reject되면 종료된다.
3) Promise.any(iterable)
- 여러 promise중 하나라도 resolve 되면 종료된다.
- race는 성공을 하든 실패를 하든 상관없지만 any는 reject를 무시한다.
4) Promise.allSettled(iterable)
- 여러 promise들이 성공했거나 실패했거나 상관없이 모두 이행된 경우를 처리한다.
5) Promise.resolve
- 주어진 값으로 이행하는 Promise.then 객체를 만든다.
- 주어진 값이 Promise인 경우 해당 Promise가 반환된다.
6) Promise.reject
- 주어진 값으로 reject 처리된 Promise.then 객체를 만든다.
- 주어진 값이 Promise인 경우 해당 Promise가 반환된다.
📌 async와 await
🔷 동기 코드처럼 보이게 짤 수 있지만 실행은 여전히 비동기로 실행되게 하는 키워드
- Promise가 콜백 depth를 1단계로 줄여주지만, 여전히 불편한 점을 두 키워드가 바로잡는다.
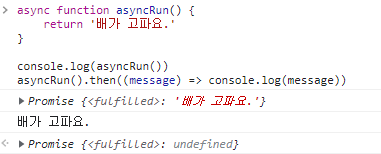
- async 키워드 함수가 붙은 함수는 실행 결과를 Promise로 감싼다.
- try-catch와 finally를 사용하여 promise의 .catch, .finally와 비슷하게 사용할 수 있다
async function asyncRun() {
    return '배가 고파요.'
}

console.log(asyncRun())
asyncRun().then((message) => console.log(message))
🖨 출력 결과
💡 기본적으로 await는 async로 감싸진 함수 scope에서만 사용 가능했지만, top level await가 등장하여 top level에서도 사용 가능하다.
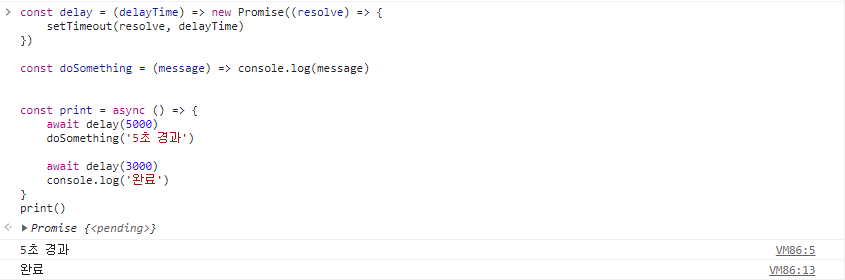
- 위의 setTimeout과 promise를 활용한 코드를 다음과 같이 더 보기 쉽게 바꿀 수 있다.
const delay = (delayTime) => new Promise((resolve) => {
    setTimeout(resolve, delayTime)
})

const doSomething = (message) => console.log(message)


const print = async () => {
    await delay(5000)
    doSomething('5초 경과')

    await delay(3000)
    console.log('완료')
}
print()
🖨 출력 결과
📌 fetch api
🔷 비동기 http 요청을 좀 더 쓰기 편하게 해주는 API
- XMLHTTPRequest를 대체한다.
- Promise 기반으로 동작한다.
- fetch의 기본 응답 결과는 Response 객체이다.
fetch('http://주소')
    .then(res => {
        return res.json
    })
    .then(data => {
        console.log(JSON.parse(data))
    })
- blob은 이미지를 처리하는데 쓸 수 있다.
fetch(imageUrl)
    .then(res => {
        return res.blob()
    })
    .then(blob => {
        console.log(blob)
        const objectURL = URL.createObjectURL(blob)
        console.log(objectURL)
        $image.src = objectURL

        document.querySelector('body').appendChild($image)
})- 존재하지 않는 API를 호출하는 등의 이유로 HTTP error가 발생하더라도 reject 되지 않는다.
❗ 네트워크 에러나 요청이 완료되지 못한 경우에만 reject 되기 때문에 response의 status code나 ok를 체크해주는 것이 좋다.
// res.ok는 status가 200~299 사이인 경우 true가 된다.
fetch('http://undefined.no.no/no-api')
    .then(res => {
        if(res.ok) {
            return res.json()
        }
        throw new Error('요청을 처리하지 못했음!')
    })
    .then(result => {
        console.log(result)
    })
.catch(e => alert(e.message))- fetch의 두 번째 인자로 옵션을 줄 수 있다.
const headers = new Headers()

headers.append('x-auth-token', 'TOKEN')

fetch('https://주소', {
    method: 'POST',
    headers,
    body: JSON.stringify(product)
})
머리가 아프다.
콜백함수부터 fetch까지 익숙해지도록 반복해서 코드를 볼 필요성이 느껴진다.

Hodie mihi, Cras tibi