Queue
interface Queue<T>
Java Collection 프레임워크에서 제공하는 interface
- enQueue →
add(), offer() - deQueue →
remove(), poll() - peek →
element(), peek()
기본 동작은 일치하지만, 오류 상황에서 동작이 다르다.
add(), remove(), element()→ 예외 발생offer(), poll(), peek()→ null 반환
구현체는 주로 LinkedList를 활용한다.
ArrayList와 LinkedList의 성능 비교
import java.util.ArrayList;
import java.util.LinkedList;
import java.util.List;

public class ListComparison {
    // ArrayList와 LinkedList의 성능비교
    public static void main(String[] args) {
        List<Object> arrayList = new ArrayList<>();
        List<Object> linkedList = new LinkedList<>();

        System.out.println("ArrayList");
        ListComparison.rearInsert(arrayList);
        ListComparison.frontInsert(arrayList);
        ListComparison.getElements(arrayList);

        System.out.println("LinkedList");
        ListComparison.rearInsert(linkedList);
        ListComparison.frontInsert(linkedList);
        ListComparison.getElements(linkedList);
    }

    // 1. 10000개의 데이터를 리스트에 순차적으로 삽입
    public static void rearInsert(List<Object> list) {
        long start = System.nanoTime();
        for (int i = 0; i < 10000; i++) {
            list.add("world");
        }
        long end = System.nanoTime();
        System.out.println(String.format("순차적 추가 소요시간: %15d ns", end - start));
    }

    // 2. 10000개의 데이터를 리스트의 앞에 삽입
    public static void frontInsert(List<Object> list) {
        long start = System.nanoTime();
        for (int i = 0; i < 10000; i++) {
            list.add(0, "hello");
        }
        long end = System.nanoTime();
        System.out.println(String.format("앞쪽에 추가 소요시간: %15d ns", end - start));
    }

    // 3. 리스트의 모든 원소를 순서(idx)를 바탕으로 조회
    public static void getElements(List<Object> list) {
        long start = System.nanoTime();
        for (int i = 0; i < list.size(); i++) {
            list.get(i);
        }
        long end = System.nanoTime();
        System.out.println(String.format("아이템 조회 소요시간: %15d ns", end - start));
    }
}
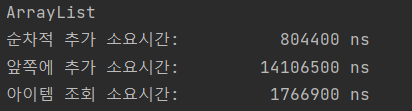
앞쪽에 추가 시간이 제일 많이 소요된다.
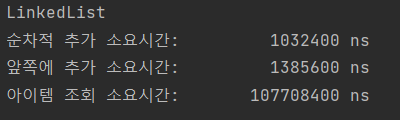
아이템 조회 시간이 제일 많이 소요된다.
LinkedList (연결 리스트)
각 노드가 데이터와 포인터를 가지고 한 줄로 연결되어 있는 방식의 데이터 구조이다.
-
노드 (node) : 데이터 구조를 구성하는 하나의 객체
-
포인터 (pointer) : 주소값을 저장하는 것으로 이 포인터가 다른 노드의 주소값을 저장하는 방식으로 노드들이 연결되어 있다.
List와 다르게 배열의 크기를 미리 정해주지 않고 필요할 때 마다 node를 추가하고 연결해 줌으로서 가변적인 상황에 대처할 수 있다.
public class MyLinkedList {
    private Node start;

    private static class Node {
        private int data;
        private Node link;

        public Node(int data) {
            this.data = data;
        }

        public Node(int data, Node link) {
            this.data = data;
            this.link = link;
        }
    }

    // add : 제일 뒤에 data 추가
    public void add(int data) {
        // 1. start == null (LinkedList가 비어있을 때)
        if (start == null) start = new Node(data);
        // 2. 아니라면, link가 null인 노드가 나올 때 까지
        else {
            Node head = start;
            while (head.link != null) {
                head = head.link;
            }

            // while이 끝났을 때, head.link == null이다. (마지막 노드이다)
            head.link = new Node(data);
        }
    }

    // remove : idx번째 데이터를 회수 및 노드 제거
    public int remove(int idx) {
        if (idx == 0) {
            int value = start.data;
            start = start.link;
            return value;
        }
        else {
            // 0이 아닐 때
            int i = 0;
            Node prev = start;
            Node head = start;
            while (i < idx) {
                prev = head;
                head = head.link;
                i++;
            }
            prev.link = head.link;
            return head.data;
        }
    }

    @Override
    public String toString() {
        StringBuilder builder = new StringBuilder("[");
        Node head = start;
        while (head != null) {
            builder.append(head.data);
            // link가 null이 아니라는건 뒤에 원소가 더 있다
            if (head.link != null) {
                builder.append(", ");
            }
            head = head.link;
        }
        builder.append("]");
        return builder.toString();
    }

    public static void main(String[] args) {
        MyLinkedList linkedList = new MyLinkedList();
        linkedList.add(1);
        linkedList.add(2);
        linkedList.add(3);
        System.out.println(linkedList);

        System.out.println(linkedList.remove(0));   // 1
        System.out.println(linkedList.remove(1));   // 3
        System.out.println(linkedList.remove(0));   // 2
    }
}
너비 우선 탐색 (BFS)
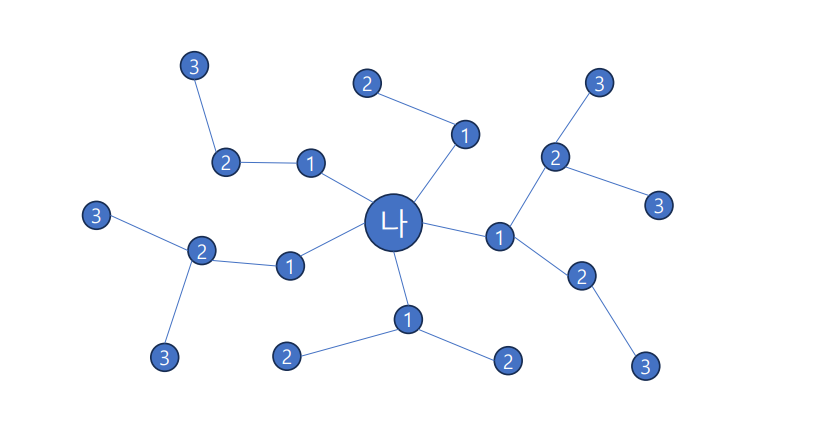
루트 노드 또는 임의의 노드에서 시작하여, 일정 노드와 인접한 노드들을 우선으로 탐색하는 방법이다.
-
시작 정점으로부터 가까운 정점을 먼저 방문하고 멀리 떨어져 있는 정점을 나중에 방문하는 순회 방법
-
사용하는 경우 두 노드 사이의 최단 경로 혹은 임의의 경로를 찾고 싶을 때
-
BFS는 시작 노드에서 시작해서 거리에 따라 단계별로 탐색한다.
-
방문한 노드들을 차례로 저장한 후 꺼낼 수 있는 자료구조인 큐(Queue)를 사용한다.
import java.io.BufferedReader;
import java.io.IOException;
import java.io.InputStreamReader;
import java.util.ArrayList;
import java.util.LinkedList;
import java.util.List;
import java.util.Queue;
public class BreadthFirstSearch {
public void solution() throws IOException {
BufferedReader reader = new BufferedReader(new InputStreamReader(System.in));
int maxNodes = Integer.parseInt(reader.readLine());
// 인접 정보 저장용
int[][] adjMap = new int[maxNodes + 1][maxNodes + 1];
String[] edges = reader.readLine().split(" ");
for (int i = 0; i < edges.length / 2; i++) {
int leftNode = Integer.parseInt(edges[i * 2]); // 0, 2, 4, ...
int rightNode = Integer.parseInt(edges[i * 2 + 1]); // 1, 3, 5, ...
adjMap[leftNode][rightNode] = 1;
adjMap[rightNode][leftNode] = 1;
}
// BFS
// 다음 방문 대상 기록용 Queue
Queue<Integer> toVisit = new LinkedList<>();
List<Integer> visitedOrder = new ArrayList<>();
// 방문 기록용 boolean[]
boolean[] visited = new boolean[maxNodes + 1];
int next = 1;
toVisit.offer(next);
// 큐가 비어있지 않은 동안 반복
while (!toVisit.isEmpty()) {
// 다음 방문 정점 회수
next = toVisit.poll();
// 이미 방문했다면 다음 반복으로
if (visited[next]) continue;
// 방문했다 표시
visited[next] = true;
// 방문한 순서 기록
visitedOrder.add(next);
// 다음 방문 대상을 검색한다.
for (int i = 0; i < maxNodes + 1; i++) {
// adjMap[next]가 담고 있는 배열은
// idx 번째가 1인 경우 idx에 연결되어있다는 의미
if (adjMap[next][i] == 1 && !visited[i]) toVisit.offer(i);
}
}
// 출력
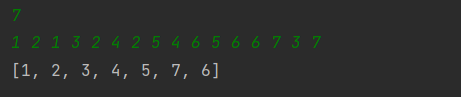
System.out.println(visitedOrder);
}
public static void main(String[] args) throws IOException {
new BreadthFirstSearch().solution();
}
}
/*
7
1 2 1 3 2 4 2 5 4 6 5 6 6 7 3 7
*/
HTTP
Serialization (직렬화)
메모리 상에 저장된 데이터를 전송 가능한 형태로 바꾸는 작업
JSON
데이터를 주고받는데 활용할 수 있는 데이터 표현 방식
-
사람이 읽고 쓰기 쉽다.
-
기계가 파싱(해석)하고 만들기 편하다
-
거의 대부분의 API 통신에서 사용한다.
-
Java의 유사한 interface: Map<String, Object> (Map 자료구조)
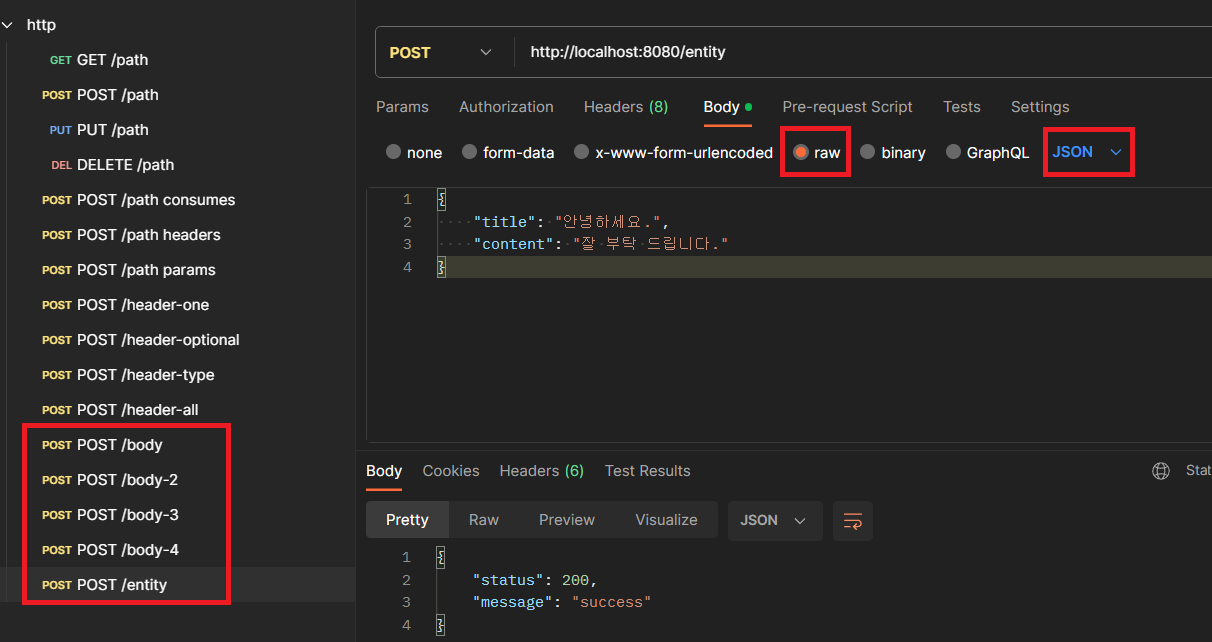
Postman Body JSON
BodyController
package com.example.http;
import com.example.http.dto.ArticleComplexDto;
import com.example.http.dto.ArticleDto;
import com.example.http.dto.ResponseDto;
import com.example.http.dto.WriterDto;
import lombok.extern.slf4j.Slf4j;
import org.springframework.http.HttpHeaders;
import org.springframework.http.HttpStatus;
import org.springframework.http.ResponseEntity;
import org.springframework.stereotype.Controller;
import org.springframework.web.bind.annotation.PostMapping;
import org.springframework.web.bind.annotation.RequestBody;
import org.springframework.web.bind.annotation.ResponseBody;
@Slf4j
@Controller
public class BodyController {
// '/body' 로 ArticleDto를 표현한 JSON과 함께 요청이 들어왔을 때,
// ResponseDto를 표현한 JSON을 포함해 응답하는 메소드
@PostMapping("/body")
@ResponseBody
public ResponseDto body(@RequestBody ArticleDto dto) {
log.info("POST /body " + dto.toString());
ResponseDto response = new ResponseDto();
response.setMessage("successs");
response.setStatus(200);
return response;
}
@PostMapping("/body-2")
@ResponseBody
public ResponseDto body2(@RequestBody WriterDto dto) {
log.info("POST /body-2 " + dto.toString());
ResponseDto response = new ResponseDto();
response.setMessage("success");
response.setStatus(200);
return response;
}
@PostMapping("/body-3")
@ResponseBody
public ResponseDto body3(@RequestBody ArticleDto dto) {
log.info("POST /body-3 " + dto.toString());
ResponseDto response = new ResponseDto();
response.setMessage("success");
response.setStatus(200);
return response;
}
@PostMapping("/body-4")
@ResponseBody
public ResponseDto body4(@RequestBody ArticleComplexDto dto) {
log.info("POST /body-4 " + dto.toString());
return new ResponseDto();
}
// @ResponseBody는 요청의 HTTP Body만 설정
// header를 추가하거나 Status code를 고르고 싶을 때
// ResponseEntity<T>
@PostMapping("/entity")
@ResponseBody
public ResponseEntity<ResponseDto> entity(@RequestBody ArticleDto dto) {
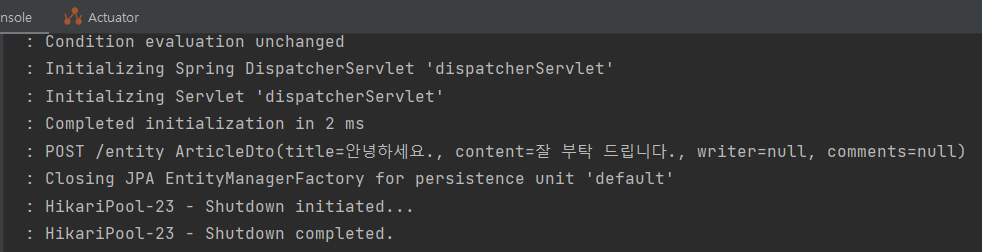
log.info("POST /entity " + dto.toString());
ResponseDto response = new ResponseDto();
response.setMessage("success");
response.setStatus(200);
// ResponseEntity 객체 그냥 쓰기
ResponseEntity<ResponseDto> responseEntity = new ResponseEntity<>(response, HttpStatus.ACCEPTED);
// return responseEntity;
// 커스텀 헤더 만들고 함께 응답하기
HttpHeaders headers = new HttpHeaders();
headers.add("x-likelion-custom", "Hello World!");
// return new ResponseEntity<>(response, headers, HttpStatus.ACCEPTED);
// Builder 사용하기
return ResponseEntity.status(HttpStatus.CREATED)
.header("x-likelion-one", "1")
.headers(headers)
.body(response);
}
}
ArticleDto
package com.example.http.dto;

import lombok.Data;

import java.util.List;

// 블로그 게시글
// 게시글 - 제목
// 게시글 - 내용
/*
{
    "title": "제목",
    "content": "content"
}
 */
@Data
public class ArticleDto {
    private String title;
    private String content;
    private String writer;
    private List<String> comments;
}
ResponseDto
package com.example.http.dto;

import lombok.Data;

// 일반적인 응답
// 상태
// 메시지
/*
{
    "status": 200,
    "message": "success"
}
 */
@Data
public class ResponseDto {
    private Integer status;
    private String message;
}
WriterDto
package com.example.http.dto;

import lombok.Data;

@Data
public class WriterDto {
    private String name;
    private Integer age;
    private String adress;
}
ArticleComplexDto
package com.example.http.dto;

import lombok.Data;

import java.util.List;

@Data
public class ArticleComplexDto {
    private String title;
    private String content;
    private WriterDto writer;
    private List<String> comments;
}
Postman
HTTP Annotation
@RequestBody
- HttpRequest의 본문 requestBody의 내용을 자바 객체로 매핑하는 역할
@ResponseBody
@ResponseBody어노테이션은 자바 객체를 HttpResponse의 본문 responseBody의 내용으로 매핑하는 역할
@RestController
-
컨트롤러 클래스에 적용되며, 해당 클래스의 모든 핸들러 메소드가 HTTP 응답 본문으로 변환되는 데 사용
-
@Controller와@ResponseBody의 조합을 단순화 하여 핸들러 메소드의 반환 값을 자동으로 HTTP 응답 본문으로 변환한다.
REST (REpresentational State Transfer)
- HTTP를 이용한 서버를 구현할 때 지켜야 하는 설계 원칙
- 서버와 클라이언트 사이의 결합성 감소에 목표를 둠
- 성능 향상
- 확장성 확보
- 사용 편의성 증대
REST 아키텍처의 6가지 원칙
- Client - Server Architecture
- Statelessness
- Cacheability
- Layered System
- Code on Demand (Optional)
- Uniform Interface
출처 : 멋사 백엔드 5기 5팀 '오'로나민C, 11팀 11번가
인사이트 타임
원소들의 곱과 합
https://school.programmers.co.kr/learn/courses/30/lessons/181929
class Solution {
    public int solution(int[] num_list) {
        int multi = 1;
        int sum = 0;
        for (int i = 0; i < num_list.length; i++) {
            multi *= num_list[i];
            sum += num_list[i];
        }
        if (multi < sum * sum) return 1;
        else return 0;
    }
}
정수 부분
https://school.programmers.co.kr/learn/courses/30/lessons/181850
class Solution {
    public int solution(double flo) {
        return (int) (flo);
    }
}
조건에 맞게 수열 변환하기 3
https://school.programmers.co.kr/learn/courses/30/lessons/181835
class Solution {
    public int[] solution(int[] arr, int k) {
        for (int i = 0; i < arr.length; i++) {
            if (k % 2 == 0) arr[i] = arr[i] + k;
            else arr[i] = arr[i] * k;
        }
        return arr;
    }
}
easy
review
매일 하는 말이지만 어렵다. 그냥 어렵다. 뭔 소린지 하나도 모르겠다 흑흑
큐는 어제보다 더 진화해서 날 패고 있고 JSON은 그저 코드만 따라칠 뿐 어제랑 비슷해서 나쁘진 않았는데 역시 주범은 알고리즘 자식임. 나만 어려워 하는 건가.. 다른 사람들도 어렵겠지? 솔직히 저 긴 로직을 어떻게 한 번에 이해하겠냐고 (강사님 빼고)
진짜 배울수록 프로젝트 기간이 두렵기만 하다. 앞으로 천천히 내가 따로 공부한다 쳐도 당장에 마주할 프로젝트를 해낼 수 있을까? 물론 죽이나 밥이되든 하겠지만 그저 두렵다. 하하 신이시여