멀티클라우드 구축해보기 - 1
Home - Oracle Cloud - AWS 연결
이전에 구성한 Oracle Cloud 환경을 기반으로, AWS와의 Site-to-Site VPN 연결을 추가로 구성하여 멀티클라우드 환경을 구축해보려 한다.
AWS의 경우 비용이 발생하는 리소스를 사용해야 하므로, Terraform을 활용하여 리소스의 생성과 삭제를 자동화하여 실습 비용을 최소화 하는 방법으로 진행할 예정이다.
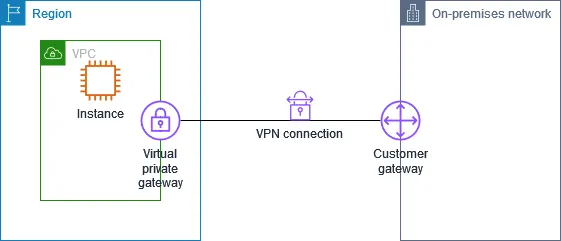
AWS 환경에 VPC, VGW를 생성하고 라우팅테이블을 이용해 Oracle, Home의 IP 대역을 VGW를 향하도록 구성할 것이다.
AWS 인프라 환경 구성
Terraform 작업 목록
- 네트워크 인프라
- VPC (Virtual Private Cloud)
- CIDR: 10.100.0.0/16
- DNS 지원 활성화
- 서브넷
- CIDR: 10.100.0.0/24
- 가용영역: ap-northeast-2a
- 퍼블릭 IP 자동 할당 활성화
- 인터넷 게이트웨이
- VPC에 연결되어 인터넷 접속 제공
- 라우팅 테이블
- 인터넷 게이트웨이로의 기본 라우트 (0.0.0.0/0)
- 온프레미스 네트워크로의 라우트 (10.200.0.0/16)
- 보안 설정
- 보안 그룹 구성(ingress)
- SSH (22)
- HTTP (80)
- HTTPS (443)
- Kubernetes NodePort (30000-32767)
- ICMP
- 온프레미스 네트워크와의 전체 통신 허용
- 컴퓨팅 리소스
- EC2 인스턴스
- t3.medium 타입
- 프라이빗 IP: 10.100.0.10
- Elastic IP 할당
- VPN 구성
- 고객 게이트웨이 (CGW)
- Oracle용 CGW
- WireGuard용 CGW
- VPN 게이트웨이 (VGW)
- VPC에 연결된 VPN 게이트웨이
- VPN 연결
- Oracle VCN과의 IPSec VPN 연결
- WireGuard와의 IPSec VPN 연결
- 키 관리
- SSH 키 페어
- 로컬 시스템의 SSH 공개키 사용
- 출력 값
- 설정된 출력
- EC2 인스턴스의 Elastic IP
- EC2 인스턴스 ID
- yaml 파일 코드
provider "aws" {
  region = "ap-northeast-2"
}

# 1. AWS VPC 생성
resource "aws_vpc" "aws_vpc" {
  cidr_block = "10.100.0.0/16"
  enable_dns_support   = true
  enable_dns_hostnames = true
  tags = {
    Name = "aws-vpc"
  }
}

# 2. AWS 서브넷 생성
resource "aws_subnet" "aws_subnet" {
  vpc_id                  = aws_vpc.aws_vpc.id
  cidr_block              = "10.100.0.0/24"
  map_public_ip_on_launch = true
  availability_zone       = "ap-northeast-2a"
  tags = {
    Name = "aws-subnet"
  }
}

# 3. AWS 인터넷 게이트웨이 생성
resource "aws_internet_gateway" "aws_igw" {
  vpc_id = aws_vpc.aws_vpc.id
  tags = {
    Name = "aws-internet-gateway"
  }
}

# 4. 기본 라우팅 테이블 수정 (인터넷 게이트웨이와 온프레미스 CIDR 추가)
resource "aws_route" "default_route_to_igw" {
  route_table_id         = aws_vpc.aws_vpc.default_route_table_id
  destination_cidr_block = "0.0.0.0/0"
  gateway_id             = aws_internet_gateway.aws_igw.id
}

resource "aws_route" "route_to_onprem_cidr" {
  route_table_id         = aws_vpc.aws_vpc.default_route_table_id
  destination_cidr_block = "10.200.0.0/16"  # 온프레미스 CIDR 블록
  gateway_id             = aws_vpn_gateway.aws_vpn_gateway.id
}

# 5. AWS 보안 그룹 생성
resource "aws_security_group" "aws_sg" {
  vpc_id = aws_vpc.aws_vpc.id

  ingress {
    description = "Allow SSH"
    from_port   = 22
    to_port     = 22
    protocol    = "tcp"
    cidr_blocks = ["0.0.0.0/0"]
  }

  ingress {
    description = "Allow HTTP"
    from_port   = 80
    to_port     = 80
    protocol    = "tcp"
    cidr_blocks = ["0.0.0.0/0"]
  }

  ingress {
    description = "Allow HTTPS"
    from_port   = 443
    to_port     = 443
    protocol    = "tcp"
    cidr_blocks = ["0.0.0.0/0"]
  }

  ingress {
    from_port   = 0
    to_port     = 0
    protocol    = "-1"
    cidr_blocks = ["10.200.0.0/16"]
  }

  ingress {
    description = "Kubernetes NodePort"
    from_port   = 30000
    to_port     = 32767
    protocol    = "tcp"
    cidr_blocks = ["0.0.0.0/0"]
  }

  ingress {
    description = "Allow ICMP"
    from_port   = -1
    to_port     = -1
    protocol    = "icmp"
    cidr_blocks = ["0.0.0.0/0"]
  }

  egress {
    from_port   = 0
    to_port     = 0
    protocol    = "-1"
    cidr_blocks = ["0.0.0.0/0"]
  }
}

# 6. SSH 키 페어 생성 (로컬 SSH 키 사용)
resource "aws_key_pair" "onprem_key" {
  key_name   = "onprem-key"
  public_key = file("~/.ssh/id_rsa.pub")  # 로컬에서 생성한 공개키 사용
}

# 7. AWS EC2 인스턴스 생성
resource "aws_network_interface" "aws_vm_network_interface" {
  subnet_id         = aws_subnet.aws_subnet.id
  source_dest_check = false
  private_ips       = ["10.100.0.10"]
  security_groups   = [aws_security_group.aws_sg.id]  # 보안 그룹 ID로 변경
}

resource "aws_instance" "aws_vm" {
  ami           = "ami-040c33c6a51fd5d96"
  instance_type = "t3.medium"
  network_interface {
    network_interface_id = aws_network_interface.aws_vm_network_interface.id
    device_index         = 0
  }

  key_name = aws_key_pair.onprem_key.key_name  # 동일한 SSH 키 사용

  tags = {
    Name = "aws-vm"
  }
}

# 8. AWS Elastic IP 할당
resource "aws_eip" "aws_eip" {
  instance = aws_instance.aws_vm.id
  vpc      = true
}

# 9. 고객 게이트웨이 (CGW) 생성 (Oracle용)
resource "aws_customer_gateway" "oracle_customer_gateway" {
  bgp_asn   = 65000
  ip_address = "1.1.1.1"
  type      = "ipsec.1"
  tags = {
    Name = "oracle-customer-gateway"
  }
}

# 10. 고객 게이트웨이 (CGW) 생성 (WireGuard용)
resource "aws_customer_gateway" "wireguard_customer_gateway" {
  bgp_asn   = 65000
  ip_address = "8.8.8.8"
  type      = "ipsec.1"
  tags = {
    Name = "wireguard-customer-gateway"
  }
}

# 11. AWS VPC의 VPN Gateway (VGW) 생성
resource "aws_vpn_gateway" "aws_vpn_gateway" {
  vpc_id = aws_vpc.aws_vpc.id

  tags = {
    Name = "aws-vpn-gateway"
  }
}

# 12. AWS VPN 연결 구성 (OnPrem VPC와 AWS VPC 연결 - Oracle용)
resource "aws_vpn_connection" "oracle_connection" {
  vpn_gateway_id      = aws_vpn_gateway.aws_vpn_gateway.id
  customer_gateway_id = aws_customer_gateway.oracle_customer_gateway.id
  type                = "ipsec.1"

  static_routes_only = true
  tunnel1_inside_cidr = "169.254.10.0/30"
  tunnel2_inside_cidr = "169.254.20.0/30"
  tags = {
    Name = "oracle-vcn"
  }
}

# 13. AWS VPN 연결 구성 (OnPrem VPC와 AWS VPC 연결 - WireGuard용)
resource "aws_vpn_connection" "wireguard_connection" {
  vpn_gateway_id      = aws_vpn_gateway.aws_vpn_gateway.id
  customer_gateway_id = aws_customer_gateway.wireguard_customer_gateway.id
  type                = "ipsec.1"

  static_routes_only = true
  tunnel1_inside_cidr = "169.254.30.0/30"
  tunnel2_inside_cidr = "169.254.40.0/30"
  tags = {
    Name = "oracle-wireguard"
  }
}

# 14. 출력 (EIP와 VM ID 출력)
output "aws_vm_eip" {
  value = aws_eip.aws_eip.public_ip
}

output "aws_vm_id" {
  value = aws_instance.aws_vm.id
}
개발자를 향해 달리는 사람