
Form
: 유저로부터 정보를 받기 위한 태그
<form action="/example.html" method="POST">
</form>
-> action은 정보가 보내지는 곳을 결정
-> method는 get 또는 post가 있다고 하는데, 정보가 많으면 post를 쓴다고 들었다.(잘모르겠다🤷♂️)
+ hijacking search
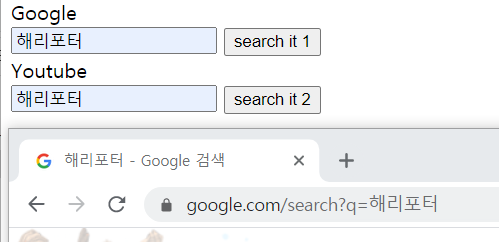
- Google : https://www.google.com/search?q=해리포터
<form action="https://www.google.com/search" target="_blank">
	<input type="text" name="q">
	<button>search it</button>
</form><form action="https://www.youtube.com/results" target="_blank">
<input type="text" name="search_query">
<button>youtube</button>
</form>input
- type에 따라 입력창의 모습이 결정된다.
- 👻caution : input은 css가 안 됨
ex) text input
<input type="" placeholder='아이디를 입력하세요'
maxlength="13" minlenth="5" required disabled/>- disabled : 사용하지 못하게 막아두는 것
- value : 초기값 (복사가 가능함;placehorder와 다른점)
ex) Password input
<form>
	<h1>Login to start creating a burger!</h1>
		<label for="username">Username:</label>
		<input type="text" name="username" id="username">
	<br>
		<label for="user-pw">Password:</label>
		<input type='password' id='user-pw' name='user-pw'>
</form>
ex) Number input
<form>
  <label for="years"> Years of experience: </label>
  <input id="years" name="years" type="number" step="1">
  <!--step creates arrows inside the input field-->
</form>
ex) file input
<input type="file" multiple/ accept="image/*, video/*">- multiple : 여러 종류의 file을 업로드 할 수 있음
- accept : 확장자 선택
- = all
label 추가하기
<label for='user_name'>이름</label>
<input type='text' id='user_name'>- 유저의 입력값이 무엇인지 알 수 있도록 label을 추가해야한다.
- 또한 label을 클릭하면 해당 입력창이 선택되어지는 장점이 있다.
RADIO (택일)
<input type='radio' value='yes' name='subscription'id='subscribed'>
<label for='subscribed'> 구독중 </label>
<input type='radio' value='no' name='subscription'id='unsubscribed'>
<label for='unsubscribed'> 미구독 </label>- 묶음으로 지정 : name으로 묶어주어야한다.
- 구분하기 : value가 어떤 버튼이 눌렸는지 알려주기에 꼭 다르게 지정!
-> ex) subscription(name)=yes(value)
CHECKBOX (다중선택)
<h1> 사용가능언어 <h1/>
<input type='checkbox' name='skills'id='html'>
<label for='html'> html </label>
<input type='checkbox' name='skills'id='css'>
<label for='css'> css </label>
<input type='checkbox' name='skills'id='js'>
<label for='js'> js </label>- 방법은 radio와 동일
SELECT : drop down 선택지 생성
<label for='skills'>사용 가능한 언어</label>
<select multiple name='skills' id='skills'>
	<option value='0'>html</option>
	<option value='1'>css</option>
	<option value='2'>js</option>
</select>- 여기서도 마찬가지로 응답의 관계성을 name과 value로 부여
- label과 select의 관계성은 for과 id로!
- multiple을 추가하면 다중선택 가능
TEXTAREA
<label for='hi'></label>
<textarea id='hi' placeholder='글을 써주세요!'></textarea>
긴글 가능

<input type='text'/>
짧은 단어 문장과 같은 것들- rows와 cols로 넓이 길이 조정 가능하나 css로 가능
button
<button type='button'> click me! </button>
<button type='submit'> 제출하기 </button>
<button type='reset'> 다시쓰기 </button>