nestjs의 Auth기능 구현하기
지난 nestjs의 기본개념과 typeorm을 이용한 간단한 게시판 crud구현에 이어, 이번엔 passport와 jwt를 조합하여 간단한 auth기능을 구현해 보겠습니다.
1. Authentication 인프라구축
1-1 모듈, 컨트롤러, 서비스 생성
먼저, Auth 모듈을 생성해보겠습니다. 이 모듈은 사용자 인증과 관련된 기능을 포함할 것입니다. 여기서는 Auth 모듈, 컨트롤러, 서비스를 생성합니다.
nest g module auth
nest g controller auth --no-spec
nest g service auth --no-spec
이 명령어들을 실행하면 auth 모듈, 컨트롤러, 서비스에 대한 파일과 디렉토리 구조가 자동으로 생성됩니다.
1-2 User Entity 생성
사용자 정보를 담을 User 엔티티를 만들어봅시다. 이 엔티티는 TypeORM을 사용하여 데이터베이스에 매핑될 것입니다.
// ./src/auth/user.entity.ts
import { BaseEntity, PrimaryGeneratedColumn, Column, Entity } from 'typeorm';

@Entity()
@Unique(['username'])
export class User extends BaseEntity {
  @PrimaryGeneratedColumn()
  id: number;

  @Column()
  username: string;

  @Column()
  password: string;
}
@Unique 데코레이터를 사용하여 username 컬럼을 고유하게 설정했습니다. 이로써 중복된 사용자 이름을 허용하지 않습니다.
이후 만약 유니크 유효성검사를 통과하지 못할 경우 해당 레포지토리의 try-catch문에서 catch에 걸리게 됩니다.
1-3 Auth Repository 생성
AuthRepository를 생성하여 데이터베이스와 상호작용할 준비를 합니다.
// ./src/auth/auth.repository.ts
import { EntityRepository, Repository, DataSource } from 'typeorm';
import { User } from './user.entity';
import { Injectable } from '@nestjs/common';

@Injectable()
export class AuthRepository extends Repository<User> {
  constructor(private dataSource: DataSource) {
  	super(User, dataSource.createEntityManager())
  }
  //...
}
1-4 Repository 임포트
Auth 모듈에 AuthRepository를 추가합니다.
// ./src/auth/auth.module.ts
import { Module } from '@nestjs/common';
import { TypeOrmModule } from '@nestjs/typeorm';
import { AuthRepository } from './auth.repository';
import { AuthController } from './auth.controller';
import { AuthService } from './auth.service';

@Module({
  controllers: [AuthController],
  providers: [AuthService, AuthRepository],
})
export class AuthModule {}
1-5 Service에 Repository의존성 주입
Auth 서비스에서 AuthRepository를 사용하기 위해 의존성 주입을 설정합니다.
// ./src/auth/auth.service.ts
import { Injectable } from '@nestjs/common';
import { AuthRepository } from './auth.repository';

@Injectable()
export class AuthService {
  constructor(private readonly authRepository: AuthRepository) {}
  //...
}
1-6 DTO 생성
인증 시 필요한 데이터를 전달할 수 있는 DTO(Data Transfer Object)를 생성합니다.
이 후에 유효성검사 코드를 추가할 것입니다.
// ./src/auth/dto/auth-credentials.dto.ts
export class AuthCredentialsDto {
  username: string;
  password: string;
}
1-7 환경변수 설정
npm i @nestjs/configtypeorm으로 DB와 서버를 연결하기 위해 TypeOrmConfig를 작성해야합니다.
작성시 TypeOrmConfig에 들어가는 DB의 connection정보들을 .env에서 관리하여 코드베이스에서 노출되지 않도록 해주어야합니다.
이는 보안을 위해 꼭 필요한 작업입니다.
// .env
PORT=3306
DB_HOST='yourhost'
DB_USERNAME='yourusername'
DB_PASSWORD='yourpassword'
DB_DATABASE='yourdatabase'
우선 루트에 .env파일을 생성한 후 위와 같이 DB 커넥션 정보를 작성합니다.
// ./src/app.module.ts
import { Module } from '@nestjs/common';
import { ConfigModule } from '@nestjs/config';
import { TypeOrmModule } from '@nestjs/typeorm';
import { AppController } from './app.controller';
import { AppService } from './app.service';
import { AuthModule } from './auth/auth.module';
import { typeOrmConfigAsync } from './configs/typeorm.config';

@Module({
  imports: [
    // typeorm config연결
    TypeOrmModule.forRootAsync(typeOrmConfigAsync),
    // 환경변수 전역설정
    ConfigModule.forRoot({
      isGlobal: true,
    }),
    AuthModule,
  ],
  controllers: [AppController],
  providers: [AppService],
})
export class AppModule {}
그 다음으로 app.module 파일을 작성해줍니다.
우선 .env에서 작성한 환경변수들을 전역으로 사용할수 있도록 임포트 해줍니다.
그리고 환경변수를 기반으로 작성할 typeorm config 파일을 임포트 해줍니다.
// ./src/config/typeorm.cofig.ts
import { ConfigModule, ConfigService } from '@nestjs/config';
import {
  TypeOrmModuleAsyncOptions,
  TypeOrmModuleOptions,
} from '@nestjs/typeorm';

export default class TypeOrmConfig {
  static getOrmConfig(configService: ConfigService): TypeOrmModuleOptions {
    return {
      type: 'mysql',
      host: configService.get('DB_HOST'),
      port: configService.get('DB_PORT'),
      username: configService.get('DB_USERNAME'),
      password: configService.get('DB_PASSWORD'),
      database: configService.get('DB_DATABASE'),
      entities: [__dirname + '/../**/*.entity{.ts,.js}'],
    };
  }
}

export const typeOrmConfigAsync: TypeOrmModuleAsyncOptions = {
  imports: [ConfigModule],
  useFactory: async (
    configService: ConfigService,
  ): Promise<TypeOrmModuleOptions> => TypeOrmConfig.getOrmConfig(configService),
  inject: [ConfigService],
};
위와 같이 TypeOrmConfig 클래스와 TypeOrmModuleAsyncOptions를 정의합니다.
먼저, @nestjs/config 모듈에서 제공하는 ConfigModule과 ConfigService를 임포트합니다. 이 모듈과 서비스는 환경 변수를 관리하고 응용 프로그램에서 사용할 수 있게 해줍니다.
TypeOrmConfig 클래스는 데이터베이스 연결 설정을 정의하는 정적 메서드 getOrmConfig를 가지고 있습니다. 이 메서드는 ConfigService를 사용하여 환경 변수에서 데이터베이스 관련 정보를 가져와 TypeOrmModuleOptions 객체를 반환합니다.
2. Authentication 구현
위에서 작성한 인프라를 기반으로 실제구현을 해보겠습니다.
2-1 유효성검사
유효성 검사(validation)는 사용자가 제공한 데이터의 유효성을 검사하는 과정입니다. 이를 위해 class-validator 패키지가 필요합니다.
npm i class-validator그리고 AuthCredentialsDto에 유효성 검사 데코레이터를 추가합니다.
// ./src/auth/auth-credentials.ts
import { IsString, Matches, MinLength, MaxLength } from 'class-validator'

export class AuthCredentialsDto {
  @IsString()
  @MinLength(4)
  @MaxLength(20)
  username: string;

  @IsString()
  @MinLength(4)
  @MaxLength(20)
  @Matches(/^[a-zA-Z0-9]*$/, {
    message: "password only accepts English and numbers"
  })
  password: string;
}
이제 AuthCredentialsDto의 필드에 대한 유효성 검사가 수행될 것입니다. 이러한 검사는 사용자가 올바른 데이터를 입력하도록 도와줍니다.
// ./src/auth/auth.controller.ts
@Post('/signup')
signup(@Body(ValidationPipe) authCredentialsDto: AuthCredentialsDto) {
	//...
}
컨트롤러에 다음과 같이 ValidationPipe를 넣어 DTO에서 유효성검사를 할 수 있도록 처리해줍니다.
2-2 암호화
비밀번호의 보안은 매우 중요합니다. bcryptjs 패키지를 사용하여 비밀번호를 안전하게 저장하고 검증합니다.
npm i bcryptjsbcrypt 알고리즘은 단방향 해싱 알고리즘으로, 복호화가 불가능합니다. 레인보우 테이블을 통한 공격을 방지하기 위해 무작위 문자열인 솔트(salt)를 비밀번호에 추가하여 암호화됩니다. 이렇게 함으로써 원본 비밀번호를 복원할 수 없게 됩니다.
password + salt = hashedPassword
다음으로, JWT를 사용하여 인증을 구현합니다.
npm i @nestjs/jwt @nestjs/passport passport-jwt passport @types/passport-jwtJWT는 헤더(Header), 페이로드(Payload), 서명(Signature)으로 구성되며, 서버에서는 클라이언트가 제공한 토큰을 검증합니다.
Header => 메타데이터(타입, 알고리즘)
Payload => 유저정보, 만료기간 등
VerigySignature => 서명(시크릿키)
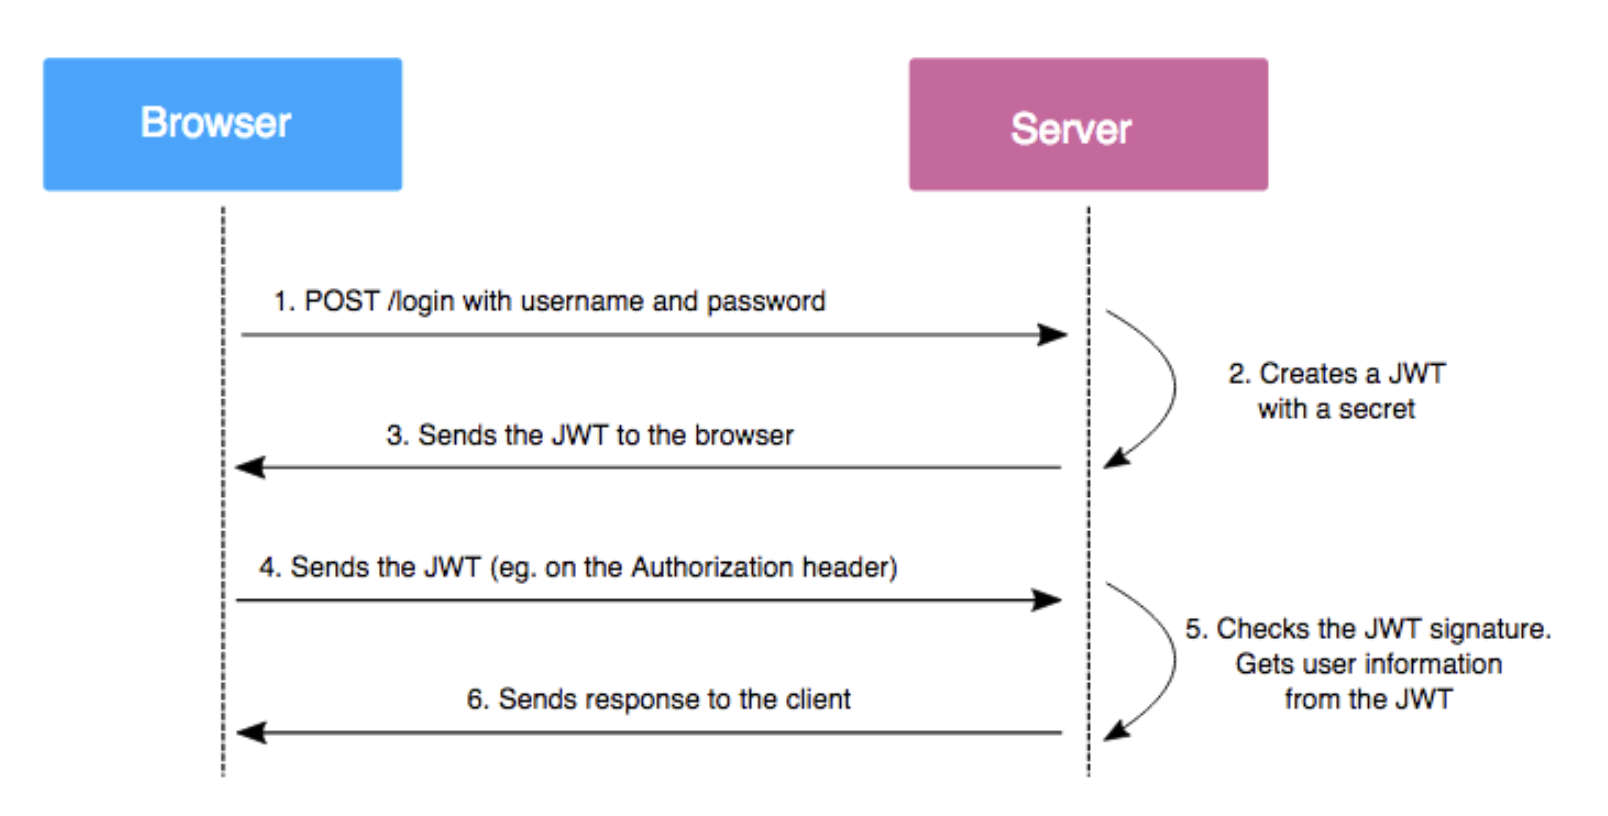
서버에서는 클라이언트에서 요청되어 오는 토큰의 Header, Payload값과 가지고 있는 시크릿키를 조합하여 JWT를 생성하고 이를 토큰과 대조합니다.
대조한 토큰이 유효하면 payload의 username값을 이용해 DB에 저장된 해당 User정보를 가져오고, 유효하지 않은 경우 error를 반환합니다.
이를 도식화하면 다음과 같은 그림이 됩니다.
이제 코드로 구현해보겠습니다.
먼저, 토큰 검증을 위한 JwtStrategy를 구현합니다.
// ./src/auth/jwt.strategy.ts
import { Injectable, UnauthorizedException } from '@nestjs/common';
import { AuthRepository } from './auth.repository';
import { InjectRepository } from '@nestjs/typeorm';
import { PassportStrategy } from '@nestjs/passport';
import { User } from './user.entity';
import { ExtractJwt, Strategy } from 'passport-jwt';

@Injectable()
export class JwtStrategy extends PassportStrategy(Strategy) {
  constructor(private readonly authRepository: AuthRepository) {
    super({
      secretOrKey: "secretKey", // 시크릿 키
      jwtFromRequest: ExtractJwt.fromAuthHeaderAsBearerToken()
    });
  }

  async validate(payload) {
    const { username } = payload;
    const user: User = await this.authRepository.findOne({ username });
    if (!user) {
      throw new UnauthorizedException();
    }
    return user;
  }
}
JwtStrategy는 JWT를 검증하고 유효한 토큰이면 사용자 정보를 반환합니다.
즉, 로그인을 했다면 user 정보를 반환하고, 아니라면 error를 반환하는 것입니다.
이 전략은 후에 소개할 UseGuards 인증가드 데코레이터로 호출할 수 있습니다.
다음으로 커스텀 데코레이터를 사용하여 요청 객체에서 사용자 정보를 추출해 보겠습니다. 아래와 같이 GetUser 커스텀 데코레이터를 생성해보겠습니다.
// ./src/auth/get-user.decorator.ts
import { createParamDecorator, ExecutionContext } from '@nestjs/common';

export const GetUser = createParamDecorator((data, ctx: ExecutionContext): User => {
  const req = ctx.switchToHttp().getRequest();
  return req.user;
});
위 코드에서는 createParamDecorator 함수를 사용하여 GetUser 데코레이터를 생성합니다. 이 데코레이터는 요청 객체에서 user 속성을 추출하고 반환합니다.
이제 커스텀 데코레이터를 사용하여 컨트롤러나 서비스에서 사용자 정보를 간편하게 얻을 수 있습니다. 예를 들어, 컨트롤러 메서드에서 사용자 정보를 어떻게 추출하는지 살펴보겠습니다.
// ./src/auth/auth.controller.ts
import { Controller, Get, UseGuards } from '@nestjs/common';
import { AuthGuard } from '@nestjs/passport';
import { GetUser } from './get-user.decorator';
import { User } from './user.entity'

@Controller('auth')
export class AuthController {
  //...
  @Get('/testJwt')
  @UseGuards(AuthGuard())
  getUser(@GetUser() user: User) {
    console.log('user', user);
  }
  //...
  /*
  @Get('/jwtTest')
  @UseGuards(AuthGuard())
  getToken(@Req() req) {
    console.log('req', req);
  }
  */
}
요청 경로는 다음과 같이 /auth/testJwt로 설정하였습니다.
위 코드에서는 @UseGuards(AuthGuard()) 데코레이터로 인증 가드를 사용합니다.
이 인증가드로 인해 JwtStrategy에 작성해놓은대로 request의 header에서 Bearer 토큰을 이용해 validate 함수로 토큰을 검증한 후 user 정보를 반환하는 작업을 처리합니다.
이 때, @GetUser() 데코레이터로 req에 있는 사용자 정보 user를 추출합니다. 이렇게 하면 해당 컨트롤러 메서드에서 user 객체를 직접 사용할 수 있습니다.
커스텀 데코레이터를 사용하면 코드를 더 깔끔하게 작성할 수 있으며, 사용자 정보를 쉽게 추출할 수 있습니다.
이제, 작성한 JwtStrategy가 auth모듈에서 UseGuards 데코레이터의 명령에 따라 제대로 호출될 수 있도록 auth 모듈에 providers로 임포트 해줍니다.
// ./src/auth/auth.module.ts
import { Module } from '@nestjs/common';
import { AuthController } from './auth.controller';
import { AuthRepository } from './auth.repository';
import { AuthService } from './auth.service';
import { JwtModule } from '@nestjs/jwt';
import { PassportModule } from '@nestjs/passport';
import { JwtStrategy } from './jwt.strategy';

@Module({
  imports: [
    PassportModule.register({ defaultStrategy: 'jwt' }),
    JwtModule.register({
      secret: 'secretKey',
      signOptions: { expiresIn: '1h' },
    }),
  ],
  controllers: [AuthController],
  providers: [AuthService, AuthRepository, JwtStrategy],
  exports: [JwtStrategy, PassportModule],
})
export class AuthModule {}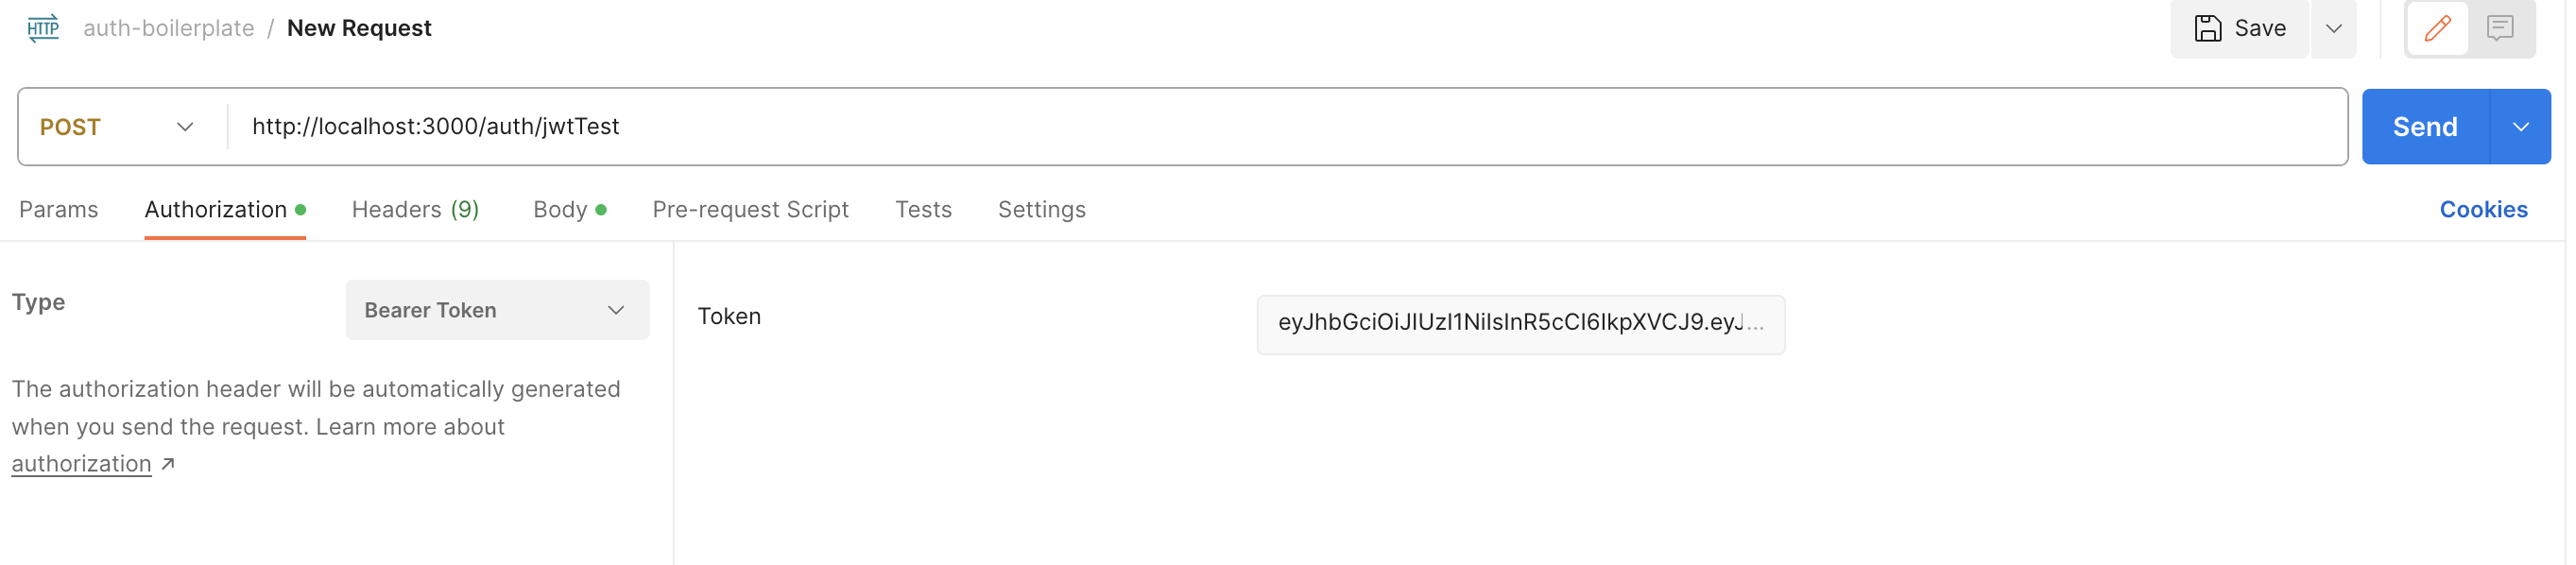
위의 사진과 같이 로그인 후 토큰을 받은 후 포스트맨에서 header에 bearer 토큰을 동봉한 후 request를 하면...
콘솔로 user정보를 확인할 수 있다.
3. 컨트롤러, 서비스, 레포지토리 작성하기
이제 네스트(NestJS) 애플리케이션에서 실제 인증(Authentication) 기능을 구현해보겠습니다. 인증 관련 코드를 컨트롤러, 서비스, 레포지토리로 구분하여 작성하고 모듈에 통합할 것입니다.
3-1 레포지토리 작성 (repository)
먼저, 레포지토리를 작성합니다. 레포지토리는 데이터베이스와 상호작용하고 인증과 관련된 작업을 수행합니다.
// ./src/auth/auth.repository.ts
import { User } from './user.entiry'
import { Repository, EntityRepository, dataSource } from 'typeorm'
import { AuthCredectialsDto } from './dto/auth-credentials.dto'
import * as bcrypt from 'bcryptjs'
import { JwtService } from '@nestjs/jwt'

@Injectable()
export class AuthRepository extends Repository<User> {
	// jwt관련 의존성주입
	constructor(
  		private dataSource: DataSource,
  		private readonly jwtService: JwtService
    ) {
    	super(User, dataSource.createEntityManager())
    }
	// 회원가입
	async createUser(authCredentialsDto: AuthCredentialsDto): Promise<void> {
		const { username, password } = authCredentialsDto;
		const salt = await bcrypt.genSalt()
		const hashedPassword = await bcrypt.hash(password, salt)
		const user = this.create({ username, password });
		try {
			await this.save(user);
		} catch (error) {
			if(error.code === '23505') {
				throw new ConflictExcepton('Existing username');
			} else {
				throw new InternalServerErrorException();
			}
		}
	}
	// 로그인
	async signIn(authCredentialsDto: AuthCredentialsDto): Promise<{accessToken: string}> {
		const { username, password } = authCredentialsDto;
		const user = await this.findOne({ username });
		const comparePassword = await bcrypt.compare(password, user.password)
		if (user && comparePassword) {
			// 토큰생성
			const payload = { username };
			const accessToken = await this.jwtService.sign(payload);
			return { accessToken }
		} else {
			throw new UnauthrizedException('login failed')
		}
	}
}
3-2 서비스 작성
서비스는 비즈니스 로직을 포함하며, 레포지토리를 사용하여 데이터베이스 작업을 수행합니다.
// ./src/auth/auth.service.ts
import { Injectable } from '@nestjs/common'
import { AuthRepository } from './auth.repository'
import { AuthCredentialsDto } from './dto/auth-credentials.dto'

// @Injectable()로 모듈의 providers에서 의존성 주입이 가능하도록 한다.
@Injectable()
export class AuthService() {
	constructor(
		@InjectRepository(AuthRepository)
		private readonly authRepository: AuthRepository
	) {}
	// 회원가입
	signUp(authCredentialsDto: AuthCredentialsDto): Promise<void> {
		return this.AuthRepository.createUser(authCredentialsDto);
	}
	// 로그인
	signIn(authCredentialsDto: AuthCredentialsDto): Promise<{accessToken: string}> {
		return this.AuthRepository.signIn(authCredentialsDto)
	}
}
3-3 컨트롤러 작성
컨트롤러는 클라이언트 요청을 처리하고 서비스로부터 받은 데이터를 반환합니다.
// ./src/auth/auth.controller.ts
import { Controller, Post, Body } from '@nestjs/common';
import { ValidationPipe } from 'class-validator'
import { AuthCredentialsDto } from './auth-credentials'
import { AuthService } from './auth.service';
import { GetUser } from './get-user.decorator';
import { User } from './auth.entity'

// import { UserGuards } from '@nestjs/common';
// import { AuthGuard } from '@nestjs/passport';

@Controller('auth')
export class AuthController {
	constructor(private readonly authService: AuthService) {}
	// 회원가입
	@Post('/signup')
	signUp(@Body(ValidationPipe) authCredentialsDto: AuthCredentialsDto): Promise<void> {
		return this.AuthService.signUp(authCredentialsDto);
	}
	// 로그인
	@Post('/signin')
	signIn(@Body() authCredentialsDto: AuthCredentialsDto): Promise<{accessToken: string}> {
		return this.AuthService.signIn(authCredentialsDto)
	}
	// request에 담긴 token을 토대로 user정보를 가져오는 테스트
	@Post('/tokenInReqHeadTest')
	// Guard는 JwtStrategy파일에 정의된 validate함수를 거쳐 토큰의 유효성을 검증
	@UserGuards(AuthGuard())
	// case 1. => req.user로 user객체가 찍힘.
	tokenInReqHeadTest(@Req() req) {
		console.log('req', req);
	}
  	/*
	// case2. => 커스텀 파라미터를 사용하면 바로 user객체를 가져올 수 있다.
	tokenInReqHeadTest(@GetUser() user: User) {
		console.log('user', user)
	}
	*/
}
3-4 모듈 통합
마지막으로, 컨트롤러, 서비스, 레포지토리를 모듈에 통합합니다.
// ./src/auth/auth.module.ts
import { Module } from '@nest/common'
import { AuthController } from './auth.controller'
import { AuthService } from './auth.service'
import { AuthRepository } from './auth.repository'
import { JwtStrategy } from './jwt.strategy'

import { PassportModule } from '@nestjs/passport'
import { JwtModule } from '@nestjs/jwt

@Module({
	imports: [
		PassportModule.register({ defaultStrategy: 'jwt' })
		JwtModule.register({
			secret: 'secretKey',
			signOptions: {
				expiresIn: 60 * 60,
			},
		}),
	],
	controllers: [AuthController],
	providers: [AuthService, AuthRepository, JwtStrategy],
	// 다른 모듈에서 사용가능하도록 설정
	exports: [JwtStrategy, PassportModule]
})

export class AuthModule {}
이제 이 전에 구현했던 게시판(board)기능에 JWT와 Passport를 사용하여 인증된 사용자만이 /board 엔드포인트에 액세스할 수 있도록 해주겠습니다.
// ./src/board/board.module.ts
import { Module } from '@nestjs/common';
import { AuthModule } from 'src/auth/auth.module';
import { BoardController } from './board.controller';
import { BoardRepository } from './board.repository';
import { BoardService } from './board.service';

@Module({
  imports: [AuthModule],
  controllers: [BoardController],
  providers: [BoardService, BoardRepository],
})
export class BoardModule {}
위와같이 jwt-passport 로직이 정의된 AuthModule을 임포트해줍니다.
// ./src/board/board.controller.ts
import { Controller, UseGuards } from '@nestjs/common';
import { AuthGuard } from '@nestjs/passport';
import { BoardService } from './board.service';

@Controller('board')
@UseGuards(AuthGuard())
export class BoardController {
  constructor(private readonly boardService: BoardService) {}
  //...
}
컨트롤러에서는 AuthGuard가 사용하여 인증가드를 거치도록해줍니다.
이로인해 컨트롤러의 모든 엔드포인트에 대한 액세스를 제한합니다.
AuthGuard는 Passport 및 JWT를 사용하여 사용자를 인증하고 인증이 된 경우는 req에서 user를 동봉하여 보내주며, 인증되지 않은 사용자의 요청을 거부합니다.
4. 릴레이션(관계) 설정
4-1 Entity에 관계정의하기
// ./src/auth/user.entity.ts
import { Board } from 'src/board/board.entity';
import {
  BaseEntity,
  Column,
  Entity,
  OneToMany,
  PrimaryGeneratedColumn,
} from 'typeorm';

@Entity()
export class User extends BaseEntity {
  @PrimaryGeneratedColumn()
  id: number;

  @Column({ unique: true })
  email: string;

  @Column()
  password: string;

  @Column()
  phone: string;

  @OneToMany(() => Board, (board) => board.user, { eager: false })
  board: Board[];
}
먼저, User 엔터티와 Board 엔터티 사이의 관계를 설정합니다.
User는 여러 개의 게시글을 가질 수 있으므로 일대다 (OneToMany) 관계를 설정합니다.
{ eager: false }는 게시글을 로드할 때 기본적으로 로드하지 않음을 의미합니다.
즉, 필요할 때만 로드됩니다.
// ./src/board/board.entity.ts
import { User } from 'src/auth/user.entity';
import { Column, Entity, ManyToOne, PrimaryGeneratedColumn } from 'typeorm';
import { BoardStatus } from './board.status';

@Entity()
export class Board {
  @PrimaryGeneratedColumn()
  id: number;

  @Column()
  title: string;

  @Column()
  description: string;

  @Column()
  status: BoardStatus;

  @ManyToOne(() => User, (user) => user.board, { eager: false })
  user: User;
}
다음으로, Board 엔터티와 User 엔터티 사이의 관계를 설정합니다.
User 엔터티와 Board 엔터티 간의 관계는 다대일(ManyToOne) 관계로, 하나의 사용자가 여러 개의 게시글을 작성할 수 있습니다.
{ eager: false }는 게시글 작성자 정보를 기본적으로 로드하지 않음을 의미합니다.
DB상에선 Board 테이블과 User 테이블은 각각 서로의 id를 외래 키로 사용하여 관계를 설정합니다.
또한 각 테이블엔 userId / boardId 컬럼이 생성됩니다.
4-3 관계를 이용한 기능구현
이제 user와 board의 관계를 활용한 두가지 기능을 만들어 볼 것입니다.
첫 번째는 접속 중인 user의 정보를 board데이터에 기록하여 생성하는 기능이고,
두 번째는 접속 중인 user가 생성한 board데이터만 읽어오는 기능입니다.
컨트롤러측
  //...
  @Post()
  @UsePipes(ValidationPipe)
  createBoard(
    @Body() boardCreateDto: BoardCreateDto,
    @GetReqUserDecorator() user: User,
  ): Promise<Board> {
    return this.boardService.createBoard(boardCreateDto, user);
  }

  @Get('/userBoards')
  getBoardByUser(@GetReqUserDecorator() user: User): Promise<Board[]> {
    return this.boardService.getBoardByUser(user);
  }
서비스측
	//...
  createBoard(boardCreateDto: BoardCreateDto, user: User): Promise<Board> {
    return this.boardRepository.createBoard(boardCreateDto, user);
  }

  getBoardByUser(user: User): Promise<Board[]> {
    return this.boardRepository.getBoardByUser(user);
  }
레포지토리측
	//...
  async createBoard(
    boardCreateDto: BoardCreateDto,
    user: User,
  ): Promise<Board> {
    const { title, description } = boardCreateDto;
    console.log(user);
    const newBoard = await this.create({
      title,
      description,
      user: user,
      status: BoardStatus.PUBLIC,
    });
    await this.save(newBoard);
    return newBoard;
  }

  async getBoardByUser(user: User): Promise<Board[]> {
    const query = await this.createQueryBuilder('board');
    const boards = await query
      .where('board.userId = :userId', { userId: user.id })
      .getMany();
    return boards;
  }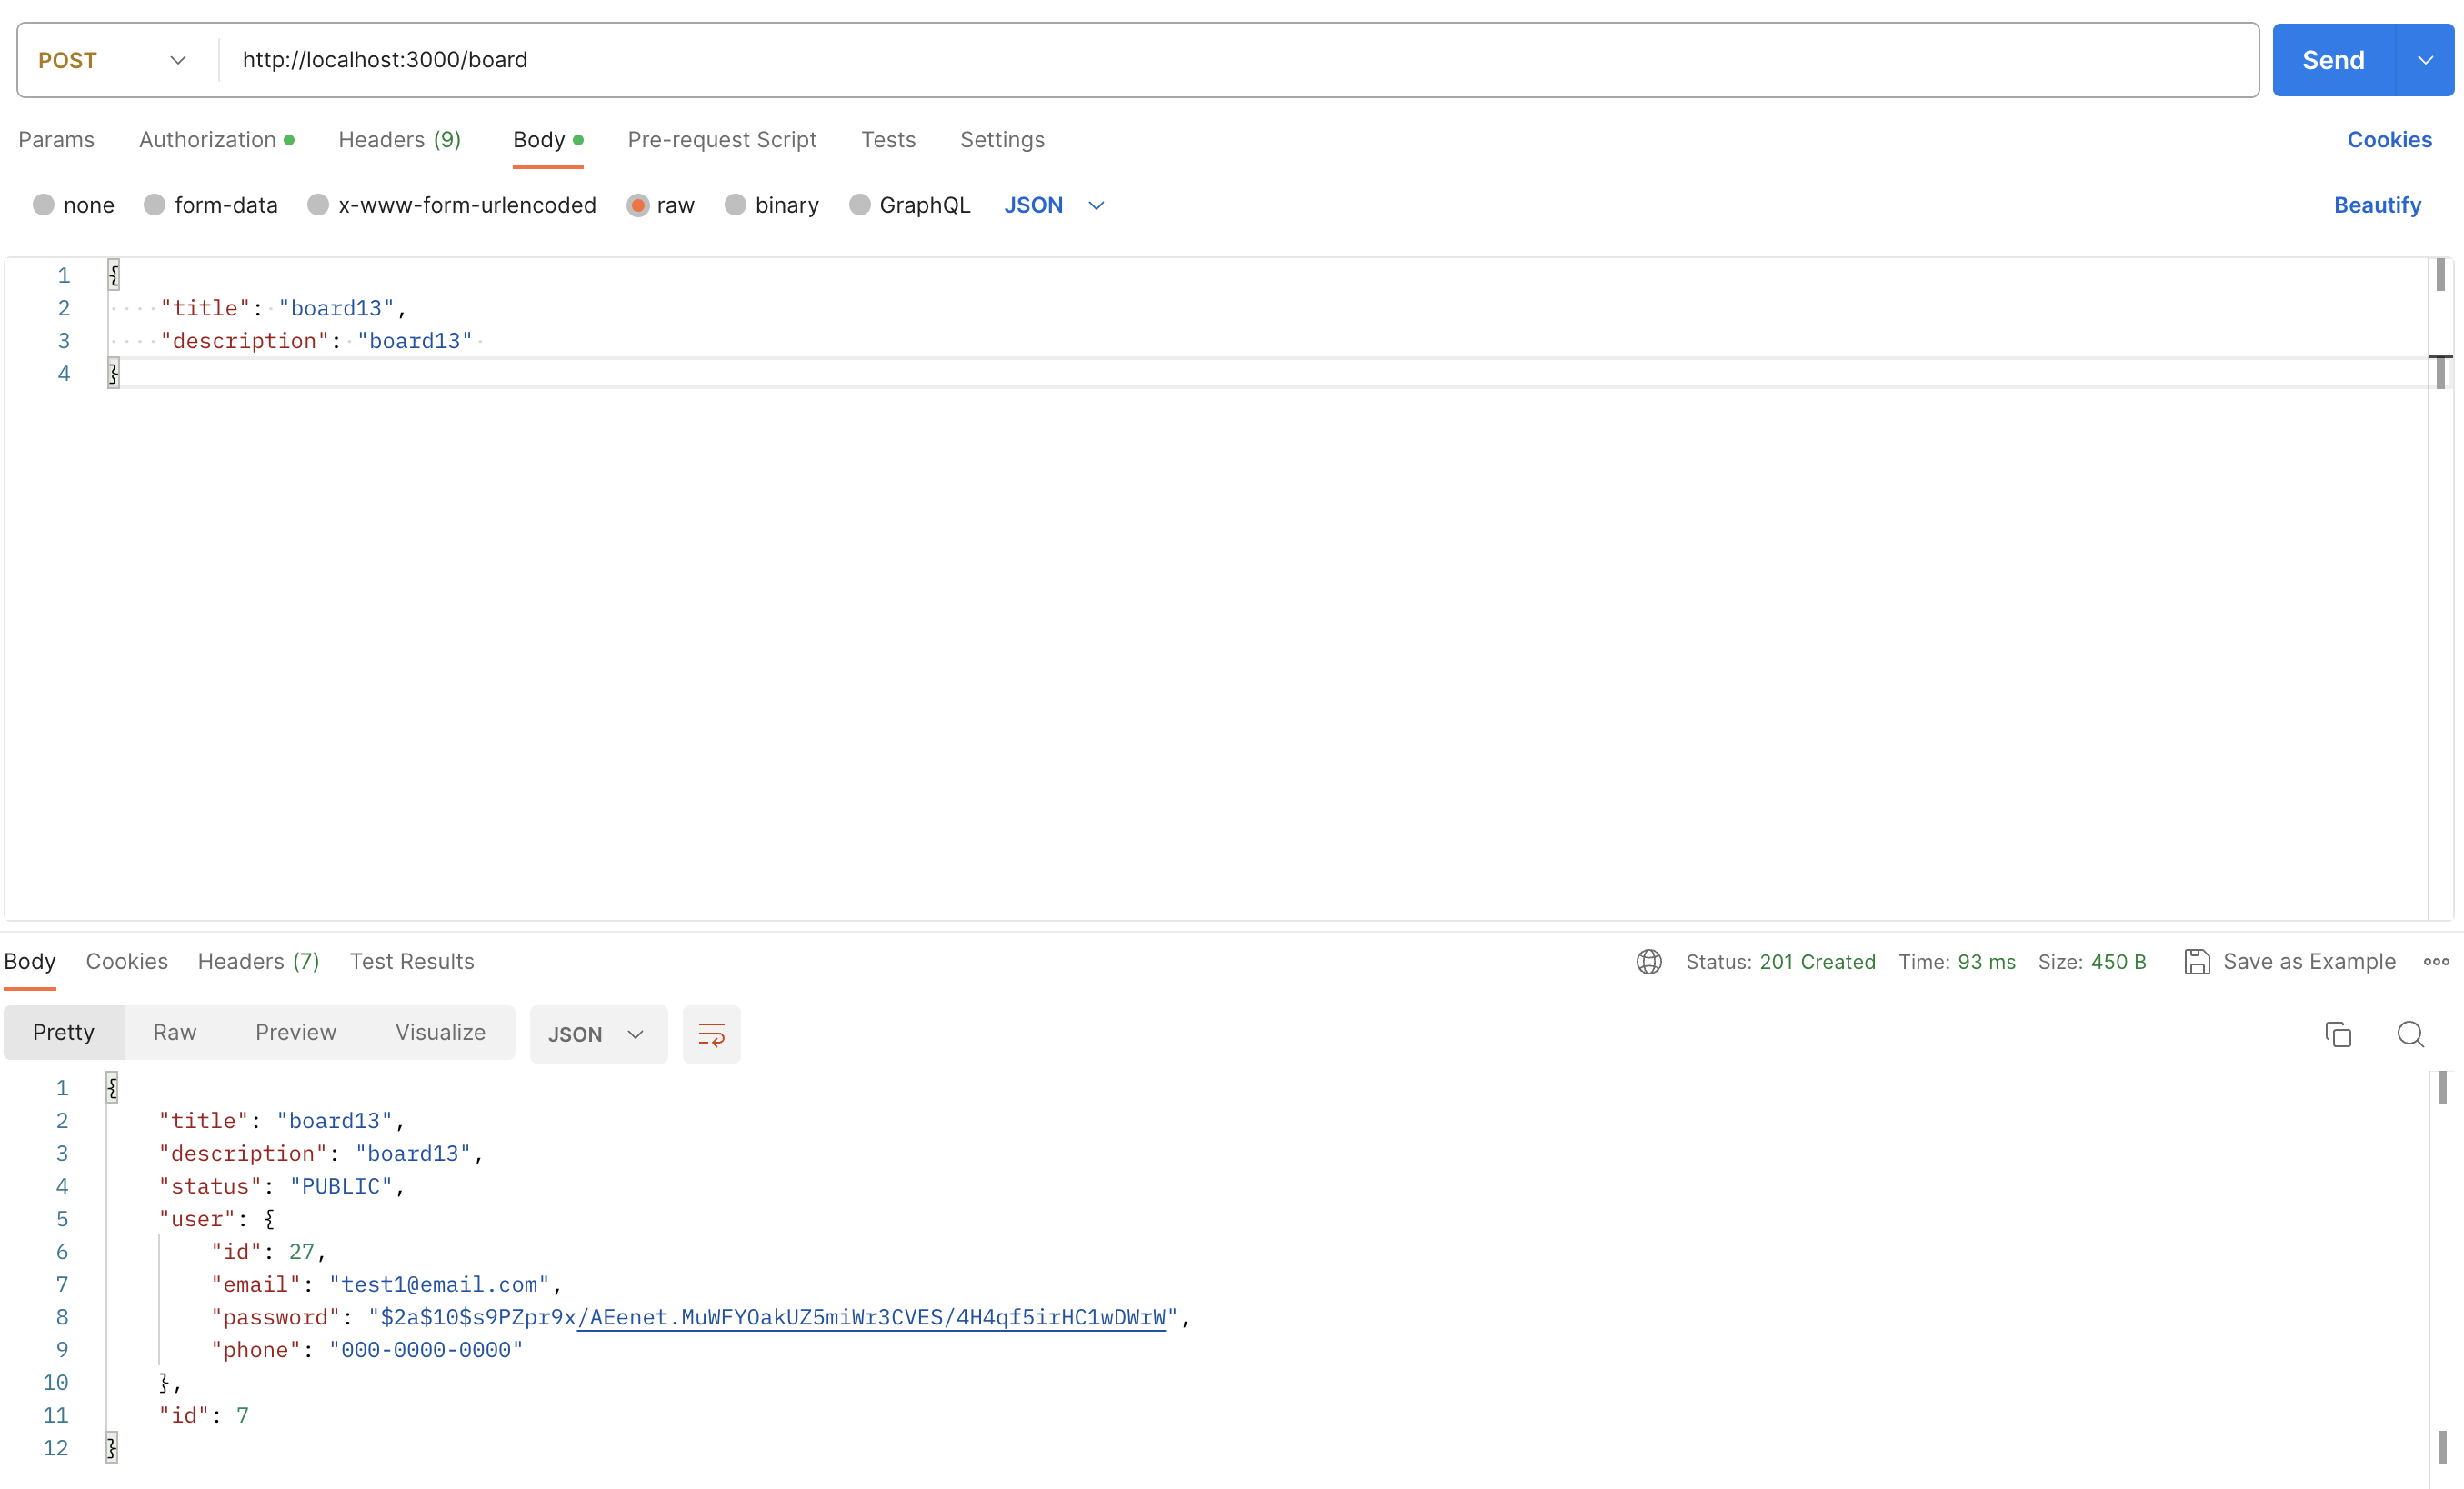
첫 번째 기능구현인 user정보를 board에 넣기를 구현하면 위와 같습니다.
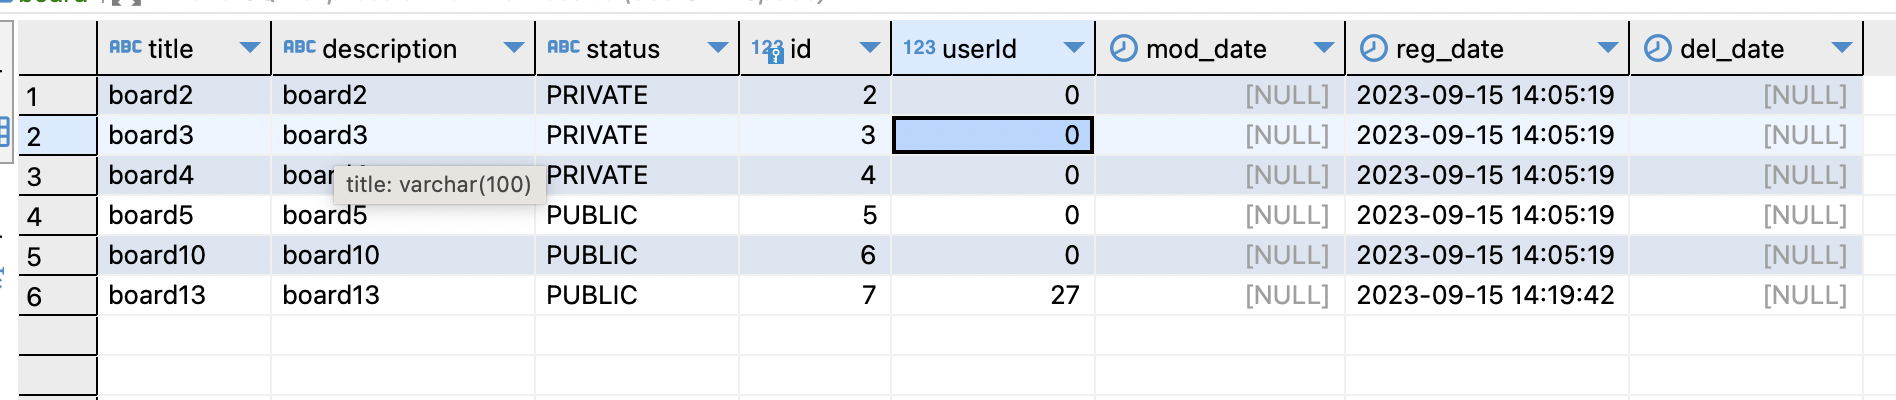
db상에선 board 테이블의 userId 컬럼에 위와 같이 user의 id가 입력됩니다.
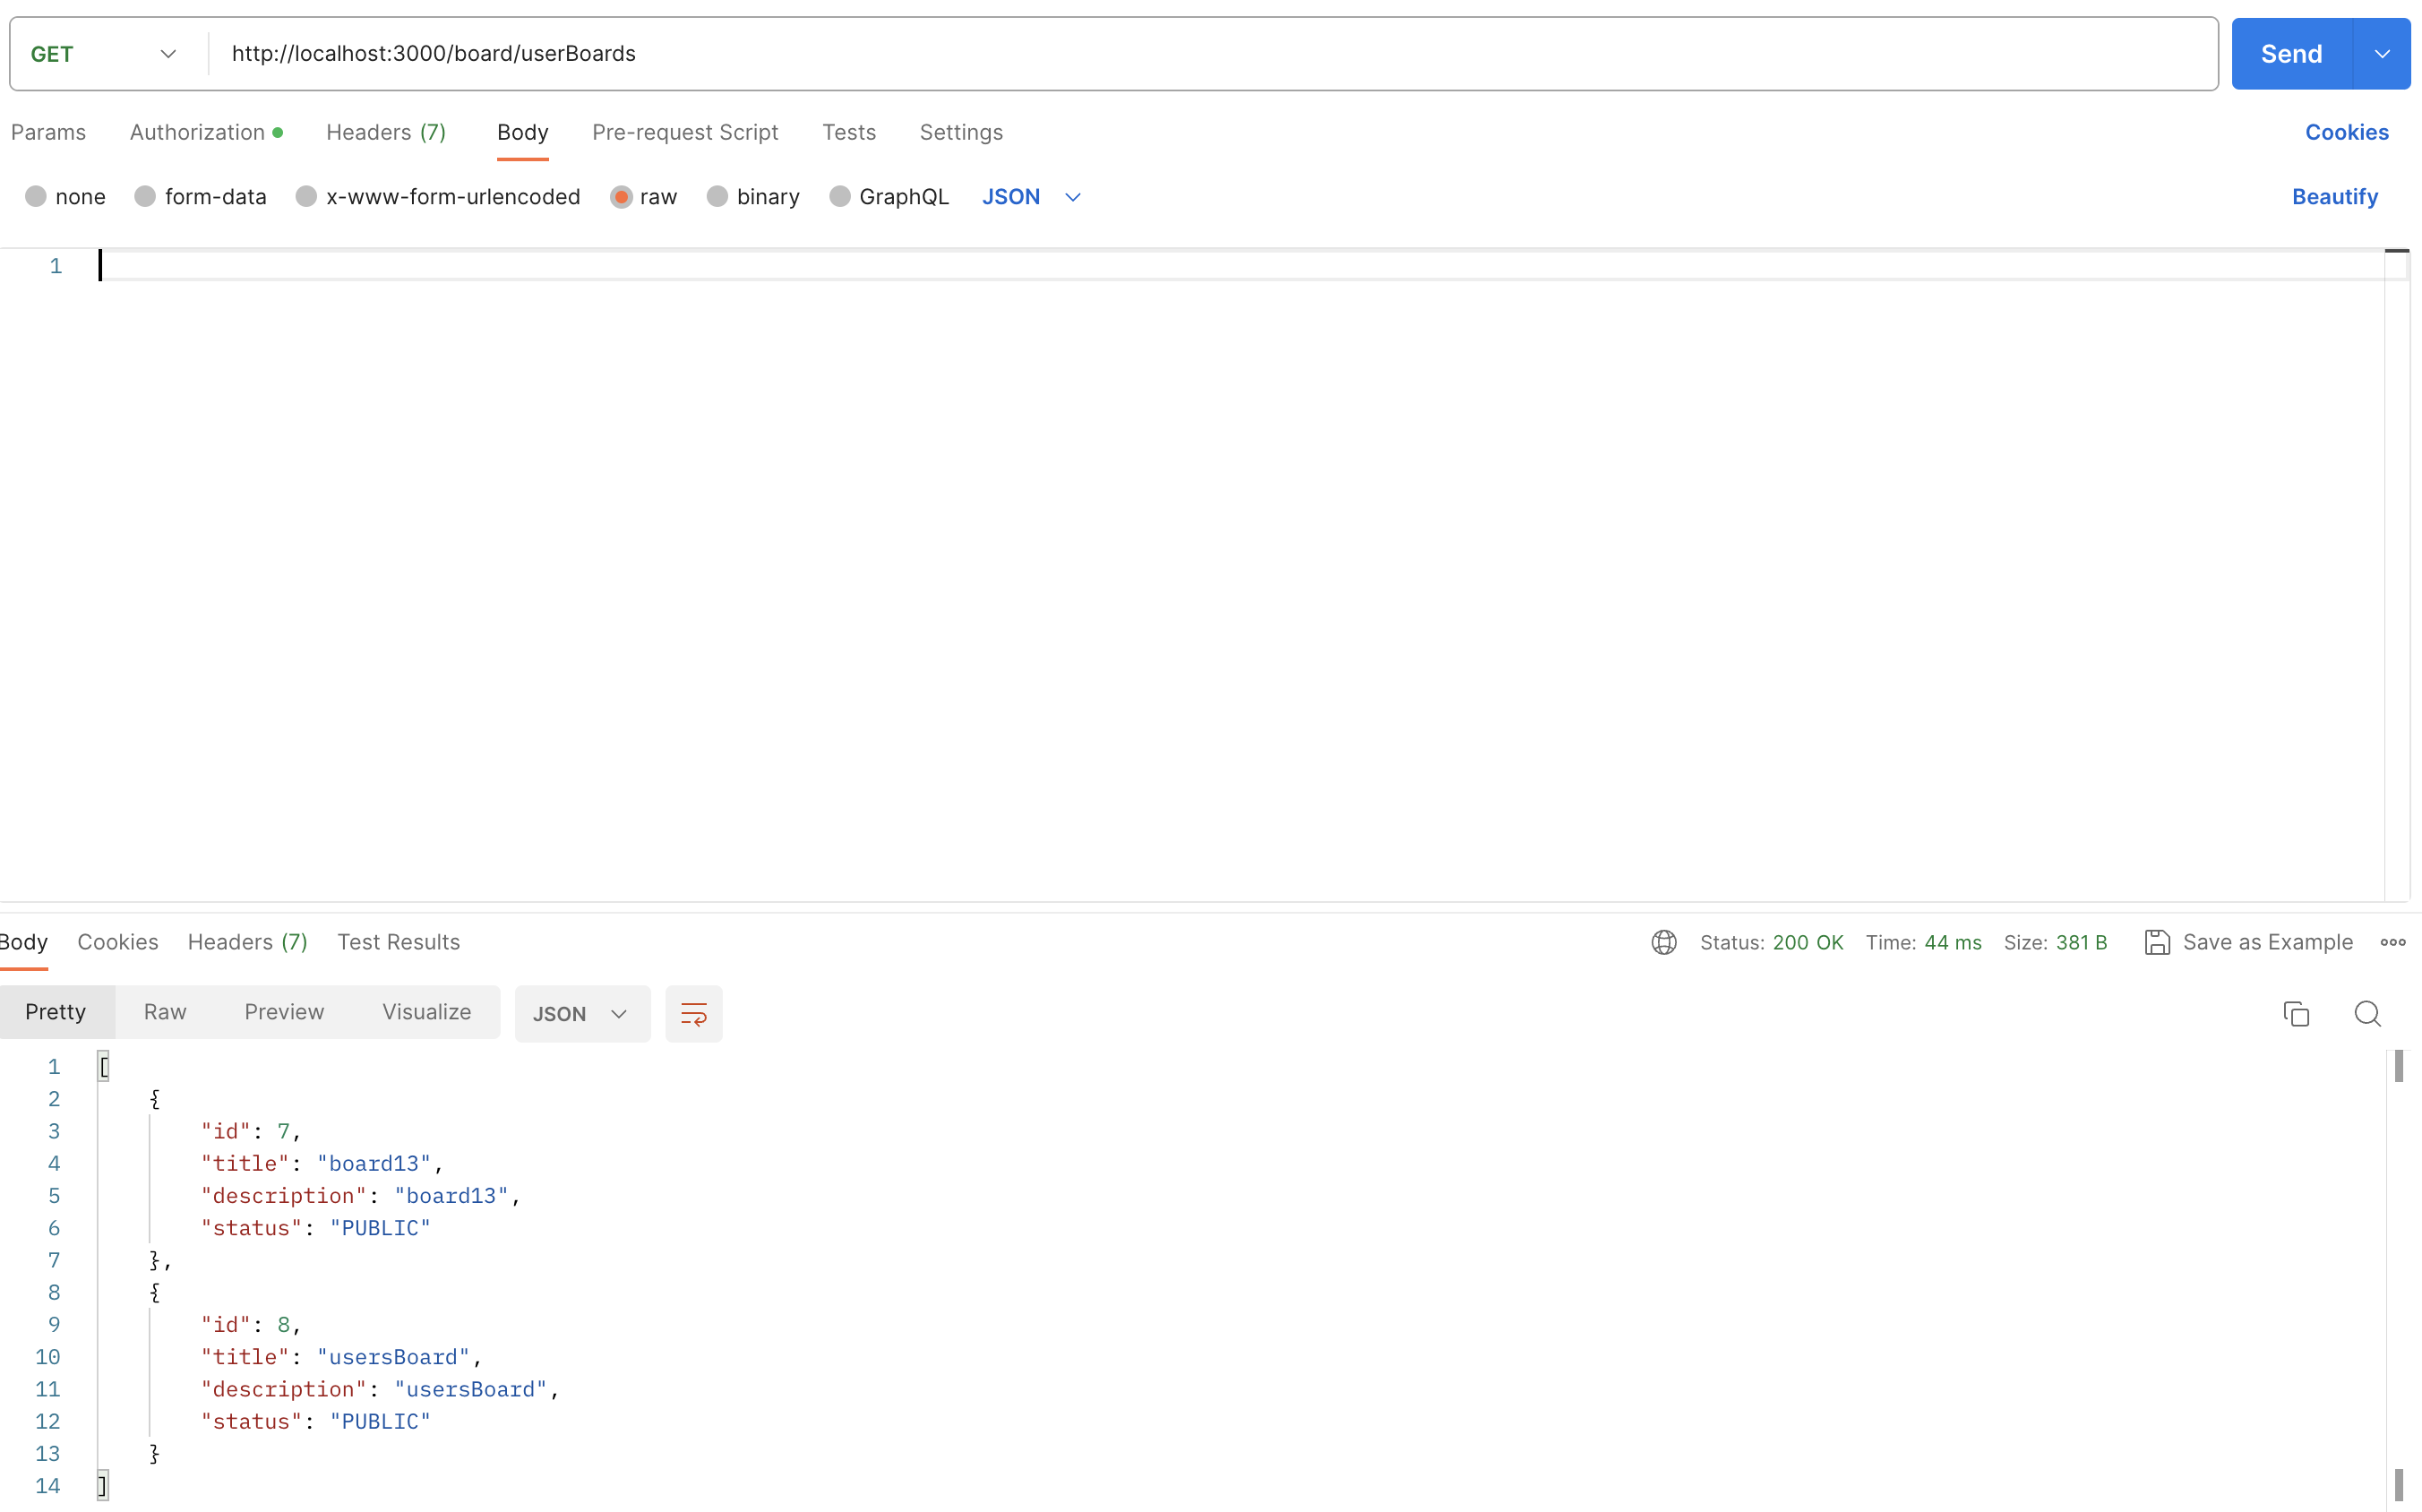
두 번째 기능구현인 접속중인 user정보로 board가져오기를 구현하면 위와 같습니다.
