Fragment Transaction
들어가기 전
-
이 글은 Fragment, FragmentManager에 대한 글의 다음 글입니다.
-
액티비티 또는 프래그먼트에 컨테이너를 배치하고, 컨테이너에 프래그먼트를 추가/교체/삭제하는 작업을 코드를 통해 수행할 수 있습니다. 이러한 작업을 위해서 Fragment Manager와 Fragment Transaction이 필요합니다.
-
Fragment Manager는 백 스택을 관리하고 프래그먼트 트랜잭션을 생성합니다.
-
Fragment Transaction은 프래그먼트를 추가/교체/삭제하는 작업을 제공합니다.
FragmentTransaction 특징
-
FragmentTransaction 클래스는 프래그먼트의 추가/변경/삭제 기능을 제공합니다.
-
다수의 프래그먼트를 추가하고 변경하는 액션을 하나의 트랜잭션으로 묶을 수 있습니다.
-
FragmentTransaction의 인스턴스는 FragmentManager의 beginTransaction() 메소드를 통해 획득할 수 있습니다.
val fragmentManager = supportFragmentManager
val fragmentTransactio = fragmentManager.beginTransaction()-
각각의 FragmentTransaction은 마지막에 트랜잭션에 대해 반드시 commit을 호출해야 합니다. commit() 메소드는 FragmentManager에게 트랜잭션에 모든 명령이 추가되었다고 알립니다.
-
기본적으로 commit() 메소드는 비동기적이고, 트랜잭션을 즉시 수행하지 않습니다. commit() 호출 시점에 트랙잭션은 메인 스레드에 예약됩니다. 그리고 메인 스레드에서 예약된 트랜잭션의 수행이 가능할 때 트랜잭션이 수행됩니다.
-
만약 즉시 트랜잭션이 수행되어야 한다면 commitNow()를 사용하면 됩니다. 다만 commitNow는 addToBackStack과 호환되지 않습니다.
-
val fragmentManager = supportFragmentManager
// Fragment-ktx 모듈의 기능을 사용
// commit 메소드
// 메인 스레드에 예약
fragmentManager.commit {
    setReorderingAllowed(true)
    add(R.id.fragment_container, FirstFragment())
}

// commitNow 메소드
// 즉시 실행
fragmentManager.commitNow {
    setReorderingAllowed(true)
    add(R.id.fragment_container, FirstFragment())
}
이제 FragmentTransaction을 이용하여 프래그먼트를 추가/변경/삭제하는 예시 코드를 확인하기 전에 프래그먼트의 생명주기에 대해 알아보겠습니다.
프래그먼트의 생명주기
각각의 프래그먼트 객체는 고유의 생명주기를 가집니다. 액티비티와 마찬가지로 사용자의 상호작용에 의해서 생명주기가 바뀝니다. 또한 프래그먼트도 액티비티와 마찬가지로 LifecycleOwner 인터페이스를 구현하고 있어서 Lifecycle 객체를 사용하여 따로 생명주기를 관리할 수 있습니다. 만약 Lifecycle 객체를 사용하지 않는다면 프래그먼트에 선언된 생명주기 콜백 메소드를 사용하면 됩니다.
프래그먼트의 view는 프래그먼트의 생명주기와 독립적으로 관리되는 Lifecycle(생명주기)이 있습니다. 프래그먼트는 view를 위한 LifecycleOwner를 유지하고, 그 객체는 getViewLifecycleOwner() 또는 getViewLifecycleOwnerLiveData() 메소드를 통해 접근할 수 있습니다.
프래그먼트의 생명주기 상태와 콜백
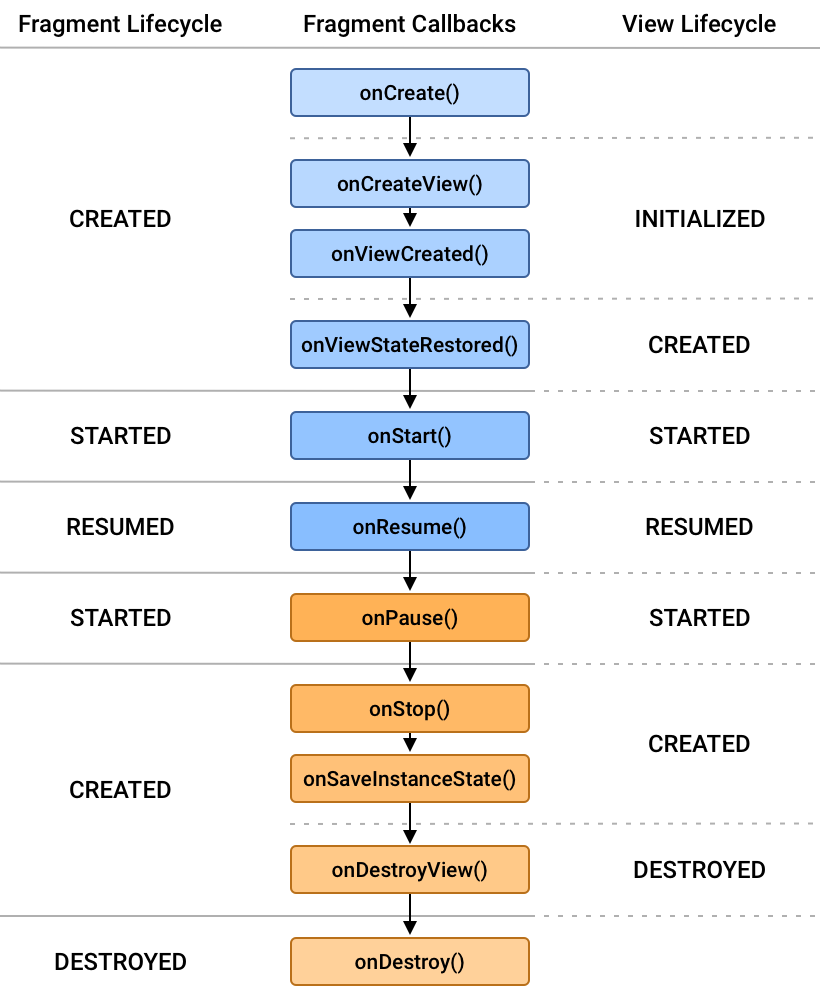
위의 그림은 프래그먼트 Lifecycle, 콜백 메소드, 프래그먼트 View의 Lifecycle을 보여줍니다. 프래그먼트의 생명주기는 기본적으로 그림의 위에서 아래 방향으로 흘러갑니다. 예를 들어 백스택의 꼭대기에 추가된 프래그먼트는 CREATED - STARTED - RESUMED의 순서로 흘러갑니다. 그와는 반대로 백스택에서 튀어나오면(pop) 프래그먼트는 RESUMED - STARTED - CREATED - DESTROYED 순으로 흘러갑니다.
그림에서 유추할 수 있듯이, Fragment의 Lifecycle이 변화되는 순간 Fragment Callback 함수를 호출하게 되고, 해당 콜백 함수가 종료되는 시점에 View의 Lifecycle에 이벤트를 전달합니다.
이제 직접 각 생명주기를 확인해보겠습니다.
-
onAttach()
- onAttach 콜백 메소드는 프래그먼트가 FragmentManager에 추가되고 호스트 액티비티에 붙을 때 호출됩니다. 프래그먼트 생명주기 콜백 메소드 중에서 가장 먼저 호출되며 이때 프래그먼트는 살아있고, FragmentManager에 의해 생명주기 상태가 관리됩니다. onAttach()가 호출되면 FragmentManager의 findFragmentById() 메소드를 통해 현재 컨테이너에 프래그먼트에 대한 참조를 얻을 수 있습니다. onAttach는 항상 모든 생명주기의 변화가 있기 전에 호출됩니다(즉, 가장 먼저 호출됩니다.).
-
onCreate()
-
프래그먼트가 CREATED 상태에 도달했을 때, FragmentManager는 onAttach() 메소드를 이미 호출한 상태입니다.
-
프래그먼트와 관련된 저장된 데이터를 복구하기에 좋은 장소입니다.
-
프래그먼트의 view는 이 시점에 생성되지 않았기에 프래그먼트의 view와 관련된 작업을 하기에는 적절하지 않습니다.
-
CREATED 상태에서 onCreate 콜백 메소드를 호출합니다. 이 콜백은 onSaveInstanceState()에 의해 저장된 savedInstanceState Bundle 인자를 받을 수 있는데, savedInstanceState는 처음 프래그먼트가 만들어질 때는 null이고, 그 후에는 null이 아닙니다.
-
-
onCreateView(), onViewCreated()
-
onCreate() 이후 onCreateView(), onViewCreated()가 호출됩니다. onCreateView() 콜백 메소드를 적절히 오버라이드하여 정상적으로 View 객체를 반환하면, 프래그먼트의 View의 Lifecycle이 생성됩니다.
-
onCreateView를 오버라이드하여 View를 생성할 수도 있지만 프래그먼트의 생성자에 레이아웃 id를 전달하여 onCreateView를 오버라이드하지 않고 View를 생성할 수도 있습니다.
-
이렇게 생성된 View는 onViewCreated() 메소드의 파라미터로 들어오게 되고, 이제 프래그먼트의 View의 Lifecycle이 INITIALIZED 상태로 업테이트 됩니다. 따라서 이 시점에 프래그먼트의 view를 업데이트하는 콜백을 가진 LiveData 객체를 관찰하기 좋고, 프래그먼트의 view에 있는 RecyclerView 또는 ViewPager2 객체에 어댑터를 설정하기 좋습니다.
-
-
onViewStateRestored()
- onViewStateRestored() 함수는 저장해둔 모든 state 값이 프래그먼트의 view 계층구조에 복원되었을 때 호출됩니다. 이 시점에 체크박스가 현재 체크되어 있는지 등을 확인할 수 있습니다.
-
onStart()
-
사용자에게 프래그먼트가 보여질 때 호출됩니다. 일반적으로 액티비티의 생명주기 Activity.onStart()와 관련이 있습니다.
-
이 시점에서 프래그먼트의 child FragmentManager를 통해 FragmentTransaction을 수행하기 좋습니다.
-
만약 프래그먼트의 view가 널이 아니라면, 프래그먼트의 Lifecycle이 STARTED로 이동한 후에 즉시 프래그먼트의 view의 Lifecycle도 STARTED로 변합니다.
-
-
onResume()
-
프래그먼트가 보이는 상태에서 모든 Animator와 Transition의 효과는 종료되고, 프래그먼트가 사용자의 상호작용할 수 있을 때 onResume() 콜백이 호출됩니다.
-
onStart()와 마찬가지로 액티비티의 생명주기 Activity.onResume()와 관련이 있습니다.
-
Resumed 상태가 되었다는 것은 유저가 프래그먼트와 상호작용하기에 적절한 상태라는 신호입니다. 즉, Resumed 상태가 되지 않은 시점에서는 프래그먼트의 뷰에 포커스를 설정하거나 입력을 시도하는 등의 처리를 하면 안됩니다.
-
-
onPause()
- 사용자가 프래그먼트를 떠나기 시작했지만, 프래그먼트가 여전히 보인다면(visible) onPause()가 호출됩니다. 여기서 Fragment와 View의 Lifecycle은 STARTED가 됩니다.
-
onStop()
-
프래그먼트가 더이상 보이지 않는다면(invisible) 프래그먼트와 View의 lifecycle은 CREATED 상태로 변화하고 onStop()이 호출됩니다. 이 상태는 부모 액티비티나 프래그먼트가 중지될 때 뿐만아니라, 부모 액티비티나 프래그먼트에 의한 상태 저장에 의해서도 호출됩니다.
-
API 28부터 onStop() 콜백 메소드와 상태를 저장하는 onSaveInstanceState() 메소드의 순서가 바뀌었습니다. 28 이전에는 onSaveInstanceState - onStop 순이였다면 28 이후에는 onStop - onSaveInstanceState 순입니다.
-

-
onDestroyView()
-
모든 나가는(exit) animation과 transition이 완료되고, 프래그먼트의 view가 화면에서 분리된 경우 프래그먼트의 뷰의 Lifecycle은 DESTROYED 상태로 움직이고 onDestroyView() 콜백이 호출됩니다.
-
이 시점에 getViewLifecycleOwnerLiveData() 메소드는 null을 반환합니다.
-
이 시점에서 프래그먼트의 view에 대한 참조를 모두 제거하여, 프래그먼트의 view가 가비지 컬렉터에 의해 수거될 수 있도록 해야 합니다.
-
-
onDestroy()
-
프래그먼트가 제거되거나 FragmentManager가 파괴(destroy)된다면, 프래그먼트의 Lifecycle은 DESTROYED로 바뀌고 onDestroy() 메소드가 호출됩니다.
-
이 시점에 프래그먼트는 생명주기의 끝에 도달합니다.
-
-
onDetach()
- onDetach 콜백 메소드는 프래그먼트가 FragmentManager에서 제거되고 호스트 액티비티에서 떨어질 때 호출됩니다. 프래그먼트는 더이상 살아있지 않고 findFragmentById()에 의해 프래그먼트의 참조를 획득할 수 없습니다. onDetach는 모든 생명주기의 변화 후에 호출됩니다(즉, 제일 마지막에 호출됩니다.).
FragmentTransaction 예시 코드
프래그먼트 추가
프래그먼트를 추가하기 위해서는 FragmentTransaction의 add() 메소드를 사용합니다. 이 메소드의 매개변수 인자로 프래그먼트를 추가할 컨테이너의 ID와 추가할 프래그먼트 클래스를 전달합니다.
컨테이너에 Fragment 두 개를 추가해보겠습니다.
xml 코드
<androidx.fragment.app.FragmentContainerView
    android:id="@+id/fragment_container"
    android:layout_width="match_parent"
    android:layout_height="0dp"
    app:layout_constraintBottom_toBottomOf="parent"
    app:layout_constraintTop_toBottomOf="@id/linear" />
호스트 액티비티 코드
class MainActivity : AppCompatActivity() {

    lateinit var addOrReplaceBtn: Button
    lateinit var removeBtn: Button

    override fun onCreate(savedInstanceState: Bundle?) {
        super.onCreate(savedInstanceState)
        setContentView(R.layout.activity_main)

        logMessage("onCreate()")

        val fragmentManager = supportFragmentManager

        if(savedInstanceState == null) {
            // commit 메소드(Fragment - ktx 기능 사용)
            fragmentManager.commit {
                setReorderingAllowed(true)
                // 컨테이너에 프래그먼트 추가
                add(R.id.fragment_container, FirstFragment())
            }

            fragmentManager.commit {
                fragmentManager.commit {
                    setReorderingAllowed(true)
                    // 컨테이너에 프래그먼트 추가
                    add(R.id.fragment_container, SecondFragment())
                }
            }
        }
    }
}- xml에 FragmentContainerView를 추가하여 프래그먼트의 컨테이너로 사용합니다. 그리고 액티비티 코드에서 두 개의 Fragment를 추가하였습니다.
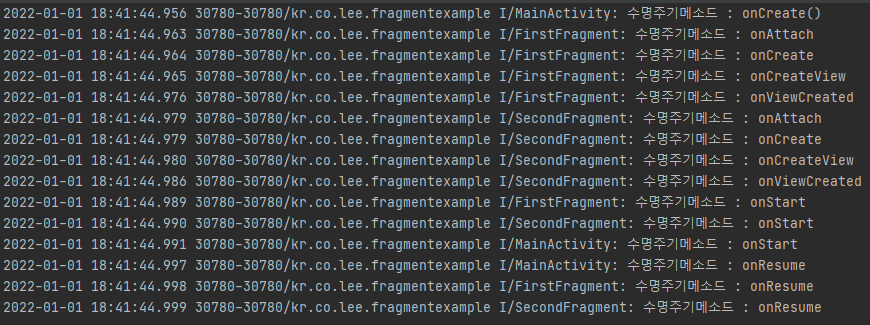
- 호스트 액티비티에서 두 개의 프래그먼트를 추가한 생명 주기는 위와 같습니다. 두 개의 프래그먼트가 거의 동시에 생성되며 모두 onResume까지 갔습니다. 즉, 아래에 깔린 FirstFragment 또한 여전히 RESUMED 상태입니다.

- SecondFragment의 색은 주황색이고 FirstFragment의 색은 하늘색인데 호스트 액티비티 위에 add된 순서대로 깔려서 FirstFragment는 보이지 않고, SecondFragment에 해당하는 주황색만 보입니다.
프래그먼트 삭제
프래그먼트의 삭제는 FragmentTransaction의 remove() 메소드를 사용합니다.

remove() 메소드는 매개변수로 프래그먼트 객체를 받는데 이 프래그먼트 객체는 FragmentManager의 findFragmentById()나 findFragmentByTag() 메소드를 통해 획득할 수 있습니다.
class MainActivity : AppCompatActivity() {

    lateinit var addOrReplaceBtn: Button
    lateinit var removeBtn: Button
    val fragmentManager = supportFragmentManager

    override fun onCreate(savedInstanceState: Bundle?) {
        super.onCreate(savedInstanceState)
        setContentView(R.layout.activity_main)
        removeBtn = findViewById(R.id.button2)

        logMessage("onCreate()")

        if (savedInstanceState == null) {
            // commit 메소드(Fragment - ktx 기능 사용)
            fragmentManager.commit {
                setReorderingAllowed(true)
                // 컨테이너에 프래그먼트 추가(태그도 추가)
                add(R.id.fragment_container, FirstFragment(), "firstFragment")
                add(R.id.fragment_container, SecondFragment(), "secondFragment")
            }
        }

        removeBtn.setOnClickListener {
            // FragmentManager의 findFragmentByTag 메소드를 이용해 Fragment 찾기
            val secondFragment = fragmentManager.findFragmentByTag("secondFragment")
            fragmentManager.commit {
                if(secondFragment != null) {
                    remove(secondFragment)
                } else {
                    Toast.makeText(this@MainActivity,
                        "SecondFragment가 존재하지 않습니다.", Toast.LENGTH_SHORT).show()
                }
            }
        }
    }
}- 우선 호스트 액티비티에 두 개의 프래그먼트를 추가하였습니다. 이때, add 메소드의 마지막 인자로 태그 값을 주어서 프래그먼트를 구분할 수 있는 식별자를 설정하였습니다. 그 후 버튼을 누르면 FragmentManager의 findFragmentByTag() 메소드를 사용하여 프래그먼트를 찾고, remove의 인자로 프래그먼트를 넘겨서 삭제하는 코드입니다.

- FirstFragment, SecondFragment 모두 onResume(RESUMED) 생명주기까지 도달하였습니다. 그 후 SecondFragment를 삭제하자 onPause부터 onDetach 콜백 메소드까지 호출되며 호스트 액티비티에서 프래그먼트가 완전히 분리되었습니다.
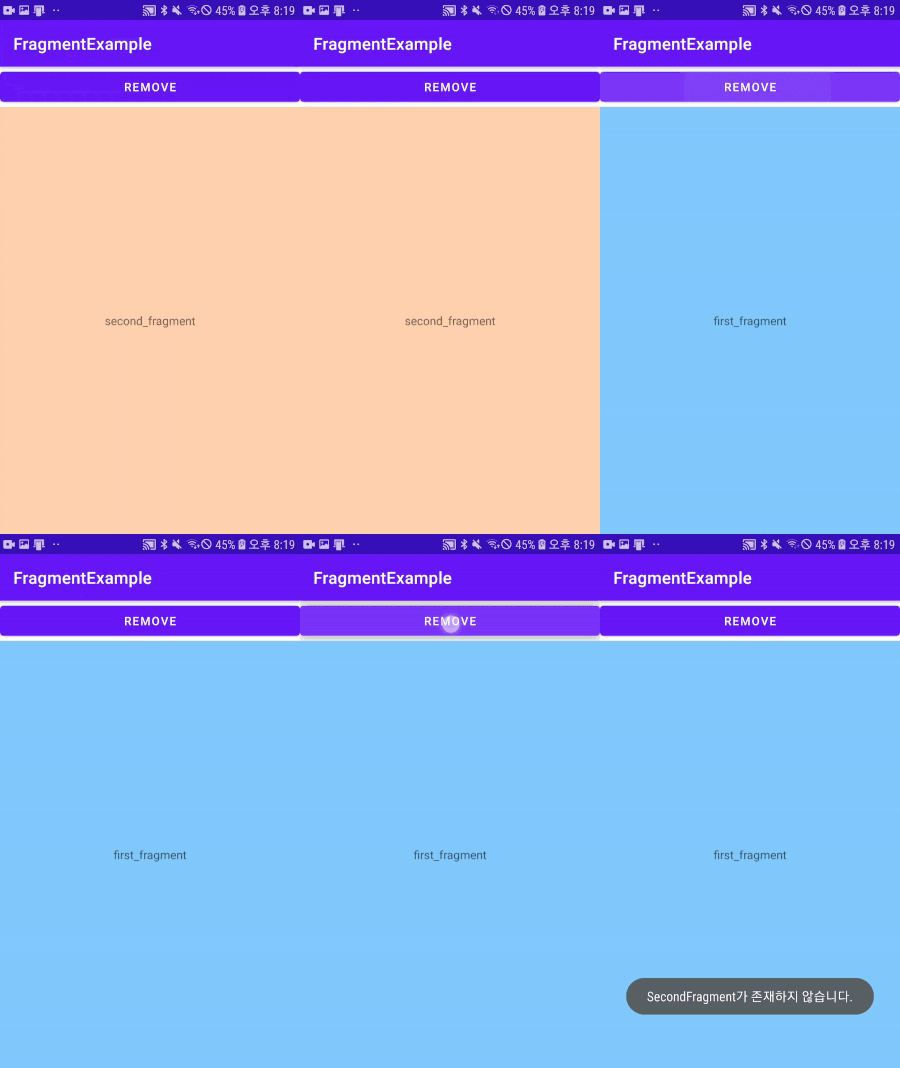
- 파란색에 해당하는 FirstFragment와 주황색에 해당하는 SecondFragment를 동시에 추가하였습니다. 그 후 SecondFragment를 remove(제거)하여 그 밑에 깔려있던 FirstFragment(파란색)가 나타나는 사진입니다.
프래그먼트 변경
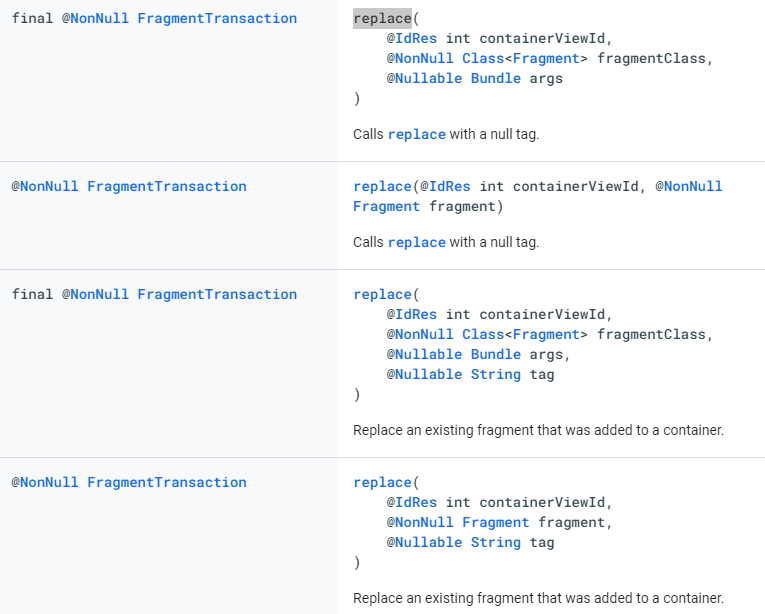
프래그먼트 변경은 FragmentTransaction의 replace 메소드를 사용합니다.
class MainActivity : AppCompatActivity() {

    lateinit var addOrReplaceBtn: Button
    lateinit var removeBtn: Button
    val fragmentManager = supportFragmentManager

    override fun onCreate(savedInstanceState: Bundle?) {
        super.onCreate(savedInstanceState)
        setContentView(R.layout.activity_main)
        addOrReplaceBtn = findViewById(R.id.button2)

        logMessage("onCreate()")

        if (savedInstanceState == null) {
            // commit 메소드(Fragment - ktx 기능 사용)
            fragmentManager.commit {
                setReorderingAllowed(true)
                // 컨테이너에 프래그먼트 추가(태그도 추가)
                add(R.id.fragment_container, FirstFragment(), "firstFragment")
                add(R.id.fragment_container, SecondFragment(), "secondFragment")
                add(R.id.fragment_container, ThirdFragment(), "thirdFragment")
            }
        }

        addOrReplaceBtn.setOnClickListener {
            val secondFragment = fragmentManager.findFragmentByTag("secondFragment")
            fragmentManager.commit {
                if(secondFragment != null) {
                    // replace 메소드를 사용하여 Fragment 교체
                    replace(R.id.fragment_container, secondFragment)
                }
            }
        }
    }
}- 호스트 액티비티에 세 개의 프래그먼트를 추가하였습니다. 그 후 replace 메소드를 통해 secondFragment로 변경하는 코드입니다.
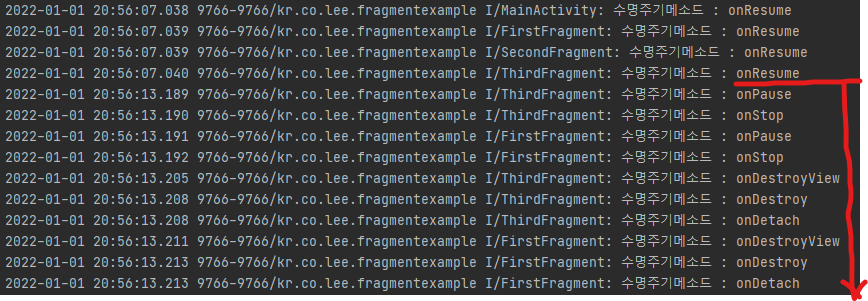
- FirstFragment와 SecondFragment, ThirdFragment 모두 onResume(RESUMED)까지 도달하였습니다. 그 후 버튼을 클릭하여 SecondFragment로 변경하였습니다. 이때, 인자로 지정된 프래그먼트를 제외하고 나머지 프래그먼트가 모두 제거됩니다. 위의 사진을 보면 FirstFragment와 ThirdFragment가 모두 onDetach까지 호출되었습니다.

- FirstFragment(하늘색), SecondFragment(주황색), ThirdFragment(핑크색) 모두 한꺼번에 추가하였습니다. 그 후 replace 메소드를 통해 SecondFragment(주황색)로 변경하니 ThirdFragment와 FirstFragment가 모두 사라지고 SecondFragment만 남는 사진입니다.
백스택에 추가하며 프래그먼트 변경
이번에는 위의 코드와 똑같지만 단지 addToBackStack() 메소드를 통해 트랜잭션을 백스택에 추가해보겠습니다.
class MainActivity : AppCompatActivity() {

    lateinit var addOrReplaceBtn: Button
    lateinit var removeBtn: Button
    val fragmentManager = supportFragmentManager

    override fun onCreate(savedInstanceState: Bundle?) {
        super.onCreate(savedInstanceState)
        setContentView(R.layout.activity_main)
        addOrReplaceBtn = findViewById(R.id.button2)

        logMessage("onCreate()")

        if (savedInstanceState == null) {
            // commit 메소드(Fragment - ktx 기능 사용)
            fragmentManager.commit {
                setReorderingAllowed(true)
                // 컨테이너에 프래그먼트 추가(태그도 추가)
                add(R.id.fragment_container, FirstFragment(), "firstFragment")
                add(R.id.fragment_container, SecondFragment(), "secondFragment")
                add(R.id.fragment_container, ThirdFragment(), "thirdFragment")
                // 백스택에 추가
                addToBackStack(null)
            }
        }

        addOrReplaceBtn.setOnClickListener {
            val secondFragment = fragmentManager.findFragmentByTag("secondFragment")
            fragmentManager.commit {
                if(secondFragment != null) {
                    // replace 메소드를 사용하여 Fragment 교체
                    replace(R.id.fragment_container, secondFragment)
                }
            }
        }
    }
}- 세 개의 프래그먼트를 추가하는 코드에서 addToBackStack() 메소드를 통해 트랜잭션을 백스택에 추가하였습니다.

- 생명주기가 호출된 사진을 보면 이전에 예제와는 조금 다릅니다. 이전의 예제는 onDetach까지 호출되며 프래그먼트가 호스트 액티비티에서 분리되었는데, 이번에는 onDestroyView까지 호출되고 onDestroy와 onDetach는 호출되지 않았습니다.
참조
안드로이드 developer - Fragment transactions
안드로이드 - 의외로 잘 모르는 Fragment의 Lifecycle
안드로이드 - 프래그먼트의 모든 것(FragmentTransaction)
위 예제 코드는 깃허브에서 볼 수 있습니다.
틀린 부분을 댓글로 남겨주시면 수정하겠습니다..!!
