
Navigaion Component
Navigation Component는 안드로이드 JetPack 라이브러리 중 하나로 사용자의 상호작용에 따라 화면간의 이동을 구현하는데 도움을 줍니다. 이전에 작성했던 Fragment와 FragmentManager 글에서도 언급했지만 해당 라이브러리를 사용하면 FragmentManager와 상호작용하지 않아도 됩니다. 특히 안드로이드에서 Single Activity를 권장하고 있기에 해당 라이브러리를 사용하면 더욱 쉽게 Fragment를 사용할 수 있습니다.
참조
Single activity: Why, when, and how (Android Dev Summit '18)
우선 주요 요소를 알아보겠습니다.
Navigaion Component의 주요 요소
-
Navigation graph : 모든 네비게이션 관련 정보를 포함하는 XML 리소스 파일입니다. 이 파일에는 destination(프래그먼트 또는 액티비티)라고 불리는 콘텐츠 영역과 destination들의 사이를 연결시켜주는 action(경로) 등이 포함됩니다.
-
NavHost : navigation graph로부터 destination을 보여주는 빈 컨테이너입니다. 즉, destination이 나타나고 사라지는 컨테이너에 해당합니다.
-
NavController : NavHost 내에서 탐색을 관리하는 객체입니다. NavController는 사용자가 앱 내에서 이동할 때 NavHost의 컨텐츠를 조정합니다. 하나의 NavHost에는 하나의 NavController가 존재하고 있습니다.
즉, 앱을 탐색할 때 navigaion graph의 경로를 따라 탐색하거나 특별히 지정된 destination으로 탐색할 것임을 NavController에게 알리는 것입니다. 그러면 NavController는 NavHost에게 적절한 destination을 표시하는 것입니다. 주요 요소에 대한 자세한 내용은 아래에서 확인해보겠습니다.
의존성 설정 및 간단한 Fragment 생성
의존성 설정
우선 Navigation Component를 사용하기 위해서 모듈 수준의 build.gradle 파일에 아래와 같이 작성합니다.
build.gradle(Module)
dependencies {
  // 작성 시점 안정 버전
  def nav_version = "2.4.1"

  // Kotlin
  implementation "androidx.navigation:navigation-fragment-ktx:$nav_version"
  implementation "androidx.navigation:navigation-ui-ktx:$nav_version"
}
Navigaion Component에는 Safe Args라는 플러그인이 있습니다. destination을 따라서 인자를 안전하게 전달하도록 도와주는 역할을 수행하는데 이를 사용하려면 아래와 같이 의존성을 추가로 설정해야 합니다.
build.gradle(Project)
buildscript {
    repositories {
        google()
    }
    dependencies {
        def nav_version = "2.4.1"
        classpath "androidx.navigation:navigation-safe-args-gradle-plugin:$nav_version"
    }
}
build.gradle(Module)
plugins {
  // for Java or mixed Java and Kotlin
  id 'androidx.navigation.safeargs'

  // only for Kotlin
  id 'androidx.navigation.safeargs.kotlin'
}
프래그먼트 생성
예제에서 사용할 프래그먼트는 아래와 같습니다. 총 3개의 Fragment를 생성하였고 모두 같은 구조의 프래그먼트입니다.
MainFragment.kt
class MainFragment: Fragment() {
    // DataBinding 사용
    private var _binding: FragmentMainBinding? = null
    private val binding: FragmentMainBinding
        get() = _binding!!

    override fun onCreateView(
        inflater: LayoutInflater,
        container: ViewGroup?,
        savedInstanceState: Bundle?
    ): View? {
        _binding = DataBindingUtil.inflate(
            layoutInflater, R.layout.fragment_main, container, false)

        return binding.root
    }

    override fun onViewCreated(view: View, savedInstanceState: Bundle?) {
        super.onViewCreated(view, savedInstanceState)

        binding.apply {

        }
    }
}
fragment_main.xml
<layout xmlns:android="http://schemas.android.com/apk/res/android"
    xmlns:app="http://schemas.android.com/apk/res-auto"
    xmlns:tools="http://schemas.android.com/tools">

    <androidx.constraintlayout.widget.ConstraintLayout
        android:layout_width="match_parent"
        android:layout_height="match_parent">

        <Button
            android:id="@+id/btn_move"
            android:layout_width="wrap_content"
            android:layout_height="wrap_content"
            android:text="move"
            app:layout_constraintBottom_toBottomOf="parent"
            app:layout_constraintEnd_toEndOf="parent"
            app:layout_constraintStart_toStartOf="parent"
            app:layout_constraintTop_toTopOf="parent" />

    </androidx.constraintlayout.widget.ConstraintLayout>

</layout>
Navigation Host 생성
Navigation Host(NavHost)는 컨테이너에 해당하고, 이를 통해 destination들이 나타나고 사라집니다. Navigation Host는 반드시 NavHost로부터 파생되어야 합니다. 기본적으로 NavHostFragment라는 클래스가 NavHost 인터페이스를 구현하고 있기에 이를 사용하면 됩니다. 아래는 activity의 XML 파일에 Navigation Host를 선언한 예제입니다.
activity_main.xml
<androidx.constraintlayout.widget.ConstraintLayout
    xmlns:android="http://schemas.android.com/apk/res/android"
    xmlns:app="http://schemas.android.com/apk/res-auto"
    xmlns:tools="http://schemas.android.com/tools"
    android:layout_width="match_parent"
    android:layout_height="match_parent"
    tools:context=".MainActivity">

    <androidx.fragment.app.fragment
        android:id="@+id/demo_nav_host_fragment"
        android:name="androidx.navigation.fragment.NavHostFragment"
        android:layout_width="match_parent"
        android:layout_height="match_parent"
        app:defaultNavHost="true"
        app:navGraph="@navigation/navigation_graph" />

</androidx.constraintlayout.widget.ConstraintLayout>
Fragment의 컨테이너 역할을 하는 fragment(FragmentContainerView도 가능)를 선언하고 Navigaion Host로 만들기 위해 여러가지 속성을 추가합니다.
-
android:name: NavHost를 구현하는 클래스의 이름을 추가해주면 됩니다. 위에서 언급했듯이 NavHostFragment가 NavHost를 구현하고 있기에 해당 클래스의 전체 경로를 추가하였습니다. -
app:navGraph: Navigaion graph 파일을 추가하면 됩니다. 아래에서 살펴보겠지만 navigaion graph는 XML 파일로 destination들을 선언하는 곳입니다. -
defaultNavHost해당 속성을 true로 설정하면 back button을 눌렀을 때 이전 화면(destination)으로 전환됩니다. 만약 false로 설정한다면 back button을 눌러도 이전 화면이 나타나지 않습니다. 즉, 백스택에 destination들을 추가하는 속성입니다.
navigation graph 생성하기
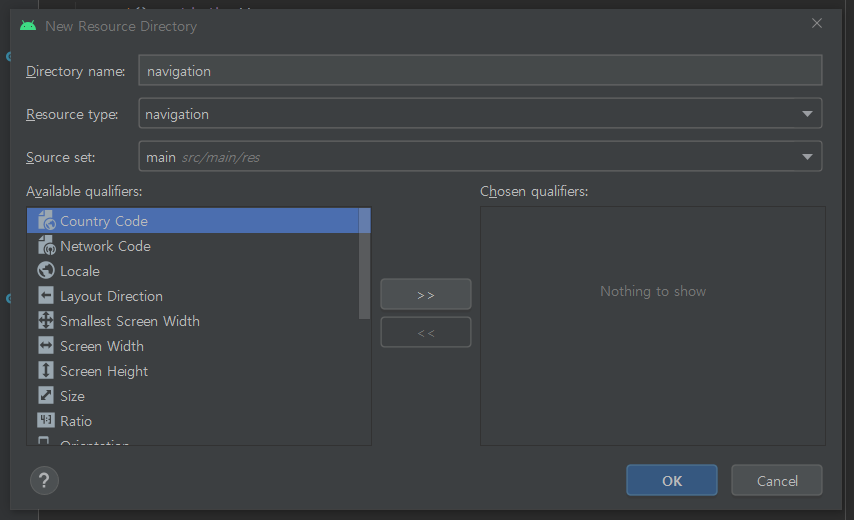
navigation graph를 생성해보도록 하겠습니다. navigation graph는 모든 navigation 관련 자료를 포함하고 있는 XML 파일 입니다. XML 파일이기 때문에 res 폴더안에 만들면 됩니다. 우선 폴더를 생성한 후 만들어보겠습니다.
new resource directory - resource type(navigation) 폴더 추가
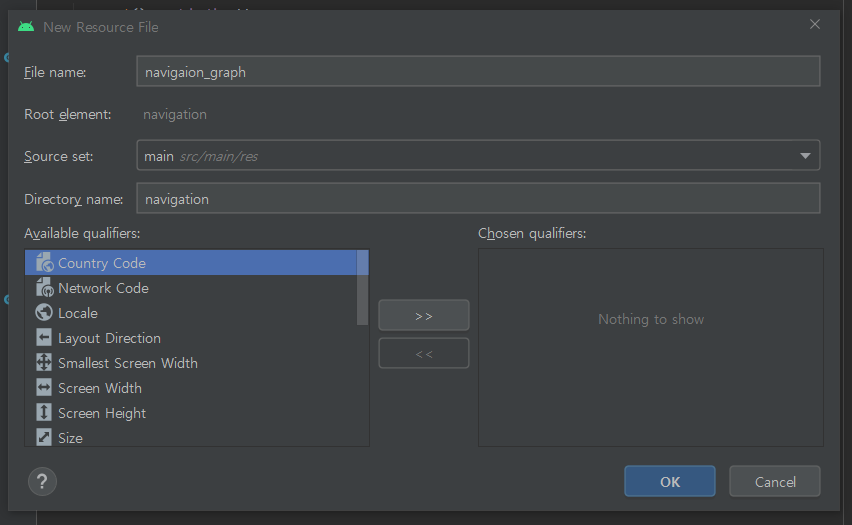
폴더를 생성하였으면 폴더안에 resource type을 navigation으로 고른 후 XML 파일을 생성하면 됩니다. 예제에서는 navigation_graph 라는 XML 파일을 생성하였습니다.
resource type(navigation) XML 파일 추가
navigation_graph.xml(design 모드)
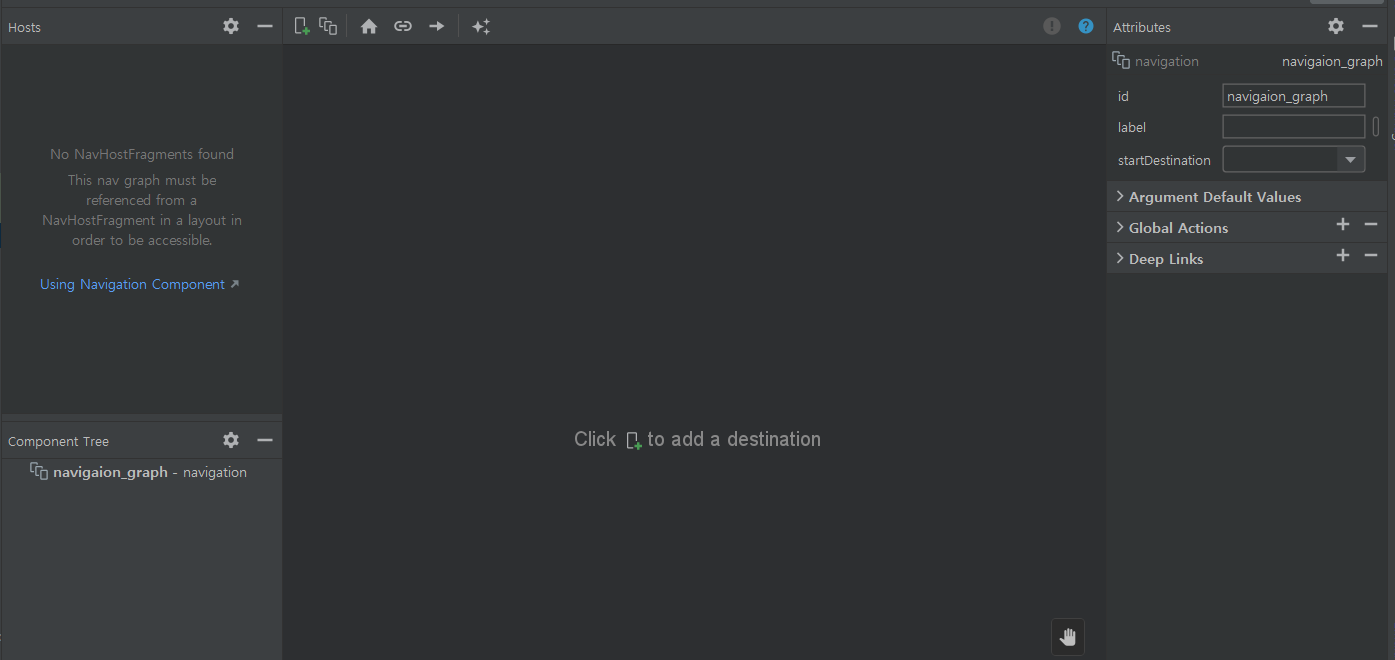
처음 생성된 navigaion graph 파일은 위와 같이 생겼습니다. 아직 아무것도 추가되지 않은 상태인데, 만약 destination를 추가하고 싶다면 상단의 + 버튼(New Destination)을 클릭하면 됩니다.
- Destination(목적지): 액티비티 또는 프래그먼트에 해당합니다. 프래그먼트 같은 경우는 액티비티 위에 생성되기에 destination으로 넣을 때 아무런 조건이 붙지 않지만 액티비티를 destination으로 넣을 경우에는 조금 달라집니다. 액티비티를 destination으로 넣는다는 것은 "현재
navigaion graph의 endpoint로 설정한다" 는 뜻입니다. 즉, 현재navigaion graph는 더 이상 사용하지 못하고 새로운 액티비티에 연결된navigaion graph로 이동합니다. 자세한 내용은 공식 사이트의 Create a new activity destination에 나와있습니다.
New Destination

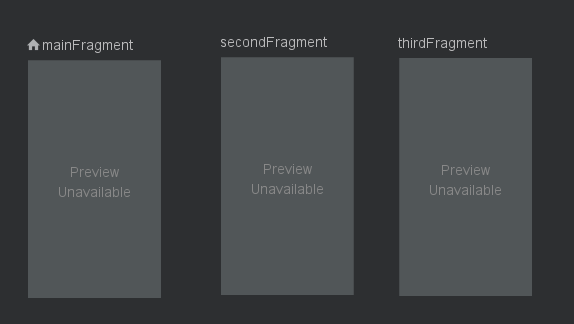
New Destination을 선택하면 위와 같은 화면이 나타납니다. 해당 기능을 통해 새로운 destination을 생성할 수도 있지만 위에서 이미 생성한 프래그먼트를 사용하도록 하겠습니다. 원하는 Fragment를 단지 클릭하면 자동으로 destination이 생성됩니다.
fragment 추가
<navigation xmlns:android="http://schemas.android.com/apk/res/android"
    xmlns:app="http://schemas.android.com/apk/res-auto"
    xmlns:tools="http://schemas.android.com/tools"
    android:id="@+id/navigation_graph"
    app:startDestination="@id/A">

    <fragment
        android:id="@+id/A"
        android:name="kr.co.lee.navigationcomponentexample.MainFragment"
        android:label="MainFragment" >
    </fragment>
    <fragment
        android:id="@+id/B"
        android:name="kr.co.lee.navigationcomponentexample.SecondFragment"
        android:label="SecondFragment" >
    </fragment>
    <fragment
        android:id="@+id/C"
        android:name="kr.co.lee.navigationcomponentexample.ThirdFragment"
        android:label="ThirdFragment" >
    </fragment>

</navigation>
생성했던 세 개의 프래그먼트를 destination으로 추가하였습니다. navaigion graph 파일의 루트 태그는 navigaion 입니다. 해당 태그의 속성 중 app:startDestination 속성은 처음 보여질 화면으로 현재 A로 설정되어 있기에 id = A에 해당하는 MainFragment가 가장 먼저 보이게 됩니다. 그리고 navigaion 태그 안에는 위에서 추가했던 destination에 해당하는 세 개의 fragment 태그가 존재하는데 android:name 속성은 Fragment의 전체 경로에 해당합니다.
이와 같이 선언하면 앱을 실행한다면 app:startDestination 으로 설정한 MainFragment만 보이게 됩니다. FragmentManager와 FragmentTransaction을 사용하지 않아도 Navigaion Component가 자동으로 관리하기 때문입니다. 아래에서는 나머지 프래그먼트들도 보일 수 있게 BottomNavigaionView를 연결하거나 Action 클래스를 사용하여 프래그먼트들을 연결해보도록 하겠습니다.
BottomNavigation 구현하기
프래그먼트는 BottomNavigaionView, ViewPager2와 같은 뷰와 많이 연결하여 사용하는데 여기서는 BottomNavigationView와 연결하는 법을 알아보도록 하겠습니다. 우선 menu 폴더를 생성 후 menu_bottom_navigaion.xml 파일을 생성합니다.
menu_bottom_navigaion.xml
<menu xmlns:android="http://schemas.android.com/apk/res/android">

    <item
        android:id="@+id/A"
        android:icon="@android:drawable/ic_menu_upload"
        android:title="Upload" />

    <item
        android:id="@+id/B"
        android:icon="@android:drawable/ic_menu_camera"
        android:title="Camera" />

    <item
        android:id="@+id/C"
        android:icon="@android:drawable/ic_menu_add"
        android:title="Add" />

</menu>
Navigation Component와 연결할 menu를 선언할 때 icon이나 title 속성은 아무렇게나 선언해도 상관이 없습니다. id 속성이 중요한데, menu에서 선언한 id와 Navigation Graph에 선언된 fragment 태그의 id를 동일하게 설정해야 합니다. 이와 같이 설정해야 id가 같은 fragment 태그와 menu가 연결됩니다.
activity_main.xml
<layout xmlns:android="http://schemas.android.com/apk/res/android"
    xmlns:app="http://schemas.android.com/apk/res-auto"
    xmlns:tools="http://schemas.android.com/tools">

    <androidx.constraintlayout.widget.ConstraintLayout
        android:layout_width="match_parent"
        android:layout_height="match_parent"
        tools:context=".MainActivity">

        <androidx.fragment.app.FragmentContainerView
            android:id="@+id/demo_nav_host_fragment"
            android:name="androidx.navigation.fragment.NavHostFragment"
            android:layout_width="match_parent"
            android:layout_height="0dp"
            app:defaultNavHost="true"
            app:layout_constraintBottom_toTopOf="@id/bnv_main"
            app:layout_constraintTop_toTopOf="parent"
            app:navGraph="@navigation/navigation_graph" />

        <com.google.android.material.bottomnavigation.BottomNavigationView
            android:id="@+id/bnv_main"
            android:layout_width="match_parent"
            android:layout_height="wrap_content"
            app:layout_constraintBottom_toBottomOf="parent"
            app:layout_constraintTop_toBottomOf="@id/demo_nav_host_fragment"
            app:menu="@menu/menu_bottom_navigation" />

    </androidx.constraintlayout.widget.ConstraintLayout>

</layout>
BottomNavigationView는 activity_main.xml 파일에 선언하였고 BottomNavigaionView가 선언된 MainActivity.kt 파일에 아래와 같이 선언하면 됩니다.
MainActivity.kt
class MainActivity : AppCompatActivity() {
    // 데이터 바인딩 사용
    private lateinit var binding: ActivityMainBinding

    override fun onCreate(savedInstanceState: Bundle?) {
        super.onCreate(savedInstanceState)

        binding = DataBindingUtil.setContentView(this, R.layout.activity_main)

        binding.apply {
            // NavController 획득
            val navController = findNavController(R.id.demo_nav_host_fragment)
            bnvMain.setupWithNavController(navController)
        }
    }
}
우선 findNavController(viewId: Int) 을 사용해 NavController를 획득하고 BottomNavigaionView의 setupWithNavController의 인자로 지정하여 해당 컨트롤러를 BottomNavigaionView와 연결하는 것인데, NavController는 아래의 Action과 Argument를 설명할 때 자세히 알아보도록 하겠습니다.
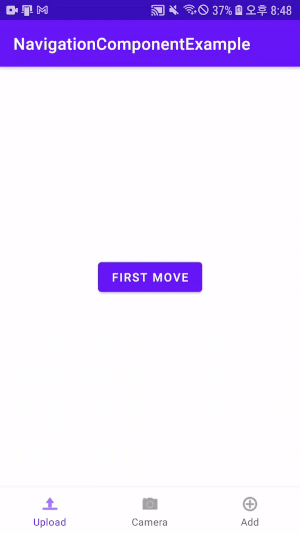
BottomNavigaionView의 setItemSelectedListener와 FragmentManager, FragmentTransaction을 연결하지 않아도 아래와 같이 BottomNavigaionView가 연동되는 것을 확인할 수 있습니다.
NavController와 Action, Args
Action
Action은 destination 사이를 연결할 때 사용합니다. Navigaion Graph에서 Action은 화살표로 나타나며, 한 destination에서 다른 destination을 가리키고 있는 모습입니다. 하나의 destination을 선택한 후 오른쪽을 클릭하고 add action 탭으로 가면 아래와 같은 옵션이 있습니다.

- To Destination : 현재 화면에서 다른 화면으로 이동하는 액션
- To Self : 자기 자신으로 이동하는 액션
- Return To Source : popBackStack시 사용될 액션
- Global : 어떤 화면에서든 현재 화면으로 이동할때의 액션(전역적인 액션)
다음은 하나의 action을 선언하고 선택한 화면입니다.
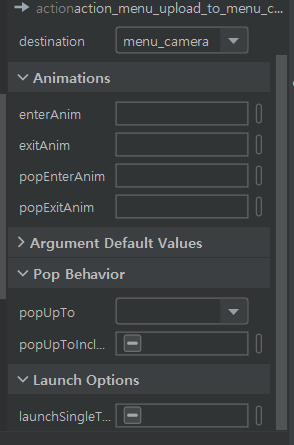
Animations은 Action을 통해 destination을 들어가거나 나갈때 애니메이션을 설정하는 것이고 Pop Behavior은 백스택과 관련된 탭입니다. Pop Behavior에는 popUpTo와 popUpToInClusive라는 속성이 있는데 이 두 속성은 아래와 같습니다.
-
popUpTo: 주어진 destination이 나올 때까지 백스택을 팝업합니다. -
popUpToInClusive: 만약 속성이 false이거나 설정되지 않았다면popUpTo는 지정된 destination을 제외한 모든 destination들을 제거합니다. 만약 속성이 true인 경우,popUpTo속성은 주어진 destination를 포함해서 모든 destination들을 백스택에서 제거합니다.
말이 조금 복잡한데 예를 들어 설명하겠습니다. destination이 (a, b, c)와 같이 있고 a -> b로, b -> c로, c -> a로 action이 선언되어 있다고 가정하겠습니다. 만약 popUpTo와 popUpToInClusive를 선언하지 않고 계속해서 action을 수행하면 백스택에는 (a, b, c, a, b, c, a, ...)와 같이 destination이 쌓이게 됩니다. 이와 같은 중복을 피하기 위해서 popUpTo와 popUpToInclusive를 사용하는데, destination c에 아래와 같이 popUpTo와 popUpToInclusive가 아래와 같이 선언되어 있다고 가정해보겠습니다.
<fragment
    android:id="@+id/c"
    android:name="com.example.myapplication.C"
    android:label="fragment_c"
    tools:layout="@layout/fragment_c">

    <action
        android:id="@+id/action_c_to_a"
        app:destination="@id/a"
        app:popUpTo="@+id/a"
        app:popUpToInclusive="false"/>
</fragment>
이와 같이 선언되어 있다면 c -> a로 action을 수행할 때 popUpTo 속성으로 지정한 a를 제외하고는 나머지 destination이 백스택에서 전부 날아가게 됩니다. 거기다가 popUpToInclusive를 true로 지정하였다면 a까지도 날아가게 됩니다. 따라서 만약 시작점을 이와 같이 설정한다면 시작점에 도착했을 때 백버튼을 클릭하면 앱이 종료되는 것입니다.
하나의 Action을 선언한 navigation_graph.xml
<fragment
    android:id="@+id/A"
    android:name="kr.co.lee.navigationcomponentexample.MainFragment"
    android:label="MainFragment" >
    <action
        android:id="@+id/action_A_to_B"
        app:destination="@id/B" />
</fragment>
<fragment
    android:id="@+id/B"
    android:name="kr.co.lee.navigationcomponentexample.SecondFragment"
    android:label="SecondFragment" >
</fragment>
<fragment
    android:id="@+id/C"
    android:name="kr.co.lee.navigationcomponentexample.ThirdFragment"
    android:label="ThirdFragment" >
</fragment>
action을 선언하면 XML 파일에는 위와 같이 생성됩니다. framgnet라는 태그의 중첩 태그로 들어가고, 현재 A 프래그먼트에서 B 프래그먼트로 destination을 지정했기에 action 태그의 app:destination 속성으로 B가 지정되어 있습니다.
NavController
선언된 action을 사용하기 위해서는 NavController가 필요합니다. NavController는 NavHost 내에서 전반적인 탐색을 관리합니다. 각 NavHost는 하나의 NavController를 가지고 있기에 직접 생성하거나 할 필요가 없이 아래의 메소드를 사용하여 획득할 수 있습니다.
다만 액티비티에서 FragmentContainerView를 사용하여
NavHostFragment를 생성하였다면 다음과 같은 코드를 사용해서NavContoller객체를 획득합니다.FragmentContainerView이 선언된 액티비티에서 NavController 획득
val navHostFragment =
        supportFragmentManager.findFragmentById(R.id.nav_host_fragment) as NavHostFragment
val navController = navHostFragment.navController
위에서 선언한 action_A_to_B action은 아래와 같이 navController를 사용하여 활성화할 수 있습니다.
MainFragment에서 action_A_to_B 활성화
btnMove.setOnClickListener {
    // NavController 획득
    val navController = findNavController()
    // navigate는 현재 navigation graph의 destination을 탐색하는 메서드로
    // 여러가지 인자가 올 수 있다.
    navController.navigate(R.id.action_A_to_B)
}
Args, SafeArgs
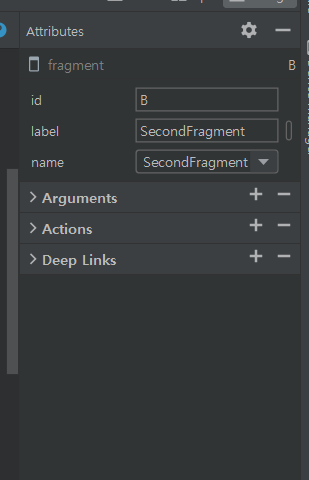
마지막으로 Args를 사용하여 destination간에 데이터를 전달해보도록 하겠습니다. Args는 데이터를 전달받는 destination에 선언하는 것으로 navigaion graph 파일에 가서 destination을 선택하면 아래와 같이 Arguments 탭이 존재합니다.
Arguments 탭에서 + 버튼을 클릭하면 아래와 같은 화면이 나타납니다.
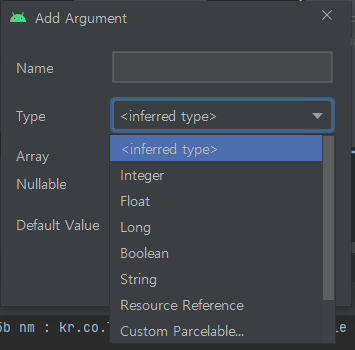
String, Int 등 타입뿐 아니라 Parcelable, Serializable, Enum 등도 지원합니다. 예제에서는 String 타입의 SafeArgs를 선언하였습니다. Args를 생성하면 XML에는 다음과 같이 태그가 생성됩니다.
만약 Paracelable에 대해서 자세히 알고 싶으시다면 Parcelable을, Serializable에 대해서 자세히 알고 싶으시다면 Serializable을 확인하시면 됩니다.
navigation_graph.xml
<fragment
    android:id="@+id/A"
    android:name="kr.co.lee.navigationcomponentexample.MainFragment"
    android:label="MainFragment">
    <action
        android:id="@+id/action_A_to_D"
        app:destination="@id/D" />
</fragment>
<fragment
    android:id="@+id/D"
    android:name="kr.co.lee.navigationcomponentexample.DataFragment"
    android:label="DataFragment">
    <argument
        android:name="message"
        android:defaultValue="No Message"
        app:argType="string" />
</fragment>
fragment 태그의 내부 태그로 argument라는 태그가 생성되었습니다. argType 이라는 속성은 해당 argument의 타입을 나타내고, defaultValue 라는 속성은 전달되는 argument가 없을 경우에 나타나는 데이터입니다. fragment a -> fragment d로 action이 연결되어 있기에 fragment a에서 fragment d로 보낼 데이터를 지정하면 됩니다.
이제 데이터를 보내고 받을 때 Safe Args를 사용해보도록 하겠습니다. Safe Args는 type에 안전한 데이터를 보장해주는 플러그인입니다. Safe Args를 활성화만해도 자동으로 각 action에 대해서는 클래스와 메서드를 생성해주고 각 destination에 대해서는 클래스를 생성해줍니다. action에 대해서 생성되는 클래스의 이름은 만약 action의 id가 action_A_to_D라고 한다면 ActionAToD라는 클래스를 생성해주고, destination에 대해서 생성되는 클래스의 이름은 destination의 이름이 MainFragment라고 한다면 MainFragmentDirections라는 클래스를 생성해줍니다. 이를 이용해 MainFragment -> DataFragment로 데이터를 전달하는 코드는 아래와 같습니다.
데이터를 보내는 MainFragment.kt
override fun onViewCreated(view: View, savedInstanceState: Bundle?) {
    super.onViewCreated(view, savedInstanceState)

    binding.apply {
        btnMove.setOnClickListener {
            // Action 생성
            // MainFragmentDirections은 MainFragment라는 destination에 자동으로 생성된 클래스
            // ActionAToD 클래스와 actionAToD 메서드는 action_a_to_d 라는 id를 가진 action에 대해
            // 자동으로 생성됨
            val action: MainFragmentDirections.ActionAToD = MainFragmentDirections.actionAToD()

            // Action에 전달할 Argument의 name에 해당하는 변수가 자동으로 생성
            // DataFragement에 선언한 name이 message인 Argument
            action.message = etMessage.text.toString()

            // NavController 획득
            val navController = findNavController()
            // navController를 통해 action을 실행
            navController.navigate(action)
        }
    }
}
데이터를 받는 DataFragment.kt
override fun onStart() {
    super.onStart()

    arguments?.let {
        // DataFragmentArgs는 Args에 대해 자동으로 생성된 클래스
        val args = DataFragmentArgs.fromBundle(it)
        binding.tvMessage.text = args.message
    }
}
정리
- Navigation Component를 사용하면 전체적인 앱의 구조 및 백스택을 관리하기가 쉬워집니다. 이전에는 액티비티나 프래그먼트 안에서 Intent 또는 FragmentManager, FragmentTransaction을 사용하여 이들을 관리했다면 이제는 Navigaion Component를 사용하여 통합적으로 관리할 수 있습니다.
- animation과 transition(전환 애니메이션)을 위한 표준화된 형식을 제공합니다.
- Safe Args를 통해 타입에 안전한 방법으로 데이터를 전달할 수 있습니다. Safe Args를 사용하면 기존에 Fragment끼리 데이터를 전달할 때 사용했던 Fragment Result Api를 대체할 수 있습니다. 물론 ViewModel도 사용가능합니다.
- 해당 글은 기초적인 내용이므로 Android Developer에 나와있는 문서를 꼭 확인해보세요..!!
글에서 사용된 코드는 Github에서 확인할 수 있습니다.
참조
Android Developer - Navigaon Component Getting Startd
Android Navigation Component 튜토리얼 - 1
Android BottomNavigaionView + Nav Component 연동 시 유의사항 정리
Android - Navigaion을 사용하는 방법
navigaion backstack
틀린 부분은 댓글로 남겨주시면 수정하겠습니다..!!
