결과

딥페이크 모델
Thin-Plate-Spline-Motion-Model
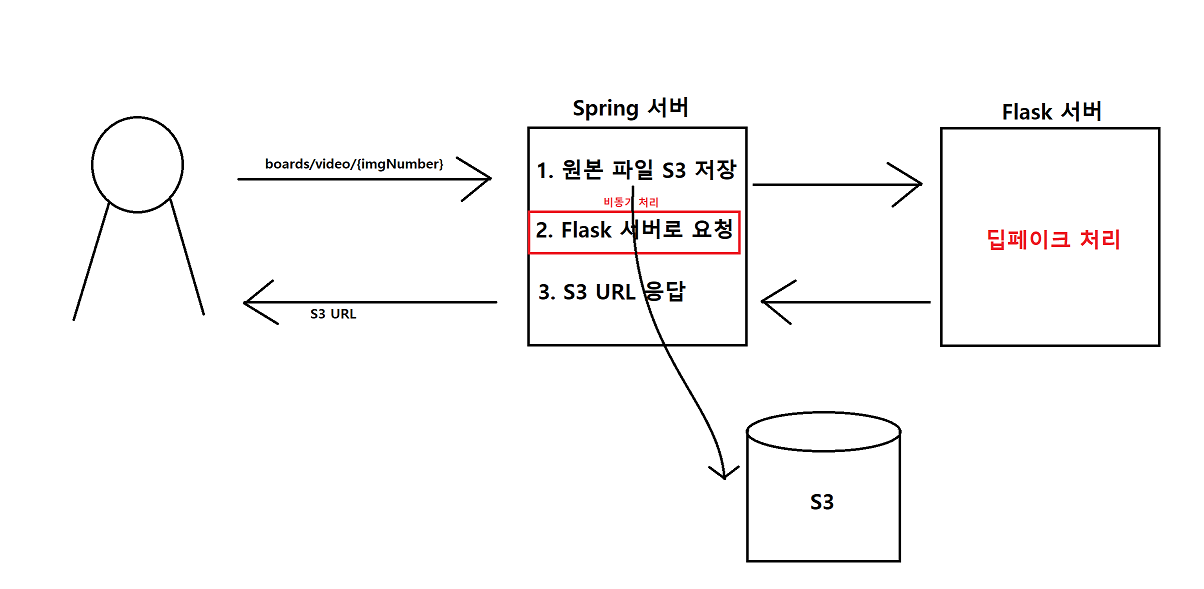
모델 서버 처리 과정
-
S3에서 저장되어 있는 원본 파일 다운
-
딥페이크 모델을 이용하여 원본 파일 영상 처리
-
원본파일에서 영상 소리 파일 추출
-
딥페이크 처리된 파일과 소리 파일 병합
-
S3에 4번에서 병합된 파일 업로드
-
임시 파일들 삭제
app.py
@app.route('/boards/video',methods=['POST'])
async def upload_video():

    if request.method == 'POST':

        req_data = request.get_json()

        img_number = req_data['imgNumber'][0]
        store_file_name = req_data['name'][0]

        s3 = s3_connection()
        file_path = s3_download_temp_file(store_file_name,s3)

        print("store_file_name : ", store_file_name)

        source_img = './assets/'+img_number+'.png'
        result_video_path = './result/' + store_file_name
        deepfake.transfer_video(source_img, file_path, result_video_path)

        output_audio_path = extract_audio(file_path, store_file_name)
        merged_video_path = merge_audio2video(output_audio_path, result_video_path, store_file_name)

        s3.upload_file(merged_video_path,BUCKET_NAME, 'video/' + store_file_name)

        remove_tempfile([file_path, result_video_path, output_audio_path, merged_video_path])


        return '동영상 변환이 완료되었습니다.' + result_video_path, 200
utility.py
def extract_audio(input_video_path, file_name):
    output_audio_path = AUDIO_TEMP + file_name + ".mp3"
    # audio stream만 copy -acodec copy
    command = f'ffmpeg -y -i {input_video_path} {output_audio_path}'
    subprocess.call(command, shell=True)
    return output_audio_path


def merge_audio2video(output_audio_path, input_video_path, store_file_name):
    output_video_path = "merge/" + store_file_name
    command = f'ffmpeg -y -i {input_video_path} -i {output_audio_path} -c:v copy -map 0:v:0 -map 1:a:0 -shortest {output_video_path}'
    subprocess.call(command, shell=True)

    return output_video_path


def remove_tempfile(tempfiles):
    for tempfile in tempfiles:
        os.remove(tempfile)
모델 서버 배포 과정
플라스크(Flask) 애플리케이션을 AWS EC2 인스턴스에 배포하기 위해 Docker를 사용하였습니다. Docker를 사용하여 애플리케이션을 독립적인 컨테이너로 패키징하여 실행할 수 있도록 했습니다.
도커 파일
FROM charmed/base-2204-python38

RUN apt-get update
RUN apt-get upgrade -y
RUN apt-get install -y git vim

RUN mkdir /home/app
RUN git clone https://github.com/Vingterview/vingterviewflask.git /home/app

RUN pip install torch==1.10.0+cu113 torchvision==0.11.1+cu113 torchaudio===0.10.0+cu113 -f https://download.pytorch.org/whl/cu113/torch_stable.html
RUN pip install -r /home/app/requirements.txt

COPY vox.pth.tar /home/app/checkpoints
COPY config.py /home/app


WORKDIR /home/app
EXPOSE 5000
ENTRYPOINT ["nohup","python","app.py","&"]

