☁️ Rendering Piepline
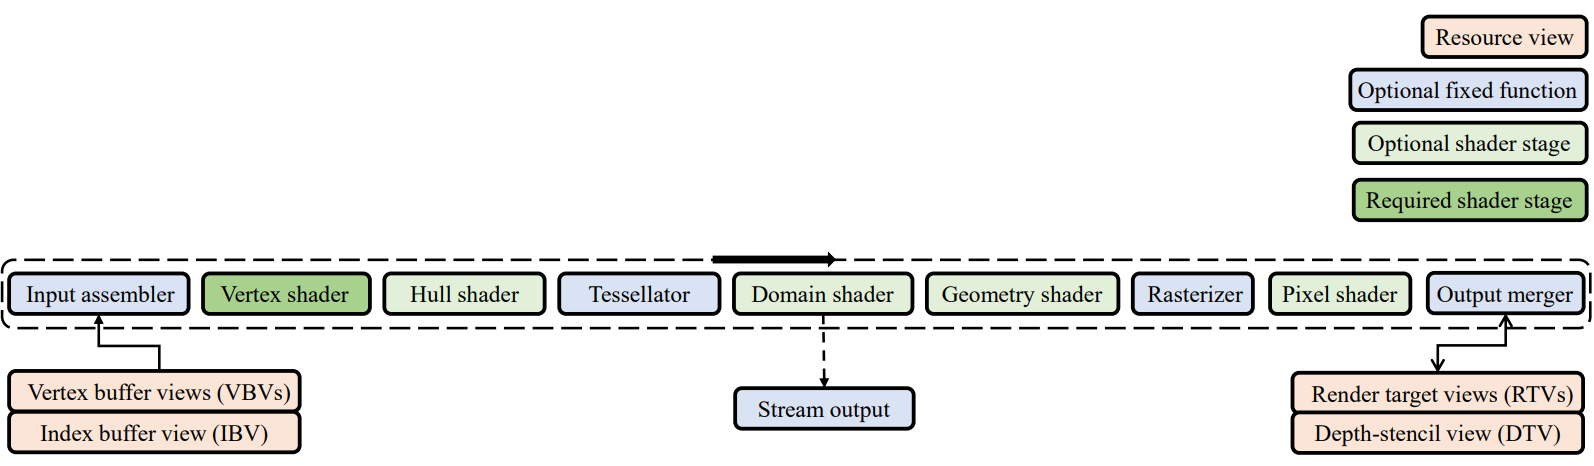
☁️ Output-Merger(OM) Stage
= pixel shader의 output인 pixel은 sequence of operation을 거친다
- Depth-Stencil Test
- Color Blending
아래 요소들을 이용해 최종 rendering될 pixel color를 만들어준다.
1) Combination of pipeline state
2) pixel shader로부터 만들어진 pixel data
3) the contents of the render targets
4) the contents of the depth/stencil buffers
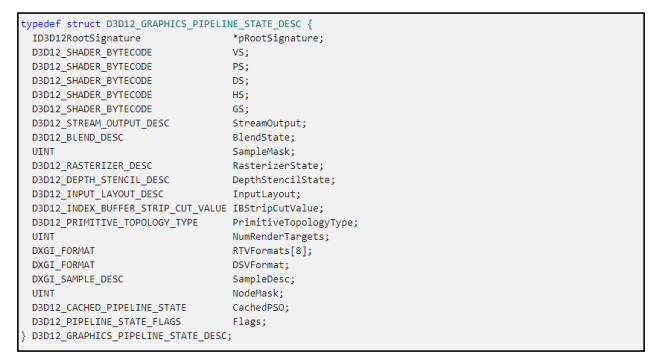
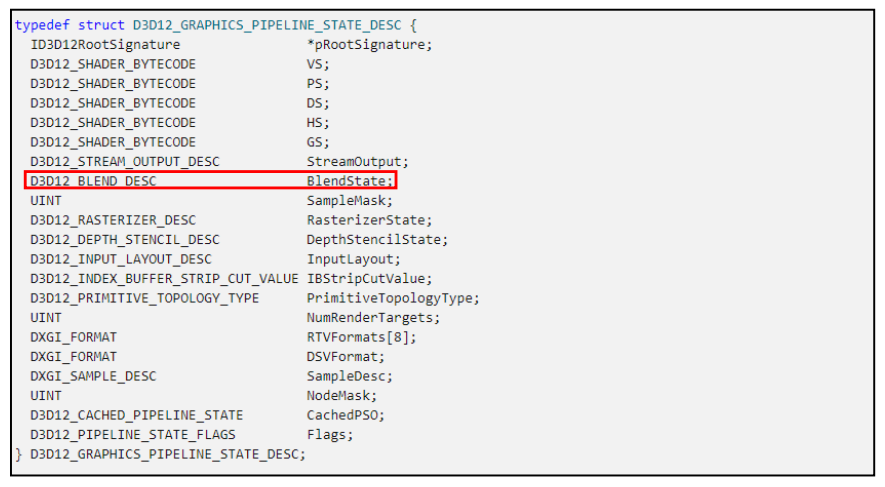
☁️ Pipeline State
= GPU가 input 데이터를 렌더링하기 위해 어떻게 해석하고 처리해야 하는지를 결정하는 하드웨어 설정 or description
- rasterizer state, blend stat, depth-stencil state와 같은 일반적인 설정뿐만 아니라 주어진 geometry information의 primitive topology type과 shader states 등을 포함한다.
- Direct3D 12에서 대부분의 그래픽 파이프라인 상태는 pipeline state objects(PSO)를 사용하여 설정된다.
- 초기화 시에는 일반적으로 여러 개의 PSO가 생성되며, 이후 렌더링 시에는 빠르게 전환되어 다른 파이프라인 상태(for rendering)를 사용합니다.
☁️ Render Target
🔎 render target
- drawing command를 받을 수 있는 resource나 object
- scene을 렌더링할 때 back buffer에 렌더링하여 바로 화면에 표시하는 대신, temporary intermediate buffer에 렌더링하여 최종적으로 사용자에게 보여지기 전에 추가적인 작업이나 후처리 효과를 적용하는 유연성을 제공한다.
- Render target drawing methods는 사용자가 render target에 컨텐츠를 그릴 수 있도록 한다.
🔎 frame buffer
- color data를 담고 있는 random-access memory(RAM)의 portion(부분)
🔎 back buffer
- 현재 화면에 표시되는 frame buffer를 front buffer 또는 primary buffer라고 한다.
- drawing 중인 frame buffer를 back buffer 또는 secondary buffer라고 한다.
☁️ Depth-Stencil Testing
- depth-stencil buffer (texture resource)
depth data와 stencil data를 모두 contain / texture을 기준으로 동작
두가지 data 모두 output-merger stage에서 pixel이 그려질지 결정하는데 사용된다.
- depth data : 어떤 픽셀들이 camera에 가장 가까운지를 결정
- stencil data : 어느 pixel을 update할 것인가
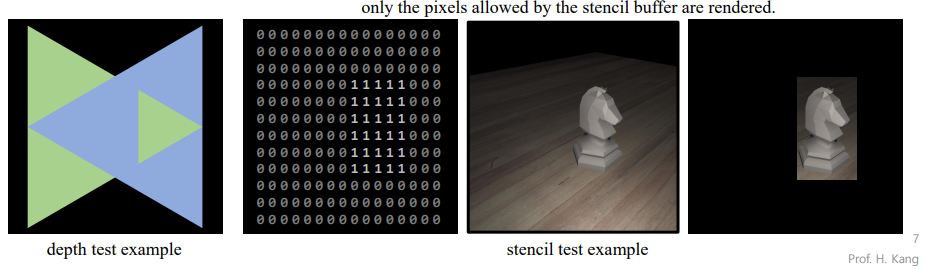
🔎 Depth Test
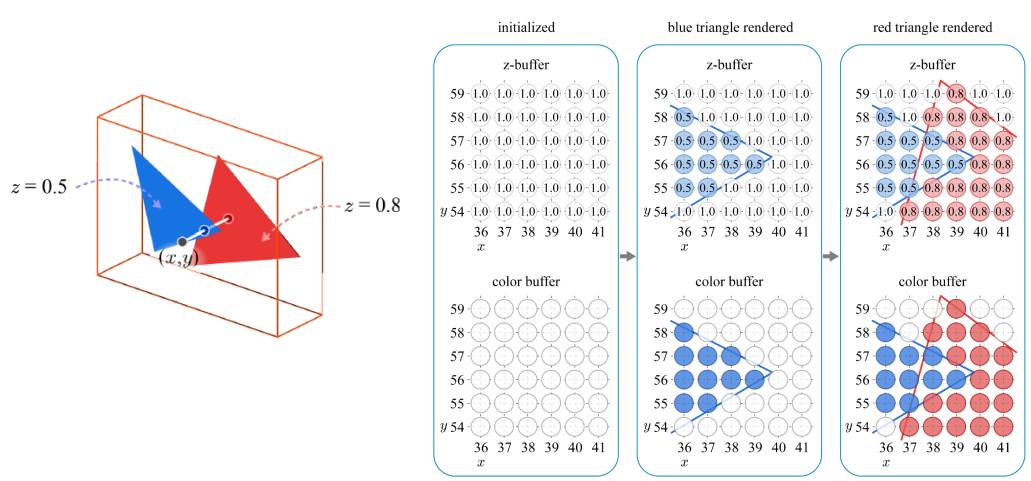
Depth buffering (z-buffering)
= depth buffer를 이용해서 어떤 pixel들이 draw되어야 하는지 결정해준다.
- depth value가 output-merger stage에 오면 clamp된다.
z = min(Viewport.MaxDepth, max(Viewport.MinDepth, z)) 이용- clamping 후 depth-buffer value와 비교한다.
Depth Test
= per-sample operation / pixel마다 처리
= visible / hidden pixel들을 구분해준다
- object가 screen에 project 되면, 생성된 pixel들의 depth가 현재 depth buffer value와 비교된다
- pixel depth < stored depth value : 픽셀이 업데이트 되어야 하는 군
= pixel의 color와 depth value가 color buffer와 depth buffer를 update- pixel depth > stored depth value : invisible
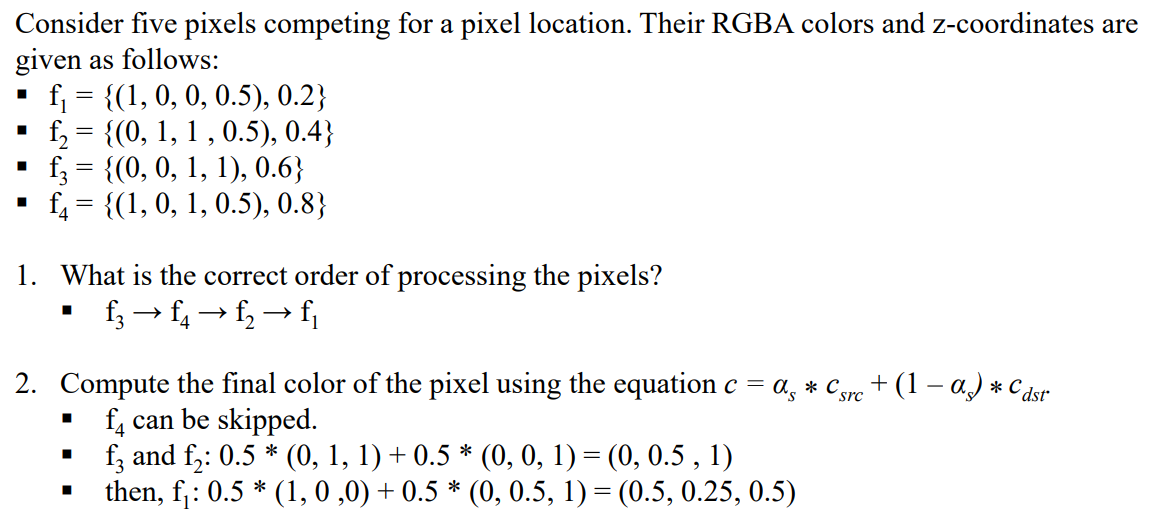
- Example
순서와 상관없이 동일한 결과물이 나온다.

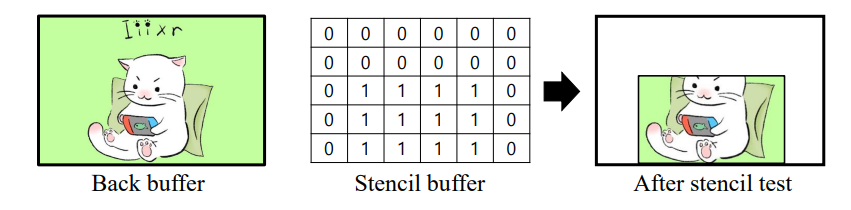
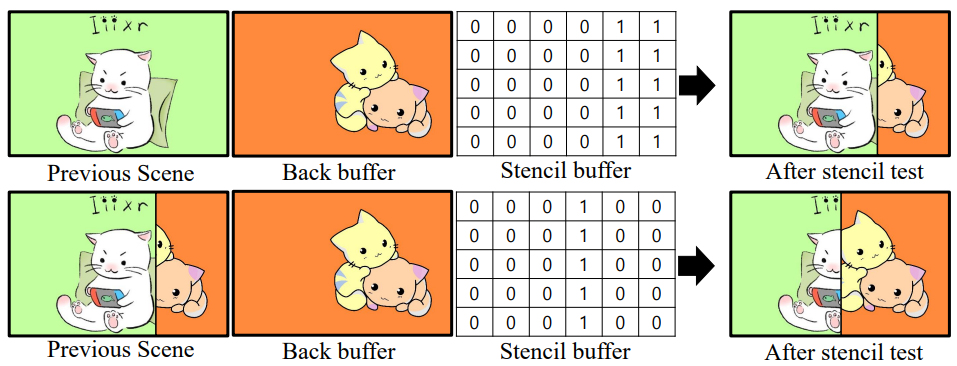
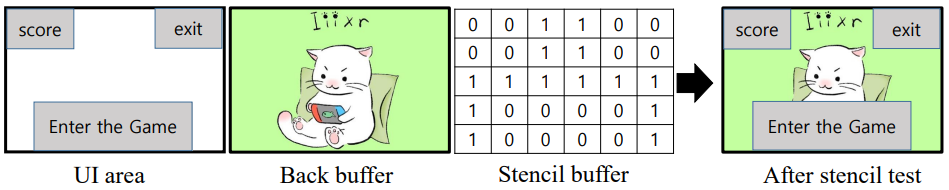
🔎 Stencil Test
= stencil buffer 값이 1인 pixel만 back buffer로 채운다.
-
Transition effect
-
Discarding UI area (reducing the number of fragments to be processed)
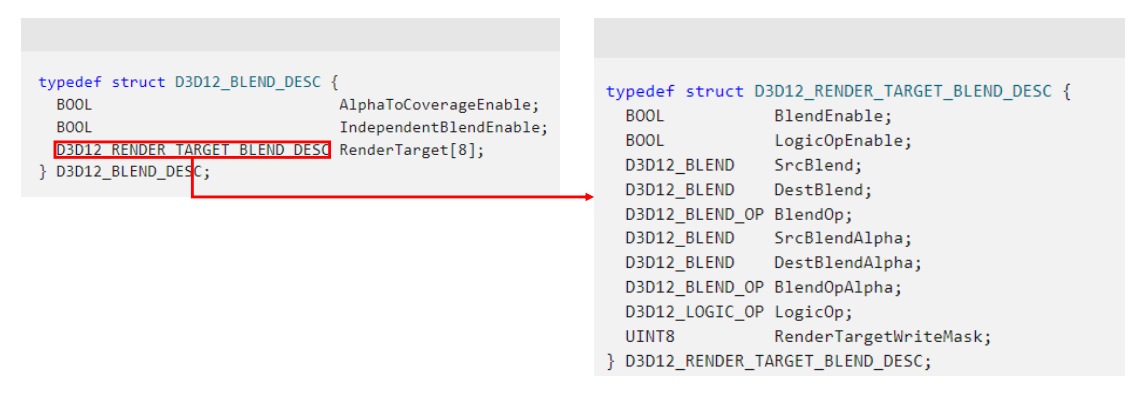
☁️ Color Blending
translucent(반투명 = partially tranparent) 물체 뒤에있으면 visible 해야 한다.
- 보통 depth text에서 pixel이 replace되거나 버려진다.
- 하지만 표면이 투명한 경우 pixel value가 combine되어야 한다. 단순히 교체 & 버리기로 안됨.
- output value가 render target에 찍히기 전에 모든 pixel shader output에 blending operation이 동작한다.
- alpha value [ 0 , 255 ] : 0- fully transparent / 255 - fully opaque
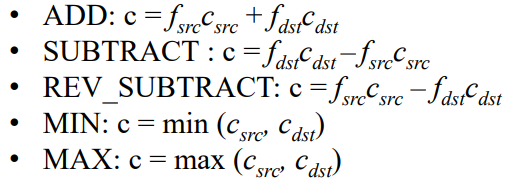
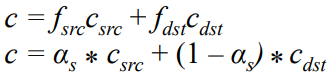
🔎 Blending equation
- : blended color -> 얘를 구하는 게 목표
- : pixel's opacity
- 들 : 우리가 정해줘야하는 factors
- c_src : color output from the pixel shader
- c_dst : color of the back buffer
- ▣ : blend operation
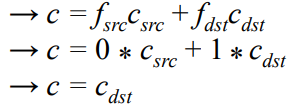
blending을 하지 않을 경우 c_dst는 c_src로 overwrite된다 / blending -> c get

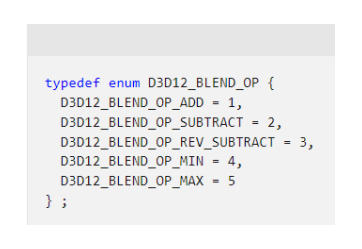
🔎 Blend operation ▣
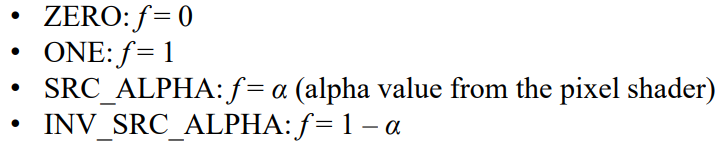
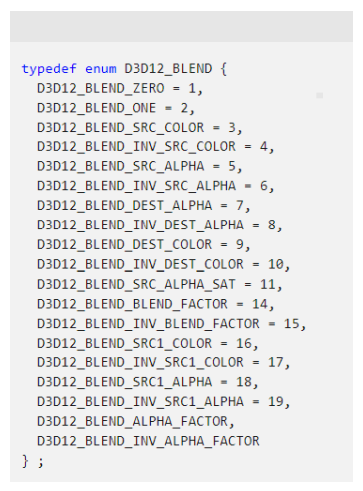
🔎 Blend factors
🔎 Blend state
- creating blend state

🔎 Keeping Destination Pixel Example
= 새로운 애가 들어와도 Destination Pixel 값으로 유지한다
= ex) 항상 앞에 있어야 하는 UI
- pixel blend factor : D3D12_BLEND_ZERO ( 0 )
- destination blend factor : D3D12_BLEND_ONE ( 1 )
- blend operator : D3D12_BLEND_OP_ADD ( ADD )
🔎 Alpha Blending (Transparency)
alpha component : pixel의 opacity 정도
Setting for alpha blending
- Source blend factor = D3D12_BLEND_SRC_ALPHA
- Destination blend factor = D3D12_BLEND_INV_SRC_ALPHA
- Blend Operator = D3D12_BLEND_OP_ADD
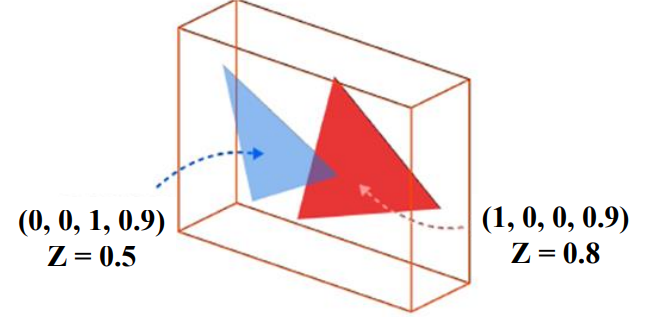
- = 0.5
- c_src = ( 0 , 0 , 1 )
- c_ds = ( 1 , 0 , 0 )
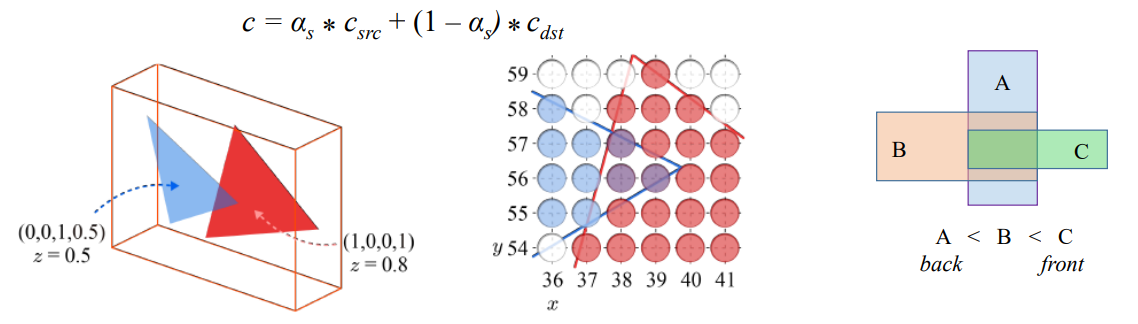
Back-to-Front order
z-buffering 때에는 순서와 상관없이 결과가 똑같았지만, Alpha blending은 순서가 중요하다.
if) 파란색 triangle이 먼저 rednering -> 빨간색이 뒤에 있어서 그냥 버려져 버림
= z 값이 큰 물체부터 그려야함

- Example