STS로 웹 개발을 하기 위해 설정을 해야할 것들 중에 데이터베이스 연동을 위한 셋팅을 해보았다.
엄청난 삽질을 한 끝에 연동을 할 수 있게 됐다...
메이븐 리포지토리에 접속해서 아래 라이브러리들을 검색해서 추가하거나 아래 소스들을 복사해서 사용해도 된다.
https://mvnrepository.com/
pom.xml
기본 설정 되어있는 곳 밑에다가 추가하면 된다.
	<!-- Test -->
		<dependency>
			<groupId>junit</groupId>
			<artifactId>junit</artifactId>
			<version>4.7</version>
			<scope>test</scope>
		</dependency>

	   <!--MySQL -->
	   <dependency>
	       <groupId>mysql</groupId>
	       <artifactId>mysql-connector-java</artifactId>
	       <version>8.0.11</version>
	   </dependency>

	   <!-- MyBatis 3.4.1 -->
	   <!-- https://mvnrepository.com/artifact/org.mybatis/mybatis -->
	   <dependency>
	       <groupId>org.mybatis</groupId>
	       <artifactId>mybatis</artifactId>
	       <version>3.4.1</version>
	   </dependency>


	   <!-- MyBatis-Spring -->
	   <!-- https://mvnrepository.com/artifact/org.mybatis/mybatis-spring -->
	   <dependency>
	       <groupId>org.mybatis</groupId>
	       <artifactId>mybatis-spring</artifactId>
	       <version>1.3.0</version>
	   </dependency>

	   <!-- Spring-jdbc -->
	   <!-- https://mvnrepository.com/artifact/org.springframework/spring-jdbc -->
	   <dependency>
	       <groupId>org.springframework</groupId>
	       <artifactId>spring-jdbc</artifactId>
	       <version>${org.springframework-version}</version>
	   </dependency>

	   <!-- Spring-test -->
	   <!-- https://mvnrepository.com/artifact/org.springframework/spring-test -->
	   <dependency>
	       <groupId>org.springframework</groupId>
	       <artifactId>spring-test</artifactId>
	       <version>${org.springframework-version}</version>
	   </dependency>

	<!-- Mybatis log -->
	   <!-- https://mvnrepository.com/artifact/org.bgee.log4jdbc-log4j2/log4jdbc-log4j2-jdbc4.1 -->
	   <dependency>
	       <groupId>org.bgee.log4jdbc-log4j2</groupId>
	       <artifactId>log4jdbc-log4j2-jdbc4</artifactId>
	       <version>1.16</version>
	   </dependency>
web.xml
이것 또한 기본 설정되어 있는 곳 밑에다가 추가하면 된다.
	<!--  문자 인코딩  시작 한글-->
	<filter>
		<filter-name>encodingFilter</filter-name>
		<filter-class>
		  org.springframework.web.filter.CharacterEncodingFilter
		</filter-class>
		<init-param>
		  <param-name>encoding</param-name>
		  <param-value>UTF-8</param-value>
		</init-param>
		<init-param>
		  <param-name>forceEncoding</param-name>
		  <param-value>true</param-value>
		</init-param>
	</filter>
	<filter-mapping>
		<filter-name>encodingFilter</filter-name>
		<url-pattern>/*</url-pattern>
	</filter-mapping>
	<!--  문자 인코딩  끝 -->
root-context.xml
파일 경로 : /src/main/webapp/WEB-INF/spring/root-context.xml
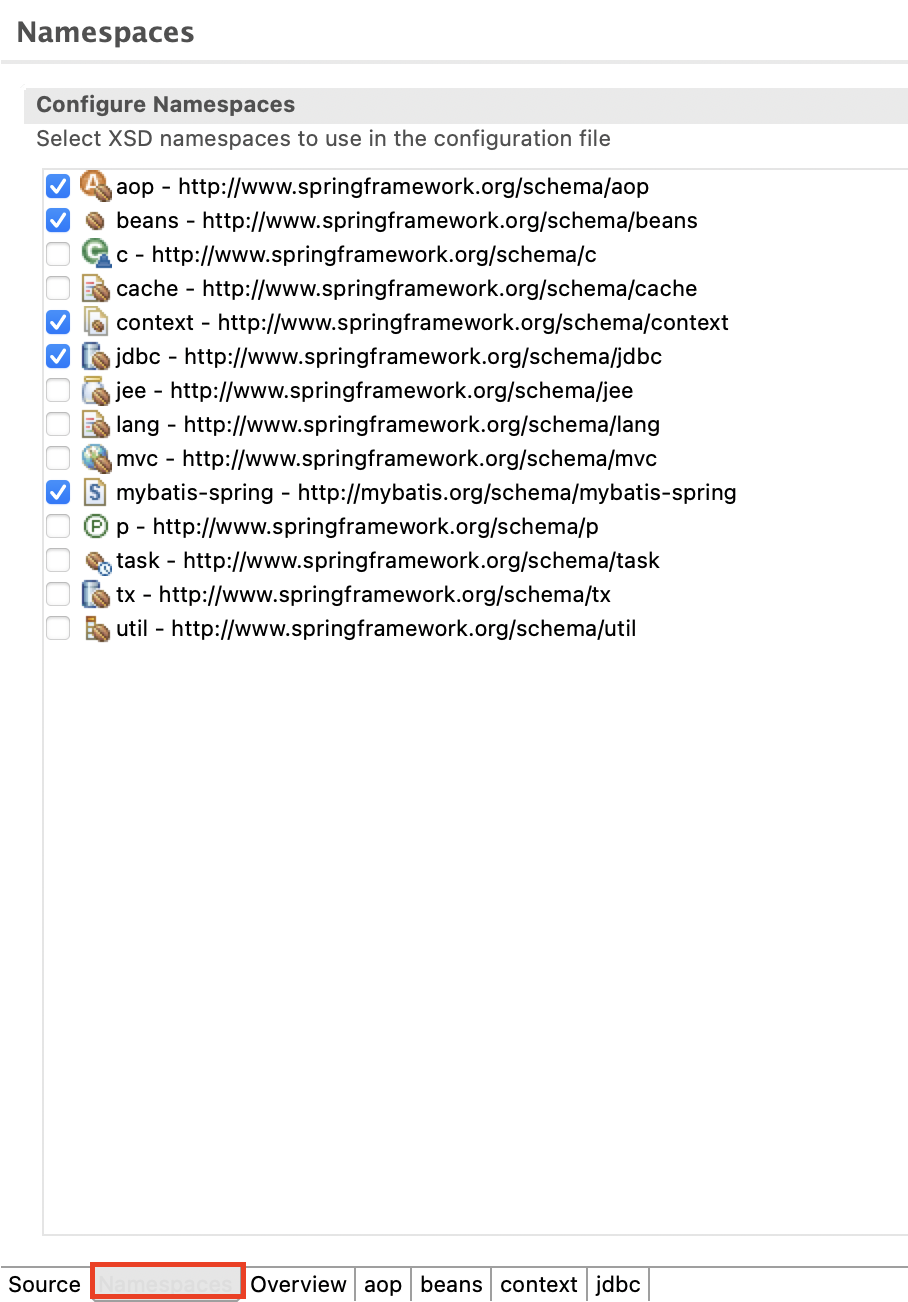
Namespaces 탭
하단 두번 째 탭에 있는 Namespaces 선택 후 아래 사진과 같이 체크를 해주면 된다.
Source 탭
Namespaces 탭 좌측에 Source 탭이 있다. 아래 사진과 초기설정을 비교해서 추가된 라인만 beans에 넣어주면 된다.
<beans xmlns="http://www.springframework.org/schema/beans"
	xmlns:xsi="http://www.w3.org/2001/XMLSchema-instance"
	xmlns:aop="http://www.springframework.org/schema/aop"
	xmlns:context="http://www.springframework.org/schema/context"
	xmlns:jdbc="http://www.springframework.org/schema/jdbc"
	xmlns:mybatis-spring="http://mybatis.org/schema/mybatis-spring"
	xsi:schemaLocation="http://www.springframework.org/schema/jdbc http://www.springframework.org/schema/jdbc/spring-jdbc-4.0.xsd
		http://mybatis.org/schema/mybatis-spring http://mybatis.org/schema/mybatis-spring-1.2.xsd
		http://www.springframework.org/schema/beans https://www.springframework.org/schema/beans/spring-beans.xsd
		http://www.springframework.org/schema/context http://www.springframework.org/schema/context/spring-context-4.0.xsd
		http://www.springframework.org/schema/aop http://www.springframework.org/schema/aop/spring-aop-4.0.xsd">
자신의 PC에 MYSql 서버를 설치했을 경우 아래 해당 내용을 beans 안에 넣어주면
된다.
<!-- 자신의 PC(로컬)에 MySql을 설치했을 경우 -->
<bean id="dataSource"
class="org.springframework.jdbc.datasource.DriverManagerDataSource">
<property name="driverClassName" value="com.mysql.cj.jdbc.Driver"></property>
<property name="url"
value="jdbc:mysql://localhost:3306/데이터베이스 이름?useSSL=false&serverTimezone=UTC">
</property>
<property name="username" value="사용자 이름"></property>
<property name="password" value="사용자 비밀번호"></property>
</bean>
<!-- mybatis SqlSessionFactoryBean -->
<bean id="sqlSessionFactory" class="org.mybatis.spring.SqlSessionFactoryBean">
<property name="dataSource" ref="dataSource"></property>
</bean>
<bean id="sqlSession" class="org.mybatis.spring.SqlSessionTemplate" destroy-method="clearCache">
<constructor-arg name="sqlSessionFactory" ref="sqlSessionFactory"/>
</bean>DB 연동 테스트 코드
경로 : /src/test/java
위 해당 경로에 패키지 생성 후 클래스를 생성하면 된다.
MyBatisTest.java
import javax.inject.Inject;

import org.apache.ibatis.session.SqlSession;
import org.apache.ibatis.session.SqlSessionFactory;
import org.junit.Test;
import org.junit.runner.RunWith;
import org.springframework.test.context.ContextConfiguration;
import org.springframework.test.context.junit4.SpringJUnit4ClassRunner;

@RunWith(SpringJUnit4ClassRunner.class)
@ContextConfiguration(locations={"file:src/main/webapp/WEB-INF/spring/**/root-context.xml"})


public class MyBatisTest {
	@Inject
	 private SqlSessionFactory sqlFactory;

	 @Test
	 public void testFactory(){
	     System.out.println("\n >>>>>>>>>> sqlFactory 출력 : "+sqlFactory);
	 }

	 @Test
	 public void testSession() throws Exception{

	     try(SqlSession session = sqlFactory.openSession()){

	         System.out.println(" >>>>>>>>>> session 출력 : "+session+"\n");

	     } catch (Exception e) {
	         e.printStackTrace();
	     }
	 }

}

실행 결과
INFO : org.springframework.beans.factory.xml.XmlBeanDefinitionReader - Loading XML bean definitions from file [/Users/kyeil/Documents/workspace-sts-3.9.18.RELEASE/Spring_Project_MySQL/src/main/webapp/WEB-INF/spring/root-context.xml]
INFO : org.springframework.context.support.GenericApplicationContext - Refreshing org.springframework.context.support.GenericApplicationContext@10163d6: startup date [Tue Feb 06 16:01:30 KST 2024]; root of context hierarchy
INFO : org.springframework.beans.factory.annotation.AutowiredAnnotationBeanPostProcessor - JSR-330 'javax.inject.Inject' annotation found and supported for autowiring
INFO : org.springframework.jdbc.datasource.DriverManagerDataSource - Loaded JDBC driver: com.mysql.cj.jdbc.Driver

 >>>>>>>>>> sqlFactory 출력 : org.apache.ibatis.session.defaults.DefaultSqlSessionFactory@19b30c92
 >>>>>>>>>> session 출력 : org.apache.ibatis.session.defaults.DefaultSqlSession@5c1bd44c

INFO : org.springframework.context.support.GenericApplicationContext - Closing org.springframework.context.support.GenericApplicationContext@10163d6: startup date [Tue Feb 06 16:01:30 KST 2024]; root of context hierarchy
MySQLConnectionTest.java
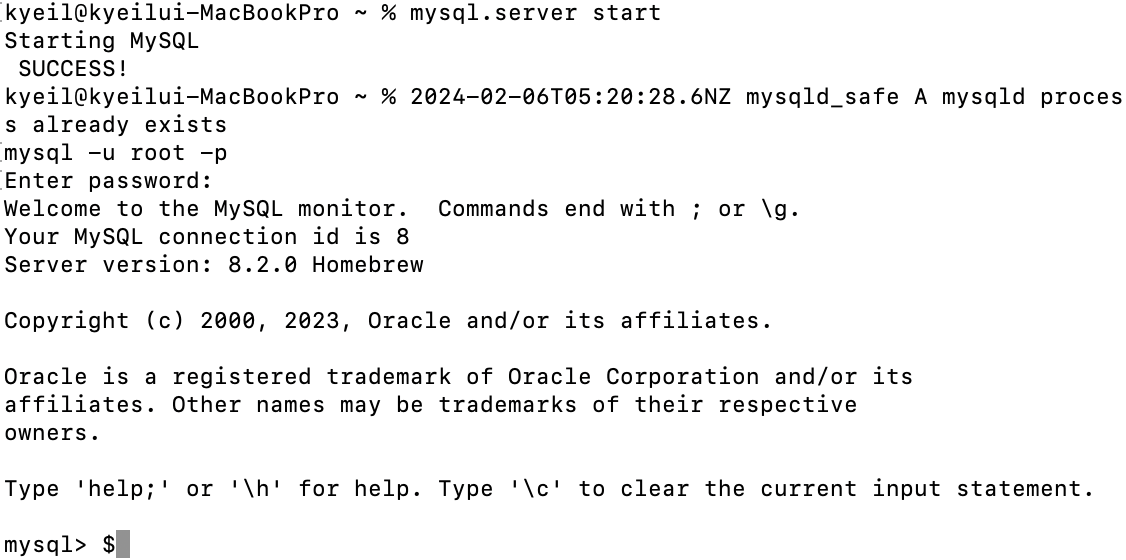
MySQLConnectionTest.java 실행 전에 mysql 서버 start를 해주어야 한다.
MySQL이 설치가 되어 있다는 가정하에 터미널에서 명령어들을 실행 후 해당 클래스를 실행시켜야 한다.
mysql.server start
mysql -u root -p 실행 후 패스워드 입력
아래 사진과 같이 접속 확인되면 MySQLConnectionTest.java 테스트 실행하면 된다
import java.sql.Connection;

import javax.inject.Inject;
import javax.sql.DataSource;

import org.junit.Test;
import org.junit.runner.RunWith;
import org.springframework.test.context.ContextConfiguration;
import org.springframework.test.context.junit4.SpringJUnit4ClassRunner;

@RunWith(SpringJUnit4ClassRunner.class)
@ContextConfiguration(locations = { "file:src/main/webapp/WEB-INF/spring/**/root-context.xml" })

public class MySQLConnectionTest {
	 @Inject
	 private DataSource ds;

	 @Test
	 public void testConnection() throws Exception {

	     try (Connection con = ds.getConnection()) {

	         System.out.println("\n >>>>>>>>>> Connection 출력 : " + con + "\n");

	     } catch (Exception e) {
	         e.printStackTrace();
	     }
	 }

}

실행 결과
INFO : org.springframework.beans.factory.xml.XmlBeanDefinitionReader - Loading XML bean definitions from file [/Users/kyeil/Documents/workspace-sts-3.9.18.RELEASE/Spring_Project_MySQL/src/main/webapp/WEB-INF/spring/root-context.xml]
INFO : org.springframework.context.support.GenericApplicationContext - Refreshing org.springframework.context.support.GenericApplicationContext@10163d6: startup date [Tue Feb 06 16:02:25 KST 2024]; root of context hierarchy
INFO : org.springframework.beans.factory.annotation.AutowiredAnnotationBeanPostProcessor - JSR-330 'javax.inject.Inject' annotation found and supported for autowiring
INFO : org.springframework.jdbc.datasource.DriverManagerDataSource - Loaded JDBC driver: com.mysql.cj.jdbc.Driver

 >>>>>>>>>> Connection 출력 : com.mysql.cj.jdbc.ConnectionImpl@50cf5a23

INFO : org.springframework.context.support.GenericApplicationContext - Closing org.springframework.context.support.GenericApplicationContext@10163d6: startup date [Tue Feb 06 16:02:25 KST 2024]; root of context hierarchy
참고

gyery