
Spring의 대표적인 Annotation과 역할
@Controller
Spring에게 해당 Class가 Controller의 역할을 한다고 명시하기 위해 사용하는 Annotation
- Spring MVC에서 Controller클래스에 쓰임
@Controller                   // 이 Class는 Controller 역할을 합니다
@RequestMapping("/user")      // 이 Class는 /user로 들어오는 요청을 모두 처리합니다.
public class UserController {
    @RequestMapping(method = RequestMethod.GET)
    public String getUser(Model model) {
        //  GET method, /user 요청을 처리
    }
}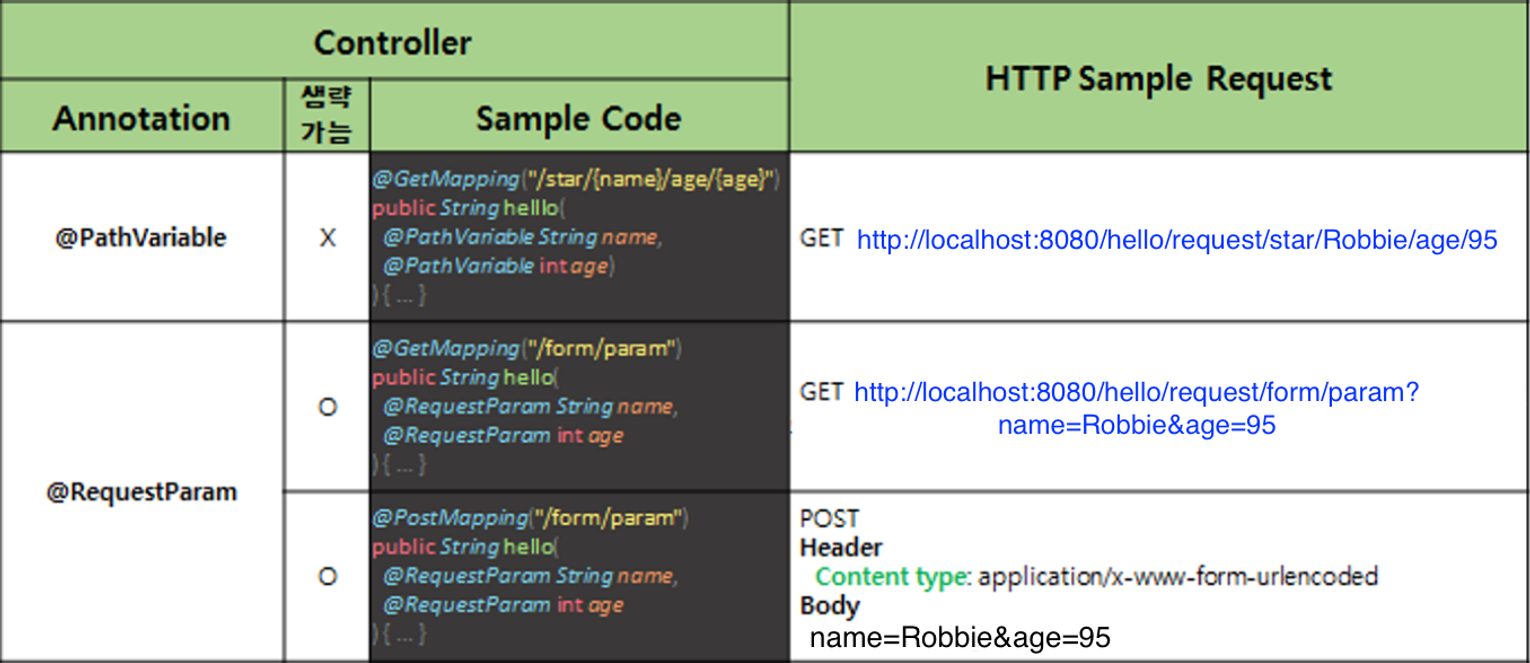
@PathValiable
서버에 GET 방식으로 HTTP Request를 보낼 때 URL 주소에 데이터를 추가해서 전송하는 방법
GET http://localhost:8080/request/star/Robbie/age/95
데이터 : /star/Robbie/age/95
@GetMapping("/star/{name}/age/{age}")
@ResponseBody
public String helloRequestPath(@PathVariable String name, @PathVariable int age)
{
    return String.format("Hello, @PathVariable.<br> name = %s, age = %d", name, age);
}
@RequestParam
- 서버에 GET 방식으로 HTTP Request를 보낼 때 URL 주소에 Query String을 추가해서 데이터를 전송하는 방법
- Query String : 서버에 보내려는 데이터를 URL 경로 마지막에
?와&를 추가하여 사용GET http://localhost:8080/hello/request/form/param?name=Robbie&age=95
데이터 : ?name=Robbie&age=95
- Query String : 서버에 보내려는 데이터를 URL 경로 마지막에
@GetMapping("/form/param")
@ResponseBody
public String helloGetRequestParam(@RequestParam String name, @RequestParam int age) {
    return String.format("Hello, @RequestParam.<br> name = %s, age = %d", name, age);
}- HTML의 form태그를 통해 POST 방식으로 서버에 데이터를 요청하는 방법
POST http://localhost:8080/hello/request/form/param
Header : Content type: application/x-www-form-urlencoded
Body : name=Robbie&age=95
@PostMapping("/form/param")
@ResponseBody
public String helloPostRequestParam(@RequestParam String name, @RequestParam int age) {
    return String.format("Hello, @RequestParam.<br> name = %s, age = %d", name, age);
}@RequestParam은 생략 가능@RequestParam(required = false)
required 옵션을 false로 설정하여 Client에서 전달받은 값들에서 해당 값이 포함되지어 있지 않아도 오류가 생기지 않는다.- 이때 Client로부터 값을 전달받지 못한 변수는 null로 초기화
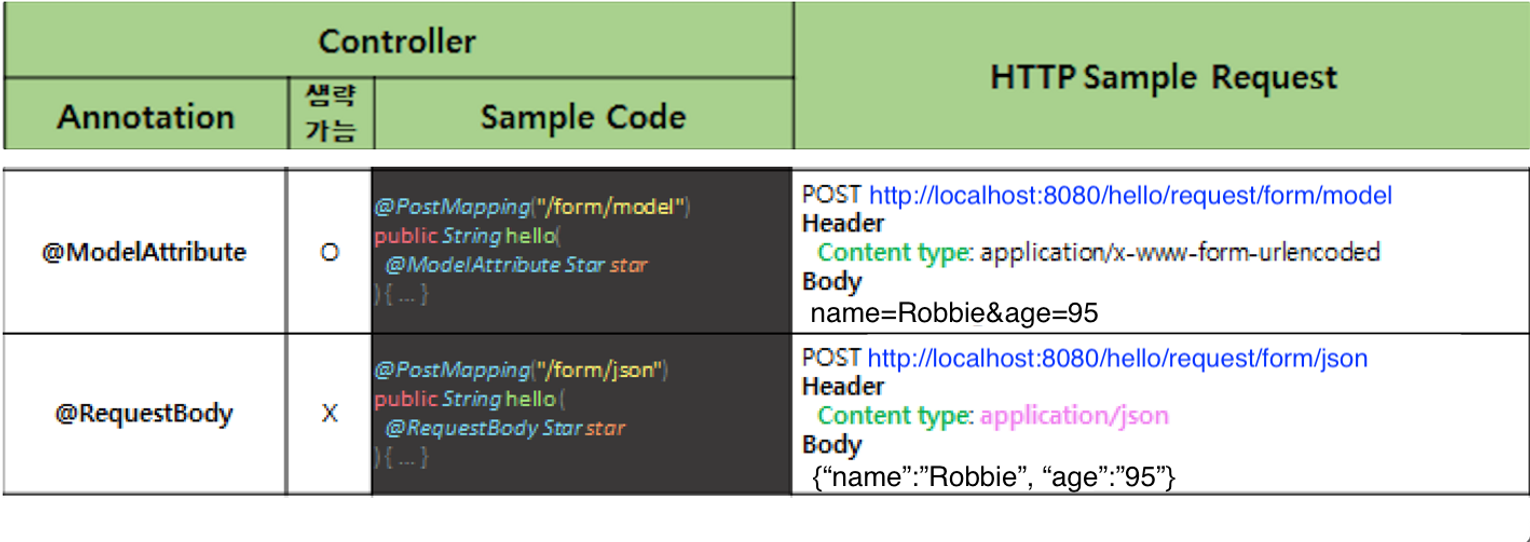
@ModelAttribute
- HTML의 form태그를 사용하여 POST 방식으로 HTTP Requset를 보냈을 때 HTTP Request의 Body 부분이 Query String인 경우 Java 객체로 변환하여 사용 가능
- Client가 전송하는 HTTP parameter, Body 내용을 Setter 함수를 통해 1:1로 객체에 데이터를 연결(바인딩)한다.
- RequestBody와 다르게 HTTP Body 내용은 multipart/form-data 형태를 요구한다.
@RequestBody가 JSON을 받는 것과 달리@ModenAttribute의 경우에는 json을 받아 처리할 수 없다.
POST http://localhost:8080/hello/request/form/model
Header : Content type: application/x-www-form-urlencoded
Body : name=Robbie&age=95
@PostMapping("/form/model")
@ResponseBody
public String helloRequestBodyForm(@ModelAttribute Star star) {
    return String.format("Hello, @ModelAttribute.<br> (name = %s, age = %d) ", star.name, star.age);
}
@RequestBody
- HTML의 form태그를 사용하여 POST 방식으로 HTTP Request를 보냈을 때 HTTP Requset의 Body부분이 JSON or xml 형태인 경우 Java 객체로 변환하여 사용 가능
- 메소드에서 리턴되는 값이 View 로 출력되지 않고 HTTP Response Body에 직접 쓰여지게 된다.
- return 시에 JSON, xml과 같은 데이터를 return
POST http://localhost:8080/hello/request/form/json
Header : Content type: application/json
Body : {"name":"Robbie","age":"95"}
@PostMapping("/form/json")
@ResponseBody
public String helloPostRequestJson(@RequestBody Star star) {
    return String.format("Hello, @RequestBody.<br> (name = %s, age = %d) ", star.name, star.age);
}
@RestController
= @Controller + @RequestBody
@RestController를 사용하면 해당 클래스의 모든 메서드에 @ResponseBody 애너테이션이 추가되는 효과를 부여할 수 있다.
@RequestBody : 이 애너테이션이 붙은 파라미터에는 http요청의 본문(body)이 그대로 전달된다.
→ 일반적인 GET/POST의 요청 파라미터라면 @RequestBody를 사용할 일이 없지만, xml이나 JSON기반의 메시지를 사용하는 요청의 경우 이 방법이 매우 유용
@Component
개발자가 생성한 Class를 Spring의 Bean으로 등록할 때 사용
- Spring은 해당 Annotation을 보고 Spring의 Bean으로 등록
@Component(value="myman")
public class Man {
    public Man() {
        System.out.println("hi");
    }
}
@ComponentScan
@ComponentScan Annotation이 있는 클래스의 하위 Bean을 등록 될 클래스들을 스캔하여 Bean으로 등록
- Spring Framework는 @Component, @Service, @Repository, @Controller, @Configuration 중 1개라도 등록된 클래스를 찾으면, Context에 bean으로 등록
@Bean
개발자가 제어가 불가능한 외부 라이브러리와 같은 것들을 Bean으로 만들 때 사용
@RequestHeader
Request의 header값을 가져올 수 있으며, 해당 Annotation을 쓴 메소드의 파라미터에 사용
@Controller                   // 이 Class는 Controller 역할을 합니다
@RequestMapping("/user")      // 이 Class는 /user로 들어오는 요청을 모두 처리합니다.
public class UserController {
    @RequestMapping(method = RequestMethod.GET)
    public String getUser(@RequestHeader(value="Accept-Language") String acceptLanguage) {
        //  GET method, /user 요청을 처리
    }
}
@RequestMapping
호출하는 클라이언트의 정보를 가져다가 서버(controller)에 전달해주는 매핑
- @RequestMapping은 [서버]에서 디스페처서블릿을 통해 [클라이언트]html의 action태그의 주소와 동일한 문자열을 찾는 매핑기능(연결)이 실행되고 하단에 메서드가 실행
→ 쉽게 말하자면 요청이 왔을 때 어떤 컨트롤러가 호출이 되어야 하는지 알려주는 지표 같은 것
@GetMapping
RequestMapping(Method=RequestMethod.GET)과 똑같은 역할
@Controller                   // 이 Class는 Controller 역할을 합니다
@RequestMapping("/user")      // 이 Class는 /user로 들어오는 요청을 모두 처리합니다.
public class UserController {
    @GetMapping("/")
    public String getUser(Model model) {
        //  GET method, /user 요청을 처리
    }

    ////////////////////////////////////
    // 위와 아래 메소드는 동일하게 동작합니다. //
    ////////////////////////////////////

    @RequestMapping(method = RequestMethod.GET)
    public String getUser(Model model) {
        //  GET method, /user 요청을 처리
    }
}
@PostMapping
RequestMapping(Method=RequestMethod.POST)과 똑같은 역할
@Controller                   // 이 Class는 Controller 역할을 합니다
@RequestMapping("/user")      // 이 Class는 /user로 들어오는 요청을 모두 처리합니다.
public class UserController {
    @RequestMapping(method = RequestMethod.POST)
    public String addUser(Model model) {
        //  POST method, /user 요청을 처리
    }

    ////////////////////////////////////
    // 위와 아래 메소드는 동일하게 동작합니다. //
    ////////////////////////////////////

    @PostMapping('/')
    public String addUser(Model model) {
        //  POST method, /user 요청을 처리
    }
}
@Autowired
Bean을 주입받기 위하여 @Autowired 를 사용
- Spring Framework가 Class를 보고 Type에 맞게(Type을 먼저 확인 후, 없으면 Name 확인) Bean을 주입
Spring Framework에서 Bean 객체를 주입받기 위한 방법
- @Autowired
- 생성자 (@AllArgsConstructor 사용)
- setter
@SpringBootTest
Spring Boot Test에 필요한 의존성을 제공
// DemoApplicationTests.java
package com.example.demo;

import org.junit.jupiter.api.Test;
import org.springframework.boot.test.context.SpringBootTest;

@SpringBootTest
class DemoApplicationTests {

	@Test
	void contextLoads() {

	}

}
@Test
JUnit에서 테스트 할 대상을 표시
Lombok의 대표적인 Annotation과 역할
@NonNull
: 자동으로 null체크를 진행하고 null인 경우 NullPointException을 발생
@Getter
: Class 모든 필드의 Getter method를 생성
@Setter
: Class 모든 필드의 Setter method를 생성
@NoArgsConstructor
: Class 기본 생성자를 자동으로 추가
@AllArgsConstructor
: Class 모든 필드 값을 파라미터로 받는 생성자를 추가
@RequiredArgsConstructor
: final이나'@NonNull'이 있는 필드가 포함된 생성자를 자동 생성
@ToString
: Class 모든 필드의 toString method를 생성
그외 Lombok의 Annotation
@CleanUp: 자동으로 자원관리, close()메서드를 호출하여 자원 종류@EqualsAndHashCode: hashCode, equals 구현@Builder: 해당 클래스에 빌드 패턴을 적용한 클래스를 생성- 생성자 상단에 선언시 생성자에 포함된 필드만 빌더에 포함
- 생성자나 빌더나 생성 시점에 값을 채워줌
- 차이점
- 생성자 : 지금 채워야 하는 필드가 무엇인지 정확히 지정 할 수 없다
- 빌더 : 어느 필드에 어떤 값을 채워야 할 지 명확히 인지 가능