Redux(리덕스)란?
공식 페이지에서는 Redux를 다음과 같이 정의한다.
redux는 자바스크립트 어플리케이션에서 흔히 사용되는 상태 컨테이너이다.
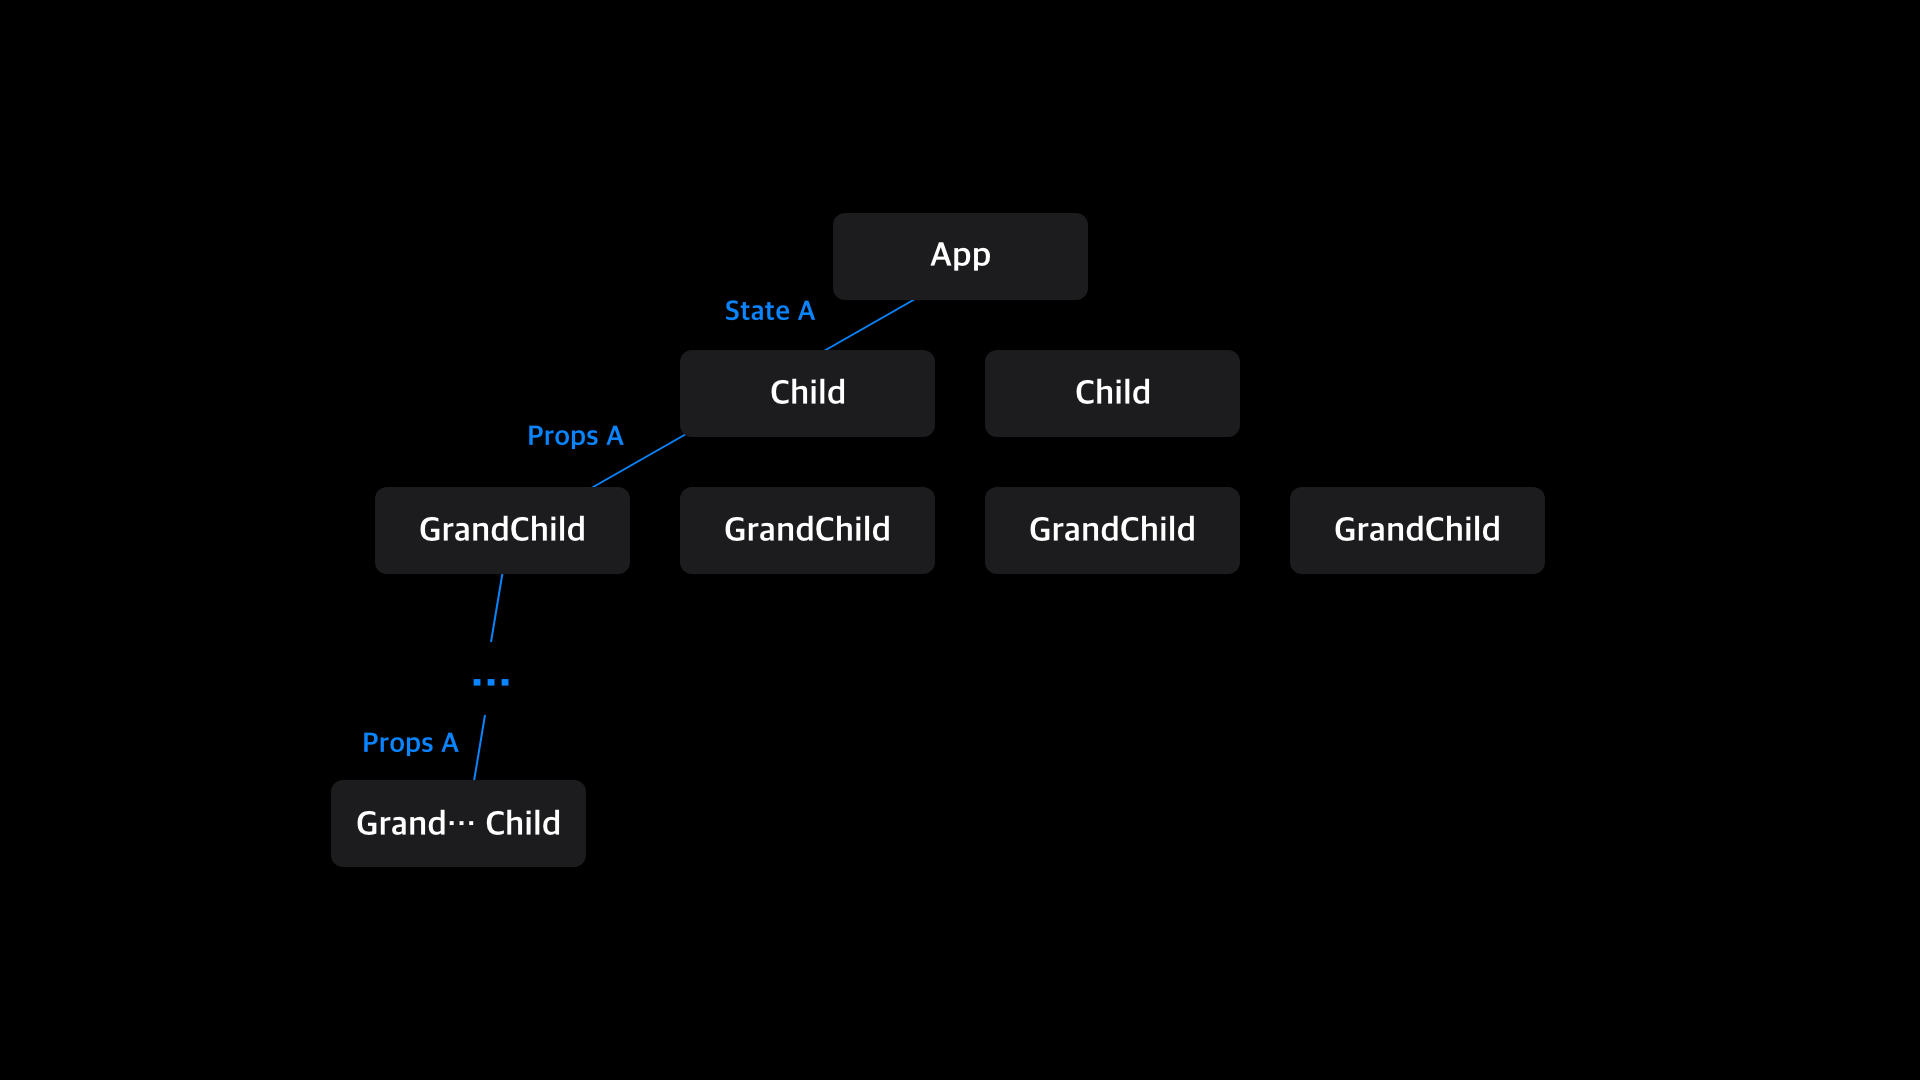
기존의 React의 데이터 구조를 보면,

위의 그림처럼, 최상단 App 컴포넌트의 데이터(State)가 하단의 Child를 거쳐 하단의 Grand... Child컴포넌트에게 Props를 전달해주는 구조이다.
이렇게 되면 직관적이고, 한곳에서 데이터를 관리할수있어서 편한점이 있지만, 앱의 규모가 커질경우 데이터 전달의 복잡성이 생기게된다.
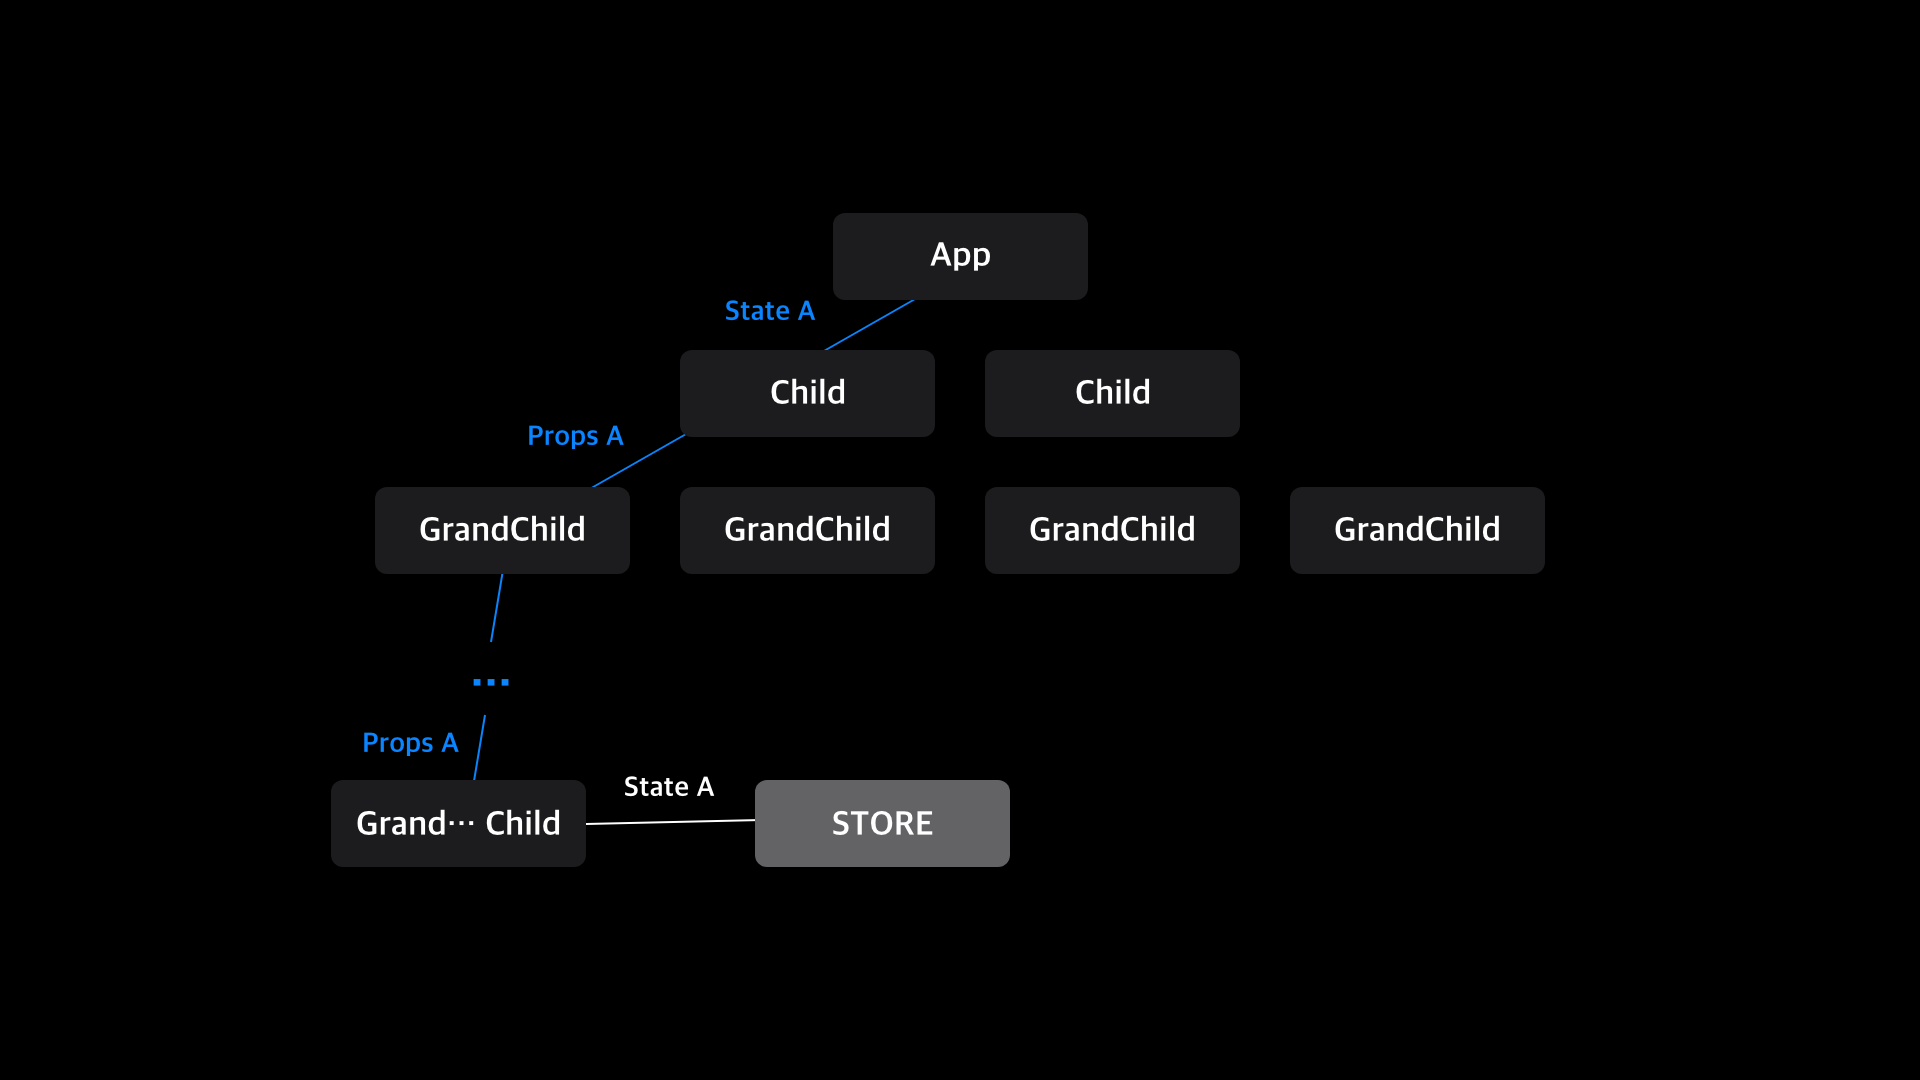
이러한 점을 보완하기위해 Redux를 사용할수있다. 리덕스는 아래의 그림처럼 글로벌에 존재하는 Store에서 state를 모든 컴포넌트에게 전달가능하다.

3가지 원칙
- 모든것은 하나의 소스로부터
- Redux는 한곳에서 데이터를 전역적으로 관리하고, 관리하는 이곳을 Store라고 부른다.
- State는 읽기전용
- 기존의 상태를 건드리지 않고 새로운 State를 생성하여 업데이트 해줘야한다. 즉 불변성을 유지하며 상태를 변경해줘야한다.
- 순수함수로 변화를
- 동일한 입력값이 있다면 동일한 출력값이 있어야하는 순수함수로 작성되어야한다.
1. Redux 시작하기
yarn add redux react-redux
Redux에 필요한 module을 설치해야한다.
프로젝트
이 프로젝트에서는 Multiple Counter를 만들예정이다.

각각의 카운터에서는 숫자를 증가 또는 감소할수있으며, 이러한 카운터를 추가하고 삭제할수있는 Multiple Counter를 Redux를 통해 만들어볼것이다.
Directory 구조
ㄴ /src
  ㄴ /actions
     ActionTypes.js
     index.js
  ㄴ /components
     App.js
     Counter.js
     CounterList.js
  ㄴ /containers
     CounterListContainer.js
  ㄴ /reducers
     index.js
  App.js
App.js
index.js
설계
- App.js
- 컴포넌트 트리구조의 가장 상단(root-level component) 에있는 App.js에서는 Store를 정의한다. CounterListContainer와 Store를 연결해줌으로써, Sotre가 관리하는 전역적인 데이터를 공유할수있다. - src/actions
- 액션과 액션생성자를 정의한다.
- 액션의 종류
INCREMENT : type과 index를 갖는다.
DECREMENT : type과 index를 갖는다.
ADD : type을 갖는다.
REMOVE : type을 갖는다. - src/components
- Presentational 컴포넌트의 DOM 마크업과 스타일을 담당한다. - src/containers
- Redux와 Presentational 컴포넌트를 연결을 담당한다. - src/reducers
- action 타입에 따른 데이터의 변화를 순수함수로 정의한다.
State와 Callback 함수
State
counter : [
     {
         counterNum : 0
     },
 ]
Callback
handleIncrement
handleDecrement
handleAddCounter
handleRemoveCounter
전체적인구조

2. 생성
우선 react-native 폴더를 생성후,
$ mkdir src
$ cd src
$ mkdir components containers
$ touch components/App.js components/Counter.js components/CounterList.js containers/CounterListContainer.js
아래의 구조를 볼수있다.
/components
   App.js
   Counter.js
   CounterList.js
/containers
   CounterListContainer.js
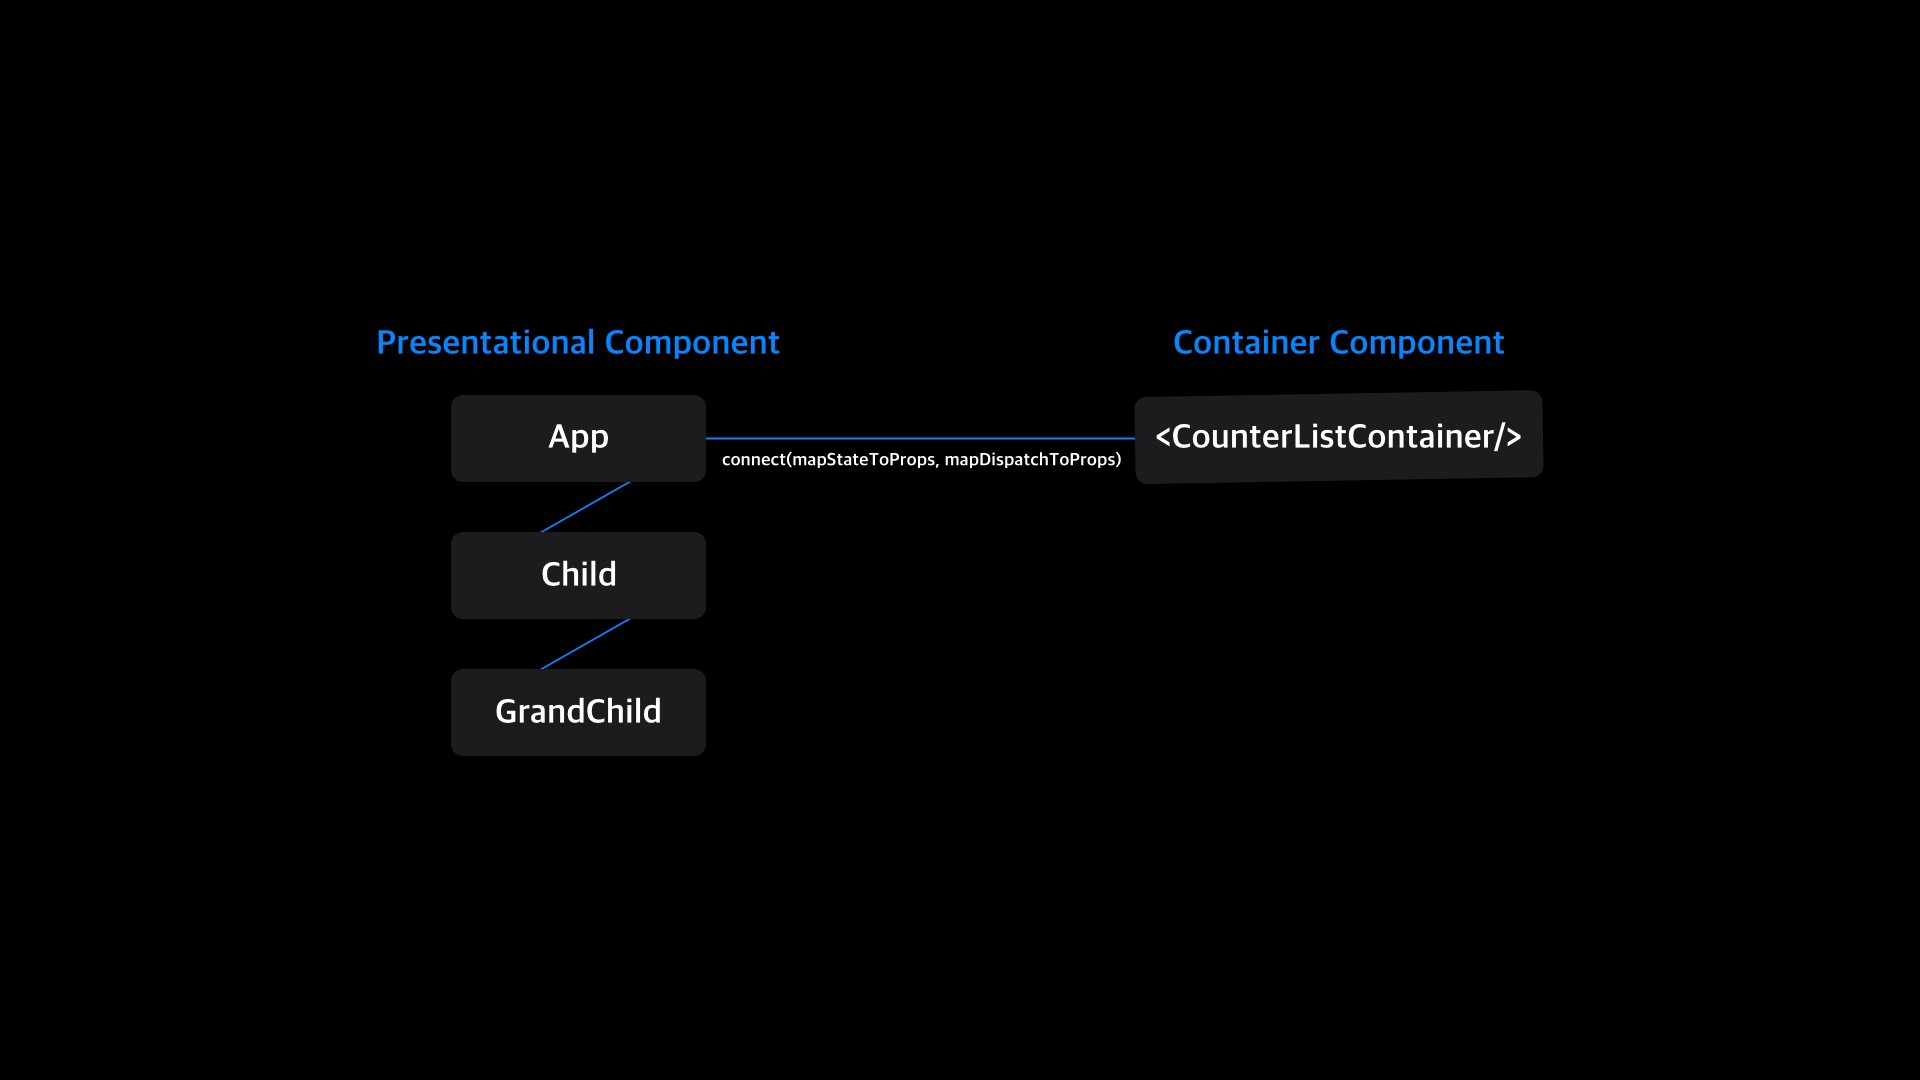
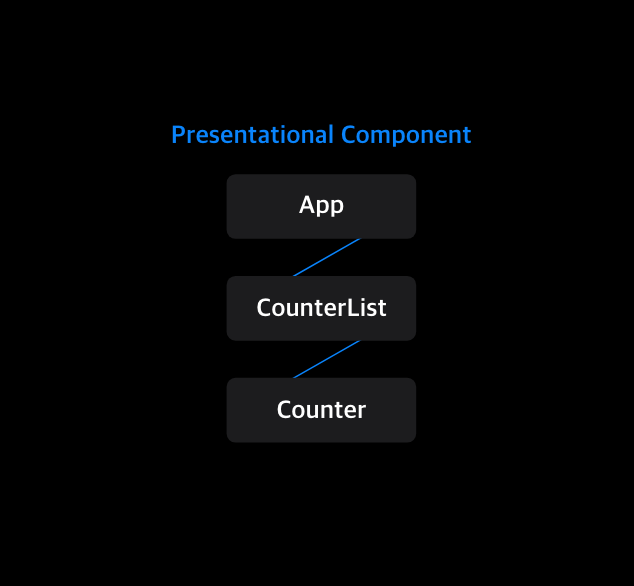
/components 와 /containers 로 component를 분리하는 방식인 Presentational and Container 패턴에 따라서 구현할것이다.
Presentational and Container 패턴이란?
데이터를 다루는 부분(Container)과 화면을 표현하는 부분(Presentational)으로 나눠서 개발하는 패턴이다.
| Presentational 컴포넌트 | Container 컴포넌트 |
|---|---|
| DOM 마크업과 스타일 담당 | 동작(behavior) 로직 |
| 데이터 처리 능력 없음 | 데이터 처리능력 있음 |
| Redux와 관련 없음 | Redux와 관련 있음 |
| 부모 컴포넌트로부터 받은 props인 데이터와 콜백(callback)을 사용한다. | 렌더링 되어야 할 데이터를 props 로써 데이터 처리 능력이 없는 컴포넌트인 Presentational 컴포넌트로 전달한다. |
유지보수와 재사용성을 고려하여 이렇게 개발하는것이 편리하다. 하지만, 필수는아니다. 기술적이 아닌 목적성에 의해 만들어진 패턴이다.
1.Presentational Component
Presentational component의 데이터 및 콜백은 props로 전달받아 사용하며, redux의 영향을 받지않고 오직 style에만 집중할수있는 컴포넌트이다.

src/components/App.js
import React from 'react';
import {
  StyleSheet,
  Text,
  TouchableOpacity,
  View,
  ScrollView,
  SafeAreaView,
} from 'react-native';
import CounterList from './CounterList';

const App = ({
  counter,
  handleAddCounter,
  handleRemoveCounter,
  handleIncrement,
  handleDecrement,
}) => {
  return (
    <SafeAreaView style={styles.safeView}>
      <ScrollView style={styles.container}>
        <View style={styles.counterAddRemoveContainer}>
          <TouchableOpacity
            style={styles.counterAddRemoveButton}
            onPress={handleAddCounter}>
            <Text style={styles.text}>AddCounter</Text>
          </TouchableOpacity>
          <TouchableOpacity
            style={styles.counterAddRemoveButton}
            onPress={handleRemoveCounter}>
            <Text style={styles.text}>Remove Counter</Text>
          </TouchableOpacity>
        </View>
        <View>
          <CounterList
            counter={counter}
            handleIncrement={handleIncrement}
            handleDecrement={handleDecrement}
          />
        </View>
      </ScrollView>
    </SafeAreaView>
  );
};

const styles = StyleSheet.create({
  safeView: {
    flex: 1,
    backgroundColor: '#1C1C1E',
  },
  container: {
    flex: 1,
    width: '100%',
    backgroundColor: '#1C1C1E',
    paddingTop: '15%',
    paddingBottom: '15%',
  },
  counterAddRemoveContainer: {
    width: '100%',
    display: 'flex',
    flexDirection: 'row',
  },
  counterAddRemoveButton: {
    margin: 10,
    padding: 10,
    flex: 1,
    backgroundColor: '#636366',
    borderRadius: 4,
  },
  text: {
    color: '#fff',
    textAlign: 'center',
  },
});

export default App;
src/components/CounterList.js
import React from 'react';
import Counter from './Counter';
import {StyleSheet, View} from 'react-native';

const CounterList = ({
  counter,
  handleAddCounter,
  handleRemoveCounter,
  handleIncrement,
  handleDecrement,
}) => {
  const counterModule = counter.map((item, index) => (
    <Counter
      key={index}
      index={index}
      value={item}
      handleIncrement={handleIncrement}
      handleDecrement={handleDecrement}
    />
  ));

  return <View style={styles.counterFrame}>{counterModule}</View>;
};

const styles = StyleSheet.create({
  counterFrame: {
    padding: 10,
  },
});

export default CounterList;
src/components/Counter.js
import React from 'react';
import {StyleSheet, Text, TouchableOpacity, View} from 'react-native';

const Counter = ({index, value, handleIncrement, handleDecrement}) => {
  return (
    <View style={styles.counterContainer}>
      <Text style={styles.counterInfo}>Count : {value.counterNum}</Text>
      <View style={styles.counterBtnContainer}>
        <TouchableOpacity
          style={styles.counterButton}
          onPress={() => handleIncrement(index)}>
          <Text style={styles.text}>INCREMENT</Text>
        </TouchableOpacity>
        <TouchableOpacity
          style={styles.counterButton}
          onPress={() => handleDecrement(index)}>
          <Text style={styles.text}>DECREMENT</Text>
        </TouchableOpacity>
      </View>
    </View>
  );
};

const styles = StyleSheet.create({
  counterContainer: {
    width: '100%',
    height: 100,
    padding: 20,
    backgroundColor: '#A7A7A7',
    shadowColor: '#000',
    shadowOffset: {
      width: 4,
      height: 3,
    },
    borderRadius: 4,
    shadowOpacity: 0.32,
    shadowRadius: 5.46,
    elevation: 9,
    marginBottom: 10,
  },
  counterInfo: {
    flex: 1,
    justifyContent: 'center',
    alignItems: 'center',
    textAlign: 'center',
    fontSize: 18,
    color: '#fff',
  },
  counterBtnContainer: {
    flex: 1,
    flexDirection: 'row',
    width: '100%',
  },
  counterButton: {
    backgroundColor: '#636366',
    marginLeft: 5,
    flex: 1,
    justifyContent: 'center',
    alignItems: 'center',
    borderRadius: 4,
  },
  text: {
    color: '#fff',
  },
});

export default Counter;
2. Container Component
- Redux의 Action 호출 하는 작업 등을 이 곳에서 작성하며, 데이터와 Callback을 컴포넌트에 props로 넘겨준다.
src/containers/CounterListContainer.js
import * as actions from '../actions';
import {connect} from 'react-redux';
import App from '../components/App';

const mapStateToProps = state => ({
  counter: state.counter,
});

const mapDispatchToProps = dispatch => ({
  handleIncrement: index => dispatch(actions.increment(index)),
  handleDecrement: index => dispatch(actions.decrement(index)),
  handleAddCounter: () => dispatch(actions.add()),
  handleRemoveCounter: () => dispatch(actions.remove()),
});

const CounterListContainer = connect(mapStateToProps, mapDispatchToProps)(App);

export default CounterListContainer;
connect()()란?
const CounterListContainer = connect(mapStateToProps, mapDispatchToProps)(App);
여기서 사용되는 connect는 react-native component와 redux를 연결하는 역할을한다.
이 코드에서는 mapStateToProps와 mapDispatchToProps 인자를 통해 컴포넌트에 state, callback을 넘겨주게된다.
mapStateToProps
전역에서 관리되는 store안의 데이터 state를 props 객체로 component에게 전달해준다. 여기서는 counter를 넘겨주는데, 전체 state 값을 가진 state에서 counter를 가져오기 위해 state.counter를 담아준다.
 const mapStateToProps = (state) => ({
     counter : state.counter,
 });
컴포넌트에서 사용되어질때, state.counter는 props.counter와 같은 방식으로 전달되어 사용되어진다.
그래서 이제는, presentational component에 넘겨줄 state값을 mapStateToProps에 담았다. 다음은 mapDispatchToProps에 callback을 담아보도록 하자
mapDispatchToProps
callback 함수와 그에따른 action을 dispatch 하는 것을 연결하여 mapDispatchToProps에 담는다.
const mapDispatchToProps = (dispatch) => ({
       handleIncrement : (index) => dispatch(actions.increment(index)),
       handleDecrement : (index) => dispatch(actions.decrement(index)),
       handleAddCounter : () => dispatch(actions.add()),
       handleRemoveCounter : () => dispatch(actions.remove()),
 });
dispatch() 란?
reducer를 불러서 현재 state에 action을 발생시키는 메서드이다. 다시말하면, 전역적으로 데이터를 관리하고있는 store에게 action 값을 넘겨주며 어떻게 state를 변화시켜야할지 알려주는 메서드이다.
3. 액션
action(액션)?
어떤 변화가 일어나야할지 알려주는 store 의 유일한 정보원이며, Action 의 이름과도 같은 type 이라는 필수 요소를 가진 자바스크립트 객체이다.
Action의 기본적인 포맷
Action 은 이름과도 같은 type 속성을 필수적으로 갖는다.
{
	type : "액션의 종류를 구분할 수 있는 문자열 상수",
	...
	... (상황에 따른 여러 요소 추가 가능하다.),
	index,
	...
}
Action의 사용
행동 지침인 Action는 dispatch() 라는 함수를 이용하여 Store 에게 상태 변화를 해야한다고 알려준다.
store.dispatch({ type : "INCREMENT", index });기본적인 방법은 위와같지만, 보통은 이런식으로 사용하지않고 action을 반환하하는 함수인 Action생성자 를 사용한다.
store.dispatch(() => increment(index));dispatch(action값) 으로 상태 변화를 해야됨을 알게된 Store 는 Reducer 에 정의되어있는 메뉴얼대로 상태변화를 실행한다.
State 를 변형하기 위해 요구되는 최소한의 정보를 나타내기 때문에 최대한 작게 유지해야한다. Action 에 따라 실행되는 dispatch() 함수는 어디서든 실행될 수 있다.
액션을 생성해보자,
$ mkdir actions
$ touch actions/ActionTypes.js actions/index.js
src/actions/ActionTypes.js
ActionTypes에서는 action의 type을 정한다.
export const INCREMENT = 'INCREMENT';
export const DECREMENT = 'DECREMENT';

export const ADD = 'ADD';
export const REMOVE = 'REMOVE';
src/actions/index.js
import * as types from './ActionTypes';

export const add = () => ({
    type : types.ADD
});

export const remove = () => ({
    type : types.REMOVE,
});

export const increment = (index) => ({
    type : types.INCREMENT,
    index
});

export const decrement = (index) => ({
    type : types.DECREMENT,
    index
});
4. 리듀서
리듀서란?
1. 이전 state와 action에 따라서, 불변성을 가진 새로운 state를 반환해주는 순수함수이다.
- 반환값인 state 가 함수 인자인 state, action 에 의해서만 정의되는 함수.
- state의 변화에 외부 요인이 영향을 주면 순수함수가 아닙니다.
const 리듀서-함수-이름 = (defaultstate, action) => {
    switch(action.type) {
        case "액션 타입 1" :
            return ({
                [액션타입에 따라 변화된 state]
            });
        case "액션 타입 2" :
            return ({
                [액션타입에 따라 변화된 state]
            });
        ...
        return defaultstate;
    }
}
2. state는 불변성을 갖는다.
state 는 트리 구조의 자료구조로 되어있기 때문에 직접 그 값을 변경해주기 위해서 깊이 있는 탐색(DFS)을 하게 될 수 있고 이에 따라 속성 전체를 비교하면 O(n) 만큼의 데이터를 비교 해야할 수 있습니다. 이러한 이유로 redux 는 다음과 같은 변경 알고리즘이 적용되어있습니다.
- reducer 를 거친 state 의 변경유무를 검사하기 위해 state 객체 주소를 비교하여 다른 주소값이라면 변경됐다고 감지한다. 즉, 같은 주소 값이라면 변경했다고 감지되지않는다.
- state 값을 변경할 때 직접 값을 수정하지 않고 state의 복제본을 만들어 수정 후, 반환하는 방식을 사용해야한다.
- state 값의 변화가 있다면 불변성을 유지해주기 위해서 새로운 객체로 반환해줘야한다.
리듀서를 생성해보자
$ mkdir reducers
$ touch reducers/index.js
src/reducers/index.js
const initialState = {
  counter: [{counterNum: 0}],
};

const counter = (state = initialState, action) => {
  const {counter} = state;

  console.log('state는?', state, counter);

  switch (action.type) {
    case 'INCREMENT':
      return {
        counter: [
          ...counter.slice(0, action.index),
          {
            counterNum: counter[action.index].counterNum + 1,
          },
          ...counter.slice(action.index + 1, counter.length),
        ],
      };
    case 'DECREMENT':
      return {
        counter: [
          ...counter.slice(0, action.index),
          {
            counterNum: counter[action.index].counterNum - 1,
          },
          ...counter.slice(action.index + 1, counter.length),
        ],
      };
    case 'ADD':
      return {
        counter: [
          ...counter,
          {
            counterNum: 0,
          },
        ],
      };
    case 'REMOVE':
      return {
        counter: counter.slice(0, counter.length - 1),
      };

    default:
      return state;
  }
};
export default counter;
INCREMENT, DECREMENT
action으로 넘겨받은 index를 통해 counter 상태 객체를 재정의 해준다.
index 이전 값들 : …counter.slice(0, action.index)
해당 index 값 : { counterNum : count[action.index].counterNum + 1 혹은 -1}
//INCREMENT = +1, DECREMENT = -1//
index 이후 값들 : …counter.slice(action.index+1, counter.length)
ADD, REMOVE
counter 상태객체에 이어 붙이거나, slice 함수를 이용하여 재정의 해준다.
4. 스토어
스토어란?
Application의 데이터 State 를 저장해서 전역에서 관리하는 한 곳.
스토어(Store)의 기능
Application에 state를 제공하고, state 가 업데이트될 때마다 화면이 다시 렌더링 되게 한다.
store.getState() : 애플리케이션의 현재 state tree에 접근하는 용도
store.dispatch(action) : 액션을 기반으로 state 변화를 일으키는 용도
store.subscribe() : state에서 변화를 감지하는 용도. 액션이 dispatch 될 때마다 호출됨.
store.unsubscribe(): 컴포넌트가 언마운트(unmounted)될 때, store에서 listening를 해제(stop)하고, 메모리 누수(memory leak)을 막기 위해 사용
App.js(root)
import App from './src/App';

export default App;
/src/App.js
import React from 'react';
import {StyleSheet} from 'react-native';
import CounterListContainer from './containers/CounterListContainer';

import {createStore} from 'redux';
import reducers from './reducers';
import {Provider} from 'react-redux';

const store = createStore(reducers);

const App = () => {
  return (
    <Provider store={store}>
      <CounterListContainer />
    </Provider>
  );
};

const styles = StyleSheet.create({
  container: {
    flex: 1,
  },
});

export default App;
Provider 컴포넌트
react-redux 에서 제공하는, 컴포넌트들이 Redux의 Store에 접근 가능하도록 해주는 컴포넌트이다.
컴포넌트의 root 위치에 감싸준다.
5. 마무리

출처 : https://jeffgukang.github.io/react-native-tutorial/docs/state-tutorial/redux-tutorial/index-kr.html
