VueJS 데이터 전달
1. props & emit
props
: 상위 -> 하위 컴포넌트 데이터 전달
<table.vue>
<!--템플릿-->
<span :props="name"> {{ name }} </span>
// 스크립트
props: {
name: {
type: String,
...
},
...<menu.vue>
<table :name="someName"></table>emit
: 하위 -> 상위 컴포넌트 데이터 전달
<table.vue>
<!--템플릿-->
<button @click="changeCnt" > {{ cnt }} </span>
// 스크립트
changeCnt() {
this.$emit("change-cnt", val);<menu.vue>
<!--템플릿-->
<table @change-cnt="changeCnt"></table>
// script
changeCnt() {
this.prCnt = ...;
}! prop을 통해 전달받은 값을 하위 컴포넌트에서 직접 변경 x

-> props로 하위 컴포넌트에 데이터 전달
-> emit을 통해 데이터를 넘겨주고 상위 컴포넌트에서 값 수정
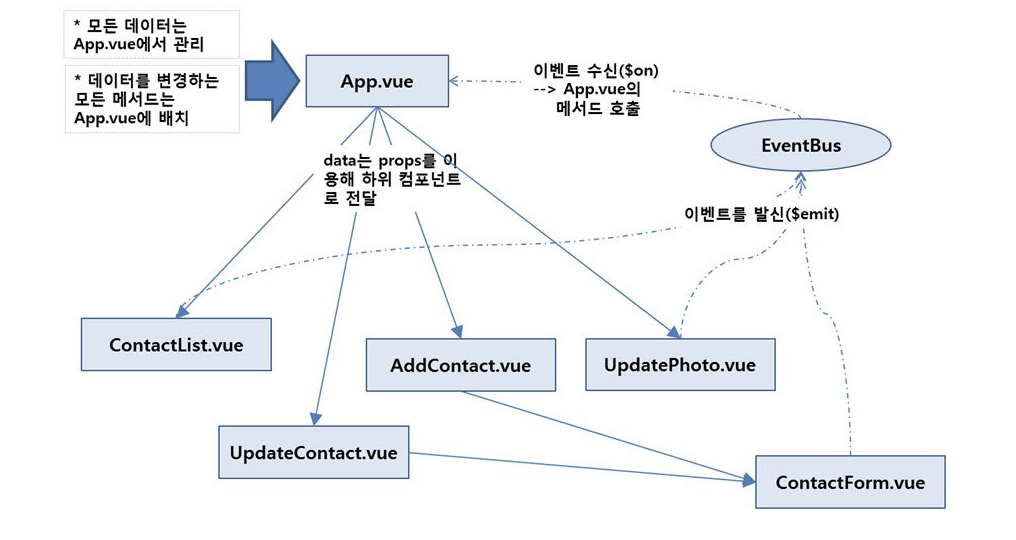
2. Event Bus
: 부모-자식 컴포넌트가 아닌 관계의 컴포넌트끼리 데이터 통신
Root Instance (main.js)
└─ 최상위 컴포넌트 (App.vue)
      ├─ Component A
               ├─ Component B
                  └─ Component C
               └─ Component D
-> 컴포넌트 C & D 사이에 데이터 통신이 필요
! props & emit : C -> B -> A -> D
-> 상태 변경 복잡성 증가 : 어플리케이션이 복잡해지면 유지보수 매우 힘들다
-> event bus 사용
EventBus 구조

<main.js>
// main.js에 event bus 등록
export const eventBus = new Vue()
component D
<template>
  <div> {{ this.textComponentD }}
    <button @click="clickComponentDButton">
      {{ this.ComponentDBtnVaule }}
    </button>
  </div>
</template><script>
import { eventBus } from "@/main.js";
export default {
name: "ComponentD",
data: function () {
return {
textComponentD: "ComponentD 입니다.",
ComponentDBtnVaule: "D의 버튼",
};
},
created() {
eventBus.$on("clickComponentCButton", (componentCButtonValue) => {
window.alert(componentCButtonValue);
});
},
beforeDestroy() {
eventBus.$off("clickComponentCButton");
},
methods: {
clickComponentDButton() {
eventBus.$emit("clickComponentDButton", this.ComponentDBtnVaule);
},
},
};
</script>
- eventBus.$on : 이벤트 받기
- eventBus.$off : 이벤트 종료
- eventBus.$emit : 이벤트 전달
!EventBus
: 사용할 모든 component에서 listener 등록과 제거 필요
: 가독성이 낮고 데이터 흐름을 파악하기 어려워 유지보수가 힘들다
3. vuex
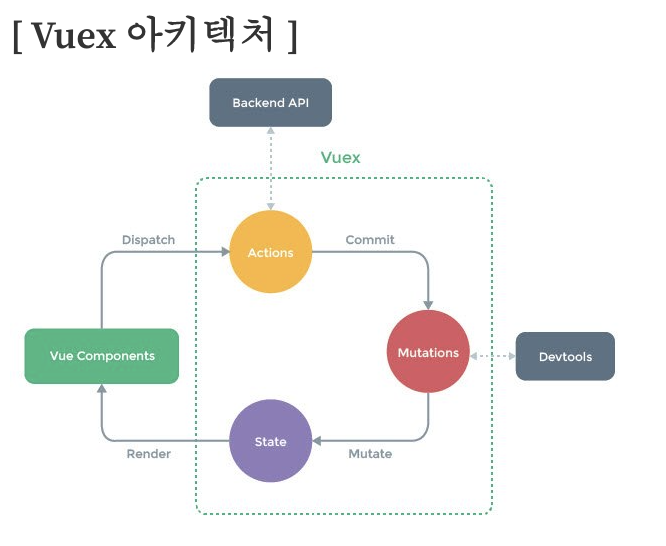
: 상태 관리를 위한 패턴이자 라이브러리

- Action : 컴포넌트에서 액션 일으킨다(ex 버튼 클릭)
-> 외부 API 호출 결과를 통해 mutation을 일으키는 것이 가능 - Mutations(변이) : state(상태)를 변경
-> DevTools를 통해 상태 변경 내역을 모두 확인 가능하다 - state : 컴포넌트들에서 사용할 데이터
=> 변경된 상태가 다시 vue component에 바인딩되어 UI 갱신
1. state
// store/index.js

import Vue from 'vue'
import Vuex from 'vuex'

Vue.use(Vuex)

export default new Vuex.Store({
  state: {
    exampleData1: '',
    exampleData2: '',
  }
})- store : vuex가 지원하는 저장소 -> 상태와 변이를 중앙집중화하여 관리
-> main.js에 store를 등록하면 사용 가능 - state : 어플리케이션에서 관리되어야 할 정보
// state 직접 사용
//component C

<script>
  ...
	this.$store.state.exampleData1 = "example 1";
	this.exampleData2 = this.$store.state.exampleData2;
</script>
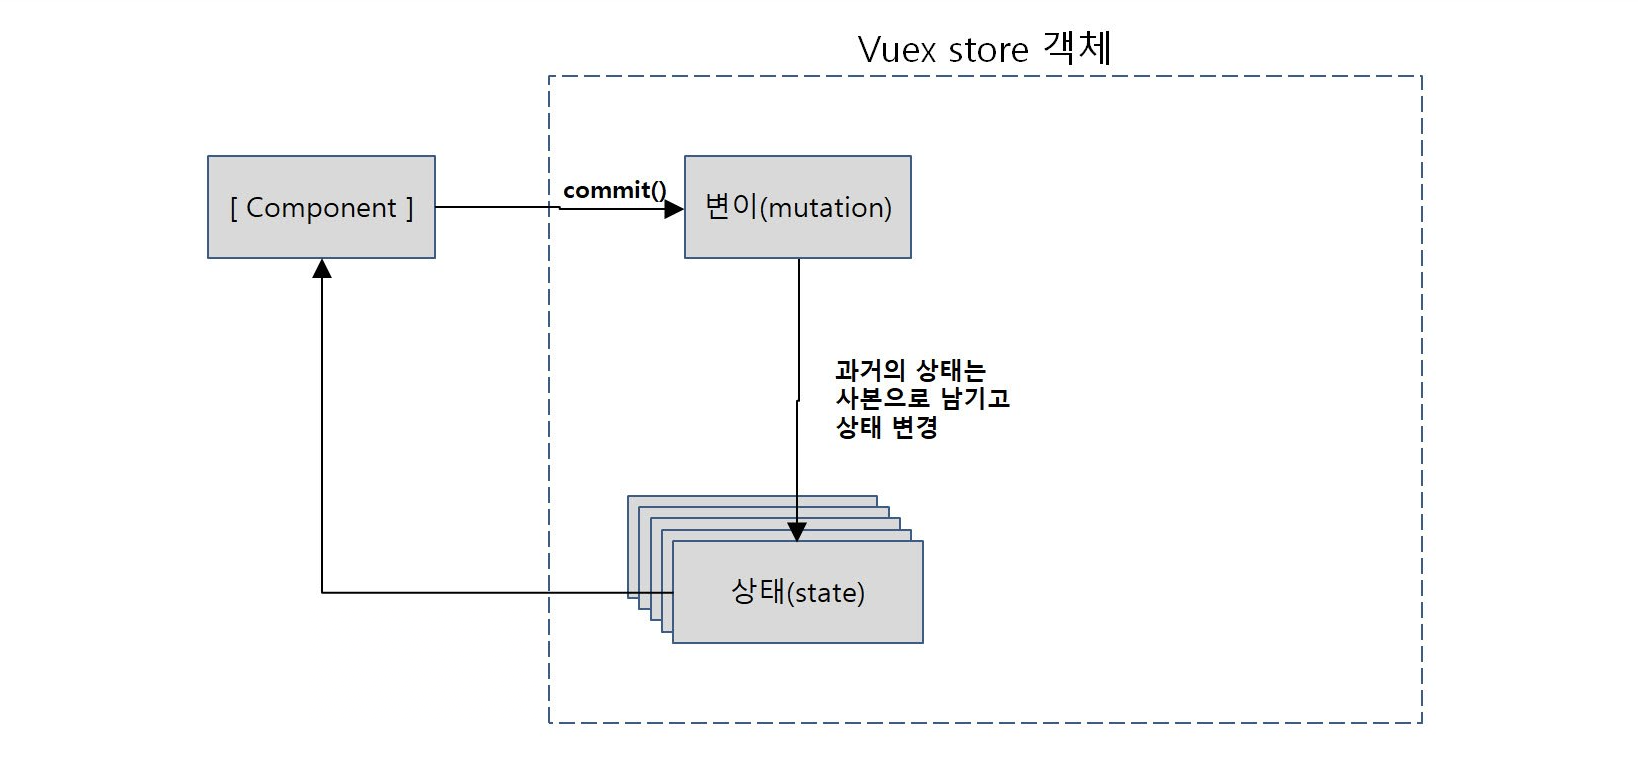
2. mutation
- state 변경 이력을 남긴다
(언제 어떤 데이터가 어떻게 변경되었는지)
-> 안전성 향상
-> 추적가능하게 상태 변경 - 데이터 변이를 위해 commit() 메서드 호출
- 비동기 지원 x
작동방식

// store/index.js

import Vue from 'vue'
import Vuex from 'vuex'

Vue.use(Vuex)

export default new Vuex.Store({
  state: {
    exampleData1: '',
    exampleData2: '',
  },
  mutations: {
    set_exampleData1(state, value) {
      state.exampleData1 = value;
    },
  }
})
// component C
<script>
...
this.$store.commit('set_exampleData1', "테스트 데이터");
...
</script>3. Action

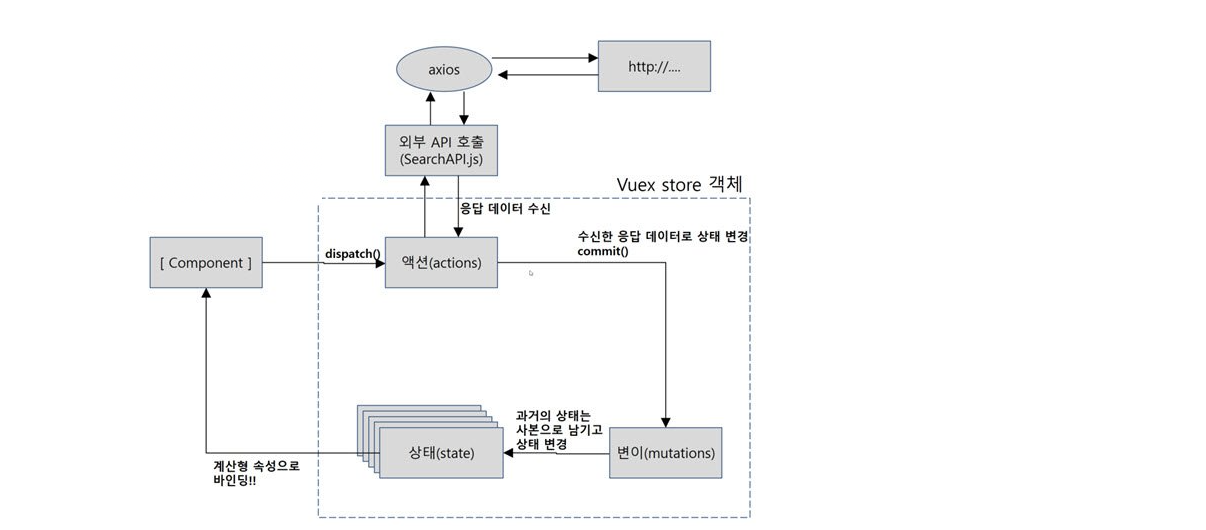
- 외부 API를 호출 가능
- 비동기 처리
-> API 호출 작업 : 시간 소요 발생(지연 시간) -> 동기화로 작업하게 되면 그 시간동안 브라우저 멈춘다 -> 비동기 작업 - Promise를 통한 순차 적용 가능
// store/index.js

import Vue from 'vue'
import Vuex from 'vuex'

Vue.use(Vuex)

export default new Vuex.Store({
  state: {
    exampleData1: '',
    exampleData2: '',
  },
  mutations: {
    set_exampleData1(state, value) {
      state.exampleData1 = value;
    },
  },
  actions : {
    setExample1({commit}, value) {
      commit('set_exampleData1', value);
    },
  }
})
// component C
<script>
...
this.$store.dispatch('setExample1', "테스트 데이터").then(() => {
...다음 작업...
})
...
</script>