이전 시간에 이어 Resource Server를 구현하여 Authorization Server로 부터 받은 access token의 유효성을 체크해보겠습니다.
Resource Server는 이전 시간에 개발한 Authorization Server로 부터 받은 access token이 필요하므로 Resource Server를 구현하기 전에 Authorization Server를 먼저 구현하시는 걸 추천합니다.
프로젝트 생성
Authorization Server와 같이 start.spring.io 사이트를 이용하여 다음과 같이 프로젝트 설정을 하고 intellij로 해당 프로젝트를 시작하겠습니다.
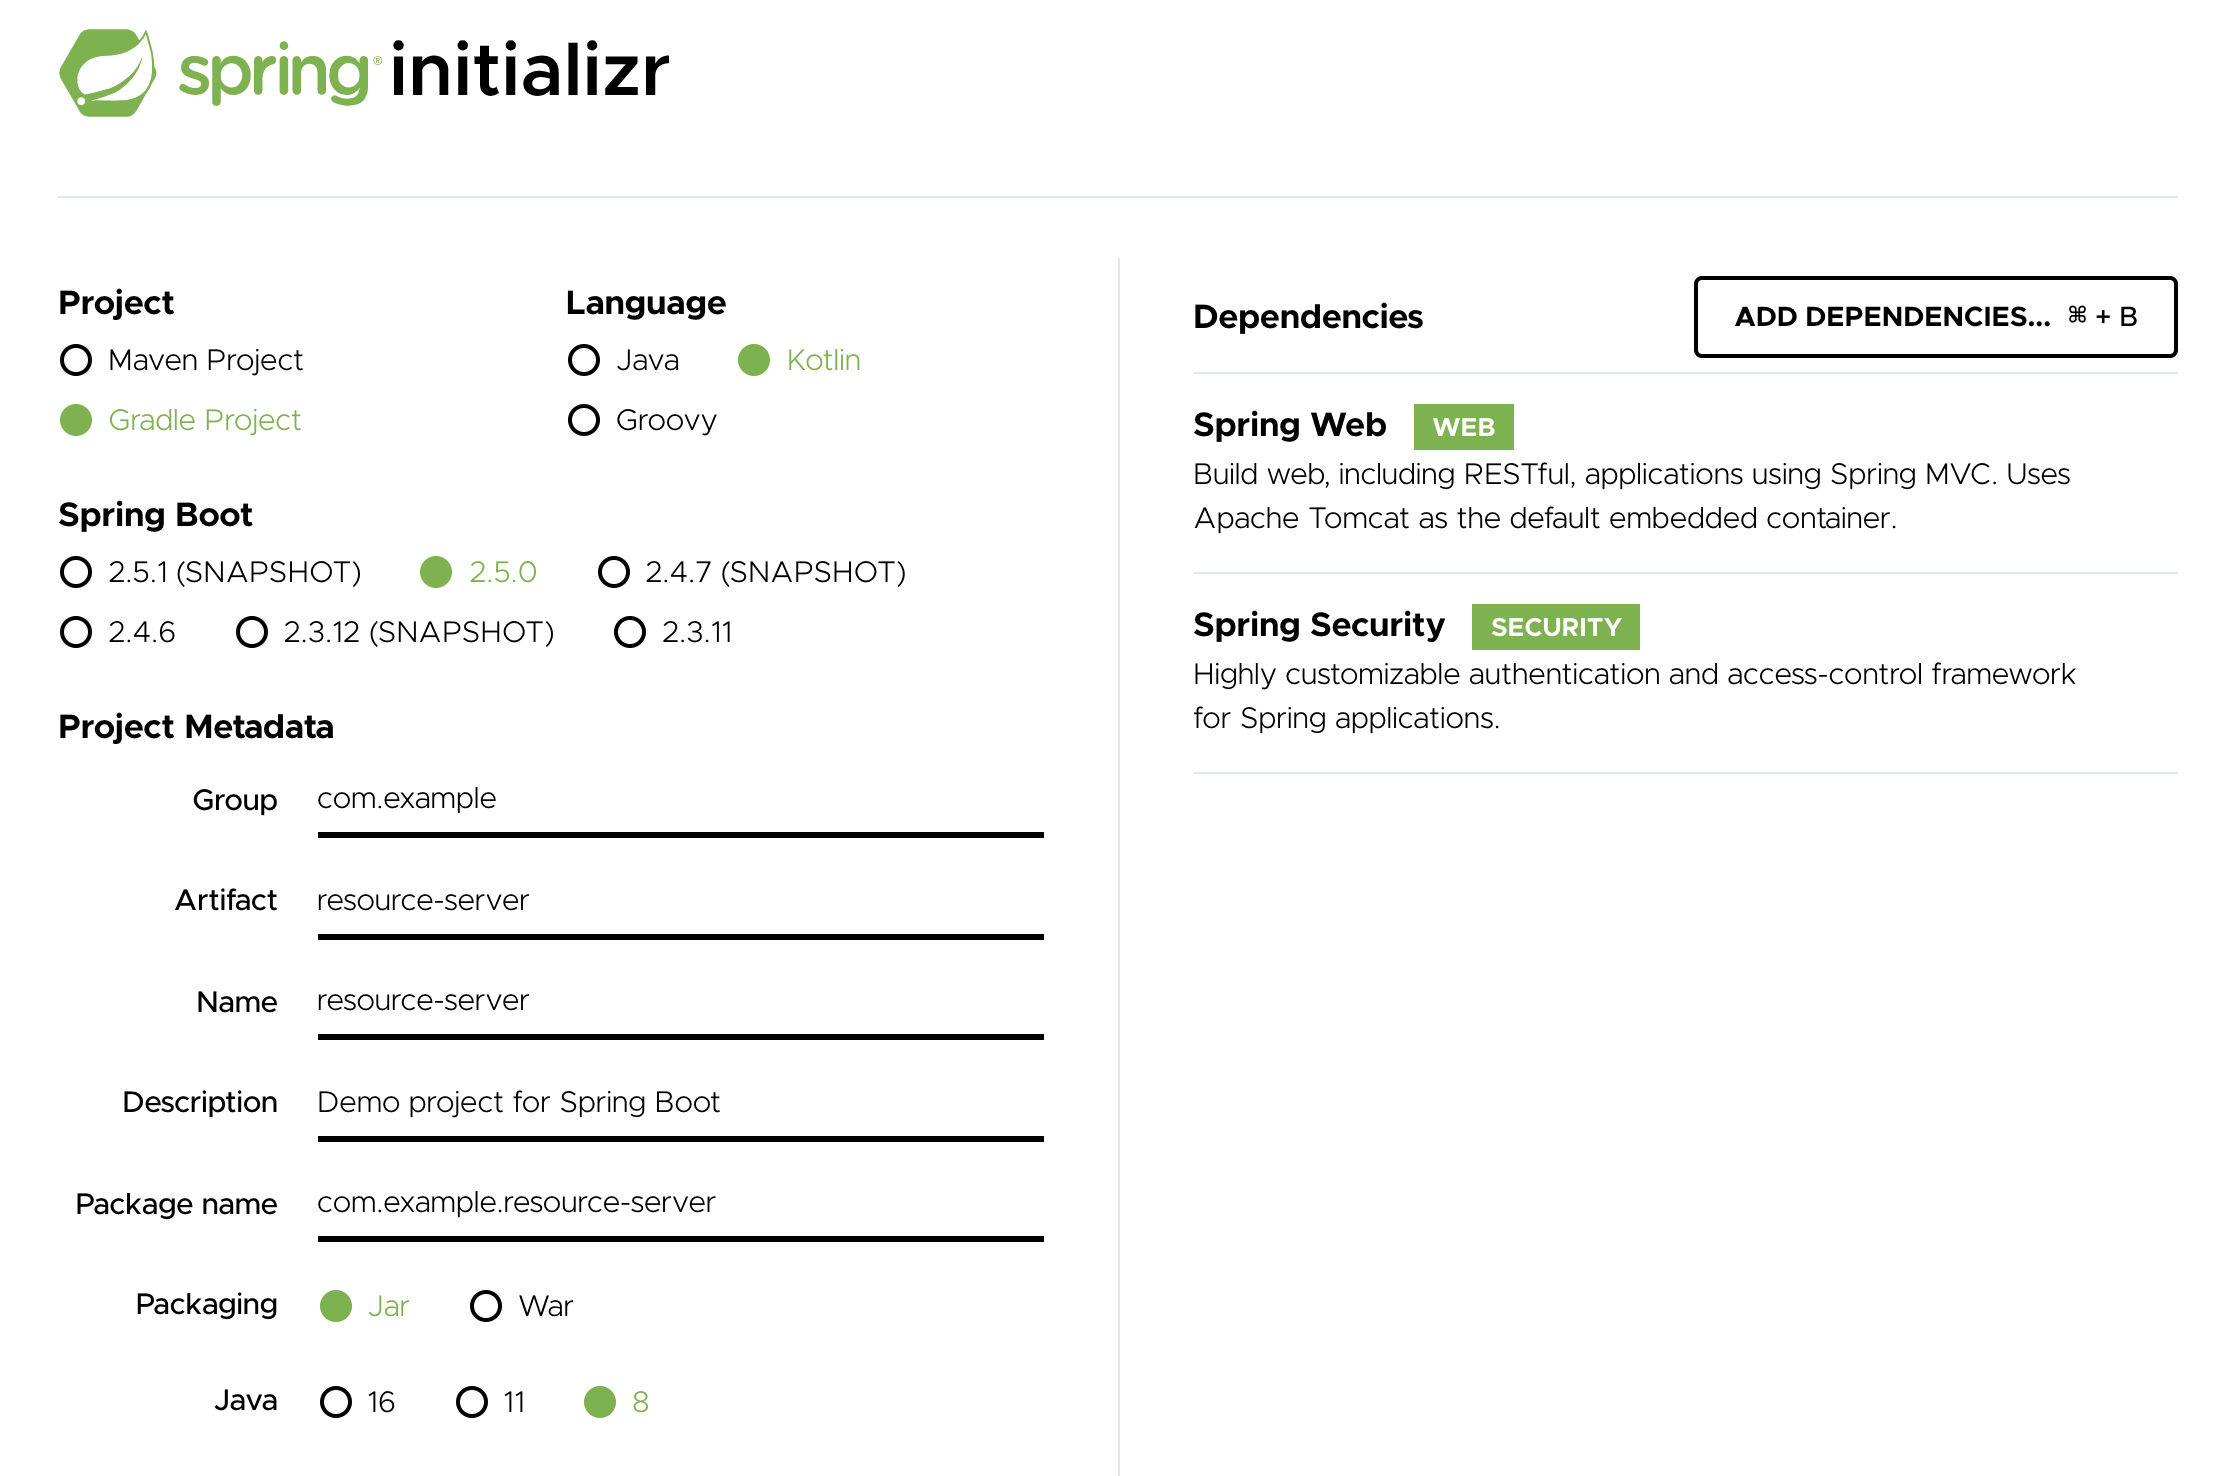
프로젝트 설정이 완료되면 다음과 같이 추가 의존성 라이브러리들을 추가해줍니다.
dependencies {
	implementation("org.springframework.security.oauth:spring-security-oauth2:2.3.8.RELEASE")
	implementation("org.springframework.security:spring-security-jwt:1.1.1.RELEASE")
}
그리고 src/main/resources/application.properties 파일에 다음과 같이 jwt secret key에 사용될 값과 해당 application의 port 번호를 입력합니다.
port번호는 Authorization Server의 port 번호인 8080과 겹치지 않게 하기 위해 8090으로 설정했으며, jwt secret key는 Authorization Server에 추가한 값과 동일해야 합니다.
example.jwt-secret=jwt-secret
server.port=8090
그 다음으로 ResourceServerConfig 파일을 com.example.resourceserver 패키지에 추가합니다.
(혹여 패키지 이름이 다르더라도 기본 ~~Application.kt 파일이 있는 패키지 내에 파일을 추가하시면 됩니다.)
ResourceServerConfig.kt
package com.example.resourceserver

import org.springframework.beans.factory.annotation.Value
import org.springframework.context.annotation.Bean
import org.springframework.context.annotation.Configuration
import org.springframework.security.config.annotation.web.builders.HttpSecurity
import org.springframework.security.config.http.SessionCreationPolicy
import org.springframework.security.oauth2.config.annotation.web.configuration.EnableResourceServer
import org.springframework.security.oauth2.config.annotation.web.configuration.ResourceServerConfigurerAdapter
import org.springframework.security.oauth2.config.annotation.web.configurers.ResourceServerSecurityConfigurer
import org.springframework.security.oauth2.provider.token.DefaultTokenServices
import org.springframework.security.oauth2.provider.token.store.JwtAccessTokenConverter
import org.springframework.security.oauth2.provider.token.store.JwtTokenStore
import org.springframework.security.web.context.NullSecurityContextRepository
import org.springframework.security.web.savedrequest.HttpSessionRequestCache

@Configuration
@EnableResourceServer
class ResourceServerConfig (
    @Value("\${example.jwt-secret}")
    private val jwtSecret: String
) : ResourceServerConfigurerAdapter() {

    @Bean
    fun accessTokenConverter(): JwtAccessTokenConverter {
        val converter = JwtAccessTokenConverter()
        converter.setSigningKey(jwtSecret)
        return converter
    }

    override fun configure(resources: ResourceServerSecurityConfigurer) {
        val tokenServices = DefaultTokenServices()
        tokenServices.setTokenStore(JwtTokenStore(accessTokenConverter()))
        resources.tokenServices(tokenServices)
    }

    override fun configure(http: HttpSecurity) {
        val httpSessionRequestCache = HttpSessionRequestCache()
        httpSessionRequestCache.setCreateSessionAllowed(false)
        http
            .authorizeRequests()
            .anyRequest().authenticated()
            .and()
            .sessionManagement().sessionCreationPolicy(SessionCreationPolicy.STATELESS)
            .and()
            .securityContext().securityContextRepository(NullSecurityContextRepository())
            .and()
            .requestCache().requestCache(httpSessionRequestCache)
            .and()
            .csrf().disable()
    }
}
accessTokenConverter()
jwt 토큰 컨버터. jwt 토큰으로 컨버팅시에 사용할 jwt secret key를 설정한다
configure(resrouces: ResourceServerSecurityConfigurer)
Resource Server의 기본 토큰 서비스를 설정하고 기본 token store을 지정한다.
configure(http: HttpSecurity)
resource server에 접근할때의 보안 설정을 한다
-
setCreateSessionAllowed(false) - 세션이 아닌 JWT(Json Web Token)를 통하여 Stateless로 로그인을 구현하기에 세션 서비스를 사용하지 않음
-
anyRequest().authenticated() - 모든 서비스에 대하여 인증을 진행한다. 요청과 함께 전달받은 access token의 유효성을 검사함
-
sessionCreationPolicy(SessionCreationPolicy.STATELESS) - 세션 방식을 STATELESS로 설정함
-
securityContextRepository(NullSecurityContextRepository()) - 세션이나 인증 정보를 저장하지 않으므로 사용하지 않음으로 설정함
- csrf().disable() - CSRF(Cross Site Request Forgery) 설정을 사용하지 않음. CSRF에 관한 내용은 다음 링크를 참조해주세용
간단한 API 추가
access token의 유효성을 확인하기 위해 간단한 API를 ResourceServerApplication.kt에 다음과 같이 추가하도록 하겠습니다.
ResourceServerApplication.kt
추가한 API는 "/" 루트 path를 가지고 있고 무조건 "hi"라는 string을 반환합니다.
package com.example.resourceserver

import org.springframework.boot.autoconfigure.SpringBootApplication
import org.springframework.boot.runApplication
import org.springframework.web.bind.annotation.GetMapping
import org.springframework.web.bind.annotation.RestController

@SpringBootApplication
class ResourceServerApplication

fun main(args: Array<String>) {
    runApplication<ResourceServerApplication>(*args)
}

@RestController
class TestController {

    @GetMapping
    fun hello() = "hi"
}
Resource Server 실행
Authorization Server를 실행시킨 방법과 같이 intellij의 service 탭에 프로젝트를 추가한 뒤 실행시키면 됩니다.
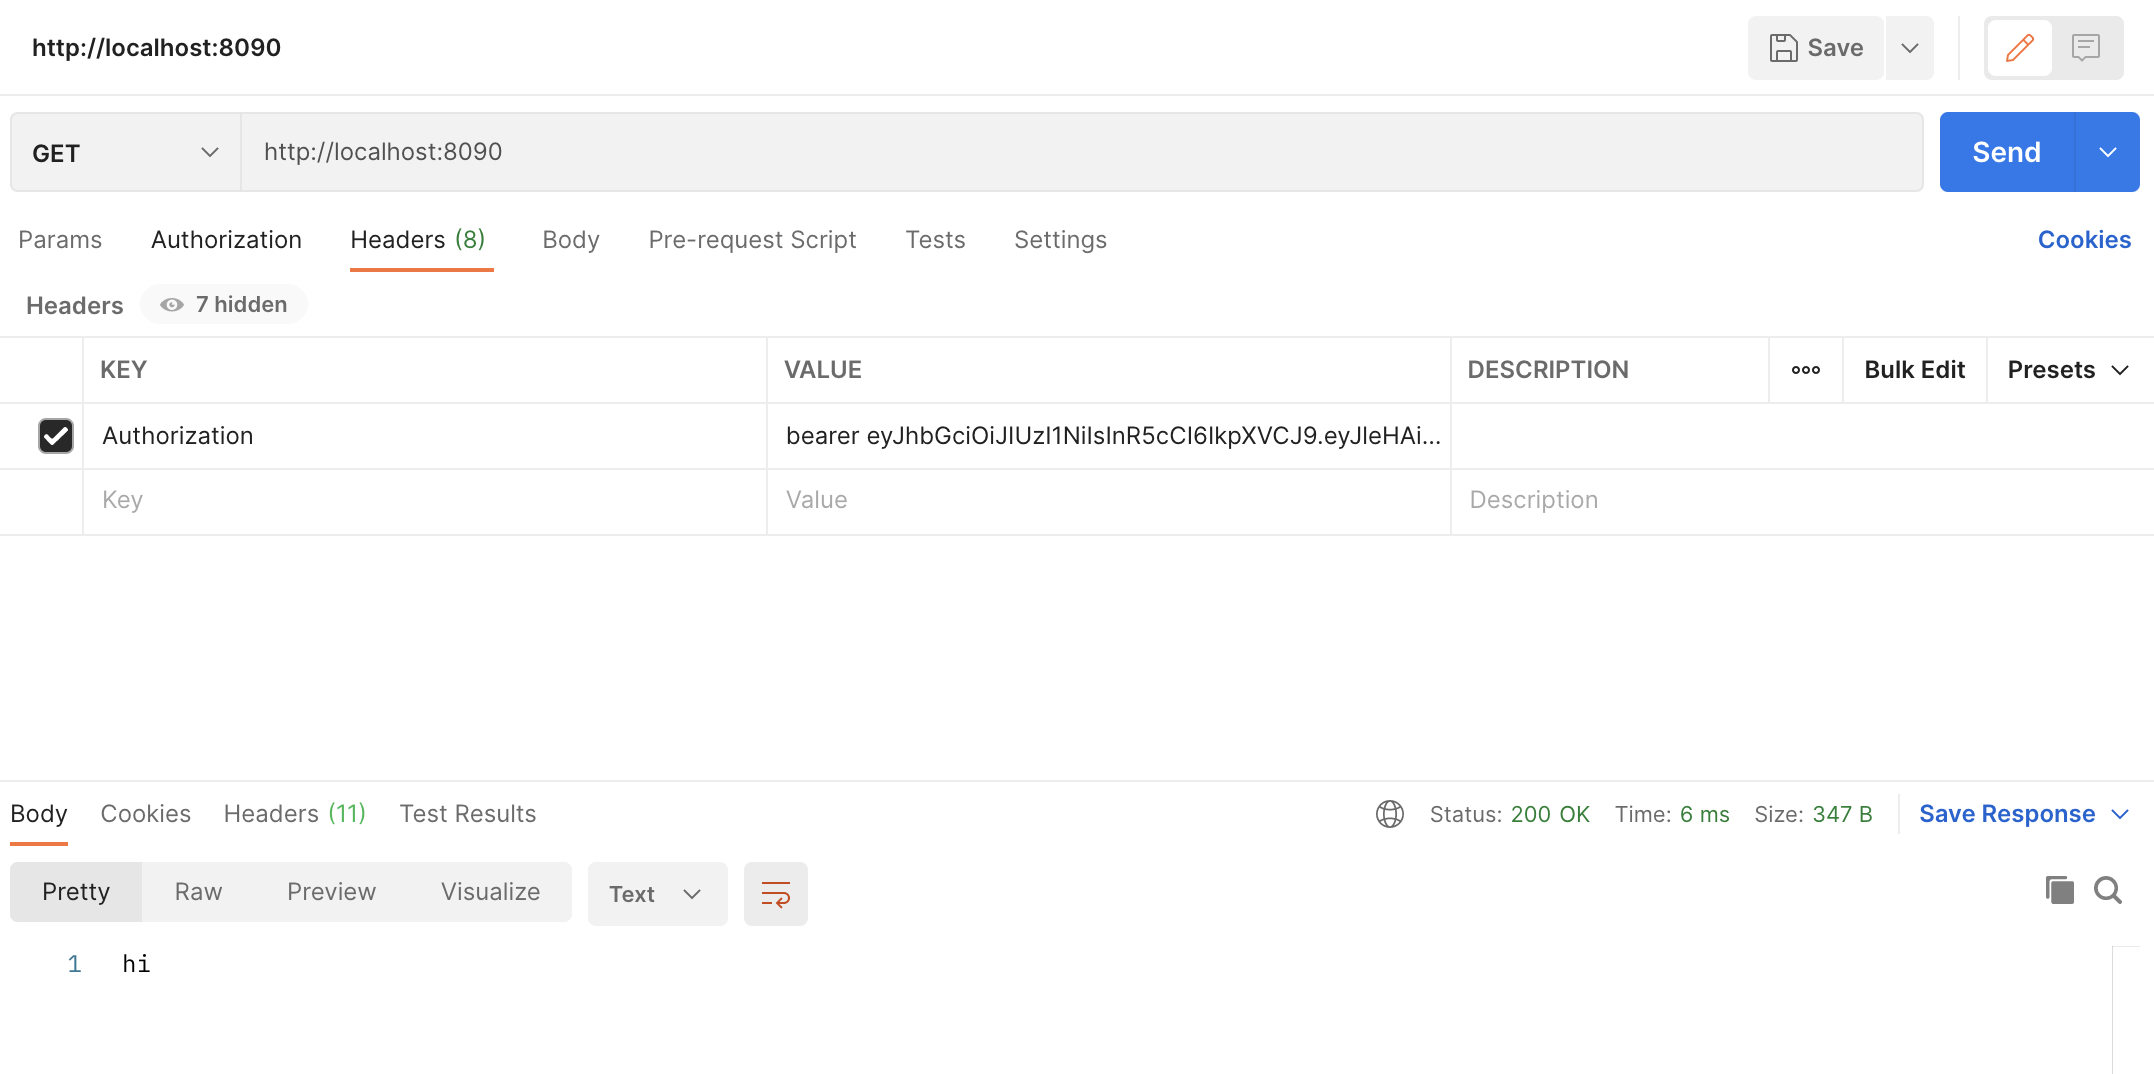
추가한 뒤 PostMan으로 access token과 함께 API를 호출하면 hi라는 반환된 데이터를 얻을 수 있습니다.
PostMan으로 호출하기 전에 header 값에 아래 그림과 같이 Authorization 값을 입력해야 합니다.
access token은 bearer type의 토큰이므로 "bearer [AccessTokenValue]" 형식으로 입력합니다.
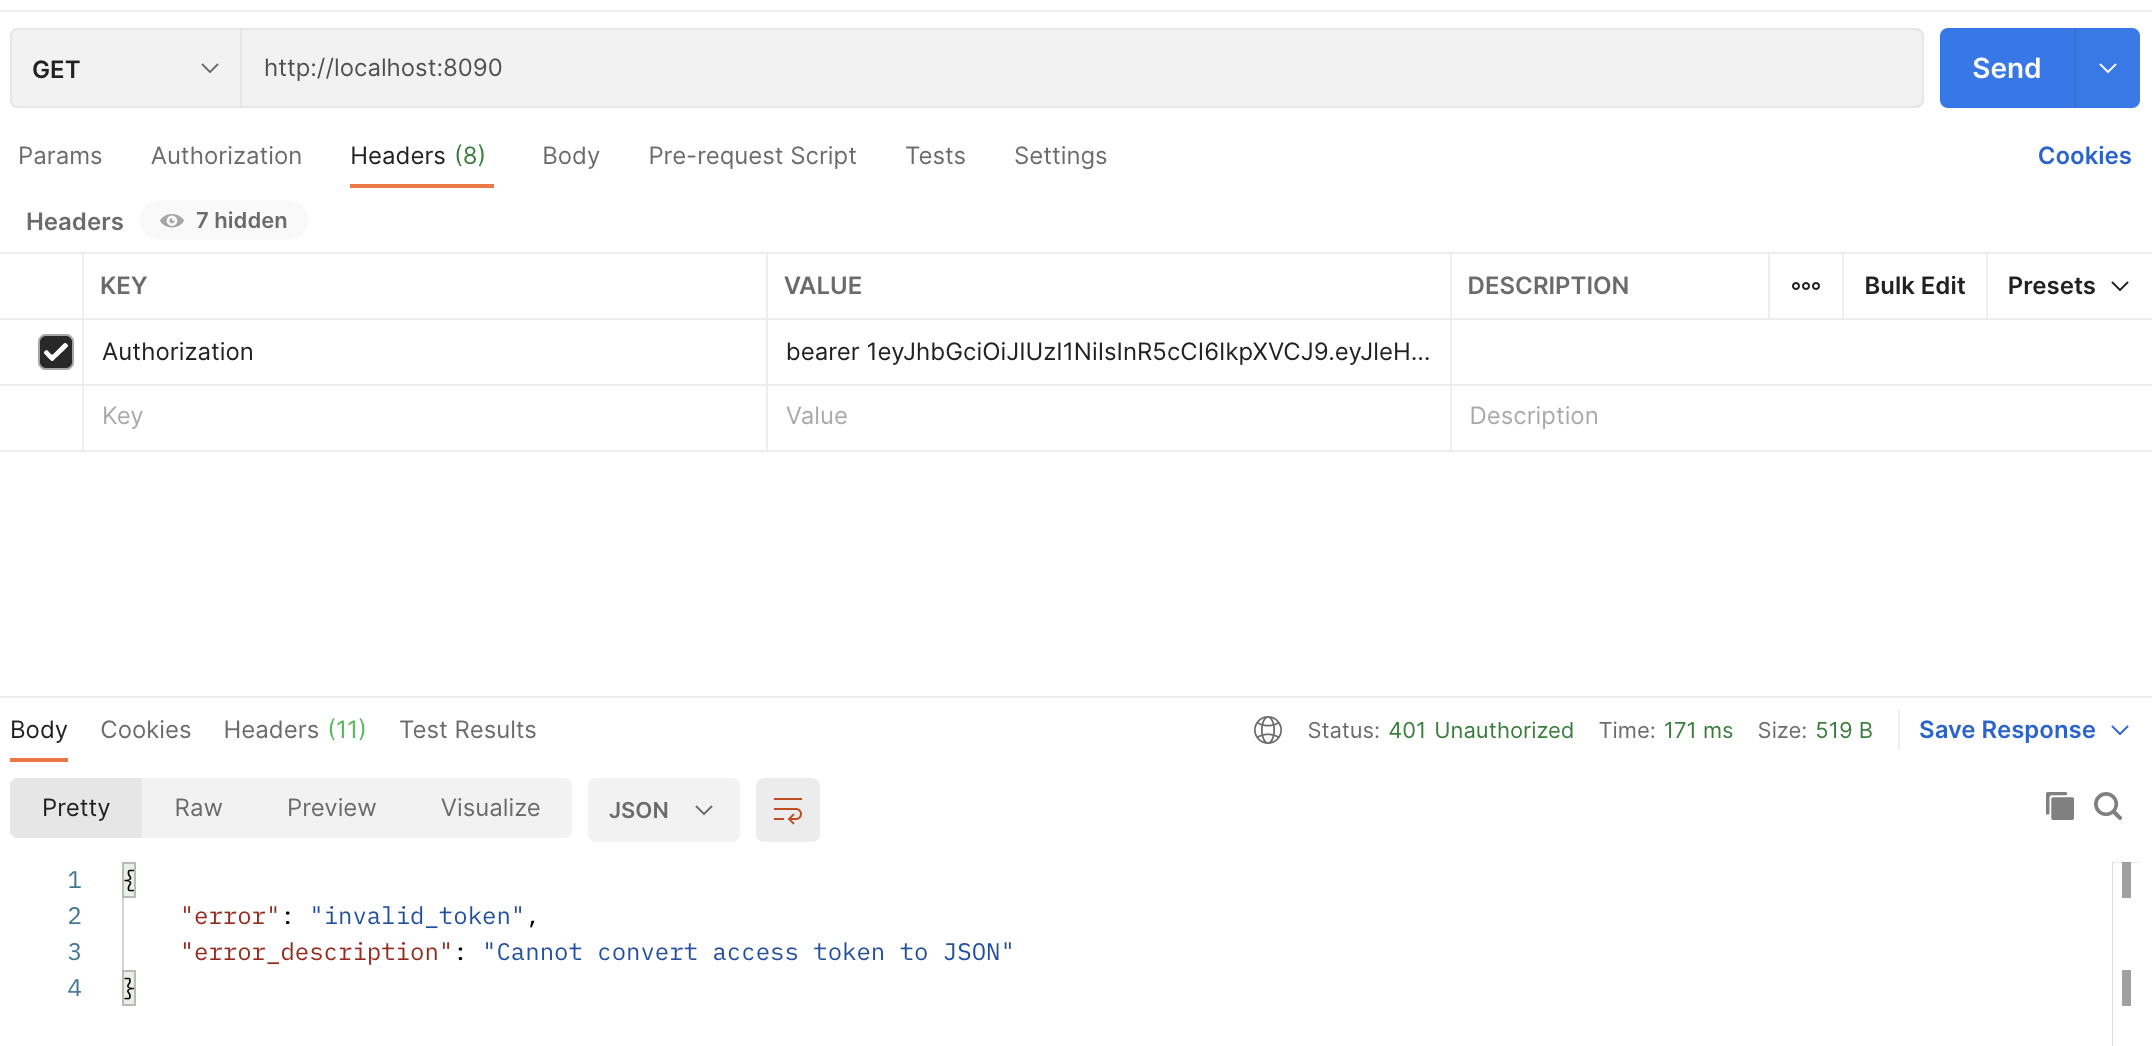
혹시라도 잘못된 header에 Authorization 데이터를 넣게 되면 다음과 같이 "invalid_token"이라는 에러를 반환합니다.
아래 예제에서는 토큰 값의 맨 앞 문자인 "e"를 "a"로 변경했을 때의 오류입니다.
다음 내용
오늘은 Resource Server를 구현하고 Authorization Server로부터 받은 access token의 유효성을 검증해보았습니다.
다음 시간에는 Resource Server를 maven 모듈로 만들어서 실제 Spring boot 서비스에 import하여 실제 서비스에 API 요청을 할때마다 자동으로 access token을 검증해보도록 하겠습니다.
감사합니다.
참고
