이전 시간에 이어 Authorization Server를 구현하여 access token을 생성하는 것까지 구현해보겠습니다.
IDE는 intellij를 사용했고 jdk는 8버전, gradle, jwt를 사용하였습니다.
프로젝트 생성
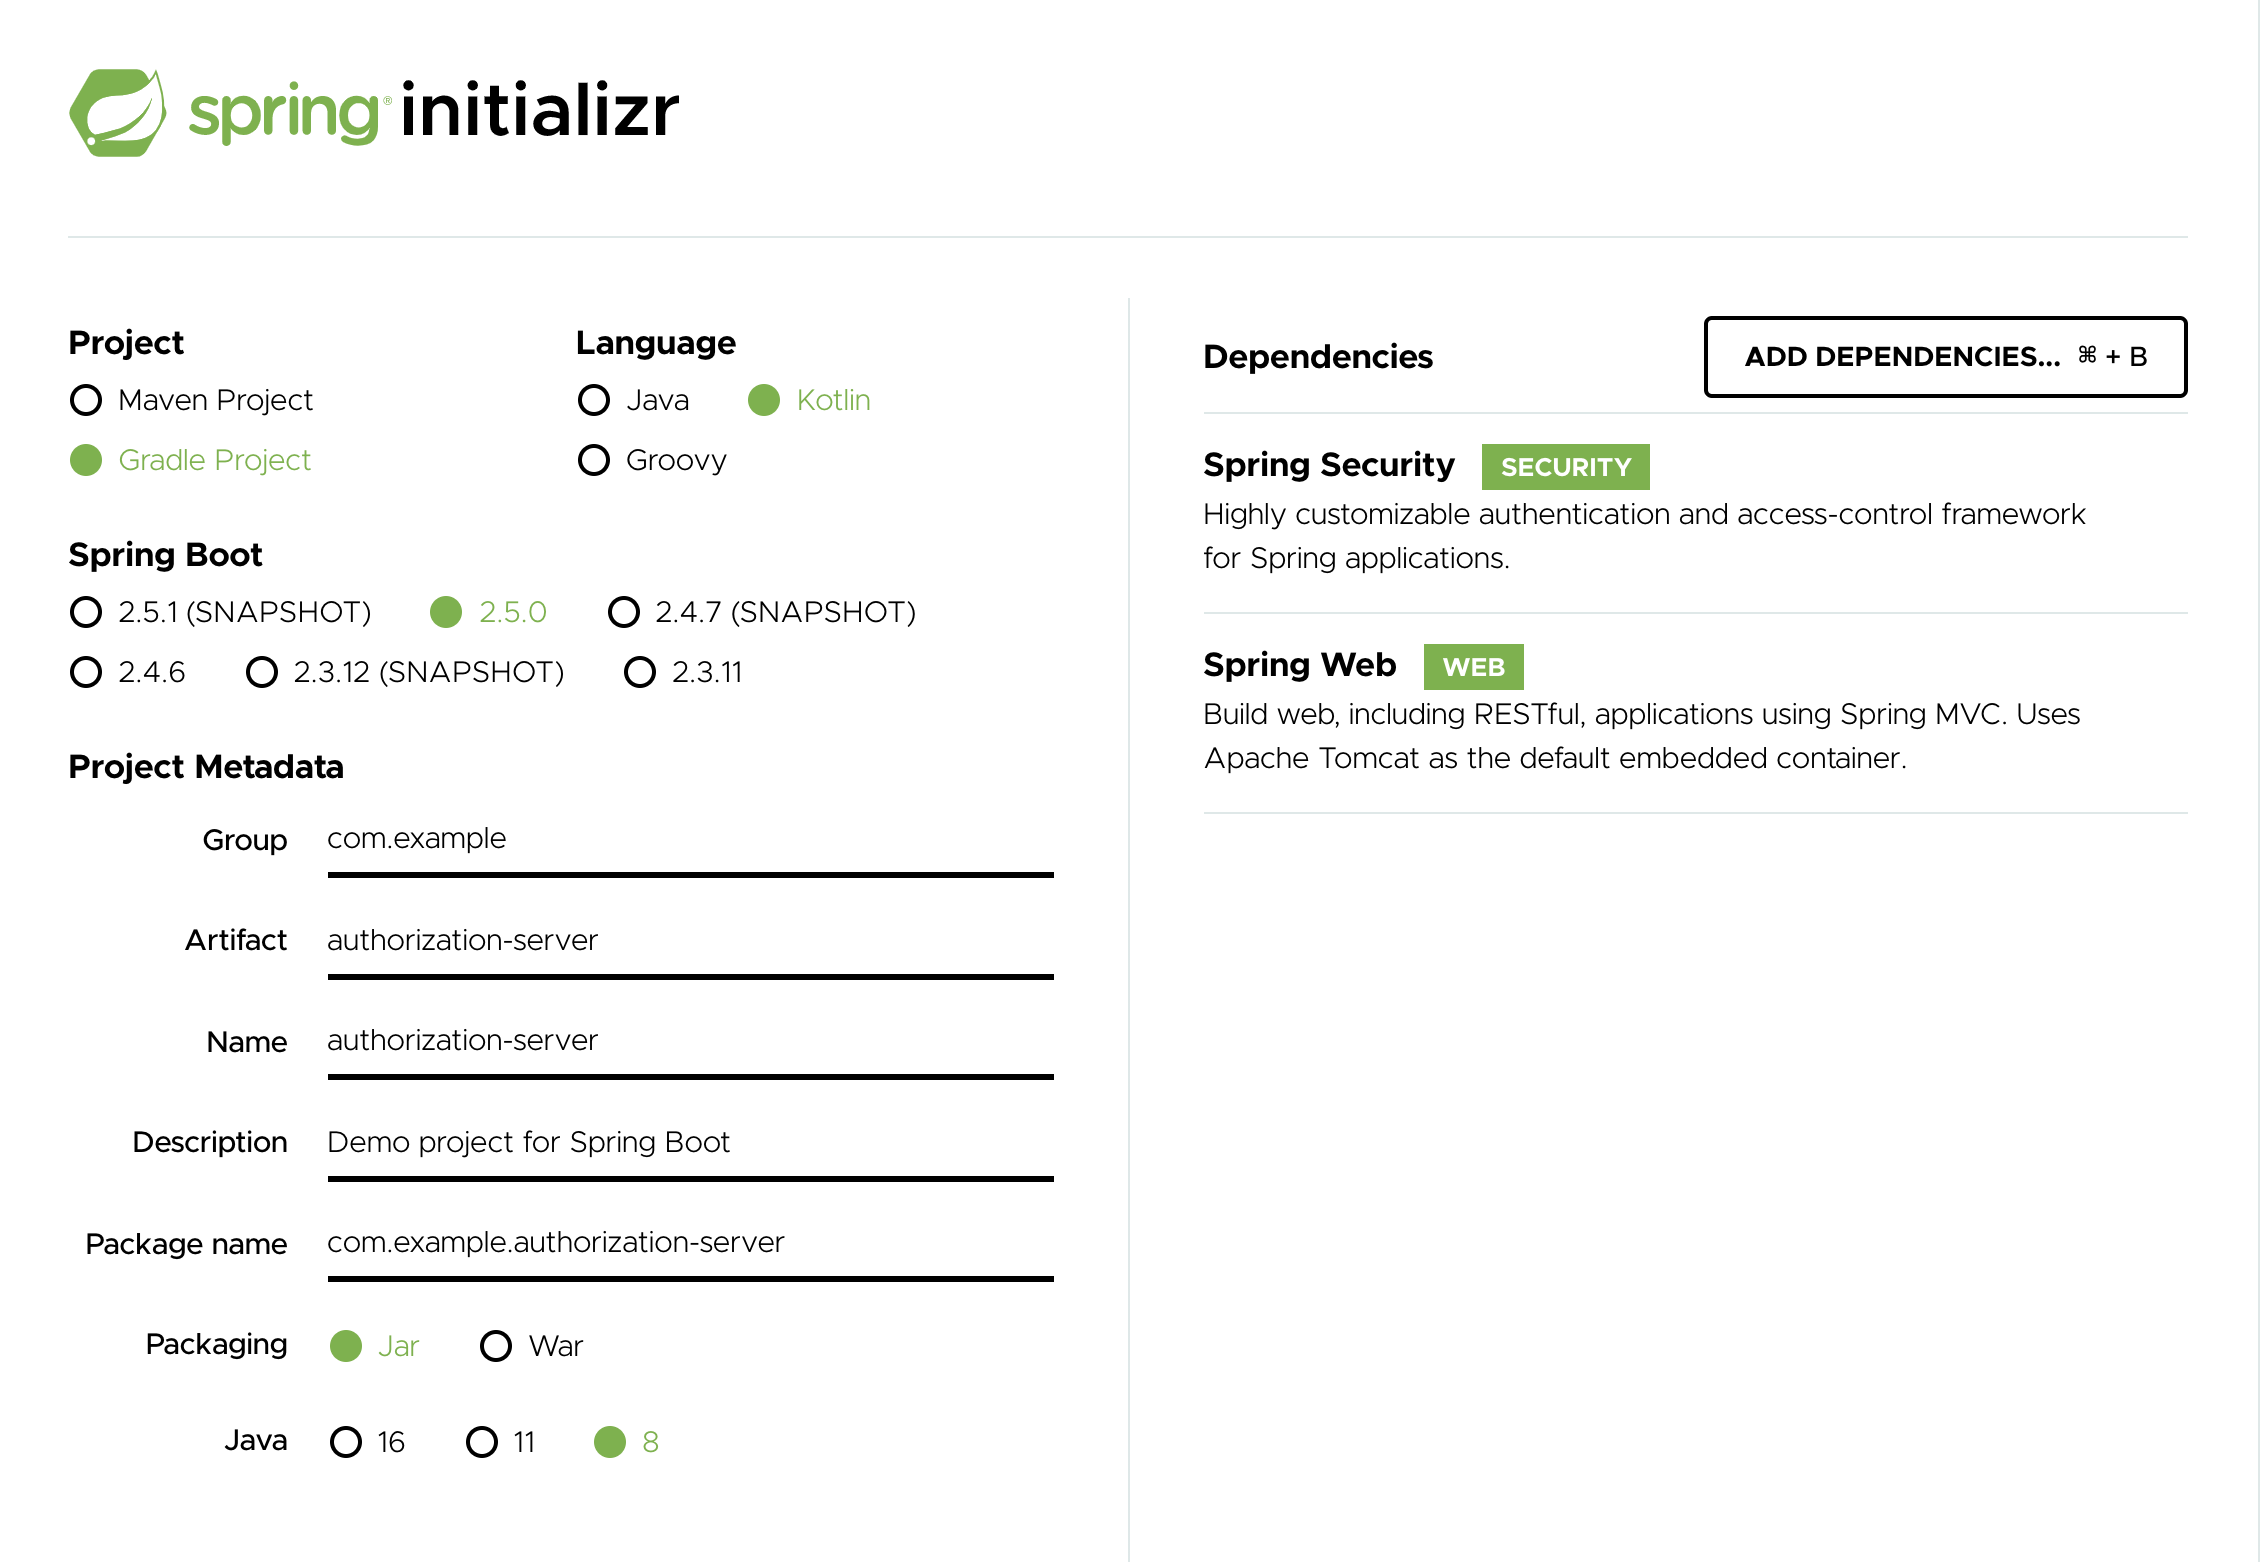
spring boot 프로젝트 설정은 start.spring.io 를 이용하였습니다. intellij를 사용하시면 메뉴의 new project를 클릭하여 Spring Initializr를 사용하시도 됩니다.
스프링 부트 설정은 아래 그림을 참고하여 설정하시고 다운받은 프로젝트를 intellij를 통해서 로딩합니다.
프로젝트 기본 설정이 완료되면 build.gradle.kts의 dependencies에 다음 코드를 추가합니다.
dependencies {
  ...
  implementation("org.springframework.security.oauth:spring-security-oauth2:2.3.8.RELEASE")
  implementation("org.springframework.security:spring-security-jwt:1.1.1.RELEASE")
  implementation("org.springframework.boot:spring-boot-starter-web")
  ...
}
그리고 src/main/resources/application.properties 파일에 다음과 같이 jwt secret key에 사용될 값을 입력합니다.
example.jwt-secret=jwt-secret그 다음으로 다음 파일들을 com.example.authorizationserver 패키지에 추가합니다.
(혹여 패키지 이름이 다르더라도 기본 ~~Application.kt 파일이 있는 패키지 내에 파일을 추가하시면 됩니다.)
AuthorizationServerConfig.kt
package com.example.authorizationserver

import org.springframework.beans.factory.annotation.Value
import org.springframework.context.annotation.Bean
import org.springframework.context.annotation.Configuration
import org.springframework.http.HttpMethod
import org.springframework.security.authentication.AuthenticationManager
import org.springframework.security.authentication.UsernamePasswordAuthenticationToken
import org.springframework.security.crypto.password.NoOpPasswordEncoder
import org.springframework.security.oauth2.config.annotation.configurers.ClientDetailsServiceConfigurer
import org.springframework.security.oauth2.config.annotation.web.configuration.AuthorizationServerConfigurerAdapter
import org.springframework.security.oauth2.config.annotation.web.configuration.EnableAuthorizationServer
import org.springframework.security.oauth2.config.annotation.web.configurers.AuthorizationServerEndpointsConfigurer
import org.springframework.security.oauth2.config.annotation.web.configurers.AuthorizationServerSecurityConfigurer
import org.springframework.security.oauth2.provider.token.DefaultAccessTokenConverter
import org.springframework.security.oauth2.provider.token.store.JwtAccessTokenConverter
import org.springframework.security.oauth2.provider.token.store.JwtTokenStore
import org.springframework.web.cors.CorsConfiguration
import org.springframework.web.cors.CorsConfigurationSource
import org.springframework.web.filter.CorsFilter

@Configuration
@EnableAuthorizationServer
class AuthorizationServerConfig(
    @Value("\${example.jwt-secret}")
    private val jwtSecret: String,
    private val authService: AuthService
): AuthorizationServerConfigurerAdapter() {

    override fun configure(security: AuthorizationServerSecurityConfigurer) {
        security
            .tokenKeyAccess("permitAll()")
            .checkTokenAccess("permitAll()")
            .allowFormAuthenticationForClients()
            .passwordEncoder(NoOpPasswordEncoder.getInstance())
            .addTokenEndpointAuthenticationFilter(CorsFilter(corsConfigurationSource()))
    }

    @Bean
    fun corsConfigurationSource() = CorsConfigurationSource {
        val corsConfiguration = CorsConfiguration()
        corsConfiguration.addAllowedOrigin("*")
        corsConfiguration.addAllowedHeader("*")
        corsConfiguration.addAllowedMethod("*")
        corsConfiguration
    }

    override fun configure(clients: ClientDetailsServiceConfigurer) {
        clients.inMemory()
            .withClient("clientId")
            .secret("clientSecret")
            .scopes("read", "write")
            .authorizedGrantTypes("client_credentials", "password", "authorization_code", "refresh_token")
            .accessTokenValiditySeconds(1800)
    }

    override fun configure(endpoints: AuthorizationServerEndpointsConfigurer) {
        endpoints
            .userDetailsService(authService)
            .accessTokenConverter(defaultAccessTokenConverter)
            .tokenStore(JwtTokenStore(jwtAccessTokenConverter))
            .authenticationManager(authenticationManager)
            .allowedTokenEndpointRequestMethods(HttpMethod.GET, HttpMethod.POST, HttpMethod.PUT, HttpMethod.DELETE)
            .tokenEnhancer(jwtAccessTokenConverter)
    }

    val authenticationManager = AuthenticationManager { authentication ->
        val input = authentication as UsernamePasswordAuthenticationToken

        val user = authService.login()

        UsernamePasswordAuthenticationToken(user, null, user.authorities)
    }

    val defaultAccessTokenConverter = object : DefaultAccessTokenConverter() {}

    val jwtAccessTokenConverter = JwtAccessTokenConverter().also {
        it.setSigningKey(jwtSecret)
        it.accessTokenConverter = defaultAccessTokenConverter
        it.afterPropertiesSet()
    }
}
@EnableAuthorizationServer
Authorization Server를 구성하는데 필요한 기본 설정을 셋팅한다.
@Configuration 어노테이션도 같이 사용한다
security: AuthorizationServerSecurityConfigurer
토큰 엔드포인트에 대한 보안 제약을 정의한다.
-
tokenKeyAccess - /oauth/token_key에 대한 허용을 의미하며 jwt 토큰 검증을 위한 공개키 노출
-
checkTokenAccess - /oauth/check_token에 대한 허용을 의미하며 access token에 포함된 데이터를 복호화하여 출력
-
allowFormAuthenticationForClients - 클라이언트의 인증 정보를 html의 form data 형태로 받을 수 있게함
-
passwordEncoder - password 데이터를 받을 때 password의 encoder를 설정. spring 5.0 부터는 보안의 이유로 NoOpPasswordEncoder가 deprecated 되었지만, firebase 로그인시에 password로 사용될 idToken 값이 이미 암호화 되어있기 때문에 해당 프로젝트에서는 NoOpPasswordEncoder를 사용
-
addTokenEndpointAuthenticationFilter - cors 정책을 지원하기 위해 추가. 현재는 모든 요청을 허용하도록 되어있음.
clients: ClientDetailsServiceConfigurer
클라이언트를 인가할 때 사용되는 client_id와 client_secret을 설정하며 인가 타입과 access token의 expire 시간을 설정합니다.
-
withClient - 접속할 클라이언트의 id를 설정
-
secret - 접속할 클라이언트의 secret key를 설정
-
scopes - 클라이언트를 제한하는 범위이며 본 프로젝트에서는 read와 write를 모두 허용
-
authorizedGrantTypes - 클라이언트가 사용할 수 있는 인가 타입을 설정
-
accessTokenValiditySeconds - 토큰의 expire 시간을 정했다. 본 프로젝트에선 30분으로 설정
endpoints: AuthorizationServerEndpointsConfigurer
인가 방법과 토큰 엔드포인트 설정 및 토큰 서비스를 정의합니다.
-
userDetailsService - 사용자를 인증하고 인가하는 서비스를 설정
-
accessTokenConverter - access token을 jwt 토큰으로 변환하기 위해 사용하며 jwtSecret 키를 통해 jwt 토큰을 설정
-
tokenStore - token이 저장될 기본 store를 정의
-
authenticationManager - password 값으로 사용자를 인증하고 인가
-
allowedTokenEndpointRequestMethods - token endpoint를 사용할 때 허용할 method들을 설정
-
tokenEnhancer - access token 추가 설정
authenticationManager
사용자를 실제로 인증하고 해당 객체를 반환합니다.
기본적으로는 firebase에서 생성하는 idToken 값이 실제 사용자의 token 값인지 서버에서 한번 더 google 로 데이터를 보내 확인해야 하지만 본 프로젝트에서는 해당 부분은 생략하였습니다.
password 인증과 관련한 firebase admin sdk는 해당 링크를 참조하면 좋을 것 같습니다,
본 프로젝트에서 구현한 로직은 실제 사용자가 디비에 있어 인증이 되었다고 가정하고 진행하였습니다.
AuthService.kt
package com.example.authorizationserver

import org.springframework.security.core.userdetails.UserDetails
import org.springframework.security.core.userdetails.UserDetailsService
import org.springframework.stereotype.Service

@Service
class AuthService (

): UserDetailsService {
    override fun loadUserByUsername(username: String?): UserDetails {
        return AuthUser(1, listOf("ADMIN", "USER"))
    }

    fun login() = AuthUser(1, listOf("ADMIN", "USER"))
}
사용자 인증 서비스입니다.
loadUserByUsername()은 refresh_token 시에 호출되는 함수이며 login() 함수는 실제 로그인 로직은 구현하지 않고 바로 사용자 객체를 반환합니다.
AuthUser.kt
package com.example.authorizationserver

import org.springframework.security.core.authority.SimpleGrantedAuthority
import org.springframework.security.core.userdetails.UserDetails

class AuthUser() : UserDetails {
    var no = 0L
    var roles = mutableSetOf<String>()

    constructor(no: Long, roles: List<String>) : this() {
        this.no = no
        this.roles.addAll(roles)
    }

    override fun getAuthorities() = roles.map { SimpleGrantedAuthority("ROLE_$it") }
    override fun isAccountNonExpired() = true
    override fun isAccountNonLocked() = true
    override fun isCredentialsNonExpired() = true
    override fun isEnabled() = true
    override fun getPassword() = null
    override fun getUsername() = null
}
사용자 객체입니다. Spring Security에서 사용하는 UserDetails 객체를 구현했으며 사용자 번호(no)와 사용자의 roles 정보를 추가하였습니다.
Authorization Server 실행
intellij의 services 탭을 활성화 시켜 Spring boot 프로젝트를 설정하면 AuthorizationServerApplication이라고 하는 서비스가 생성됩니다.
해당 서비스를 실행시키면 8080포트로 서비스가 실행되는걸 확인할 수 있습니다.
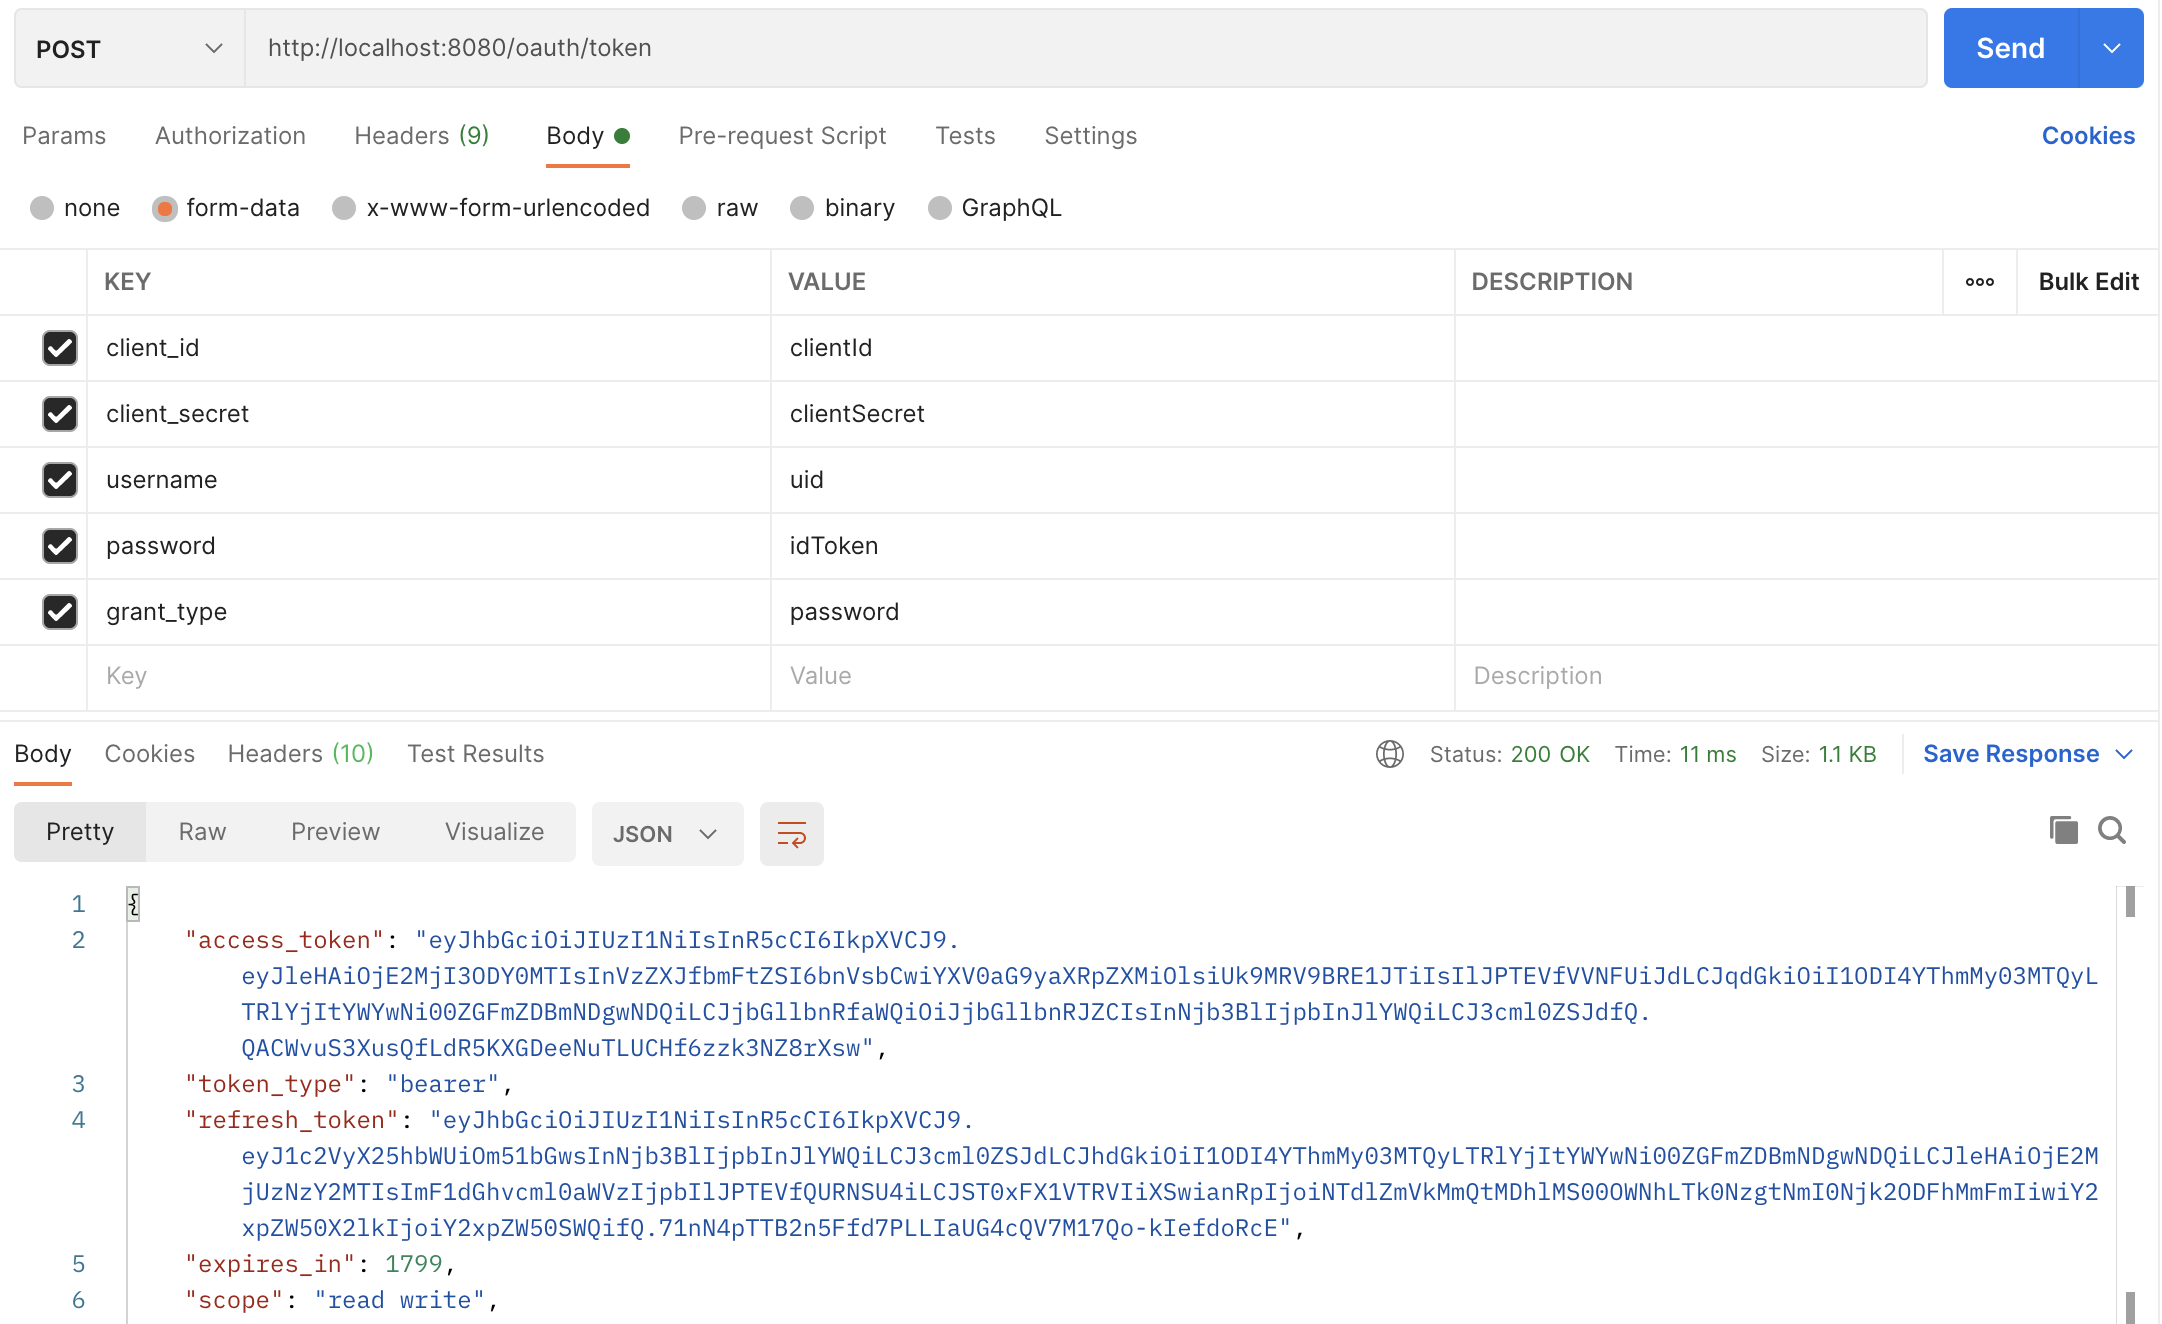
서비스가 실행되면 해당 url의 /oauth/token 으로 access token을 얻어올 수 있습니다.
해당 endpoint로 데이터를 넘길 때 username에는 구글 로그인시 얻은 uid 값을 password에는 idToken 값을 넘겨주면 됩니다.
(본 프로젝트에선 password와 uid 값을 firebase admin sdk로 확인하는 루틴이 없기때문에 현재 코드에선 무조건 인증이 됩니다.)
api 테스트는 PostMan을 사용하여 테스트 해보겠습니다.
/oauth/token을 호출할 때에는 아래 그림과 같이 form data에 데이터를 넣어서 호출해야 합니다.
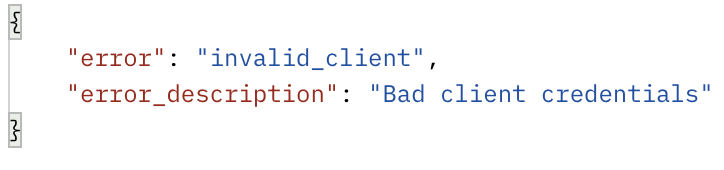
나머지 값은 client_id, client_secret, grant_type은 값이 위에 값과 같아야 합니다. 만약 같지 않을 경우에는 다음과 같은 에러가 발생합니다.
이전에 작성했던 html과의 연결
이전에 작성했던 html에서 formData에 데이터를 입력하여 access token 값을 얻을 수도 있습니다.
이전에 작성했던 html을 다음과 같이 변경하겠습니다.
<html>
<head>
  <script src="https://www.gstatic.com/firebasejs/8.6.4/firebase-app.js"></script>
  <script src="https://www.gstatic.com/firebasejs/8.6.4/firebase-auth.js"></script>
</head>
<body>
  <script>
    const firebaseConfig = {
      apiKey: "****",
      authDomain: "****",
      projectId: "******",
      storageBucket: "*****",
      messagingSenderId: "*****",
      appId: "******",
      measurementId: "******"
    };

    firebase.initializeApp(firebaseConfig);

    const handleGoogleLogin = async () => {
      const result = await firebase.auth().signInWithPopup(new firebase.auth.GoogleAuthProvider());

      const params = new URLSearchParams();

      params.append('client_id', 'clientId');
      params.append('client_secret', 'clientSecret');
      params.append('grant_type', 'password');
      params.append('username', result.user.uid);
      params.append('password', await result.user.getIdToken());

      const tokenResult = await fetch('http://localhost:8080/oauth/token', {
        method: 'POST',
        headers: {
            'Content-Type': 'application/x-www-form-urlencoded',
        },
        body: params
      });

      console.log(await tokenResult.json());
    }
  </script>

  <button onclick="handleGoogleLogin();">google login</button>
</body>
</html>
위의 코드와 같이 변경하고 구글 로그인을 진행하면 구글 크롬의 개발자 도구 console에서 서버로 부터 받은 access_token이 포함되어 있는 결과를 얻을 수 있습니다.
다음 내용
위의 Authorization Server를 구현함으로써 구글 로그인과 함께 access_token을 얻을 수 있었습니다. 다음 시간에는 Resource Server 구현과 함께 받은 access_token의 유효성을 검사해보도록 하겠습니다.
참고

안녕하세요. oauth2.0 사용하여 인증서버 구축중인데, 작성해주신 글이 많이 도움이 되었습니다.
작성해주신 코드를 보니 인증서버+리소스서버를 만드신 듯한데, 중간에 갑자기 나오는 구글로그인부분이 잘 이해가 안가서요. 보통 구글 로그인 oauth구현 사례를 보면 구글쪽이 리소스서버이던데... 구글을 리소스 서버로 두고 개발하신게 아닌 것 같아서요. 만드신코드=인증서버, 구글=클라이언트 이 형태로 개발하신게 맞을까요? 제가 해당 지식이 많이 부족해서..ㅎㅎ 확신이 안서네요. 도움주시면 감사하겠습니다.