서론
Promise는 자바스크립트의 비동기 작업을 다루는 데 필수적인 객체이다. 콜백 헬(callback hell)에서 벗어나 비동기 작업의 성공과 실패를 명확히 구분하고 체이닝을 가능하게 하게한다. 이 글은 Promise가 어떻게 작동하는지, 그 핵심 원리를 단계별로 짚어가며 내부 상태들과 핵심 메소드들을 직접 구현해보며 이해하자.
구현하기 전 개념
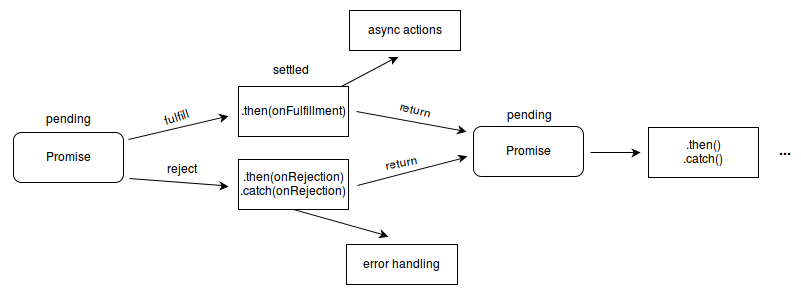
Promise는 비동기 흐름을 직관적으로 이어주는 도구이다. 먼저 위 그림에서 확인하면 Promise가 생성되면 처음엔 항상 pending 상태이다. 그이후 작업이 끝나면 fulfilled(성공), 아니면 rejected(실패)로 settled된다.
then/catch 실행부는 성공했을 때 .then(onFulfilled) 실패했을 때 .catch(onRejected)가 실행된다. 두 경우 모두 항상 새로운 Promise객체를 반환한다.
Promise 체이닝은 .then -> .then -> .then -> .then 이런식으로 이어지며 비동기 작업을 순차적으로 깔끔하게 표현이 가능하다. (함수형 프로그래밍의 함수합성과 비슷한 패턴이다.)
Promise를 구현하기 위해서는 먼저 Promise가 무엇을 저장해야 하는지 이해하고 넘어가자.
class BasePromise {
    constructor(executor) {
        // Promise는 현재 상태를 알아야 함
        this.state = 'pending';

        // 성공했을 때의 값
        this.value = undefined;

        // 실패했을 때의 이유
        this.reason = undefined;
    }
}
이 세 가지 변수가 필요한 이유는 다음과 같다
먼저 .
state: Promise의 현재 상태(pending,fulfilled,rejected)를 추적.value:resolve될 때 전달받은 성공 값을 저장.reason:reject될 때 전달받은 실패 이유(에러)를 저장.
구현
1단계: 가장 기본적인 구조
BasePromise 클래스를 만들어주고 생성자에서 앞서 설명한 세 가지 상태 변수를 초기화하자.
class BasePromise {
    constructor(executor) {
        this.state = 'pending';
        this.value = undefined;
        this.reason = undefined;
    }
}
2단계: resolve와 reject 함수 추가
Promise 생성자는 비동기 작업을 수행하는 함수인 executor를 받는다. 이 executor는 Promise의 상태를 변경하는 resolve와 reject 함수를 인자로 받는다.
이 두 함수는 생성자 내부에서만 접근 가능한 클로저형태로 구현할 수 있다.
class BasePromise {
    constructor(executor) {
        this.state = 'pending';
        this.value = undefined;
        this.reason = undefined;

        const resolve = (value) => {
            console.log('resolve 호출됨:', value);
            // TODO: 상태 변경 로직 구현
        };

        const reject = (reason) => {
            console.log('reject 호출됨:', reason);
            // TODO: 상태 변경 로직 구현
        };
    }
}
3단계: 상태 변경 로직
Promise의 상태는 한 번만 변경 가능하다는 매우 중요한 규칙이 있다.
따라서 resolve와 reject 함수는 state가 pending일 때만 상태를 변경하도록 로직을 구현해야한다.
class BasePromise {
    constructor(executor) {
        this.state = 'pending';
        this.value = undefined;
        this.reason = undefined;

        const resolve = (value) => {
            if (this.state === 'pending') {
                this.state = 'fulfilled';
                this.value = value;
                console.log('Promise가 fulfilled 상태로 변경됨:', value);
            }
        };

        const reject = (reason) => {
            if (this.state === 'pending') {
                this.state = 'rejected';
                this.reason = reason;
                console.log('Promise가 rejected 상태로 변경됨:', reason);
            }
        };
    }
}
if (this.state === 'pending') 체크는 resolve('성공'); 후에 reject('실패');가 호출되는 등의 상황을 막아준다.
4단계: executor 실행 및 에러 처리
executor 함수를 실행할 때, 동기적으로 에러가 발생하면 try...catch 블록을 사용하여 자동으로 reject를 호출하도록 처리하자.
class BasePromise {
    constructor(executor) {
        this.state = 'pending';
        this.value = undefined;
        this.reason = undefined;

        const resolve = (value) => {
            if (this.state === 'pending') {
                this.state = 'fulfilled';
                this.value = value;
            }
        };

        const reject = (reason) => {
            if (this.state === 'pending') {
                this.state = 'rejected';
                this.reason = reason;
            }
        };

        try {
            executor(resolve, reject);
        } catch (error) {
            reject(error);
        }
    }
}
5단계: 콜백 저장소 추가 (핵심!)
비동기 작업이 나중에 완료될 때, then에 등록된 콜백을 어떻게 실행할까?
정답은 Promise가 pending 상태일 때 등록된 콜백들을 저장할 배열에 저장해놓고 이후에 pending 상태일 때 이 배열에 실행할 함수를 추가하면 된다.
class BasePromise {
    constructor(executor) {
        this.state = 'pending';
        this.value = undefined;
        this.reason = undefined;

        // ⭐ 핵심: pending 상태에서 등록된 콜백들을 저장할 배열
        this.onFulfilledCallbacks = [];
        this.onRejectedCallbacks = [];

        const resolve = (value) => {
            if (this.state === 'pending') {
                this.state = 'fulfilled';
                this.value = value;
                // 저장된 콜백들 실행
                this.onFulfilledCallbacks.forEach(callback => callback());
            }
        };

        const reject = (reason) => {
            if (this.state === 'pending') {
                this.state = 'rejected';
                this.reason = reason;
                // 저장된 콜백들 실행
                this.onRejectedCallbacks.forEach(callback => callback());
            }
        };

        try {
            executor(resolve, reject);
        } catch (error) {
            reject(error);
        }
    }
}
이제 이렇게 기본 BasePromise의 뼈대를 완성했다.
이 뼈대를 기반으로 간단한 테스트를 해보며 어떤 것들을 이해했는지 잠깐 정리하고 가보자.
const promise = new BasePromise((resolve, reject) => {
    resolve("Hello"); // ← 이 resolve는 BasePromise 내부 구현 함수!
});
BasePromise를 구현하면서 정리한 핵심 개념
- 상태 불변성: 한 번 settled된 Promise는 상태가 변하지 않음
- 콜백 저장소: 비동기 상황에서 나중에 실행할 콜백들을 배열로 관리 (pending 상태일때)
- 에러 경계: executor에서 발생한 동기 에러를 자동으로 catch하여 reject로 변환
- 클로저 활용: resolve/reject 함수가 Promise 인스턴스의 내부 상태에 접근
then 메서드 구현
Promise와 마이크로태스크큐
실제 JavaScript 표준 Promise에서는 콜백이 즉시 호출되지 않고, 마이크로태스크 큐(Microtask Queue)에 들어간다.
왜 Promise 콜백은 마이크로태스크로 들어갈까?
Promise 체이닝은 현재 실행 중인 동기 코드가 끝난 직후 콜백이 실행되는 것이 안전하다. 따라서 then에 등록된 콜백은 즉시 호출하지 않고 마이크로태스크 큐에 등록된다. 마이크로태스크 큐에 들어간 콜백은 다음과 같은 순서로 실행된다.
console.log("시작");

setTimeout(() => console.log("매크로태스크 실행"), 0);

Promise.resolve().then(() => console.log("마이크로태스크 실행"));

console.log("끝");
실행 결과
시작
끝
마이크로태스크 실행
매크로태스크 실행
동기 코드가 먼저 실행되고, 그다음 마이크로태스크 큐가 처리되며, 마지막으로 매크로태스크가 실행된다.
즉, Promise 콜백은 동기 코드가 끝난 후 가능한 한 빨리 실행되도록 보장된다.
BasePromise에서 마이크로태스크 큐 반영
우리가 구현한 BasePromise에서도 마찬가지로, resolve와 reject 내부에서 콜백을 바로 호출하지 않고 마이크로태스크 큐에 등록할 수 있다.
 const resolve = (value) => {
      if (this.state === "pending") {
         ...
        queueMicrotask(() => {
          this.onFulfilledCallbacks.forEach((cb) => cb());
        });
      }
    };
    const reject = (reason) => {
      if (this.state === "pending") {
   		...
        queueMicrotask(() => {
          this.onRejectedCallbacks.forEach((callback) => callback());
        });
      }
    };
이렇게 마이크로태스크 큐를 활용하면 Promise 체이닝이 항상 안정적이고 예측 가능한 순서로 실행될 수 있다.
다음으로는 Promise 체이닝에 필요한 then 메서드를 구현해보자.
1단계: then의 기본 요구사항 이해하기
then의 기본 시그니쳐.
promise.then(onFulfilled, onRejected)then(onFulfilled, onRejected): 성공/실패 콜백을 인자로 받는다.- 체이닝:
then은 항상 새로운 Promise를 반환해야 한다. - 상태별 동작:
fulfilled,rejected,pending상태에 따라 다르게 동작해야 한다.
상태별 처리방식 이해하기
// fulfilled 상태: onFulfilled 콜백 실행
promise.then(value => {
    console.log('성공:', value);
    return '새로운 값';
});

// rejected 상태: onRejected 콜백 실행
promise.then(null, error => {
    console.log('실패:', error);
    return '복구된 값';
});

// pending 상태: 콜백을 저장해뒀다가 나중에 실행
const pendingPromise = new Promise(resolve => {
    setTimeout(() => resolve('지연된 값'), 1000);
});
pendingPromise.then(value => console.log(value)); // 1초 후 실행
2단계: fulfilled 상태 처리
먼저 가장 간단한 경우부터 구현해보자. Promise가 이미 fulfilled 상태인 경우의 처리는 아래와 같이 한다.
then 메서드는 항상 새로운 Promise를 반환해야 하므로 내부적으로 새로운 BasePromise를 생성한다.
이때 새로운 Promise의 executor 함수 내에서 현재 Promise의 상태를 확인하고 적절한 처리를 수행한다.
현재 Promise의 상태가 fulfilled일 때의 처리 과정은 다음과 같다.
- onFulfilled 콜백 함수를 현재 Promise의 value와 함께 실행
- 콜백 함수의 반환값을 새로운 Promise의 resolve에 전달
- 클로저 기반으로 구현된 resolve 함수에서 새로운 Promise의 상태를 fulfilled로 변경하고 반환값을 저장
이 로직을 구현해보면 아래와 같다.
then(onFulfilled, onRejected) {
   // 1. 새로운 Promise 생성
    return new BasePromise((resolve, reject) => {
       // 2. 호출된 Promise의 현재 상태가 fulfilled 이라면
        if (this.state === 'fulfilled') { //  // this는 then을 호출한 원본 Promise를 가리킴

           // 3. onFulfilled가 함수인지 체크
            if (typeof onFulfilled === 'function') {
                try {
                  // 4. onFulfilled 실행
                    const result = onFulfilled(this.value);
                  // 5. 실행된 결과값을 resolve로 전달
                    resolve(result);
                } catch (error) {
                    reject(error);
                }
            } else {
                resolve(this.value);
            }
        }
        // 다른 상태는 다음 단계에서...
    });
}
위의 새로운 BasePromise의 this는 이전 호출된 Promise를 this로 가르킨다.
promise1 = new BasePromise(resolve => resolve('값1'));
promise2 = promise1.then(value => '값2');  // 여기서 this = promise1
promise3 = promise2.then(value => '값3');  // 여기서 this = promise2
3단계: rejected 상태 처리
rejected 상태일 때 onRejected 콜백이 실행된다. onRejected가 성공적으로 실행되면 새로운 Promise를 resolve한다. 이는 에러를 복구하고 체이닝을 계속 이어가기 위한 목적이다.
Promise 체이닝에서의 에러처리 관점은 계속해서 체이닝을 이어갈 수 있어야한다.
// 에러 발생
promise1 (rejected: NetworkError)
    ↓
// onRejected가 값을 반환
promise2 (fulfilled: { error: true, fallback: '...' })
    ↓
// 다음 then이 실행됨
promise3 (fulfilled: '처리 결과')
이런식으로 진행되어야하는데 이 매커니즘은 onRejected를 호출한 뒤 다음 체이닝이 가능하게 상태를 fulfilled로 변경해주어야하기 때문에 resolve로 결과값을 넘긴다.
else if (this.state === 'rejected') {
    if (typeof onRejected === 'function') {
        try {
            const result = onRejected(this.reason);
            resolve(result); // reject가 아니라 resolve로 다음 체이닝에선 정상 작동하게!
        } catch (error) {
            reject(error);
        }
    } else {
        reject(this.reason);
    }
}
예를들어 심각한 네트워크 에러가 발생했다고 가정해보자.
// 심각한 네트워크 에러 발생
fetchCriticalData()
    .then(
        data => data,
        networkError => {
            console.error('치명적 네트워크 에러:', networkError);

            // 에러는 여전히 존재하지만, 앱이 완전히 죽지 않도록 처리
            return {
                error: true,
                message: '서버에 연결할 수 없습니다',
                data: null,
                fallbackMode: true
            };
        }
    )
    .then(result => {
        if (result.error) {
            // 에러 상황이지만 앱은 계속 동작
            showOfflineMode();
            loadCachedData();
            showUserMessage('오프라인 모드로 전환됩니다');
        } else {
            showOnlineData(result.data);
        }
    });
이렇게 처리하면 다음 체이닝인 then에선 정상 작동하게 처리할 수 있다.
하지만 실제로는 대부분 .then()에서 onRejected 로직을 생략하고 .catch()에서 일괄 처리하는 경우가 많다.
하지만 위의 예시는 특정 단계에서 에러를 즉시 복구해야 하는 특별한 케이스이고, 일반적인 Promise 체이닝은 다음과 같이 작성된다.
fetchCriticalData()
    .then(data => processData(data))
    .then(processed => validateData(processed))
    .then(validated => saveData(validated))
    .then(saved => showSuccessMessage(saved))
    .catch(error => {
        // 모든 단계의 에러가 여기로 전파됨
        console.error('처리 중 에러 발생:', error);
        showErrorMessage('데이터 처리에 실패했습니다');
    });
4단계: pending 상태 처리
이제 마지막 pending 상태일때를 구현해보자.
Promise가 pending 상태일 때 then이 호출되는 상황을 해결하기 위해서는 다음과 같은 요구사항들을 만족해야한다.
- 지연 실행: 아직 완료되지 않은 비동기 작업의 결과를 기다려야 함
- 다중 콜백 지원: 하나의 Promise에 여러 개의 then이 등록될 수 있음
- 실행 순서 보장: 콜백들이 등록된 순서대로 실행되어야 함
- 메모리 효율성: 콜백들을 적절히 저장하고 관리해야 함
else if (this.state === 'pending') {

   // 성공 콜백을 저장소에 추가
    this.onFulfilledCallbacks.push(() => {
        if (typeof onFulfilled === 'function') {
            try {
                const result = onFulfilled(this.value);
                resolve(result);
            } catch (error) {
                reject(error);
            }
        } else {
            resolve(this.value);
        }
    });
  // 실패 콜백을 저장소에 추가
    this.onRejectedCallbacks.push(() => {
        if (typeof onRejected === 'function') {
            try {
                const result = onRejected(this.reason);
                resolve(result);
            } catch (error) {
                reject(error);
            }
        } else {
            reject(this.reason);
        }
    });
}
이렇게 코드를 작성했다.
이 코드를 기반으로 테스트해보자.
처음에 resolve에 1을 전달하고 체이닝으로 나머지 연산을 하는 코드를 작성해보았다.
이 코드는 동기적으로 동작하기때문에 아마 콘솔에 완성된 값 20이 떠야 정상이다.
const promise = new BasePromise((resolve, reject) => {
  resolve(1);
});

promise
  .then((result) => {
    console.log(result);
    return result * 10;
  })
  .then((result) => {
    console.log(result);
    return result + 10;
  })
  .then((result) => {
    console.log("완성된 값", result);
  });
결과는
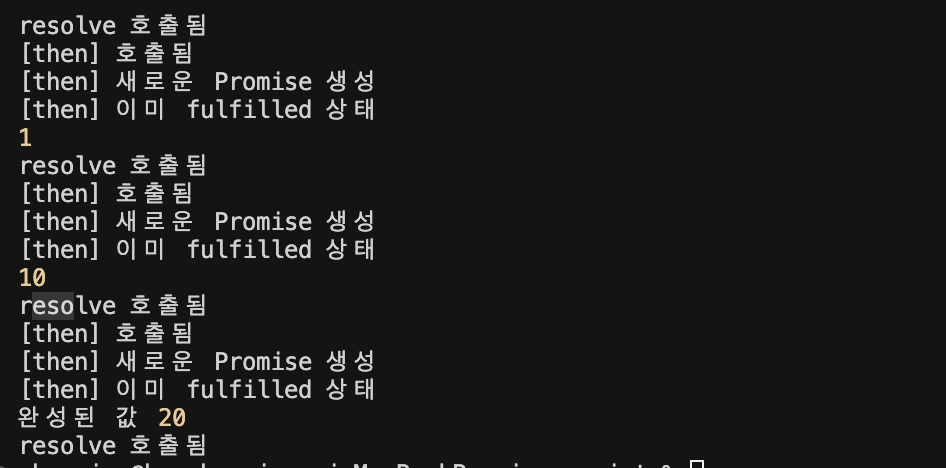
동기적인 체이닝이 잘 작동한다!..
그러면 비동기적인 체이닝은 잘 작동할까? 가짜 API 모킹함수를 만들어서 BasePromise를 리턴하게끔 만들어보자.
// 가짜 API 함수들 (실제 API 호출을 시뮬레이션)
function fetchUser(userId) {
  return new BasePromise((resolve, reject) => {
    console.log(`사용자 ${userId} 정보를 가져오는 중...`);
    setTimeout(() => {
      if (userId === 1) {
        resolve({
          id: 1,
          name: "김철수",
          email: "kim@example.com",
          age: 30,
        });
      } else if (userId === 2) {
        resolve({
          id: 2,
          name: "이영희",
          email: "lee@example.com",
          age: 25,
        });
      } else {
        reject(new Error(`사용자 ID ${userId}를 찾을 수 없습니다.`));
      }
    }, 1000);
  });
}

function fetchUserPosts(userId) {
  return new BasePromise((resolve, reject) => {
    console.log(`사용자 ${userId}의 게시글을 가져오는 중...`);
    setTimeout(() => {
      if (userId === 1) {
        resolve([
          { id: 1, title: "첫 번째 게시글", content: "안녕하세요!" },
          { id: 2, title: "두 번째 게시글", content: "오늘 날씨가 좋네요" },
        ]);
      } else if (userId === 2) {
        resolve([{ id: 3, title: "영희의 게시글", content: "새로운 프로젝트를 시작했어요" }]);
      } else {
        reject(new Error(`사용자 ${userId}의 게시글을 찾을 수 없습니다.`));
      }
    }, 800);
  });
}
위 코드는 user의 전체 정보를 가져오는 함수와 post를 가지고오는 mock 함수이다.
위 mock 함수를 기반으로 userId가 1인 유저의 정보를 가지고와서 그 유저의 post를 가지고 오는 코드를 작성해보자.
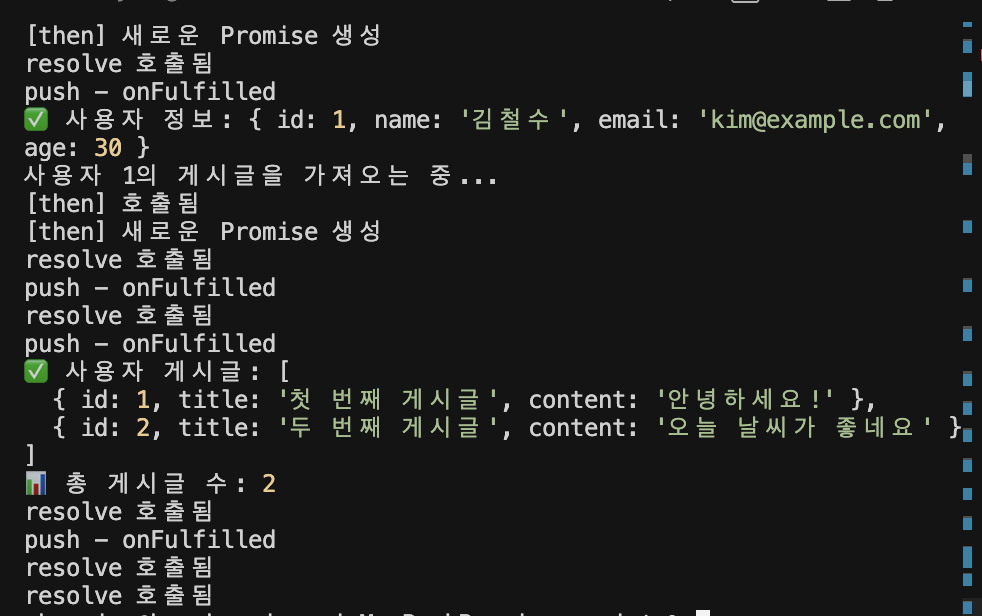
fetchUser(1)
  .then((user) => {
    console.log("✅ 사용자 정보:", user);
    return fetchUserPosts(user.id);
  })
  .then((posts) => {
    console.log("✅ 사용자 게시글:", posts);
    console.log("📊 총 게시글 수:", posts.length);
  })
  .catch((error) => {
    console.error("❌ 에러 발생:", error.message);
  });
이렇게 작성했다.
테스트해보자.
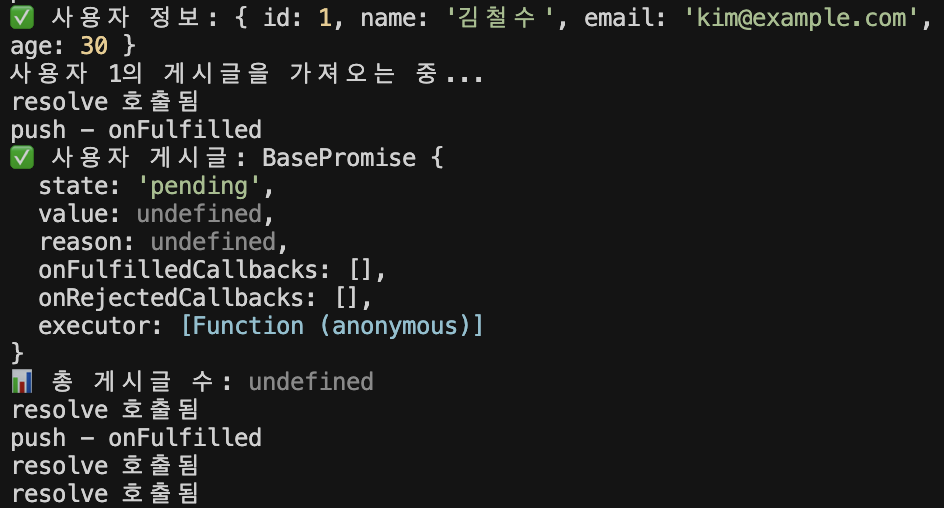
이렇게 첫 체이닝에서의 then만 잘 작동하고 이후의 then은 잘 작동하지 않는 모습이다.
왜 이렇게 동작할까?
fetchUser(1)
  .then((user) => {
    // user = { id: 1, name: "김철수", ... }
    return fetchUserPosts(user.id);  // BasePromise 인스턴스 반환
  })
  .then((posts) => {
    // posts = BasePromise 객체 (실제 게시글 배열이 아님!) ❌
    console.log("✅ 사용자 게시글:", posts);  // BasePromise의 [object Object] 출력
  });
첫번째 체이닝에서의 return fetchUserPosts(user.id); 함수는 BasePromise를 리턴하고 있는데 이 값을 then메소드에서 바로 resolve로 넘겨버리면 resolve에서는 Promise값을 결과로 받기때문에 적절하게 처리하지 못하고 Promise 객체 자체가 결과로 넘어와버리게 된다.
어떻게 해결하면 될까?
else if (this.state === 'fulfilled') {
    if (typeof onFulfilled === 'function') {
        try {
            const result = onFulfilled(this.value);

            // 핵심: result가 BasePromise인지 확인
            if (result instanceof BasePromise) {
                // BasePromise라면 그 결과를 기다림
                result.then(resolve, reject);
            } else {
                // 일반 값이라면 그대로 전달
                resolve(result);
            }
        } catch (error) {
            reject(error);
        }
    } else {
        resolve(this.value);
    }
}
result가 BasePromise라면 그 결과를 기다리게해서 다음 체이닝으로 넘겨주면 된다.
이렇게 했을 때 post의 결과까지 잘 받아오는 모습을 확인할 수 있다.
catch와 finally 메서드 구현
catch 메서드
catch는 사실 then의 특별한 형태이다. 에러를 처리할 onRejected 함수만 받으면 되는 구조이기 때문에 첫 번째 매개변수를 null로 고정한 then과 동일하다.
그러면 미리 구현했던 then을 히용해서 아래와 같이 처리할 수 있다.
catch(onRejected) {
    return this.then(null, onRejected);
}
이렇게 간단한 구현이 가능한 이유는 then 메서드가 이미 모든 상태를 처리하기 때문에 그냥 catch함수로 then을 래핑해주면 쉽게 구현할 수 있다.
finally 메서드
finally는 성공/실패 관계없이 항상 실행되면서, 원래 값이나 에러를 그대로 전달하는 특별한 메서드이다.
finally(onFinally) {
    return this.then(
        (value) => {
            onFinally();    // 성공 시에도 실행
            return value;   // 값은 그대로 전달
        },
        (reason) => {
            onFinally();    // 실패 시에도 실행
            throw reason;   // 에러는 그대로 전파
        }
    );
}
완성된 BasePromise 클래스
class BasePromise {
  constructor(executor) {
    this.state = "pending"; // promise의 상태 : pending, fulfilled, rejected
    this.value = undefined; // promise의 값
    this.reason = undefined; // promise의 실패했을때의 이유

    // pending 상태에서 등록된 콜백들
    this.onFulfilledCallbacks = []; // promise의 콜백 함수
    this.onRejectedCallbacks = []; // promise의 콜백 함수

    this.executor = executor; // executor 함수

    const resolve = (value) => {
      if (this.state === "pending") {
        this.state = "fulfilled";
        this.value = value;
        queueMicrotask(() => {
          this.onFulfilledCallbacks.forEach((cb) => cb());
        });
      }
    };
    const reject = (reason) => {
      if (this.state === "pending") {
        this.state = "rejected";
        this.reason = reason;

        queueMicrotask(() => {
          this.onRejectedCallbacks.forEach((callback) => callback());
        });
      }
    };

    try {
      this.executor(resolve, reject);
    } catch (error) {
      reject(error);
    }
  }

  then(onFulfilled, onRejected) {
    // then은 항상 새로운 Promise를 반환
    return new BasePromise((resolve, reject) => {
      if (this.state === "fulfilled") {
        // fulfilled 상태란? Promise가 성공적으로 완료된 상태
        if (typeof onFulfilled === "function") {
          try {
            // onFulfilled 호출하고 결과를 다음 Promise에 전달
            const result = onFulfilled(this.value);
            // result가 BasePromise인지 확인
            if (result instanceof BasePromise) {
              // BasePromise라면 그 결과를 기다림
              result.then(resolve, reject);
            } else {
              // 일반 값이라면 그대로 전달
              resolve(result);
            }
          } catch (error) {
            reject(error);
          }
        } else {
          // onFulfilled가 함수가 아니면 값 그대로 전달
          resolve(this.value);
        }
      } else if (this.state === "rejected") {
        // onRejected가 함수인지 확인
        if (typeof onRejected === "function") {
          try {
            // 🔥 중요: onRejected가 성공적으로 실행되면 resolve!
            const result = onRejected(this.reason);
            // result가 BasePromise인지 확인
            if (result instanceof BasePromise) {
              // BasePromise라면 그 결과를 기다림
              result.then(resolve, reject);
            } else {
              // 일반 값이라면 그대로 전달
              resolve(result);
            }
          } catch (error) {
            reject(error);
          }
        } else {
          // onRejected가 함수가 아니면 에러 그대로 전달
          reject(this.reason);
        }
      } else if (this.state === "pending") {
        this.onFulfilledCallbacks.push(() => {
          if (typeof onFulfilled === "function") {
            try {
              const result = onFulfilled(this.value);
              // result가 Promise인지 확인
              if (result instanceof BasePromise) {
                // Promise라면 그 결과를 기다림
                result.then(resolve, reject);
              } else {
                // 일반 값이라면 그대로 전달
                resolve(result);
              }
            } catch (error) {
              reject(error);
            }
          } else {
            // onFulfilled가 함수가 아니면 값 그대로 전달
            resolve(this.value);
          }
        });
        this.onRejectedCallbacks.push(() => {
          if (typeof onRejected === "function") {
            try {
              const result = onRejected(this.reason);
              // result가 Promise인지 확인
              if (result instanceof BasePromise) {
                // Promise라면 그 결과를 기다림
                result.then(resolve, reject);
              } else {
                // 일반 값이라면 그대로 전달
                resolve(result);
              }
            } catch (error) {
              reject(error);
            }
          } else {
            // onRejected가 함수가 아니면 에러 그대로 전달
            reject(this.reason);
          }
        });
      }
    });
  }

  catch(onRejected) {
    return this.then(null, onRejected);
  }

  finally(onFinally) {
    return this.then(
      (value) => {
        onFinally();
        return value;
      },
      (reason) => {
        onFinally();
        throw reason;
      }
    );
  }
}
핵심 개념 정리
Promise 구현을 통해 이해한 핵심 개념들
1. 상태 불변성
한 번 settled(fulfilled 또는 rejected)된 Promise의 상태는 절대 변하지 않는다.
2. 콜백 저장소
비동기 상황에서 나중에 실행할 콜백들을 배열로 관리하는 패턴은 다른 비동기 라이브러리에서도 자주 사용된다.
3. then 체이닝에서의 Promise처리
then 체이닝에서 return 값이 Promise인 경우에는 Promise Resolution Procedure가 적용되어 그 Promise의 완료를 기다린 후 실제 결과값으로 다음 체인을 진행시켜야 한다. 이를 통해 중첩된 Promise가 자연스럽게 평탄화(flatten)되어 직관적인 비동기 체이닝이 가능해진다.
4. 에러 복구 메커니즘
onRejected가 성공적으로 실행되면 새로운 Promise가 fulfilled 상태가 되는 것은 Promise의 가장 강력한 기능 중 하나이다.
5. 조합성(Composability)
catch와 finally가 내부적으로 then을 사용하여 구현되는 것처럼, 기본 메서드를 조합하여 복잡한 기능을 만들 수 있다.
마무리
Promise를 직접 구현해보며 JavaScript의 비동기 프로그래밍 모델을 깊이 이해하고 실제 Promise가 어떻게 콜백들을 처리하는 지 구현을 통해 더 깊이있게 이해할 수 있었다.
다음 시간에는 Promise.all과 Promise.race의 동작원리를 더 깊이있게 파해쳐보자.


우아 뭐야 이게