Canvas가 무엇인가?
-
특정 공간이나 구역에 드로잉을 할 수 있게해주는 컴포넌트이다.
Component that allow you to specify an area on the screen and perform canvas drawing on this area. -
사용자는 Modifier.fillMaxisze(), weight, relative to parent 등 modifier를 통해 사이즈를 무조건 명시해 주어야 한다.
You MUST specify size with modifier, whether with exact sizes via Modifier.size modifier, or relative to parent, via Modifier.fillMaxSize, ColumnScope.weight, etc. -
부모가 자식으로 Canvas를 감싸는 경우 정확한 사이즈가 명시되어야 한다.
If parent wraps this child, only exact sizes must be specified.
@Composable
fun Canvas(modifier: Modifier, onDraw: DrawScope.() -> Unit) =
    Spacer(modifier.drawBehind(onDraw))
파라미터로써는 modifier과 onDraw가 필요하며
- modifier : 의무적으로 이 컴포넌트에 대한 정확한 사이즈를 명시해야한다.
- onDraw : 드로잉을 수행하는 lambda함수로써 그리기 단계에서 호출되므로 composition scope에 엑세스할 수 없다. 이말은 즉 onDraw에서 Composable 함수가 호출되면 runtime exception이 발생한다.
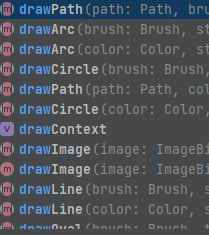
onDraw 람다 식에서는 다음과 같은 여러 함수들을 제공하며 각각의 함수로 원하는 도형, 이미지 등을 그릴 수 있다.
그럼 직접 사용해보자.
1. 원형 그래프 만들기
목표 : 원형 그래프로 값 표시하기
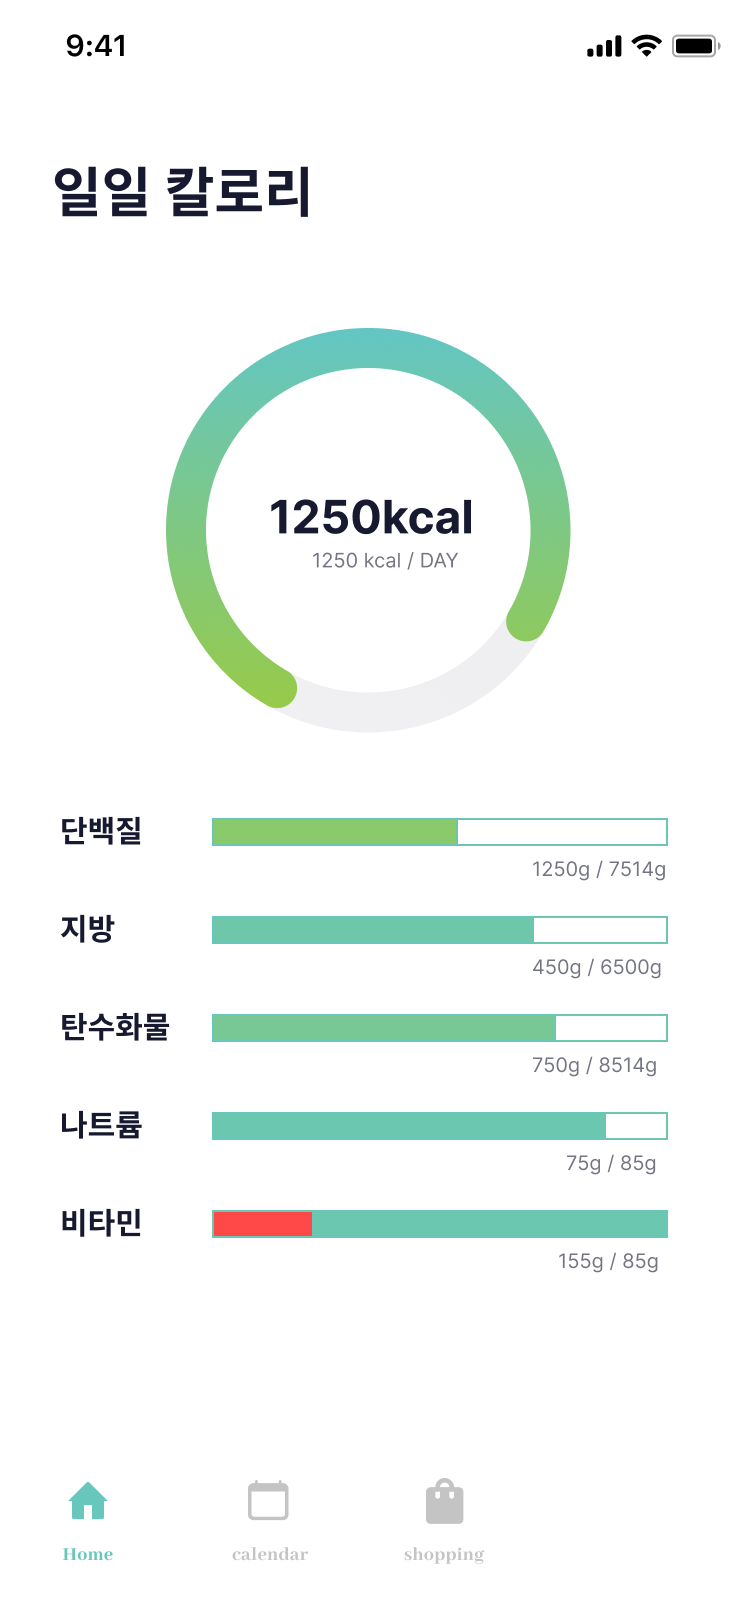
중앙에 원형 차트가 필요하다. 이를 위해서 우리는 drawArc라는 함수를 사용할 것이다.
- drawArc : 주어진 직사각형 안에 맞도록 호를 그린다.
fun drawArc(
  color - Color to be applied to the arc
  topLeft - Offset from the local origin of 0, 0 relative to the current translation
  size - Dimensions of the arc to draw
  startAngle - Starting angle in degrees. 0 represents 3 o'clock
  sweepAngle - Size of the arc in degrees that is drawn clockwise relative to startAngle
  useCenter - Flag indicating if the arc is to close the center of the bounds
  alpha - Opacity to be applied to the arc from 0.0f to 1.0f representing fully transparent to fully opaque respectively
  style - Whether or not the arc is stroked or filled in
  colorFilter - ColorFilter to apply to the color when drawn into the destination
  blendMode - Blending algorithm to be applied to the arc when it is drawn
  )
onDraw람다 내 Drawing 함수들은 topLeft 속성을 각각 지니고 있어 Drawing을 어디서부터 시작할지 정할 수 있다.
Box(
	modifier = Modifier
          .fillMaxWidth()
          .height(300.dp)
	) {
    	Canvas(
          modifier = Modifier.fillMaxSize()
        ) {
			// DrawFunction...
          }
      }
    val size: Size
        get() = drawContext.size
또한 Canvas 내부에서 size를 사용하여 drawcontext의 Size를 구해올 수 있다.
      Canvas(
        modifier = Modifier.fillMaxSize()
      ) {
        val sizeArc = size / 1.75F
        drawArc(
          color = Color(0xFFE1E2E9),
          startAngle = 0f,
          sweepAngle = 360f,
          useCenter = false,
          topLeft = Offset((size.width - sizeArc.width) / 2f, (size.height - sizeArc.height) / 2f),
          size = sizeArc,
          style = Stroke(width = 70f)
        )

		drawArc(
          brush = Brush.linearGradient(
            colors = listOf(
              Color(0xff63C6C4), Color(0xff97CA49)
            ),
            start = Offset.Zero,
            end = Offset.Infinite,
          ),
          startAngle = 100f,
          sweepAngle = animatedValue.value,
          useCenter = false,
          topLeft = Offset(
            (size.width - sizeArc.width) / 2f,
            (size.height - sizeArc.height) / 2f
          ),
          size = sizeArc,
          style = Stroke(width = 70f, cap = StrokeCap.Round)
        )
        }
startAngle 시작 각도 -> 오른쪽이 0f,
sweepAngle 돌아갈 각도 -> 시작 각도를 기점으로 호를 어디로 그릴지
useCenter - 호가 경계 중심을 닫는지 여부를 나타내는 플래그
색은 color를 사용해 단일 색을 넣을 수도 있고, brush를 사용해 gradient를 넣을 수 있다.
  val animatedValue = remember { Animatable(0f) }

  // 특정 값으로 색을 채우는 Animation
  LaunchedEffect(Unit) {
    animatedValue.animateTo(
      targetValue = targetvalue,
      animationSpec = tween(durationMillis = 2000, easing = LinearEasing),
    )
  }
또한 초기에 animation을 주기위해 composition 시작 시 각도 값을 animateTo를 사용해 targetvalue까지 움직여 준다.

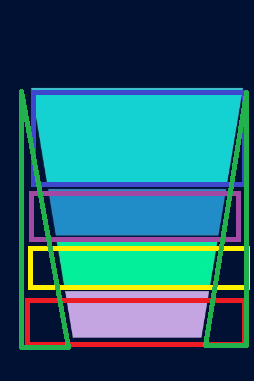
2. 컵 모양 Drawing 만들기

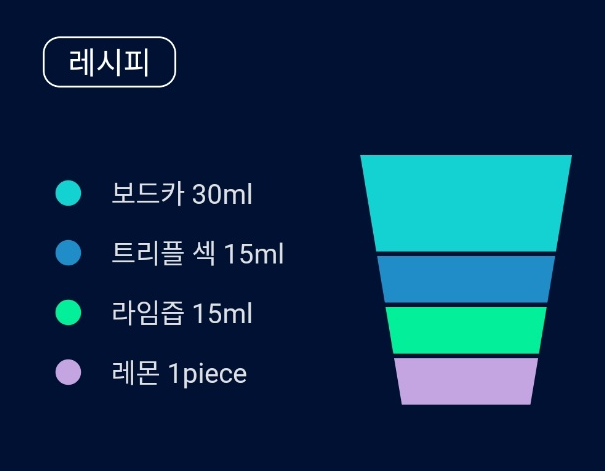
위의 사진들과 같이 재료들의 갯수에 따라 가변적으로 높이가 변하는 컵모양의 레시피를 만들고 싶다.
형제의 높이에 따라 다른 형제의 높이를 가변적으로 변경시키는 방법 중 하나에는 IntrinsicSize를 활용할 수 있다.
IntrinsicSize란? - Android Developer
IntrinsicSize는 하위요소가 실제로 측정되기 전에 하위 요소를 쿼리하여 최소/최대 값을 가져온다.
다음과 같은 예를 보자.
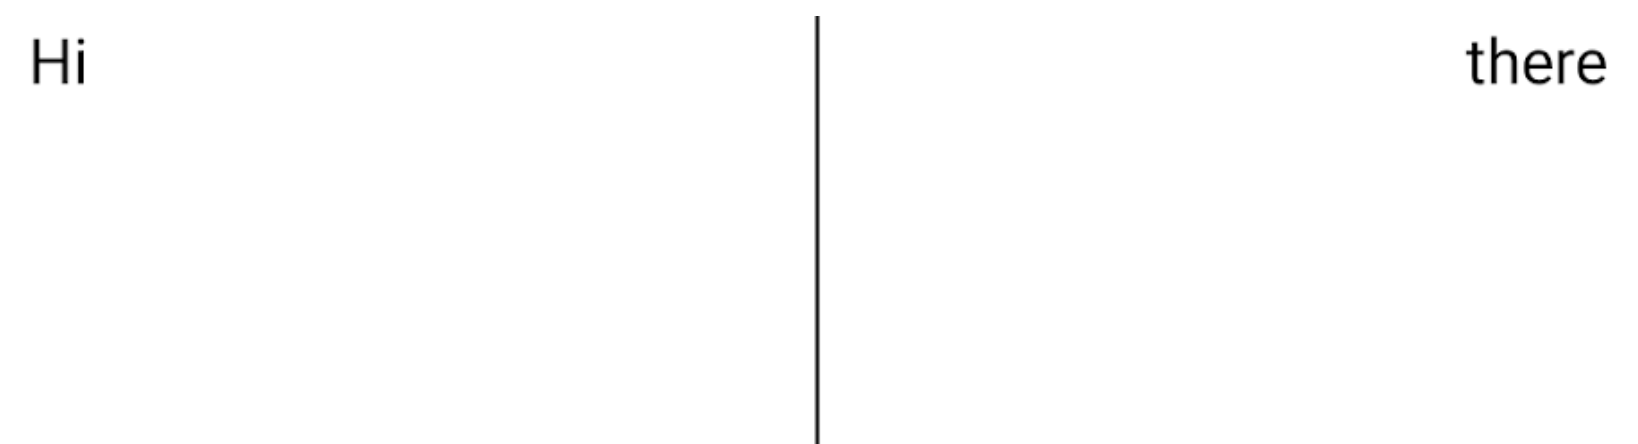
Hi와 there이라는 두 텍스트사이에 width가 1dp인 실선을 뛰우고자 한다.

@Composable
fun TwoTexts(
    text1: String,
    text2: String,
    modifier: Modifier = Modifier
) {
    Row(modifier = modifier) {
        Text(
            modifier = Modifier
                .weight(1f)
                .padding(start = 4.dp)
                .wrapContentWidth(Alignment.Start),
            text = text1
        )

        Divider(
            color = Color.Black,
            modifier = Modifier.fillMaxHeight().width(1.dp)
        )
        Text(
            modifier = Modifier
                .weight(1f)
                .padding(end = 4.dp)
                .wrapContentWidth(Alignment.End),
            text = text2
        )
    }
}
다음과 같이 작성하면 문제가 없이 작동될 것 같지만,
실선이 아주 길어진다. 이는 Row가 하위요소를 개별적으로 측정하며 Text의 높이를 사용하여 Divider의 높이를 제한할 수 없기 때문에 이런 문제가 발생한다.
height(IntrinsicSize.Min)는 하위 요소의 크기를 고유한 최소 높이로 강제 지정한다. 이 기능은 반복적으로 Row 및 하위 minIntrinsicHeight를 쿼리한다.
@Composable
fun TwoTexts(
    text1: String,
    text2: String,
    modifier: Modifier = Modifier
) {
    Row(modifier = modifier.height(IntrinsicSize.Min)) {
        Text(
            modifier = Modifier
                .weight(1f)
                .padding(start = 4.dp)
                .wrapContentWidth(Alignment.Start),
            text = text1
        )
        Divider(
            color = Color.Black,
            modifier = Modifier.fillMaxHeight().width(1.dp)
        )
        Text(
            modifier = Modifier
                .weight(1f)
                .padding(end = 4.dp)
                .wrapContentWidth(Alignment.End),
            text = text2
        )
    }
}
잘 작동한다.
IntrinsicSize.Min을 부모요소의 height에 대입하고 뷰를 그리면 레시피의 갯수에 따라 높이가 달라질 것 이다.
이를 쓰는 이유는 Canvas 컴포저블은 무조건 size를 명시해 주어야하고, 부모의 높이에 IntrinsicSize.Min을 활용 및 자식에 MaxSize를 활용하여 자식 중 최소높이의 뷰에 높이를 맞출 수 있다.
전체 소스
Row(
modifier = Modifier
.padding(20.dp)
.height(IntrinsicSize.Min)
.heightIn(min = 150.dp),
verticalAlignment = CenterVertically
) {
// Sureface(weight(6f) 좌측 60%를 활용
// ...
Box(
modifier = Modifier
.weight(4f) // 우측 40%를 화면을 활용함
) {
Column(
modifier = Modifier.fillMaxSize(),
horizontalAlignment = Alignment.CenterHorizontally,
verticalArrangement = Arrangement.Center
) {
val weightList = cocktail.ingredient.split(',').map {
val num: String = it.replace("[^0-9]".toRegex(), "")
if (num.isBlank()) {
15
} else {
15.coerceAtLeast(num.toInt())
}
}
weightList.mapIndexed { index, it ->
Canvas(
modifier = Modifier
.fillMaxWidth()
.weight(it.toFloat()),
) {
drawRect(
color = Color(colorList[index]),
)
drawLine(
start = Offset(x = 0f, y = size.height),
end = Offset(x = size.width, y = size.height),
color = Color_Default_Backgounrd,
strokeWidth = 15f
)
}
}
}
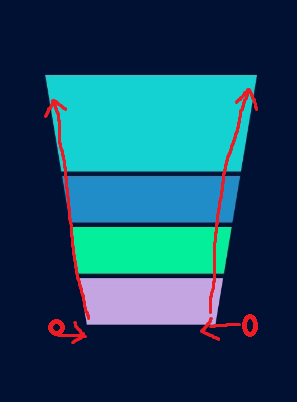
// 삼각형 2개
Canvas(
modifier = Modifier
.fillMaxSize(),
) {
val trianglePath = Path().apply {
moveTo(x = 0f, y = size.height)
lineTo(x = size.width * 0.2f, y = size.height)
lineTo(x = 0f, y = 0f)
}
drawPath(
color = Color_Default_Backgounrd,
path = trianglePath
)
}
Canvas(
modifier = Modifier
.fillMaxSize(),
) {
val trianglePath = Path().apply {
moveTo(x = size.width, y = size.height)
lineTo(x = size.width * 0.8f, y = size.height)
lineTo(x = size.width, y = 0f)
}
drawPath(
color = Color_Default_Backgounrd,
path = trianglePath
)
}
}
}쪼개보면 다음과 같다.
각각의 weight로 4개의 사각형을 그리고 위에 삼각형을 덮는다.
사각형 그리기
    fun drawRect(
        color: Color,
        topLeft: Offset = Offset.Zero,
        size: Size = this.size.offsetSize(topLeft),
        /*@FloatRange(from = 0.0, to = 1.0)*/
        alpha: Float = 1.0f,
        style: DrawStyle = Fill,
        colorFilter: ColorFilter? = null,
        blendMode: BlendMode = DefaultBlendMode
    )
Canvas(
modifier = Modifier
.fillMaxWidth()
.weight(it.toFloat()),
) {
drawRect(
color = Color(colorList[index]),
)
}size에 아무것도 넣지 않아도 (0.0f, 0.0f)를 기준으로 size를 자동으로 꽉 채운다.
topLeft: Offset = Offset.Zero,
size: Size = this.size.offsetSize(topLeft)
삼각형 그리기
Canvas(
  modifier = Modifier
    .fillMaxSize(),
) {
  val trianglePath = Path().apply {
    moveTo(x = 0f, y = size.height)
    lineTo(x = size.width * 0.2f, y = size.height)
    lineTo(x = 0f, y = 0f)
  }
  drawPath(
    color = Color_Default_Backgounrd,
    path = trianglePath
  )
}
Canvas(
  modifier = Modifier
    .fillMaxSize(),
) {
  val trianglePath = Path().apply {
    moveTo(x = size.width, y = size.height)
    lineTo(x = size.width * 0.8f, y = size.height)
    lineTo(x = size.width, y = 0f)
  }
  drawPath(
    color = Color_Default_Backgounrd,
    path = trianglePath
  )
}
}
drawPath는 다음과 같다.
    fun drawPath(
        path: Path,
        color: Color,
        /*@FloatRange(from = 0.0, to = 1.0)*/
        alpha: Float = 1.0f,
        style: DrawStyle = Fill,
        colorFilter: ColorFilter? = null,
        blendMode: BlendMode = DefaultBlendMode
    )
Path 객체를 활용하여
moveTo -> 이동, lineTo -> 라인 그리기
를 활용해 Path라인을 형성하고 이를 기반으로 다각형을 그릴 수 있다.
참고자료
https://velog.io/@jshme/Jetpack-Compose-Canvas-%ED%86%BA%EC%95%84%EB%B3%B4%EA%B8%B0
https://stackoverflow.com/questions/68218714/angled-gradient-background-in-jetpack-compose