
시작하기에 앞서서...
이 시리즈는 유데미의 React Native - The Practical Guide [2020 Edition] 강의를 듣고 정리한 글입니다.
이번시간부터는 간단한 앱을 하나 만들어보면서 기초적인부분에 대해서 학습을 하도록 하겠습니다.
컴포넌트

컴포넌트는 크게 Built into React Native와 Custom Components로 나뉩니다. Built into React Native는 react-native라이브러리에서 제공되는 기본 컴포넌트(=위젯)입니다. 보시는 것처럼 View, Text, Button 등 다양하게 존재합니다.
Custom Components는 우리가 만드는 컴포넌트입니다. Built into React Native에 존재하는 여러 위젯을 조합해서 만들 수 있습니다.
Styling

CSS와 비슷하게 생겼지만, 정확히는 CSS가 아닙니다. styling command, syntax가 비슷할 뿐입니다. Styling 적용방식은 Inline Styles방식과 StyleSheet Objects 방식이 있습니다.
Todo-App 만들기
간단하게 목표를 설정할 수 있고, 다 했으면 삭제가 가능한 간단한 앱을 만들어볼 것입니다.
1. 컴포넌트 & 스타일
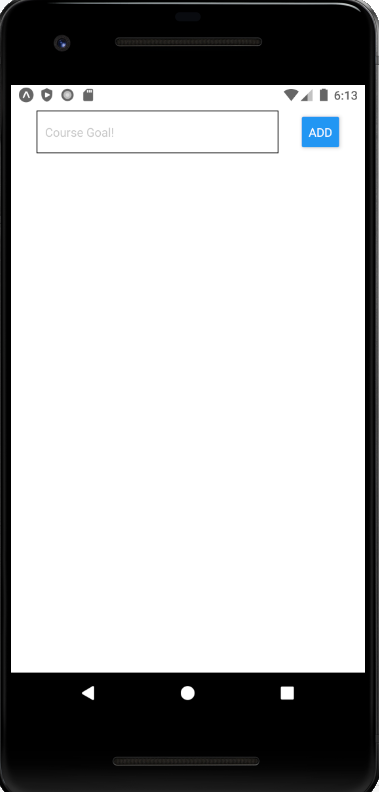
import React from "react";
import { View, Button, TextInput } from "react-native";

export default function App() {
  return (
    <View style={{ padding: 30 }}>
      <View>
        <TextInput
          placeholder="Course Goal!"
          style={{ borderColor: "black", borderWidth: 1, padding: 10 }}
        />
        <Button title="ADD" />
      </View>
    </View>
  );
}- View는 Web에서의 div와 비슷한 역할을 합니다. TextInput은 input이랑 동일하고요. Button은 button과 동일합니다.
core components에는 여러가지가 있는데 참조를 해보시기 바랍니다.- 또한 View에 적용할 수 있는 스타일도 존재하는데 형태를 보면 CSS와 은근히 비슷하게 생겼습니다. 이것도 참조를 해보시길 바랍니다.

2. flex layout
저희가 원하는건 input box와 button이 한줄로 나오도록 하는 것입니다. 그럴때 유용하게 쓰이는게 바로 flex입니다.
export default function App() {
  return (
    <View style={{ padding: 30 }}>
      <View
        style={{
          flexDirection: "row",
          justifyContent: "space-between",
          alignItems: "center",
        }}
      >
        <TextInput
          placeholder="Course Goal!"
          style={{
            flexBasis: "80%",
            borderColor: "black",
            borderWidth: 1,
            padding: 10,
          }}
        />
        <Button title="ADD" />
      </View>
    </View>
  );
}
CSS FlexLayout을 공부해본적이 있다면 쉽게 쓸 수 있을겁니다.
3. stylesheet objects
inline style은 쉽게 적용하기 쉽지만 적용해야 할 속성이 많아지면 보기가 별로 안좋습니다. 따라서 그 양이 많아지면 stylesheet objects 방식을 사용하는게 좋습니다.
import React from "react";
import { View, Button, TextInput, StyleSheet } from "react-native";

export default function App() {
  return (
    <View style={styles.screen}>
      <View style={styles.inputContainer}>
        <TextInput placeholder="Course Goal!" style={styles.input} />
        <Button title="ADD" />
      </View>
    </View>
  );
}

const styles = StyleSheet.create({
  screen: {
    padding: 30,
  },
  inputContainer: {
    flexDirection: "row",
    justifyContent: "space-between",
    alignItems: "center",
  },
  input: {
    flexBasis: "80%",
    borderColor: "black",
    borderWidth: 1,
    padding: 10,
  },
});
styles을 분리하고 나니까 보기가 괜찮아진거 같지 않나요?
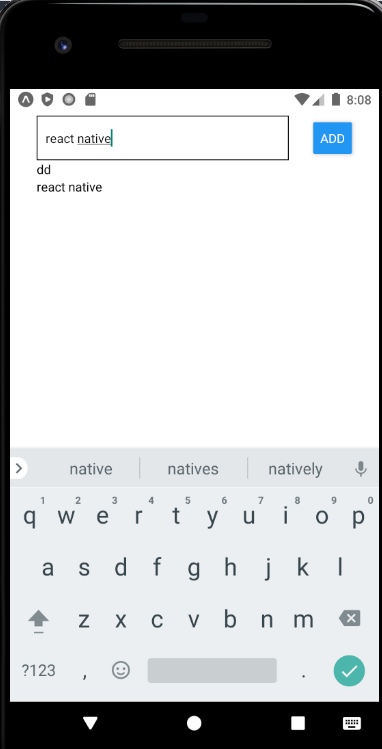
4. state & events
import React, { useState } from "react";
import { View, Button, TextInput, StyleSheet } from "react-native";

export default function App() {
  const [enteredGoal, setEnteredGoal] = useState("");
  const [courseGoals, setCourseGoals] = useState([]);

  const goalInputHandler = (enteredText) => {
    setEnteredGoal(enteredText);
  };

  const addGoalHandler = () => {
    console.log(enteredGoal);
    setCourseGoals(currentGoals => [...currentGoals, enteredGoal]);
  };

  return (
    <View style={styles.screen}>
      <View style={styles.inputContainer}>
        <TextInput
          placeholder="Course Goal!"
          style={styles.input}
          onChangeText={goalInputHandler}
          value={enteredGoal}
        />
        <Button title="ADD" onPress={addGoalHandler} />
      </View>
      <View>

      </View>
    </View>
  );
}- useState를 통한 상태관리를 하는 모습, 이벤트 처리함수를 만드는 모습은 리액트와 동일한 듯 합니다.
- TextInput
onChangeText 이벤트가 발생할때마다 goalInputHandler가 실행되어서 enteredGoal의 상태가 변화하고, Add버튼을 누르면Button onPress 이벤트가 발생되면서 addGoalHandler가 실행되어 CoureGoals의 상태가 업데이트되도록 했습니다.
밑에 참조 문서에 보면 다 나와있는 것들입니다.
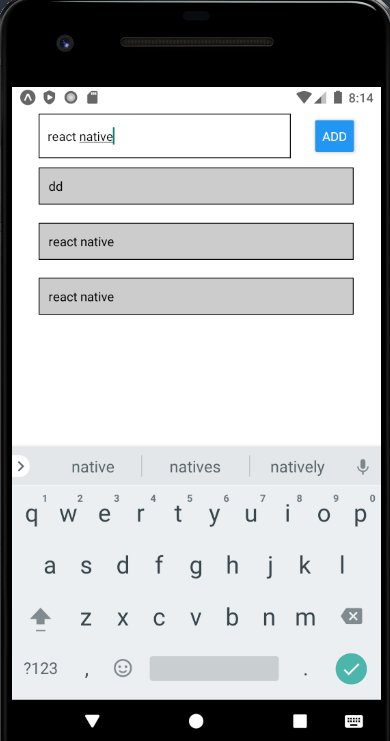
5. list of items
그렇다면 이제 courseGoals 배열을 사용자에게 보여줘야겠죠? 리액트에서 했던것 처럼 하면 됩니다. 바로 map을 이용하면 됩니다.
 return (
    <View style={styles.screen}>
      <View style={styles.inputContainer}>
        <TextInput
          placeholder="Course Goal!"
          style={styles.input}
          onChangeText={goalInputHandler}
          value={enteredGoal}
        />
        <Button title="ADD" onPress={addGoalHandler} />
      </View>
      <View>
        {courseGoals.map((goal, index) => (
          <Text key={index}>{goal}</Text>
        ))}
      </View>
    </View>
  );
조금 단출하니 이제 Styling을 해보도록 하겠습니다.
  return (
    (...생략...)

      <View>
        {courseGoals.map((goal, index) => (
          <View style={styles.listItem} key={index}>
            <Text>{goal}</Text>
          </View>
        ))}
      </View>

	(...생략...)
  );
}

const styles = StyleSheet.create({
  ...,

  listItem: {
    padding: 10,
    marginVertical: 10,
    backgroundColor: "#ccc",
    borderColor: "black",
    borderWidth: 1,
  },
});
주의할 점은 View와 Text는 Style 적용가능한 목록이 틀립니다. 이를테면 View에서 padding, margin 적용할 수 있던것이 Text에서는 적용이 안되며, Text에서 fontSize, fontAlign 등이 View에서는 적용이 안되는 셈입니다.
6. Scrollable with ScrollView
<ScrollView>
   {courseGoals.map((goal, index) => (
      <View style={styles.listItem} key={index}>
         <Text>{goal}</Text>
      </View>
   ))}
</ScrollView>
기존에 있던 View를 ScrollView로 대체하기만 하면 됩니다. 이렇게 하면 리스트가 화면을 넘어갔을때 스크롤이 가능해집니다.
하지만 여기에는 치명적인 단점이 있는데, 리스트 아이템이 무진장 많을경우 모든 리스트를 불러와야 한다는 것입니다.
7. FlatList
그런 문제를 해결해주는게 바로 FlatList입니다. FlatList는 한번에 모든 데이터를 렌더링하지 않고 화면에 보여지는 부분만 렌더링할 수 있습니다.
...

  const addGoalHandler = () => {
    setCourseGoals((currentGoals) => [
      ...currentGoals,
      { key: Math.random().toString(), value: enteredGoal },
    ]);
  };

  return (
    <View style={styles.screen}>
      <View style={styles.inputContainer}>
        <TextInput
          placeholder="Course Goal!"
          style={styles.input}
          onChangeText={goalInputHandler}
          value={enteredGoal}
        />
        <Button title="ADD" onPress={addGoalHandler} />
      </View>
      <FlatList
        data={courseGoals}
        renderItem={(itemData) => (
          <View style={styles.listItem}>
            <Text>{itemData.item.value}</Text>
          </View>
        )}
      ></FlatList>
    </View>
  );
}

...
사용법은 ScrollView를 FlatList로 바꿔주고 data에는 courseGoals를 넣어주고, renderItem은 저런식으로 써주면 됩니다. 다만 주의할 점은 데이터에는 key라는 속성이 있어야 합니다. 따라서 setGourseGoals할때 key라는 속성을 추가해주었습니다.
key는 key라는 이름이나 혹은 id라는 이름을 가지는게 좋은데, 딴 이름을 쓰려면 따로 설정이 필요합니다. 실제로 sid라고 변경해봤을때 아래와 같은 경고가 뜨게 됩니다.

<FlatList
   keyExtractor={(item, index) => index.sid}
   data={courseGoals}
   renderItem={(itemData) => (
      <View style={styles.listItem}>
        <Text>{itemData.item.value}</Text>
      </View>
   )}
></FlatList>
그랬을때는 KeyExtractor를 써주면 해결됩니다.
마침
react native 기초사용법에 대해 배워봤습니다. react나 css를 사용해봤던 사람으로써 상당히 익숙해서 그런지 쉽게 느껴지는거 같습니다.
또한 공식문서가 상당히 정리가 잘 되어있는 편이므로 간혹 헷갈린다거나 무슨 기능이 필요하다 그러면 찾아쓰기 쉬울거 같습니다.
다음시간에도 이어서 todo App을 만들면서 기초사용법에 대해 몇가지 더 알아보도록 하겠습니다.
References
- react-native core components docs : https://reactnative.dev/docs/view
- react-native View Style Props : https://reactnative.dev/docs/view-style-props
![]()