
시작하기에 앞서서...
이 시리즈는 유데미의 React Native - The Practical Guide [2020 Edition] 강의를 듣고 정리한 글입니다.
저번시간과 이어지는 내용입니다.
1. Spliting the App into Components
먼저 components라는 폴더를 생성합니다.
GoalItem 분리
그런다음 GoalItem.js 파일을 만들어서 다음과 같이 작성해줍니다.
// components/GoalItem.js
import React from "react";
import { View, Text, StyleSheet } from "react-native";

const GoalItem = ({ title }) => {
  return (
    <View style={styles.listItem}>
      <Text>{title}</Text>
    </View>
  );
};

const styles = StyleSheet.create({
  listItem: {
    padding: 10,
    marginVertical: 10,
    backgroundColor: "#ccc",
    borderColor: "black",
    borderWidth: 1,
  },
});

export default GoalItem;
App.js에서 GoalItem 컴포넌트를 불러와서 써줍니다.
import GoalItem from "./components/GoalItem";

  return (
    ...
      <FlatList
        data={courseGoals}
        renderItem={(itemData) => <GoalItem title={itemData.item.value} />}
      ></FlatList>
    ...
GoalInput 분리
다음으로는 GoalInput은 분리시켜보겠습니다.
// components/GoalInput.js
import React, { useState } from "react";
import { View, TextInput, Button, StyleSheet } from "react-native";

const GoalInput = ({ onAddGoal }) => {
  const [enteredGoal, setEnteredGoal] = useState("");

  const goalInputHandler = (enteredText) => {
    setEnteredGoal(enteredText);
  };

  return (
    <View style={styles.inputContainer}>
      <TextInput
        placeholder="Course Goal!"
        style={styles.input}
        onChangeText={goalInputHandler}
        value={enteredGoal}
      />
      <Button title="ADD" onPress={() => onAddGoal(enteredGoal)} />
    </View>
  );
};

const styles = StyleSheet.create({
  inputContainer: {
    flexDirection: "row",
    justifyContent: "space-between",
    alignItems: "center",
  },
  input: {
    width: "80%",
    borderColor: "black",
    borderWidth: 1,
    padding: 10,
  },
});

export default GoalInput;
App.js 코드입니다.
import React, { useState } from "react";
import { View, Button, TextInput, StyleSheet, FlatList } from "react-native";
import GoalInput from "./components/GoalInput";
import GoalItem from "./components/GoalItem";

export default function App() {
  const [courseGoals, setCourseGoals] = useState([]);

  // 추가
  const addGoalHandler = () => {
    setCourseGoals((currentGoals) => [
      ...currentGoals,
      { key: Math.random().toString(), value: enteredGoal },
    ]);
  };

  return (
    <View style={styles.screen}>
      <GoalInput onAddGoal={addGoalHandler} />
      <FlatList
        data={courseGoals}
        renderItem={(itemData) => <GoalItem title={itemData.item.value} />}
      ></FlatList>
    </View>
  );
}

const styles = StyleSheet.create({
  screen: {
    padding: 30,
  },
});
App.js가 훨씬 단순해졌습니다. 어떻게 분리시킬지는 딱히 정답은 없습니다. 양이 그렇게 많지 않은경우에는 분리시키지 않아도 되고, 너무 많이 분리시키면 오히려 보기 힘들어질 수도 있으니까요.
2. Working with Touchable Components
이제 해당 리스트 아이템을 클릭하면 그런 표시가 일어나도록 하고 콘솔에다가 간단한 문장을 출력해볼 것입니다.
// GoalItem.js
import { View, Text, StyleSheet, TouchableOpacity } from "react-native";

const GoalItem = ({ title, onDelete }) => {
  return (
    <TouchableOpacity activeOpacity={0.8} onPress={onDelete}>
      <View style={styles.listItem}>
        <Text>{title}</Text>
      </View>
    </TouchableOpacity>
  );
};

// App.js
<GoalItem
   onDelete={() => console.log("Does that work?")}
   title={itemData.item.value}
/>
TouchableOpacity 컴포넌트는 '터치 이벤트(onPress 등)를 사용할 수 있는 VIew'라고 생각하시면 됩니다. Opacity는 투명도를 뜻하는데, 버튼을 눌렀을 때 투명도를 설정해서 버튼이 눌렸는지 확인할 수 있겠끔 사용자에게 보여줄 수 있습니다.
list 중에 아무거나 하나는 눌러보면 좀 투명하게 될것입니다. 그리고 콘솔에 보면 문장이 출력되어있을 것입니다.
그외에도, TouchableHightlight, TouchableWithoutFeedbact 등이 존재합니다.
참고 : https://reactnative.dev/docs/touchableopacity
3. Deleteing Items
이제 아이템을 누르면 삭제되는 기능을 추가해보겠습니다. react에서처럼 filter함수를 이용하면 됩니다.
// App.js
const removeGoalHandler = (goalId) => {
  setCourseGoals((currentGoals) => {
    return currentGoals.filter((goal) => goal.key !== goalId);
  });
};
return (
  ...
  <FlatList
    data={courseGoals}
    renderItem={(itemData) => (
      <GoalItem
        id={itemData.item.key}
        title={itemData.item.value}
        onDelete={removeGoalHandler}
      />
    )}
  ></FlatList>
  ...


// GoalItem.js
const GoalItem = ({ id, title, onDelete }) => {
  return (
    <TouchableOpacity activeOpacity={0.8} onPress={() => onDelete(id)}>
      <View style={styles.listItem}>
        <Text>{title}</Text>
      </View>
    </TouchableOpacity>
  );
};
리스트 중에 하나를 클릭해보세요. 없어지게 될것입니다.
4. Add a Modal Overlay
“모들 윈도(Modal Window)는 사용자 인터페이스 디자인 개념에서 자식 윈도에서 부모 윈도로 돌아가기 전에 사용자의 상호동작을 요구하는 창을 말한다.” — 위키피디아
용어는 생소하실 수 있지만 우리가 실제로 App과 Web에서 자주 봐 왔던 UI입니다. Modal을 이용하면 사용자에게 특정 행동(선택)을 요구할 수 있습니다. 주는 Props값(옵션)에 따라서 특정 행동을 하도록 강제할 수도 있고, 주변화면을 터치하여 Modal 창을 사라지게 할 수도 있습니다.
코어 라이브러리로는 크게 React-Native 안의 기본 Modal과 react-native-community의 react-native-modal가 있습니다. (저희는 기본 Modal부터 먼저 써보겠습니다. 기능이나 다양함은 react-native-modal이 더 많다고 하니 나중에는 이걸 써보시길 바랍니다)
// app.js (전체코드)
import React, { useState } from "react";
import { View, StyleSheet, FlatList, Button } from "react-native";
import GoalInput from "./components/GoalInput";
import GoalItem from "./components/GoalItem";
export default function App() {
const [courseGoals, setCourseGoals] = useState([]);
const [isAddMode, setIsAddMode] = useState(false);
// 추가
const addGoalHandler = (goalTitle) => {
setCourseGoals((currentGoals) => [
...currentGoals,
{ key: Math.random().toString(), value: goalTitle },
]);
setIsAddMode(false);
};
// 삭제
const removeGoalHandler = (goalId) => {
setCourseGoals((currentGoals) => {
return currentGoals.filter((goal) => goal.key !== goalId);
});
};
// 모듈 없애기
const cancelGoalAdditionHandler = () => {
setIsAddMode(false);
};
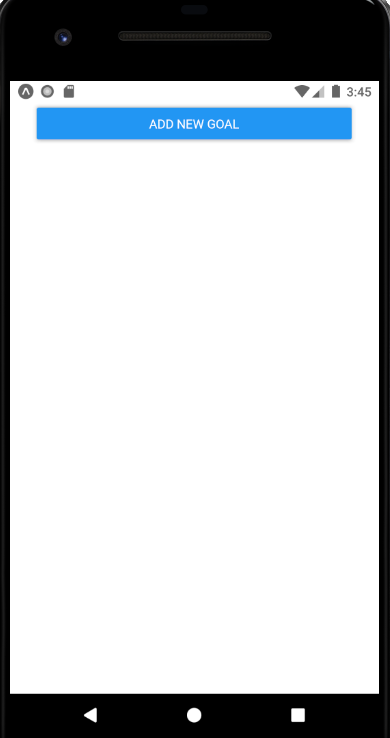
return (
<View style={styles.screen}>
<Button title="Add New Goal" onPress={() => setIsAddMode(true)} />
<GoalInput
visible={isAddMode}
onAddGoal={addGoalHandler}
onCancel={cancelGoalAdditionHandler}
/>
<FlatList
data={courseGoals}
renderItem={(itemData) => (
<GoalItem
id={itemData.item.key}
title={itemData.item.value}
onDelete={removeGoalHandler}
/>
)}
></FlatList>
</View>
);
}
const styles = StyleSheet.create({
screen: {
padding: 30,
},
});
- Modal을 보여줄지 말지는
isAddMode에서 상태관리를 해주고 있습니다. - Add New Goal 버튼을 누르면
setIsAddMode(true)로 만듭니다. - addGoalHandler, cancleGoalAdditionHandler 에서는
setIsAddMode(false)로 만들어줍니다. (추가 혹은 취소시에 Modal이 없어지도록) - 여기서는 GoalInput이 Modal이 됩니다. visible과 onCancle을 props로 넘겨줍니다.
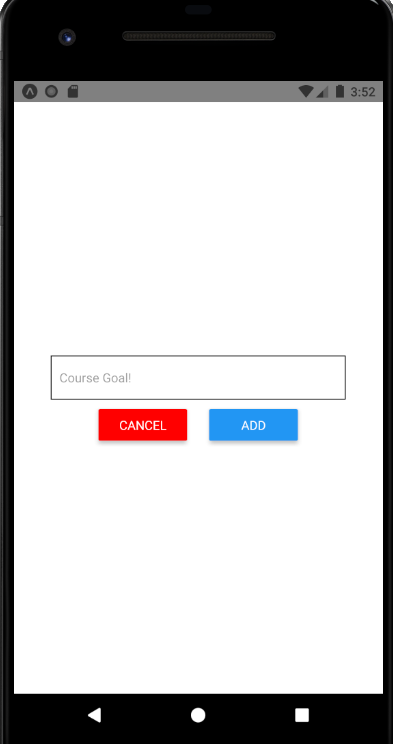
// GoalInput.js (전체코드)
import React, { useState } from "react";
import { View, TextInput, Button, StyleSheet, Modal } from "react-native";

const GoalInput = ({ visible, onAddGoal, onCancel }) => {
  const [enteredGoal, setEnteredGoal] = useState("");

  const goalInputHandler = (enteredText) => {
    setEnteredGoal(enteredText);
  };

  const addGoalHandler = () => {
    onAddGoal(enteredGoal);
    setEnteredGoal("");
  };

  return (
    <Modal visible={visible} animationType="slide">
      <View style={styles.inputContainer}>
        <TextInput
          placeholder="Course Goal!"
          style={styles.input}
          onChangeText={goalInputHandler}
          value={enteredGoal}
        />

        <View style={styles.buttonContainer}>
          <View style={styles.button}>
            <Button title="CANCEL" color="red" onPress={onCancel} />
          </View>
          <View style={styles.button}>
            <Button title="ADD" onPress={addGoalHandler} />
          </View>
        </View>
      </View>
    </Modal>
  );
};

const styles = StyleSheet.create({
  inputContainer: {
    flex: 1,
    justifyContent: "center",
    alignItems: "center",
  },
  input: {
    width: "80%",
    borderColor: "black",
    borderWidth: 1,
    padding: 10,
    marginBottom: 10,
  },
  buttonContainer: {
    width: "60%",
    flexDirection: "row",
    justifyContent: "space-around",
  },
  button: {
    width: "40%",
  },
});

export default GoalInput;
- Modal을 가장 상위에다가 써주고 visible속성을 통해 보여줄지 말지를 제어합니다. animationType으로 보여주고 사라지는 동작을 애니메이션 효과를 넣어줄 수 있습니다.
- 취소버튼을 추가하고 onPress했을 때 onCancel을 동작시킵니다.
- 스타일을 가운데 정렬하고, 버튼은 크기를 지정해줌으로써 깔끔하게 통일 시켰습니다.
flex: 1의 의미는 화면전체를 1의 비율만큼 차지하겠다는 소리입니다.
마침
이것으로 간단하게 리액티 네이티브를 이용해 첫번째 앱을 만들어봤습니다. 아직 익숙하지 않아서 얼마나 많은 컴포넌트가 있고 그 기능은 뭔지 궁금하네요.
References
- react-native core components docs : https://reactnative.dev/docs/view
- react-native View Style Props : https://reactnative.dev/docs/view-style-props
- react-native 레이아웃 디자인 : https://yuddomack.tistory.com/entry/5React-Native-%EB%A0%88%EC%9D%B4%EC%95%84%EC%9B%83-%EB%94%94%EC%9E%90%EC%9D%B8-1%EB%B6%80-flex%EC%99%80-width-height
![]()