yarn add @next/bundle-analyzer를 설치하고
아래와 같이 next.config.js 에
// next.config.js

/** @type {import('next').NextConfig} */
const withPWA = require('next-pwa')({
  dest: 'public',
  disable: true,
  register: true,
  skipWaiting: true,
});
const { i18n } = require('./next-i18next.config');

// @next/bundle-analyzer 설정 추가
const withBundleAnalyzer = require('@next/bundle-analyzer')({
  enabled: true, // 번들 분석 활성화 여부
  openAnalyzer: true, // 분석 결과를 자동으로 열기
});

// withBundleAnalyzer를 사용하여 nextConfig에 번들 분석 설정 추가
const nextConfig = withPWA(
  withBundleAnalyzer({
    images: {
      remotePatterns: [
        {
          protocol: 'https',
          hostname: '**',
        },
      ],
    },
    i18n,
    webpack: (config, options) => {
      // CSS 로더 설정에서 모듈 exportLocalsConvention을 camelCase로 변경
      config.module.rules
        .find(({ oneOf }) => !!oneOf)
        .oneOf.filter(({ use }) => JSON.stringify(use)?.includes('css-loader'))
        .reduce((acc, { use }) => acc.concat(use), [])
        .forEach(({ options }) => {
          if (options.modules) {
            options.modules.exportLocalsConvention = 'camelCase';
          }
        });

      // SVG 파일을 처리하기 위한 로더 추가
      config.module.rules.push({
        test: /\.svg$/,
        use: ['@svgr/webpack'],
      });

      // MP3 파일을 처리하기 위한 로더 추가
      config.module.rules.push({
        test: /\.(mp3)$/,
        use: {
          loader: 'file-loader',
          options: {
            name: '[name].[ext]',
            publicPath: `/_next/static/sounds/`,
            outputPath: `${options.isServer ? '../' : ''}static/sounds/`,
          },
        },
      });

      return config;
    },
  }),
);

module.exports = nextConfig;
next/bunler analyzer 를 통해서
내가 만든 캘린더( 캘린더 + 기능 + css )와 react-calendar , react-big-calendar 를 비교해 보고자 한다.
위와 같이 bundler를 next.config에 추가하여 yarn build 시 자동으로 브라우저에 자동으로 분석 표를 보여주는데
사진은 아래와 같다.
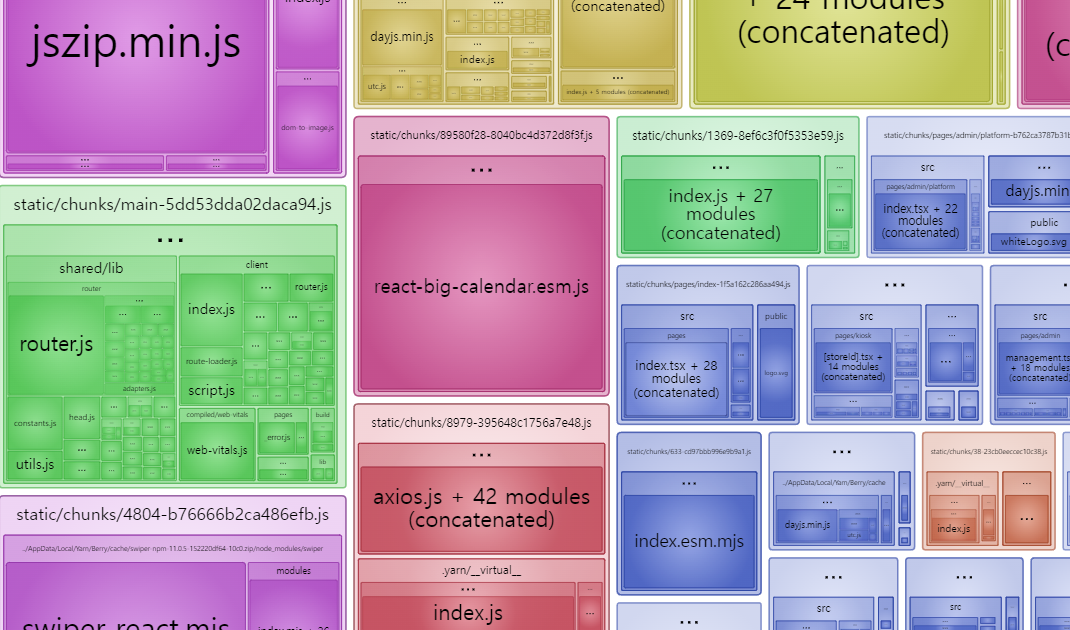
openAnalyzer 의 값을 true 로 해서 자동으로 브라우저에 저런 분석표가 뜬다.
