1. event.target
이벤트가 발생한 요소를 반환해준다.
document.querySelector('.a').addEventListener(
  'click',function(event){
    console.log(event.target)
  }
)- class가 a인 요소를 클릭했을 때 이벤트가 발생하고, 이벤트 발생 때마다 이벤트 대상인 a가 콘솔창에 출력 된다.
document.querySelector('.a').addEventListener(
  'click',function(event){
    console.log(event.target.id)
  }
)- 이벤트가 발생한 요소의 id값을 콘솔에 출력한다.
2. setAttribute()
element를 선택해서 setAttribute함수를 실행하면 설정한 속성이름(attribute_name)과 속성값(attribute_value)이 생성 된다.
document.getElementById('id_value').setAttribute('title', 'It is kkamikoon Title');
getElementById로 'id_value'를 가지고 있는 요소를 가져온다. 그리고setAttribute()함수를 통해 'title' 이라는 이름에 'It is kkamikoon Title'이라는 값을 넣어준다.
3. getElementsByTagName()
특정 tag명을 가지고 있는 요소에 접근한다.
<html lang="ko">
  <head>
    <script src="./test.js"></script>
    <title>mineItRecord</title>
  </head>
  <body>
    <div>div-1</div>
    <div>div_2</div>
    <div>
      <span>span</span>
      <p>p</p>
    </div>
    <div id="wrap" class="wrap">
      <span class="sp">span</span>
    </div>
  </body>
</html>document.getElementsByTagName('div');
// HTMLCollection(4) [div, div, div, div#wrap.wrap, wrap: div#wrap.wrap]
document.getElementsByTagName('span');
// HTMLCollection(2) [span, span.sp]
// 모든 태그 요소 가져오기
document.getElementsByTagName('*');
// HTMLCollection(13)
// [html, head, script, title, body, div, div, div, span, p, div#wrap.wrap, span.sp, script, wrap: div#wrap.wrap]
// 특정 요소 내부에서 스캔하기
wrap.getElementsByTagName('span'); // HTMLCollection [span.sp]
document.getElementsByTagName('div')[2].getElementsByTagName('p');
// HTMLCollection [p]
document.getElementsByTagName('div')[2].getElementsByTagName('*');
// HTMLCollection(2) [span, p]- '*' 을 사용해 전체 테그들을 가져올 수도 있다.
4. insertBefore()
- 부모노드의 기준점 노드 앞에 노드를 삽입.
- 기존 부모 노드 안에서의 이동은 따로 삭제하지 않아도 이동이 가능.
- 다른 부모의노드로 가게될 경우 기존 자리에서 삭제 후이동.
- 기준점 노드를 null로 하게 되면 제일 끝에 삽입.
<ul class = "parent">
  <li class="newEle">+</li>
  <li class="ele">button</li>
  <li class="ele">button</li>
  <li class="ele">button</li>
  <li class="ele">button</li>
</ul>
let ele = document.querySelector('.newEle');
let parent = document.querySelector('.parent');
parent.insertBefore(ele, null); //맨 끝에 삽입
parent.insertBefore(ele, parent.firstChild); //맨 앞에 삽입5. cloneNode()
복사를 원하는 노드.cloneNode()를 통해 노드를 복사한다.
- cloneNode(trure) : 노드의 자식요소까지 복사를 한다.
- cloneNode() : 자식요소를 포함하지 않고 노드만 복사
예시로 정사각형 복사를 해보면
html
<div id="cloneTest">
        <div id="cloneTestSon"></div>
    </div>
    <div id = 'cloneTest1'>
css
#cloneTest {
    margin: 1%;
    width:36px;
    height: 36px;
    background: #000;
    display: inline-block;
}
#cloneTest1 {
    margin: 1%;
    width:36px;
    height: 36px;
    background: #000;
    display: inline-block;
}
#cloneTestSon {
    margin: 1%;
    width:12px;
    height: 12px;
    background: #fff;
    display: inline-block;
}
script
<script>
        let test = document.getElementById('cloneTest');
        let cloneTest1 = document.getElementById('cloneTest1');
        // test 변수에 복제 할 노드를 지정

        let test1 = test.cloneNode();
        let test2 = test.cloneNode();
        let test3 = test.cloneNode(true);
        // 복사할 개수만큼 복제변수를 생성


        cloneTest1.appendChild(test1);
        cloneTest1.appendChild(test2);
        cloneTest1.appendChild(test3);
</script>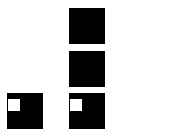
- 마지막 true가 들어간
cloneNode만 자식 요소까지 복제된 것을 볼 수 있다.

프론트앤드 공부중인 챔수입니다.