
OAuth란?
액세스를 위임하여주는 개방형 표준 인가 프로토콜이다.
다양한 플랫폼 환경에서 권한을 부여해 줄 수 있다.
OAuth 흐름
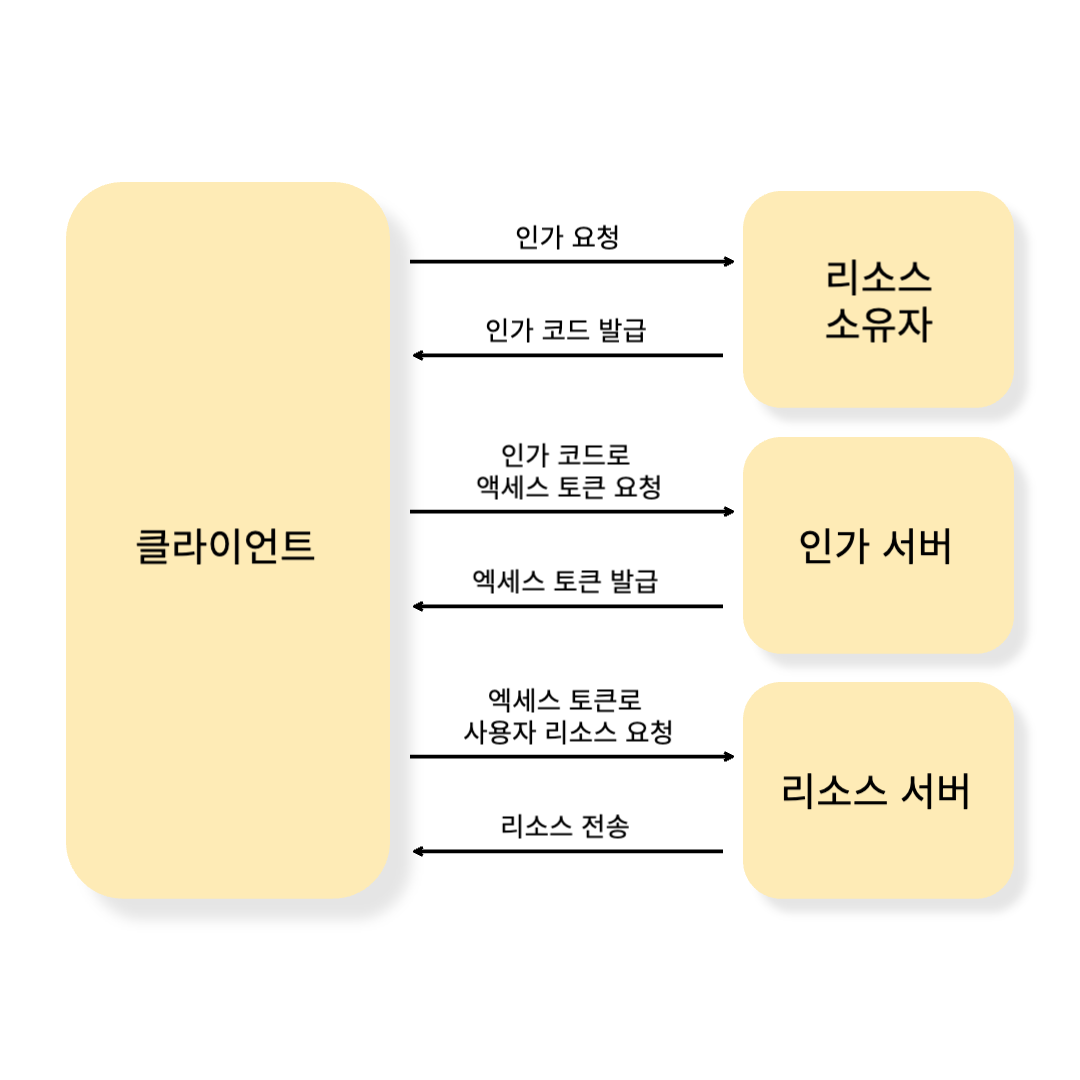
프론트엔드 단에서는 인가 요청을 하여 인가 코드를 발급하고 해당 인가 코드를 백엔드로 넘겨주면 된다.
Access/Refresh Token 흐름
-
서버에서는 사용자가 로그인 하면 사용자와 1:1 매핑이 되도록 access token과 refresh token 값을 DB에 저장하고 클라이언트에 두 token 모두 내려준다.
-
클라이언트는 쿠키에 두 token 값을 저장한다.
-
API를 통신할 때에, 클라이언트는 access token 값을 header에 담아 전송한다.
-
서버에서 access token이 만료되었으면 클라이언트에 401 에러를 보낸다.
-
클라이언트는 401 에러를 받으면 refresh token을 header에 담아 보낸다.
-
서버는 받은 refresh token을 검증한다.
6-1. refresh token이 만료되었으면 401에러를 보낸다. 클라이언트는 401에러를 받으면 로그인 페이지로 보낸다.
6-2. refresh token이 만료되지 않았으면 새로운 access token과 refresh token을 발급한 후 클라이언트에 보낸다.
access token은 수명을 5~30분 정도로 짧게 가져가고, refresh token은 짧게는 3일에서 길게는 1년까지 길게 가져간다.
리액트에서 OAuth 구글 로그인 적용
- 구글 클라우드 플랫폼에서 정보 등록
구글링하면 많이 나온다.
승인된 자바스크립트 원본에서 개발 환경(localhost:5173), 배포 환경(도메인 주소)를 둘다 넣어야 하는 것만 주의
참고 - react-oauth/google 라이브러리 사용
<GoogleOAuthProvider clientId={clientId}> // 구글 클라우드 플랫폼에서 발급받은 client Id 넣기
  <Paper variant='outlined' onClick={()=>login()}>
    <Typography>Google Login</Typography>
  </Paper>
</GoogleOAuthProvider>
type loginPayload = {
authCode: string;
}
const login = useGoogleLogin({
onSuccess: async tokenResponse => {
const payload: loginPayload = {
authCode: tokenResponse.code
}
mutate(payload) // api 통신 함수
},
onError: (errorResponse: unknown) => {
console.error(errorResponse);
},
flow: "auth-code",
});트러블 슈팅
- mismatch redirect uri 오류가 계속해서 발생하였다. 구글 로그인 창 uri를 자세히 보니까 ?redirect_uri=storagerelay 이렇게 올바르지 않은 uri가 매핑되어 있는 것을 확인했다. 이를 중심으로 구글링하여 해결방법을 찾아내었다. 하지만 클라이언트에서 하지 않고, 서버 쪽에서 redirect uri를 "postmessage"로 설정하니까 해결되었다.
리액트에서 access/refresh token 적용
- utils/apiUtils.tsx
export const getApi = (apiEndPoint: string, api: string) => {
    return fetch(apiEndPoint + api, {
        headers: {
            "Gauth": getCookie('access')
        }
    })
}

export const postApi = (apiEndPoint: string, api: string, payload: any) => {
    return fetch(apiEndPoint + api, {
        method: 'POST',
        headers : { 'Content-Type' : 'application/json',
                    'Gauth': getCookie('access') },
        body: JSON.stringify(payload)
    })
}

export const putApi = (apiEndPoint: string, api: string, payload: any) => {
    return fetch(apiEndPoint + api, {
        method: 'PUT',
        headers : { 'Content-Type' : 'application/json',
                    'Gauth': getCookie('access') },
        body: JSON.stringify(payload)
    })
}

export const deleteApi = (apiEndPoint: string, api: string) => {
    return fetch(apiEndPoint + api, {
        method: 'DELETE',
        headers : { 'Content-Type' : 'application/json',
                    'Gauth': getCookie('access') }
    })
}

export const refreshApi = (apiEndPoint: string, notify: Function, navigate: Function) => {
    return fetch(`${apiEndPoint}/api/update/token`
    , {
        headers: {
            'Refresh' : getCookie('refresh')
        }
    }
    ).then(response => {
        if (response.status === 401) {
          navigate('/login')
          notify('Login time has expired')
          throw new Error('로그아웃')
        }
        else if (response.status === 200) {
          let jwtToken: string | null = response.headers.get('Gauth')
          let refreshToken: string | null = response.headers.get('RefreshToken')

          if (jwtToken) {
              setCookie('access', jwtToken)
          }

          if (refreshToken) {
              setCookie('refresh', refreshToken)
          }
        }
      })
}
트러블 슈팅
- 클라이언트 쪽에서 분명 헤더에 토큰 값을 넣어서 보냈는데 서버에서는 오지 않았다.
여러 시행착오 끝에, 서버에서 헤더명을 허용해주어야 받아졌다. (Access-Control-Allow-Headers)

개발자