목적
Sequelize 모델을 직접 작성하고 이를 통해 Node.js 프로젝트를 구성하는 방법을 기술하였습니다.
Migrate와 Seed를 사용하여 모델 생성, 초기적재 등을 하는 부분이 궁금하신 분은
이전 포스트를 참고하시기 바랍니다.
초기세팅
설치
npm install sequelize mysql2
npm install -g sequelize-cli
init을 하면
npx sequelize init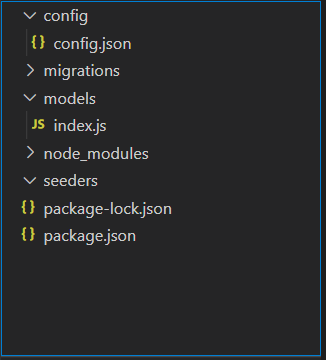
몹시 언짢게 생긴 구조로 폴더가 생성됩니다.
다른 구조를 만들어봅시다.
root에 .sequelizerc 파일은 만들어서 경로를 지정합니다.
const path = require('path');

module.exports = {
  config: path.resolve('config', 'db.config.js'),
  'models-path': path.resolve('src/models'),
  'seeders-path': path.resolve('src/models/seeders'),
  'migrations-path': path.resolve('src/models/migrations'),
};
$ npx sequelize init설정파일 작성
db.config.js 파일을 작성합니다.
보안을 위해서 .env 파일을 참조하도록 하였습니다.
const env = process.env;

const development = {
  username: env.MYSQL_USERNAME,
  password: env.MYSQL_PASSWORD,
  database: env.MYSQL_DATABASE,
  host: env.MYSQL_HOST,
  dialect: 'mysql',
  port: env.MYSQL_PORT,
  ssl: 'Amazon RDS',
  logging: console.log,
  timezone: '+09:00',
};

const production = {
  username: env.MYSQL_USERNAME,
  password: env.MYSQL_PASSWORD,
  database: env.MYSQL_DATABASE,
  host: env.MYSQL_HOST,
  dialect: 'mysql',
  port: env.MYSQL_PORT,
  ssl: 'Amazon RDS',
  logging: console.log,
  timezone: '+09:00',
};

const test = {
  username: env.MYSQL_USERNAME,
  password: env.MYSQL_PASSWORD,
  database: env.MYSQL_DATABASE_TEST,
  host: env.MYSQL_HOST,
  dialect: 'mysql',
  port: env.MYSQL_PORT,
  ssl: 'Amazon RDS',
  logging: console.log,
  timezone: '+09:00',
};

export { development, production, test };
.env 파일도 만듭니다.
아래는 예시입니다.
SERVER_PORT=3000
DB_DIALECT=mysql
MYSQL_USERNAME= user
MYSQL_PASSWORD= 1234
MYSQL_DATABASE= test
MYSQL_HOST=localhost
MYSQL_PORT=3306
DATABASE_URL=mysql://root:1234@localhost:3306/test
JWT_SECRET_KEY=6ASFASDADASQWXCZX
SEQUELIZE_LOGGING=false
NODE_ENV=development
src/models/index.js 파일 수정
'use strict';

import fs from 'fs';
import path from 'path';
import Sequelize from 'sequelize';
import process from 'process';
const basename = path.basename(__filename);
const env = process.env.NODE_ENV || 'development';
const config = require('../config/db.config')[env];
const db = {};

let sequelize;
if (config?.use_env_variable) {
  sequelize = new Sequelize(process.env[config.use_env_variable], config);
} else {
  sequelize = new Sequelize(
    config.database,
    config.username,
    config.password,
    config
  );
}

fs.readdirSync(__dirname)
  .filter((file) => {
    return (
      file.indexOf('.') !== 0 && file !== basename && file.slice(-3) === '.js'
    );
  })
  .forEach((file) => {
    const model = require(path.join(__dirname, file))(
      sequelize,
      Sequelize.DataTypes
    );
    db[model.name] = model;
  });

Object.keys(db).forEach((modelName) => {
  if (db[modelName].associate) {
    db[modelName].associate(db);
  }
});

db.sequelize = sequelize;
db.Sequelize = Sequelize;

module.exports = db;
시퀄라이즈 객체에 정보를 주고,
DB에 담긴 JSON에 있는 key값인 modeName을 조사하여
.associate라는 항목이 존재할 경우 해당 함수를 실행시키는데
이것은 FK가 설정된 모델들을 서로 연결해주는 작업을 해줍니다.
db.model로 하여 만들어놓은 DB model을 넣어주고,
Sequlize을 넣어주면 접속연결 객체와 Sequelize에 담긴 메서들들이 JSON에 들어갑니다.
모델 작성
ex. src/models/user.js
'use strict';
import bcrypt from 'bcryptjs';

module.exports = (sequelize, DataTypes) => {
  const User = sequelize.define(
    'User',
    {
      userId: {
        type: DataTypes.UUID,
        defaultValue: DataTypes.UUIDV4,
        allowNull: false,
        primaryKey: true,
        field: 'id',
      },
      email: {
        type: DataTypes.STRING,
        allowNull: false,
      },
      password: {
        type: DataTypes.STRING,
        set(value) {
          if (value.length >= 6) {
            this.setDataValue('password', bcrypt.hashSync(value, 10));
          } else {
            throw new Error('Password should be at least 6 characters long!');
          }
        },
        allowNull: false,
      },
      nickname: {
        type: DataTypes.STRING,
        allowNull: false,
      },
      profileImage: {
        type: DataTypes.STRING,
        allowNull: true,
        field: 'profile_image',
      },
      userDesc: {
        type: DataTypes.TEXT,
        allowNull: true,
        field: 'user_desc',
      },
    },
    {
      charset: 'utf8mb4',
      collate: 'utf8mb4_general_ci',
      underscored: true,
      paranoid: true,
      freezeTableName: true,
      tableName: 'user',
    }
  );

  User.prototype.isValidPassword = async function (pw) {
    try {
      return await bcrypt.compare(pw, this.password);
    } catch (err) {
      throw new Error(err);
    }
  };

  User.associate = function (models) {
    User.hasMany(models.Item, {
      foreignKey: 'userId',
      as: 'item',
    });
    User.hasMany(models.Dibs, {
      foreignKey: 'userId',
      as: 'dibs',
    });
  };
  return User;
};
나머지 테이블도 같은 방식으로 모델을 작성한다.
자동싱크 설정
app.js 등 메인파일에 아래와 같이 추가하면
app 구동 시 db를 불러와 실제 DB와 싱크를 맞춰서 DB에 연결한다.
import db from './models';
db.sequelize
.sync()
.then(() => {
console.log('db 연결 성공');
})
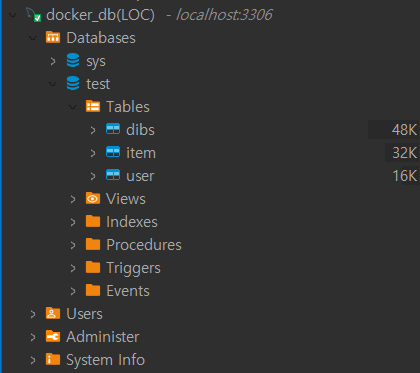
.catch(console.log.error);npm run startDB 및 테이블이 자동으로 생성되어 있는 것을 확인할 수 있습니다.
사용방법
저장
import { User } from './models'

app.post('/', async (req, res) => {
		await User.create(
			email : req.body.email,
			password: req.body.password
		)
	})
조회(단건)
const user = await User.findOne(
	where: { email: req.body.email }
)
예외처리
if (!user) {
	return res.send({'에러 메세지')
	}
else (user) {
	return res.send(user)
	}
JOIN
User.findOne({
	where: { id: user.id},
	include: [{
			model: 모델이름,
		}, {
			model: 모델이름,
			as : 설정한 이름
			}
		]
	})
위처럼 하면 해당 모델의 ID에 연결된 FK들에 묶인 모델데이터들을 Join해서 가지고 올 수 있다.
정렬, 오프셋
User.findAll({
	where: { id: user.id }
	limit: 10,
	offset: 100,
	order: [['createdAt', 'DESC']] //최신순으로 목록 가지고 오기
	include: [{
		model: User,},
		model: Image,},
		model: Comment,
		include:[{model: User, attributes: ['id', 'email']}]
	]
});
위와 같은 방식으로 offset과 limit 그리고 order로 정렬이 가능하며, join 하려고 불러온 모델 안에서는 include하면 그 모델과 연결된 모델과 다시 join시켜서 리턴해줍니다.
삭제, 수정
app.delete('/', async (req, res) => {
		await 모델이름.destroy({
			where: {
				id: req.body.id.
			}
		})
	})

app.post('/', async (req, res) => {
		await 모델이름.update(
		{ password : req.body.password }
		,{
			where: {
				id: req.body.id.
			}
		})
	})
그 외
model이름.add모델이름({추가 속성과 그 내용})
model이름.remove모델이름({지울 속성과 그 내용}) //(many일때는 뒤에 s를 붙여야한다.)
model이름.get모델이름({가지고올 속성과 그 내용}) //(해당 모델내용 가지고 오기)
model이름.set모델이름({변경할 속성과 그 내용}) //(해당 모델내용 수정하기)
참고
https://sequelize.org/docs/v6
https://inpa.tistory.com/entry/ORM-📚-sequelize-cli-모듈-사용하기
https://velog.io/@litien/Seqeulize-Doc-번역-Model-Basic
https://pjt3591oo.github.io/sequelizejs_translate/build/html/index.html
https://medium.com/prisma-korea/번역-마이그레이션과-sequelize-cli-튜토리얼-3926c0a9eae6
코치님 노션
