
Harbor에 대해 공부한 내용을 정리한 글입니다.
harbor - github를 참고하여 진행하였습니다.
또한, 마스터 노드1, 워커노드 2로 실습 진행하였습니다.
🤣🤩😊pipeline 내용 공부 정리입니다.
서론
IP 주소의 기본적인 설정 방법과 스위치의 역할을 이해하고, 네트워크 통신의 기본 원리를 실습으로 익히고자 합니다. 본 실습은 가상 환경에서의 구성과 네트워크 통신 테스트를 통해 실제 네트워크 환경과 유사한 문제 해결 과정을 경험할 수 있도록 설계되었습니다.
Helm
쿠버네티스 환경에서 helm을 사용해 어플리케이션을 설치할 수 있도록 도와줍니다.
- 각각 리소스를 관리하는 것이 아닌, 템플릿을 통해 공통부분은 두고, 세부사항만 변경
- 라이브러리 패키지 형태로 리소스를 제공합니다.
- 별도의 yaml파일을 작성하지 않고, 헬름파일을 사용해 배포합니다.
이번 실습에서는 helm에 대해서 자세히 다루지는 않을 예정입니다.
다운로드 되어 있다고 가정하고 진행하겠습니다.
Harbor
Harbor는 CNCF의 프로젝트 중 하나로서, 온프레미스 환경에서 컨테이너 이미지 저장소로 사용 가능한 레포지토리입니다.
- 역할 기반 접근제어 설정 가능
- 이미지 취약점 스캐닝
- 이미지 서명
- Nexus, GitLab 등 다양한 컨테이너 이미지 솔루션을 사용할 수 있습니다.
오늘 실습할 내용은 harbor 설치 후, docker Hub 대신 이미지가 harbor에 업로드 되는지 확인하는 곳 까지 진행하겠]습니다.
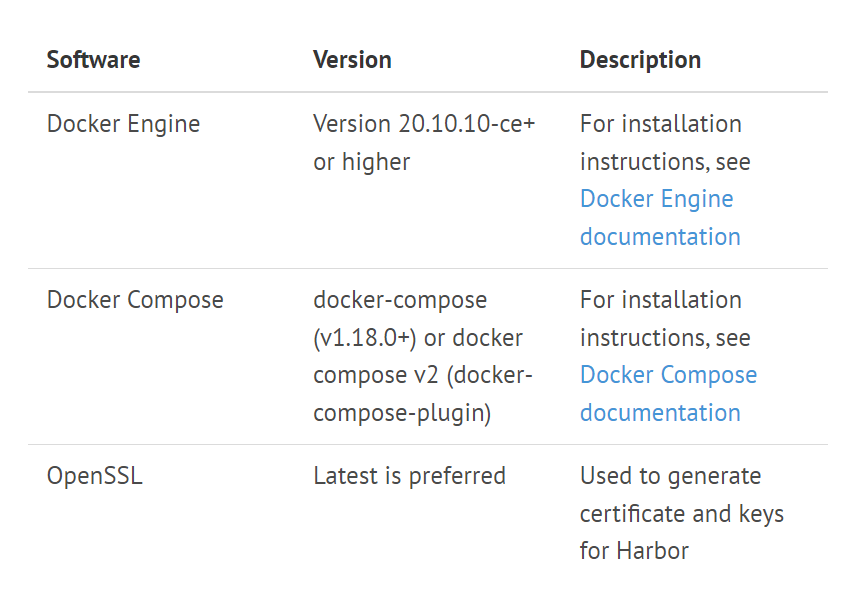
harbor의 경우, 권장 docker 버전이 17.06 버전 이상이 필요합니다.
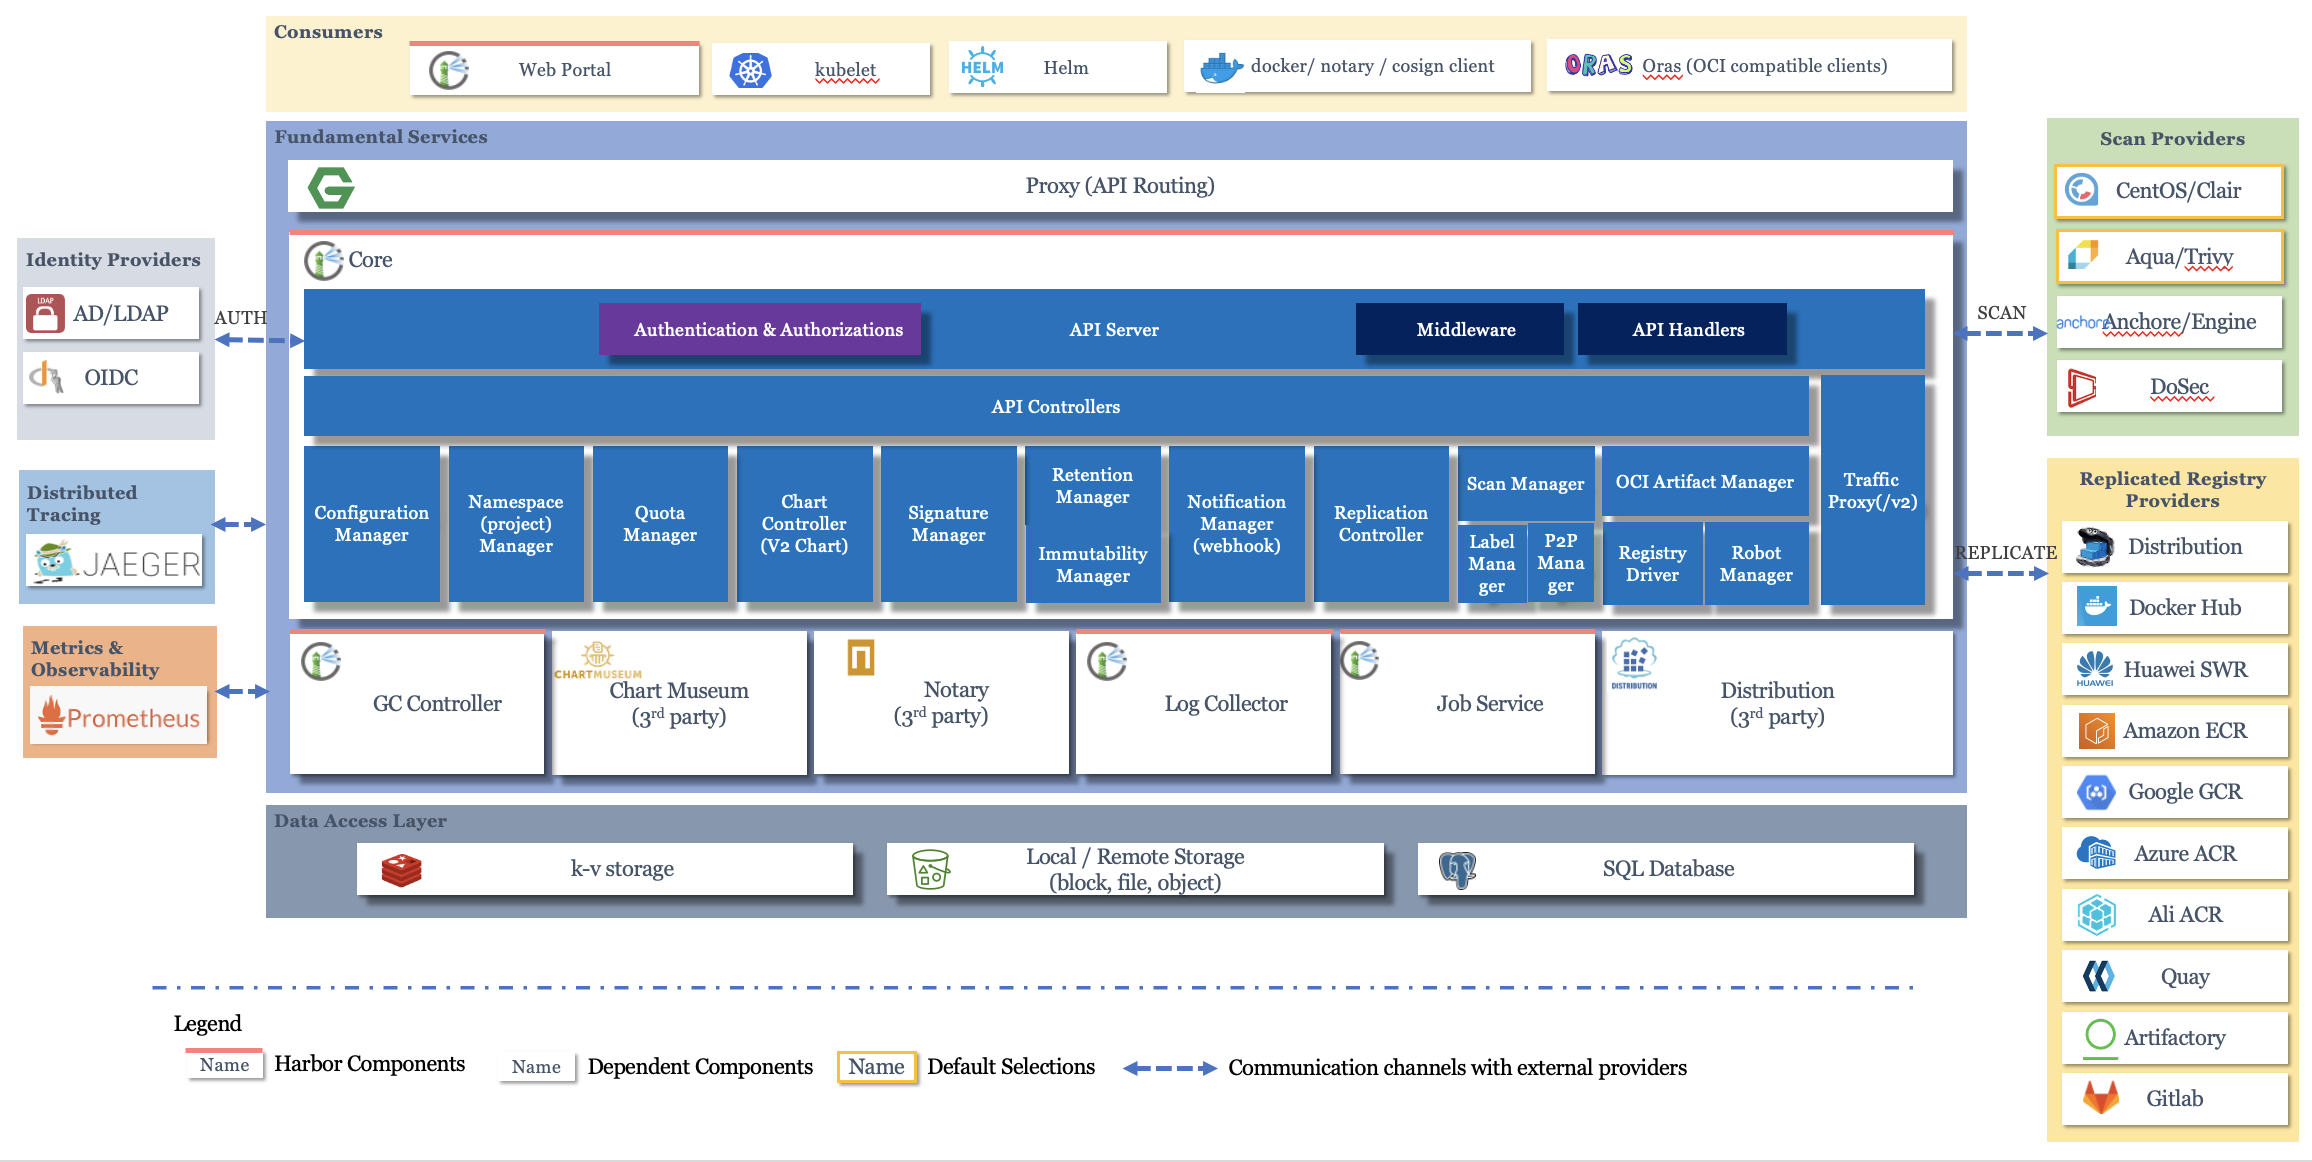
Harbor Architecture
helm을 통해 harbor설치
# helm 최신버전이면 상관 없을 것
$ helm repo add harbor https://helm.goharbor.io

$ helm repo update
$ helm pull harbor/harbor

# 최신 버전으로 다운될 것.. 압축 풉시다
$ tar xvfz harbor-1.13.1.tgz
$ rm -rf harbor-1.13.1.tgz

$ mv harbor harbor-1.13.1
$ cd harbor-1.13.1

# helm 적용할 템플릿 yaml 작성
$ cp values.yaml my-values.yaml
harbor를 배포할 때 사용할 loadBalancer
comet's study - service #metallb
loadBalancer으로 metalLB를 채택하였습니다.
# namespace 생성
$ kubectl apply -f https://raw.githubusercontent.com/metallb/metallb/v0.9.6/manifests/namespace.yaml

$ https://raw.githubusercontent.com/metallb/metallb/v0.9.6/manifests/metallb.yaml
# configMap 생성
apiVersion: v1
kind: ConfigMap
metadata:
  namespace: metallb-system
  name: config
data:
  config: |
    address-pools:
    - name: default
      protocol: layer2
      addresses:
      - 192.168.219.70-192.168.219.80
# IPAddressPool 생성
apiVersion: metallb.io/v1beta1
kind: IPAddressPool
metadata:
name: first-pool
namespace: metallb-system
spec:
addresses:
- 192.168.219.70-192.168.219.80저는 harbor의 ip를 192.168.219.75로 잡겠습니다.
harbor storage 생성
kube 환경에서 쉽게 설치 가능한 openebs를 사용했습니다.
- Kube PVC 스토리지로 오픈소스 OpenEBS 사용 가능
- Local Disk를 사용하여 latency 등 성능이 뛰어나며 사용이 아주 간편함
$ kubectl apply -f https://openebs.github.io/charts/openebs-operator-lite.yaml

$ kubectl apply -f https://openebs.github.io/charts/openebs-lite-sc.yaml
helm chart 설정
아래 내용에 맞게 helm chart를 설정해줍니다.
expose:
  type: loadBalancer

  ...

  auto:
    commonName: "harbor.myweb.io"
  secret:
    secretName: "tls-secret"

  //

  loadBalancer:
    IP: "192.168.219.75"


externalURL: https://harbor.myweb.io

    //

    persistentVolumClaim:
      registry:

        storageClass: "openebs-hostpath"

  # 초기 비밀번호. id는 admin
  harborAdminPassword: "Harbor12345"
적용하기
우선, /etc/hosts 파일에 192.168.219.75의 도메인을 지정해줍니다.
# /etc/hosts
...
192.168.219.75 harbor.myweb.io
윈도우에도 설정해줍니다.
윈도우의 host 설정파일은 C:\Windows\System32\drivers\etc\hosts
Mac의 host 설정파일은 리눅스와 같이 /etc/hosts
TLS인증서
책의 내용에서는 harbor v1.9.1로, cert파일이 harbor와 같이 존재했습니다.
하지만, 최신 버전인 harbor v1.13.1에는 cert파일이 존재하지 않았기 때문에
직접 파일을 준비해두어야 했습니다. (Secret)
$kubectl create secret tls [secret name] -n harbor \
--cert=tls.crt \
--key=tls.key
tls.crt와 tls.key파일의 경우
#!/bin/bash

# 개인 키 생성
openssl genpkey -algorithm RSA -out tls.key

# 자체 서명된 CA 인증서 생성
openssl req -new -x509 -key tls.key -out localCA.pem -subj "/CN=localCA"

# 서버용 TLS 인증서 및 요청 생성
openssl req -new -key tls.key -out server.csr -subj "/CN=my-server"
openssl x509 -req -in server.csr -CA localCA.pem -CAkey tls.key -CAcreateserial -out tls.crt
로 openssl사용함으로 tls을 간단하게 생성해둘 수 있습니다.