지난 시간 복습
if문의 조건문 = 논리식, yes no question을 해야 함 -> 결과는 true / false 만 나와야함.
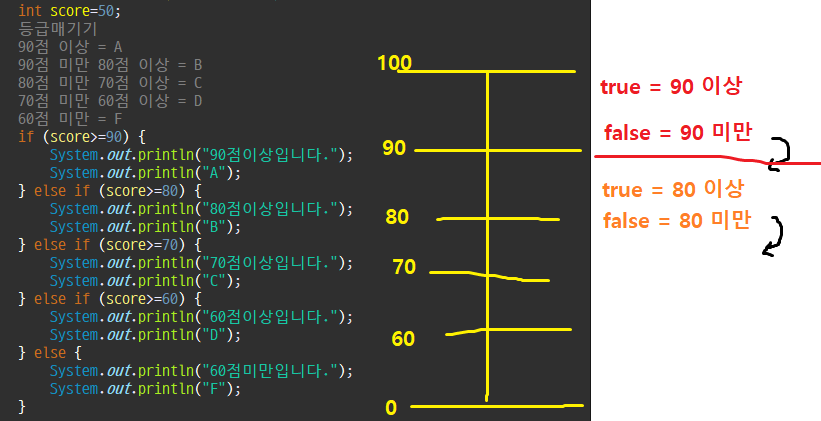
위 같은 경우 두번째 논리식에는 90미만이라는 조건을 넣을 필요가 없는데, 이미 1번 조건에서 'true = 90 이상, false = 90 미만' 임을 의미하기 때문에 2번 조건으로 넘어간다면 이미 'false = 90 미만' 이라는 조건이 base 로 깔려있음.
Switch Case
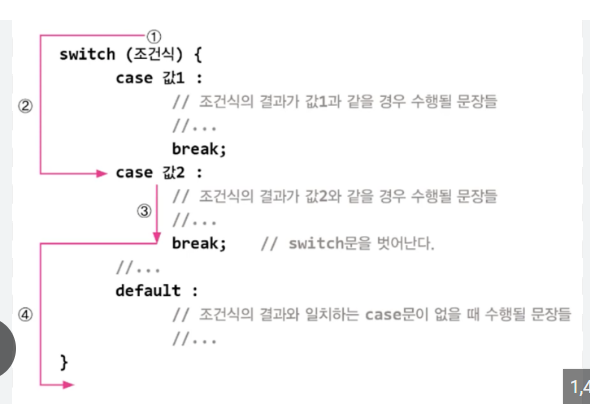
case문의 기본 구조
조건식 = key
case 'key값' = if 역할
break = 다음 case들을 무시하고 빠져나옴
default = else 의 역할
//		1~6 까지 랜덤추출 하세요
		int num=(int)((Math.random()*6)+1);
		System.out.println(num);

		switch (num) { // 경우의 수 : 1, 2, 3, 4, 5, 6
		case 1:
			System.out.println("1면");
			break;
		case 2:
			System.out.println("2면");
			break;
		case 3:
			System.out.println("3면");
			break;
		case 4:
			System.out.println("4면");
			break;
		case 5:
			System.out.println("5면");
			break;
		case 6:
			System.out.println("6면");
			break;
		default:
			System.out.println("기타면");
			break;
결과
4
4면
계절 (season)
1~12 까지 랜덤추출 하세요
12,1,2,3 : 겨울
4,5 : 봄
6,7,8,9 : 여름
10, 11 : 가을
		int season=(int)((Math.random()*12)+1);
		System.out.println(season);

		switch (season) {
		case 12:
			System.out.println("겨울");
			break;
		case 1:
			System.out.println("겨울");
			break;
		case 2:
			System.out.println("겨울");
			break;
		case 3:
			System.out.println("겨울");
			break;
		case 4:
			System.out.println("봄");
			break;
		case 5:
			System.out.println("봄");
			break;
		case 6:
			System.out.println("여름");
			break;
		case 7:
			System.out.println("여름");
			break;
		case 8:
			System.out.println("여름");
			break;
		case 9:
			System.out.println("여름");
			break;
		case 10:
			System.out.println("가을");
			break;
		case 11:
			System.out.println("가을");
			break;
		default:
			System.out.println("없음");
			break;
결과
8
여름
강사님의 코드
		int season=(int)((Math.random()*12)+1);
		System.out.println(season);

		switch (season) {
		case 12:	System.out.println("겨울");	break;
		case 1:		System.out.println("겨울");	break;
		case 2:		System.out.println("겨울");	break;
		case 3:		System.out.println("겨울");	break;

		case 4:		System.out.println("봄");	break;
		case 5:		System.out.println("봄");	break;

		case 6:		System.out.println("여름");	break;
		case 7:		System.out.println("여름");	break;
		case 8:		System.out.println("여름");	break;
		case 9:		System.out.println("여름");	break;

		case 10:	System.out.println("가을");	break;
		case 11:	System.out.println("가을");	break;

		default:
			System.out.println("너가 왜 거기서 나와!!");
			break;
결과
5
봄
break 를 활용해서 출력문 압축
		int season=(int)((Math.random()*12)+1);
		System.out.println(season);

		switch (season) {
		case 12:
		case 1:
		case 2:
		case 3:		System.out.println("겨울");	break;

		case 4:
		case 5:		System.out.println("봄");	break;

		case 6:
		case 7:
		case 8:
		case 9:		System.out.println("여름");	break;

		case 10:
		case 11:	System.out.println("가을");	break;

		default:
			System.out.println("너가 왜 거기서 나와!!");
			break;
결과
9
여름
switch 케이스를 if 문으로 변경하세요.
		int season=(int)((Math.random()*12)+1);
		System.out.println(season);

		if (season>=12) {
			System.out.println("겨울");
		} else if (season>=10) {
			System.out.println("가을");
		} else if (season>=6) {
			System.out.println("여름");
		} else	if (season>=4) {
		System.out.println("봄");
		} else	if (season>=1) {
			System.out.println("겨울");
		}
		else {
		System.out.println("너가 왜 거기서 나와!!");
		}
결과
6
여름
강사님의 코드
//		switch 케이스를 if 문으로 변경하세요.

		int season=(int)((Math.random()*12)+1);
		System.out.println(season);
		if (season==12) {
			System.out.println("겨울");
		} else if (season==1) {
			System.out.println("겨울");
		} else if (season==2) {
			System.out.println("겨울");
		} else if (season==3) {
			System.out.println("겨울");
		} else if (season==4) {
			System.out.println("봄");
		} else if (season==5) {
			System.out.println("봄");
		} else if (season==6) {
			System.out.println("여름");
		} else if (season==7) {
			System.out.println("여름");
		} else if (season==8) {
			System.out.println("여름");
		} else if (season==9) {
			System.out.println("여름");
		} else if (season==10) {
			System.out.println("가을");
		} else if (season==11) {
			System.out.println("가을");
		}
결과
5
봄
&& 또는 || 를 이용해서 if문 압축시키기
		int season=(int)((Math.random()*12)+1);
		System.out.println(season);
		if (season==12 || season==1 || season==2 || season==3) {
			System.out.println("겨울");
		} else if (season==4 || season==5) {
			System.out.println("봄");
		} else if (season==6 || season==7 || season==8 || season==9) {
			System.out.println("여름");
		} else if (season==10 || season==11) {
			System.out.println("가을");
		}
결과
6
여름
미션
월마다 말일이 다름.
각 월마다 말일을 출력하세요.
출력
ex) "1월의 말일은 31일 입니다."
1월 : 31
2월 : 28 (윤년 무시)
3월 : 31
4월 : 30
5월 : 31
6월 : 30
7월 : 31
8월 : 31
9월 : 30
10월 : 31
11월 : 30
12월 : 31
switch를 이용
		int month=(int)((Math.random()*12)+1);
		System.out.println(month);
		int num1=31;
		int num2=30;
		int num3=28;

		switch (month) {
		case 1: System.out.println(month+"월의 말일은 "+num1+"일 입니다.");
			break;
		case 2: System.out.println(month+"월의 말일은 "+num3+"일 입니다.");
			break;
		case 3: System.out.println(month+"월의 말일은 "+num1+"일 입니다.");
			break;
		case 4: System.out.println(month+"월의 말일은 "+num2+"일 입니다.");
			break;
		case 5: System.out.println(month+"월의 말일은 "+num1+"일 입니다.");
			break;
		case 6: System.out.println(month+"월의 말일은 "+num2+"일 입니다.");
			break;
		case 7: System.out.println(month+"월의 말일은 "+num1+"일 입니다.");
			break;
		case 8: System.out.println(month+"월의 말일은 "+num1+"일 입니다.");
			break;
		case 9: System.out.println(month+"월의 말일은 "+num2+"일 입니다.");
			break;
		case 10: System.out.println(month+"월의 말일은 "+num1+"일 입니다.");
			break;
		case 11: System.out.println(month+"월의 말일은 "+num2+"일 입니다.");
			break;
		case 12: System.out.println(month+"월의 말일은 "+num1+"일 입니다.");
			break;
		default:
			break;
		}
결과
3
3월의 말일은 31일 입니다.
if를 이용
		int month=(int)((Math.random()*12)+1);
		System.out.println(month);
		int num1=31;
		int num2=30;
		int num3=28;

		if (month==1 || month==3 || month==5 || month==7 || month==8 || month==10 || month==12) {
			System.out.println(month+"월의 말일은 "+num1+"일 입니다.");
		} else if (month==4 || month==6 || month==9 || month==11) {
			System.out.println(month+"월의 말일은 "+num2+"일 입니다.");
		} else if (month==2) {
			System.out.println(month+"월의 말일은 "+num3+"일 입니다.");
		}
결과
12
12월의 말일은 31일 입니다.
강사님의 코드 (switch)
		int season=(int)((Math.random()*12)+1);
		System.out.println(season);
		String lastDay="";
		switch (season) {
		case 1:
		case 3:
		case 5:
		case 7:
		case 8:
		case 10:
		case 12:  lastDay="31일";	break;

		case 4:
		case 6:
		case 9:
		case 11:  lastDay="30일";	break;

		case 2:   lastDay="28일";	break;

		default:
			System.out.println("너가 왜 거기서 나와!!");
			break;
		}
		System.out.println(season+"월의 말일은 "+lastDay+" 입니다.");
결과
10
10월의 말일은 31일 입니다.
강사님의 코드 (if)
생략하고 넘어감
import java.util.Date; // 패키지를 가져다 쓰겠다는 의미

		Date date=new Date(); // 객체 생성
		int currHour=date.getHours();
        //가운데 가로줄 : deprecated (되도록 사용하지 마라는 뜻)
		System.out.println(currHour);

		if(currHour<=12) {
			System.out.println("Good Morning");
		} else {
			System.out.println("Good Evening");
		}
객체와 패키지 둘다 아직 안배움.
아직은 그냥 따라하는중.
date 객체가 deprecated 된 이유 : calendar 라는 객체가 나와서 그렇다
		Calendar calendar=Calendar.getInstance();
		int hour=calendar.get(Calendar.HOUR_OF_DAY);
		int month=calendar.get(Calendar.MONTH)+1;

		System.out.println(hour);
		System.out.println(month);

		if(hour<=12) {
			System.out.println("Good Morning");
		} else {
			System.out.println("Good Evening");
		}
calendar 사용 예시
Hour_OF_DAY : 24 시간제, Hour : 12 시간제
MONTH : 0부터 시작함, 0 이 1월, 11이 12월
com.tech.gt002 package 생성
ForExample class 생성
반복문
반복문 = loop문
		for (int i = 0; i < 10; i++) {
			System.out.println("hello:"+i);
		}

		for (int j=0;j<10;j++) {
			System.out.println("hello:"+j);
		}
결과
hello:0
hello:1
hello:2
hello:3
hello:4
hello:5
hello:6
hello:7
hello:8
hello:9
hello:0
hello:1
hello:2
hello:3
hello:4
hello:5
hello:6
hello:7
hello:8
hello:9
for 문

실행 순서는 1-2-3-4-2-3-4-2-3-4... (2의 조건이 끝나면) 탈출
반복 합계 구하기
		int sum=0; // sum 이라는 변수에 합계를 누적
		for(int i=1;i<10;i++) {
			sum=sum+i; // 반복 누적
			System.out.println("합계: "+sum);
		}
결과
합계: 1
합계: 3
합계: 6
합계: 10
합계: 15
합계: 21
합계: 28
합계: 36
합계: 45
미션
1부터 50까지의 숫자 중 짝수의 합과 홀수의 합을 구해서 출력하세요.
		int sumOddNum=0;
		int sumEvenNum=0;

		for(int i=1;i<=50;i++) {
			if (i%2==1) {
				sumOddNum=sumOddNum+i; // 반복 누적
			} else {
				sumEvenNum=sumEvenNum+i;
			}
		}
		System.out.println("홀수 의 합 : "+sumOddNum);
		System.out.println("짝수 의 합 : "+sumEvenNum);
결과
홀수의 합 : 625
짝수의 합 : 650
강사님의 코드
		int sum1=0;
		int sum2=0;
		for (int i=0;i<=50;i++) {
			if (i%2==1) { // 홀수
				sum1=sum1+i;
			} else { // 짝수
				sum2=sum2+i;
			}
		}
		System.out.println("홀수 : "+sum1);
		System.out.println("짝수 : "+sum2);
결과
홀수 : 625
짝수 : 650
int sum=0;
for(int i=1;i<=10;i=i+2) {
sum=sum+i;
System.out.println(i);
}
System.out.println("sum:"+sum);
System.out.println("=========");
for(int j=0;j<=10;j=j+2) {
sum=sum+j;
System.out.println(j);
}
System.out.println("sum:"+sum);결과
1
3
5
7
9
sum:25
=========
0
2
4
6
8
10
sum:55
홀수만 고르기 + 합계 / 짝수만 고르기 + 합계
실수 적용
		for(float x=0.1f;x<=1.0;x=x+0.1f) {
			System.out.println(x);
		}
결과
0.1
0.2
0.3
0.4
0.5
0.6
0.70000005
0.8000001
0.9000001
오차가 발생함.
		for(float x=0.1f;x<=1.0;x=x+0.1f) {
			System.out.printf("%.2f\n",x);
		}
결과
0.10
0.20
0.30
0.40
0.50
0.60
0.70
0.80
0.90
printf(c언어에서의 출력 명령어) 를 이용해 표현범위를 지정해줄 수 있음.
printf("표현형식",표현할변수);
%.2f : 소수점 2째자리까지 표현
\n : 줄바꿈
		for(float x=0.1f;x<=1.0;x=x+0.1f) {
			System.out.printf("%7.2f\n",x);
		}
결과
   0.10
   0.20
   0.30
   0.40
   0.50
   0.60
   0.70
   0.80
   0.90
총 표현 할 자리수를 지정할 수 있음.
위의 경우 '공백' '공백' '공백' '공백' '0' '.' '9' '0' 으로 총 7자리로 표현됨.
%숫자1.숫자2f : 총 자리수 = '숫자1', 소수점 '숫자2' 째 자리까지 표현
		int num=100;
		String str="구디역";
		char ch='굳';
		System.out.printf("num : %d \n",num);
		System.out.printf("str : %s \n",str);
		System.out.printf("ch : %c \n",ch);
		System.out.printf("구트는 %s에 있는 %d%% %c \n", str, num, ch);
결과
num : 100
str : 구디역
ch : 굳
구트는 구디역에 있는 100% 굳
대입되는 형식에 따라 포맷의 표시형식이 달라짐.
int = %d
string = %s
char = %c
printf 문으로 좀 더 정교하고 다양한 방식으로 출력할 수 있음
