패스트캠퍼스 메가바이트스쿨 Day 27 (6주차 화요일) -React 공식문서 뽀개기Component, Props,State,LifeCycle)
패스트캠퍼스 메가바이트스쿨 프론트엔드
목록 보기
25/41

1. component,props
1-1). 함수 컴포넌트와 클래스 컴포넌트의 이해
function App() {
  function Welcome(props) {
    console.log(props)
    return <h1>Hello, {props.name}, {props.hi}, {props.keys},{props.constructor.keys.length}</h1>;
  }

  return (
    <div>
      <Welcome name="sara" hi="hi" keys="2"/>
    </div>
  )
}

ReactDOM.render(
  <App/>,
  document.getElementById('root')
);
1-2) props와 함수 컴포넌트
🚀 공식문서 내 props 설명

🚀 props는 함수 인자값? 객체? 도대체 뭐야..
- props라는 하나의 데이터를 가진 객체인자를 받는다는 말은 함수의 인자값 처럼 받는데, 그 인자값 안에 여러 데이터들이 포함되어있는 것을 말함
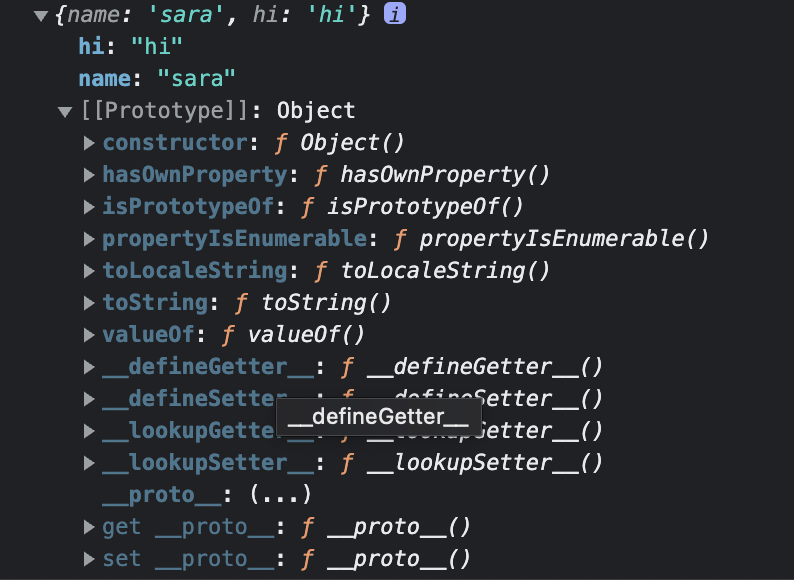
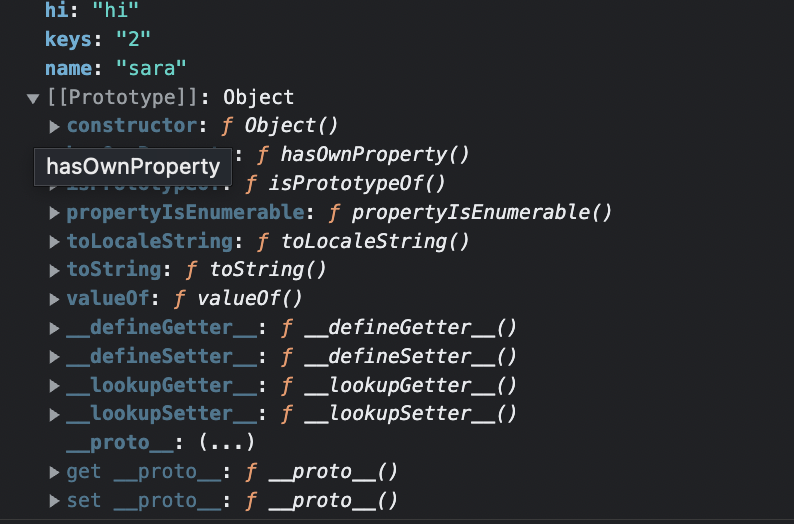
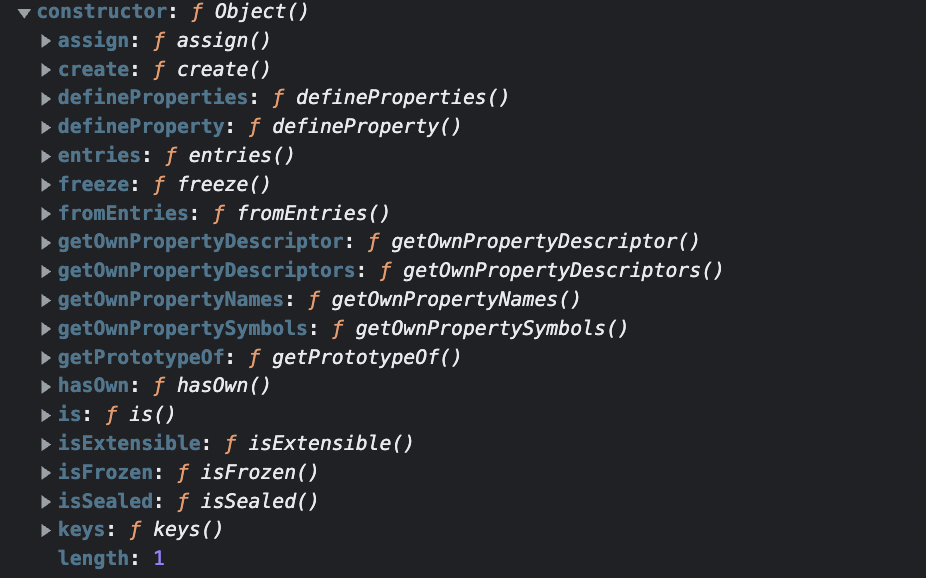
- 실제로 props를 콘솔에서 확인했을 때 여러 프로토타입 객체안에 여러 데이터를 반환하고 있다.
- 생긴 것은 함수와 비슷하지만 사실상 객체라고 봐도 무방하다.(자바스크립트 프로토타입 함수,클래스가 섞인 묘한 느낌)
🚀 props에는 아무 데이터나 전달이 가능할까?
const comment = {
  date: new Date(),
  text: 'I hope you enjoy learning React!',
  author: {
    name: 'Hello Kitty',
    avatarUrl: 'http://placekitten.com/g/64/64'
  }
};
function Comment(props) {
  return (
    <div className="Comment">
      <UserInfo user={props.author}/>
- 가능하다 실제로 위의 코드 처럼 hi데이터에 hi를 할당해서 선언을 했는데 잘 출력된다.
- 추가로 위 처럼 author로 할 당된 데이터를 child에서는 user로 props.author를 전달하고 그 차일드에서는 user로 props를 받아도 똑같이 author 데이터의 출력이 가능하다
- 클래스 혹은 객체에서 아무 데이터나 입력 받을 수 있는 것과 유사하다.

🚀 props에 있는 인자가 prototype에 접근이 될까?
- 확인해본 결과 props에 있는 name은 prototype에 접근이 되지만, hi,keys 같은 것들은 전달이 되지 않았다.
- 그런데 keys 값을 변화를 줘도 constructor안에 있는 keys에는 접근이 안되었다.
- 접근하는 다른 방법이 있을 것 같은데 거기까지는 모르겠다
1-3) 클래스 컴포넌트
class Welcome extends React.Component {
  render() {
    return <h1>Hello, {this.props.name}</h1>;
  }
}

ReactDOM.render(
  <Welcome />,
  document.getElementById('root')
);
🚀 javascript class 함수 예시
class Fruit {
    //constructor를 생성자라고 함. (new 키워드로 객체를 생성할 때 호출되는 함수)
    constructor(name,emoji) {
        this.name = name;
        this.emoji = emoji;
    }
    display = () => {
        console.log(`${this.name}: ${this.emoji}`)
    };
}
// apple은 fruit 클래스의 인스턴스이다.
const apple = new Fruit('apple','🍎')
// orange는 fruit 클래스의 인스턴스이다.
const orange = new Fruit('orange','🍊')
class Dog extends Animal { constructor (color, ownerName) { super(color); // super를 이용하면 부모 생성자함수를 호출할 수 있음 this.ownerName = ownerName; } play() { console.log('놀자아!'); } eat() { super.eat();// super를 이용하면 부모 생성자함수를 호출할 수 있음 console.log('강아지가 먹는다!'); } }
🚀 클래스 컴포넌트 이해하기
- 자바스크립트 내에서 클래스를 선언할 때 아래코드 처럼 constructor로 인자값을 받고, 새로운 함수들을 선언 해줄 수 있었음
- 그리고 extends를 통해서 자식 클래스를 만들어서 super로 부모 클래스의 요소를 끌어와서 쓰는 것도 가능했음.
- 따라서 클래스컴포넌트는 React.Component라는 부모클래스의 자식클래스로 내가 설정하고 싶은 것을 생성하고, 거기에 render라는 내장되어있는 객체를 받아서 return을 해주면 그 값을 나타낼 수 있다고 볼 수 있다.
1-4) 컴포넌트 추출 및 합성
function Comment(props) {
  return (
    <div className="Comment">
      <div className="UserInfo">
        <img className="Avatar"
          src={props.author.avatarUrl}
          alt={props.author.name}
        />
        <div className="UserInfo-name">
          {props.author.name}
        </div>
      </div>
      <div className="Comment-text">
        {props.text}
      </div>
      <div className="Comment-date">
        {formatDate(props.date)}
      </div>
    </div>
  );
}
function Comment(props) {
return (
<div className="Comment">
<div className="UserInfo">
<Avatar user={props.author} />
<div className="UserInfo-name">
{props.author.name}
</div>
</div>
<div className="Comment-text">
{props.text}
</div>
<div className="Comment-date">
{formatDate(props.date)}
</div>
</div>
);
}- 이런식으로 추출이 가능하다. 위의 코드에서는 Avatar라는 것을 추출해서 user로 props를 받는 자식요소를 프로퍼티로 형성했다.
예제다루기
목표
- 컴포넌트를 자유자재로 사용할 수 있음
- 내가 원할 때 props를 이용해서 어떤 데이터든 끌어올 수 있음.
단계
1. props에 들어갈 데이터를 객체형태로 먼저 전달
2. 부모컴포넌트를 props를 통해 전달
3. 자식컴포넌트의 props를 다른 인자값으로 변환해서 전달

function Comment(props) {
  return (
    <div className="Comment">
      <div className="UserInfo">
        <img className="Avatar"
          src={props.author.avatarUrl}
          alt={props.author.name}
        />
        <div className="UserInfo-name">
          {props.author.name}
        </div>
      </div>
      <div className="Comment-text">
        {props.text}
      </div>
      <div className="Comment-date">
        {formatDate(props.date)}
      </div>
    </div>
  );
}
🚀 합성 및 추출 결과
export default function Extraction() {
  return (
    <Comment
    date={comment.date}
    text={comment.text}
    author={comment.author} />
  )
}
구조 만들기
3개로 끊기
- 위의 3개의 구조를 date,text,author로 각각 끊을 수 있다. userinfo, text, date로 3개를 나눈다.
최종 컴포넌트 먼저 만들기
function Comment(props) {
  return (
    <div className="Comment">
      <UserInfo user={props.author}/>
      <div className="Comment-text">
        {props.text}
      </div>
      <div className="Comment-date">
        {formatDate(props.date)}
      </div>
    </div>
  );
}
Userinfo 만들기
function UserInfo(props) {
  return (
    <div className="UserInfo">
      <Avatar user={props.user} />
      <div className="UserInfo-name">
        {props.user.name}
      </div>
    </div>
  );
}
function Avatar(props) {
  return (
    <img className="Avatar"
    src={props.user.avatarUrl}
    alt={props.user.name} />
  );
}
formatDate 만들기
function formatDate(date) {
  return date.toLocaleDateString();
}
props로 전달해줄 값 만들기
const comment = {
  date: new Date(),
  text: 'I hope you enjoy learning React!',
  author: {
    name: 'Hello Kitty',
    avatarUrl: 'http://placekitten.com/g/64/64'
  }
};
2. State,LifeCycle
🚀 state의 기본 형태
  this.setState((state) => {
    // 중요: 값을 업데이트할 때 `this.state` 대신 `state` 값을 읽어옵니다.
    return {count: state.count + 1}
  });
}
- state를 인자로 받는 setState함수를 선언하고 state의 변경되는 값을 계속 추적하게 만들 수 있다.
- 위처럼 1을 증가시키고, 그 값을 계속 불러오고 싶을 때 사용할 수 있는 state 함수이다.
🚀 클릭 횟수 보여주는 버튼 만들기
class Button extends React.Component {
  constructor(props) {
    super(props);
    this.state = {
      count: 0,
    };
  }
  updateCount() {
    this.setState((prevState, props) => {
      return { count: prevState.count + 1 }
    });
  }
  render() {
    return (<button
              onClick={() => this.updateCount()}

              Clicked {this.state.count} times
            </button>);
  }
}
- 위처럼 실제로 사용할 때는 constrctor를 먼저 만들어서 props를 받고, state를 정의해줄 수 있다.
- updateCount로 prevState로 초기 값 설정과 props를 받을 수 있는 setState함수를 생성할 수 있다
🚀 useState Hook
const [state, setState] = useState(0)
- hook을 사용하면 훨씬 쉽게 state를 활용할 수 있다.
🚀 LifeCycle
- component가 생성되고, 사라지는 순간까지를 lifecycle이라고 한다.
= state, hook은 기본적으로 위에서 밑으로 실행이 되지만, 각각의 특성상 lifecycle이 다를 수 있다.- state와 hook의 실행 순서를 잘 인지해야 내가 원할 때 원하는 값을 처리해줄 수 있다.
🚀 Class state LifeCycle
export default class ClassComponent extends Component {
  constructor(props){
    super(props);
    console.log('constructor');
    this.state = {date: new Date()};
    // this.handleClick=this.handleClick.bind(this)
  }
  componentDidMount() {
    console.log('componentDidMount');
    this.timerID = setInterval(()=> this.tick(),10000)
  }
  componentDidUpdate() {
    console.log('componentDidUpdate');
  }
  componentWillUnmount() {
    console.log('componentWillUnmount');
    clearInterval(this.timerID);
  }
  tick() {
    this.setState({date: new Date()});
  }
  handleClick = () => {
    alert(this.state.date)
  }
  render() {
    console.log('render');
    return (
      <div>
        <h1 onClick={this.handleClick}>Hello, World!</h1>
        <h2>{this.state.date.toLocaleTimeString()}</h2>
      </div>
    )
  }
}
위와 같이 시계를 만들고, 시계가 10초마다 업데이트되면서 시간을 알려주는 state를 만들었다.
- 실행 순서는 맨처음으로 constructor와 render가 실행되면서 컴포넌트를 불러온다
- 그 뒤에 componentDidMount() -> componentWillUnmount()를 실행하면 먼저 실행하고 업데이트가 실행될 때만, compononetDidUpdate()가 실행된다.
- componentDidMount : Dom 노드 초기화 및 데이터 fetch
- componentWillUnmount : 타이머 제거 및 요청 취소 및 구독 해제
- componentUpdate : 업데이트 되었을 때 실행

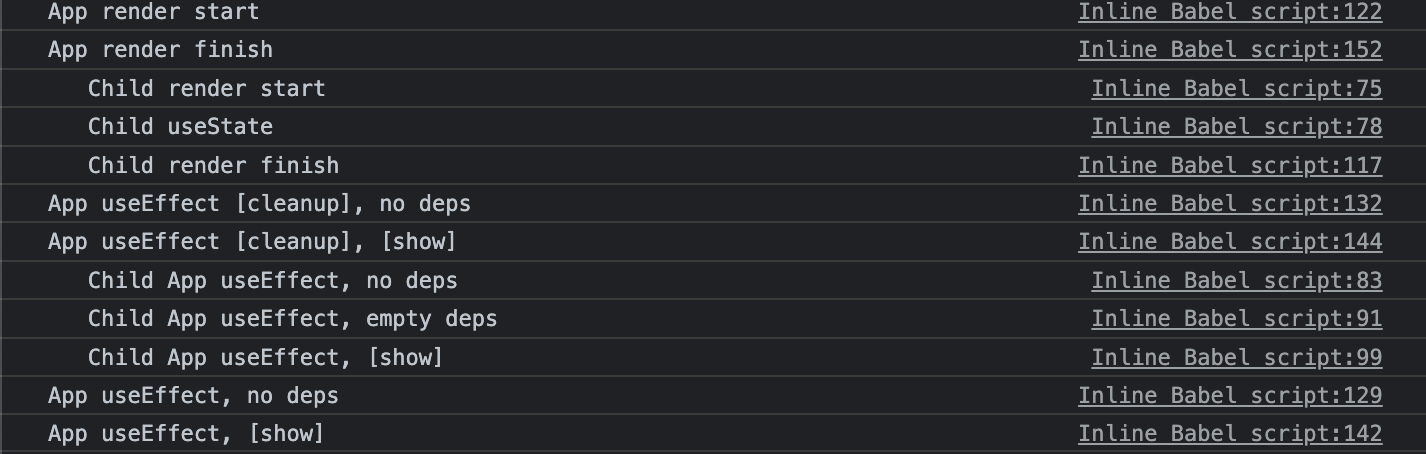
🚀 HookFlow
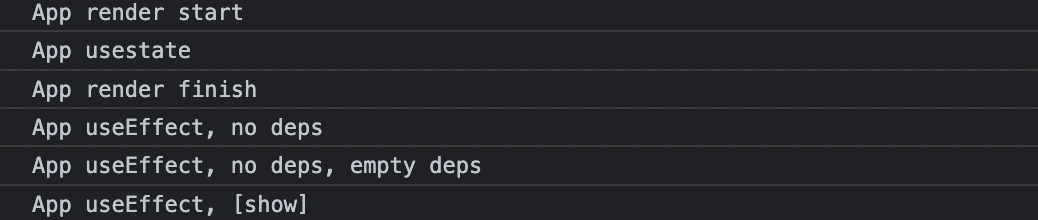
- render가 시작 되면, useEffcet가 실행됨.
- render가 시작되고, 변경이 일어나면 render를 다시 실행하는데, 차일드가 시작이 되고, 앱이 한 번이라도 렌더가 되었다면 우선적으로 실행하는 cleanup을 실행하고, 그 뒤에 다시 차일드의 useEffect가 실행이되고, 그 후의 app의 useEffect가 실행됨.
- 즉, useEffect는 자식요소 함수가 먼저 실행이 되고, 그 전에 cleanup을 먼저 한 뒤에 차일드의 useeffect가 실행이되는 것을 보아서 useeffect보다 cleanup은 먼저 실행됨.
- 만약 아래 처럼 차일드에 클린업이 있을 경우에는 차일드 useEffect보다 먼저 실행된다.
- 만약 클린업이 동시에 실행되면 클린업의 우선순위는 App 즉, 부모요소가 된다.


프로그래밍으로 지속가능한 세상을 꿈꾸며