
Today Topic : Javascript for Web
🗝 Keywords
✅ coordinates
✅ scroll
✅ Dom
1. 좌표(coordinate)
특정 요소의 좌표값 알아내기
<body>
  <div></div>
  <div></div>
  <div></div>
  <div></div>
  <div></div>
  <div></div>
  <div class="special"></div>
  <div></div>
  <div></div>
  <div></div>
  <script>
    const special = document.querySelector('.special');
    special.addEventListener('click', event => {
      const rect = special.getBoundingClientRect();
      console.log(rect);
      console.log(`client :${event.clientX}, ${event.clientY}`);
      console.log(`page: ${event.pageX}, ${event.pageY}`);
    });
  <script/>
 <body/>
getBoundingClientRect
- 특정 요소의 위치(좌표)값을 구하기 위해서 요소를 쿼리셀렉터로 선택 후에 getBoundingClientRect를 이벤트로 만들면 된다.
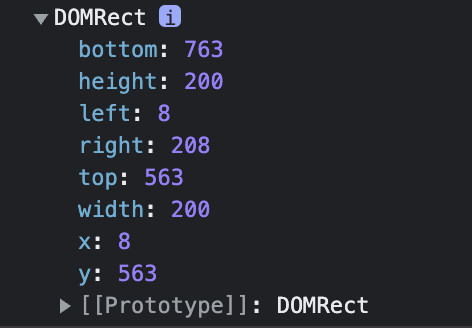
x좌표와 y좌표 값 알아내기
- client는 현재 페이지 내에서의 왼쪽부터 떨어진 위치(x)와 위에서부터 떨어진 위치(y)좌표 값을 알아냄
- page는 page 전체에서의 떨어진 x,y값을 알아냄. 스크롤 밑에 있는 페이지의 요소의 값을 구하고 싶을 때 사용함
2. scroll
<body>
  <aside>
    <button class="scroll-by">scroll by 100px(y)</button>
    <button class="scroll-to">scroll to 100px(y)</button>
    <button class="scroll-into">scroll into special</button>
  </aside>

 <script>
    const scrollBy = document.querySelector('.scroll-by');
    const scrollTo = document.querySelector('.scroll-to');
    const scrollInto = document.querySelector('.scroll-into');

    scrollBy.addEventListener('click',()=>{
      window.scrollBy({top:100, left:0, behavior:'smooth'});
    })

    scrollTo.addEventListener('click',()=>{
      window.scrollTo(0,100);
    })

    scrollInto.addEventListener('click', ()=>{
      special.scrollIntoView();
    })
  </script>

</body>
scroll
-window.scrollBy : 전체페이지의 스크롤을 100만큼 내리고 싶을 때 설정(top,left,behivor)속성 설정 가능
-window.scrollTo : 전체페이지 내의 지정 위치로 이동하고 싶을 때 설정
-요소.scrollIntoView : 특정 요소로 바로 이동하고 싶을 때 설정

3. Dom
const h2 = document.createElement('h2');
h2.setAttribute('class','title);
//<h2 class="title></h2>
h2.textContent = 'this is a tilte';
//<h2 class="title>this is a title</h2>
section.appenChild(h2) // h2를 섹션의 자식요소로 넣고 싶을 때 사용
section.insertBefore(h2,h3) // h2를 h3전에 넣고 싶을 때 사용
section.removeChild(h2) // h2 없애기
section.innerHTML = `<h2 class="title>this is a title</h2>`
요소를 선택/생성/삭제하는 Dom
- querySelector : getElementBy는 class,id 등에 따라 다르게 호출해야하지만querySelector는 상관없이 모두 선택할 수 있기 때문에 많이 사용함.
- createElement,innerHTML : 요소를 만들 때 사용가능함. innerHTML은 안에 직접 백틱을 활용해서 html 태그를 넣어서 직접 쓸 수 있음.
다만, 특정 요소만 수정이 되는데 innerHTMl로 계속 수정을 하면 불필요한 작업이 계속 진행이 되기 때문에 creatElement로 생성하는 것이 좋음.- setAttribute : 속성값 전달가능
- textContent : 내용을 추가해줄 때 사용함
- append or appendChild : 부모요소에 자식요소로 넣기
- insertBefore : 특정 위치에 자식요소로 넣기
- removeChild : 요소를 없애기

프로그래밍으로 지속가능한 세상을 꿈꾸며