
Today Topic : React element
🗝 Keywords
✅ react element 생성방법
✅ babel 적용해보기 및 jsx 사용해보기
✅ react에 spread operator
✅ 멀티 element 생성
✅ 함수로 element 생성하기
✅ jsx와 js 섞어쓰기
1. static html과 react element 생성방법 비교
<script crossorigin src="https://unpkg.com/react@17/umd/react.development.js"></script>
<script crossorigin src="https://unpkg.com/react-dom@17/umd/react-dom.development.js"></script>
<div id="root"></div>
<script>
// static html version
//const rootElement = document.getElementById("root")
// const element = document.createElement("h1")
// element.textContent = "hello, world!"
// rootElement.appendChild(element)
const rootElement = document.getElementById("root")
const element = React.createElement("h1", null , "hello, world")
// const element = React.createElement("h1", {children:"hello, world"})
console.log(element);
ReactDOM.render(element, rootElement);
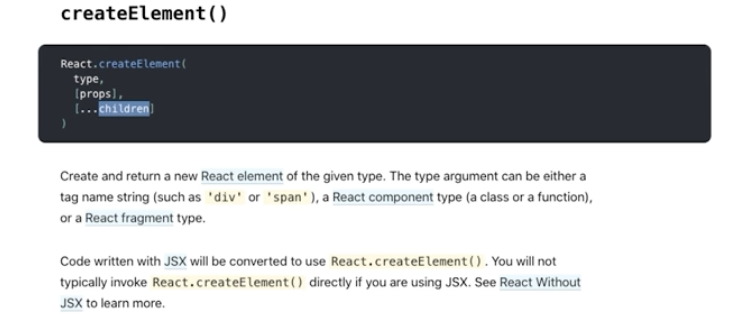
</script>🚀 element 만들기
React.createElement("h1", null , "hello, world")
React.createElement("h1", {children:"hello, world"})
- element 즉 요소를 만들 때 document -> React로 바꿔주면 돼. 그리고 텍스트 컨텐트를 따로 할 필요가 없음
- element, {children: text}하면 한 번에 작성이 가능함
- 두번째 인자에 children으로 안주고, 세번째 인자 값에 텍스트컨텐트를 작성할 수도 있음.
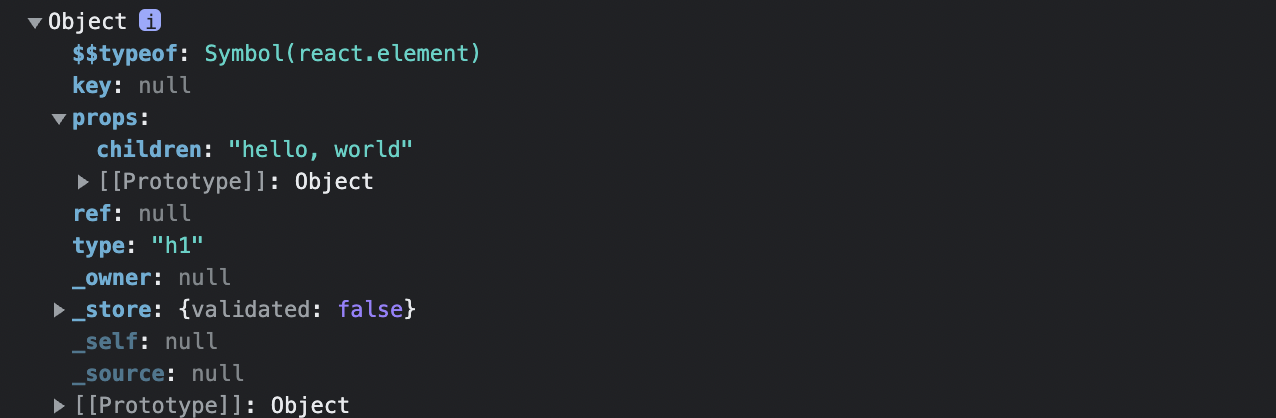
🚀 element 객체 구성요소 살펴보기 (children!!)
- 이 때 element를 console.log를 하게 되면 여러 객체가 나오게 됨.
- 이 중에서 props에 children안에 문자열이 저장되게 됨.
🚀 ReactDOM.render(appendChild와 같은 기능을 수행)
- appendChild와 같은 역할을 하는 것이 ReactDOM.render(작은요소,큰요소)로 해서 포함시킬 수 있음 (DOM 꼭 대문자로 작성할 것!!)

🚀 element className추가, children에 배열로 여러 텍스트 넣기
const rootElement = document.getElementById("root")
const element = React.createElement("h1", {
  className : "title",
  children: ["hello, world", "hihihihi"]
})
console.log(element);
ReactDOM.render(element, rootElement);
- 두 번째 children 인자값에 classname을 추가할 수도 있고, 여러 문자열을 넣을 수도 있다.
2. babel 적용해보기 및 jsx 사용해보기
🚀 babel 사용하기
<script src="https://unpkg.com/@babel/standalone/babel.min.js"></script>
<script type="text/babel">
- babel이라는 javascript compiler라는 일종의 번역기를 통해서 jsx 문법을 해석할 수 있음
- cdn 링크를 통해서 언팩으로 사용할 수 있음.
🚀 jsx란?
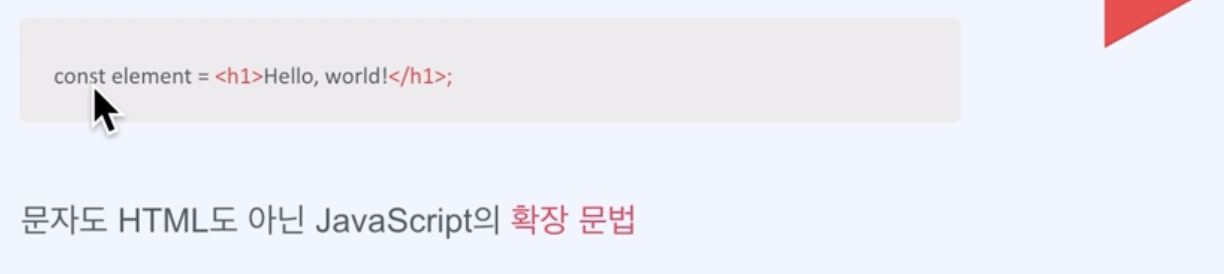
const element = <h1 className="title">Hello,world</h1>

const text = 'Hello,world'
const titleClassName = 'title'
const element = <h1 className={titleClassName}>{text}</h1>

const custom1 = <h1 className={titleClassName}>{text}</h1>
const element = custom1- jsx란 javascript와 html을 섞어서 만들어낸 문법이다.
- react createelement 방식으로 element를 만들어내지 않아도 element를 만들 수 있음.
- jsx는 변수 자체를 주입할 수도 있음. 따라서 굉장히 간소화해서 사용을 할 수 있기 때문에 유용함.
3. spread operator(...)
🚀 spread operator
- 배열 또는 객체에 대해 iterable Object(열거 가능한 오브젝트)을 "개별" 요소로 분리한다.
- 배열(Array) spread
let a = [1, 2];
let b = [3, 4];
let spread = [...a, ...b, 5];
console.log(spread); // [1, 2, 3, 4, 5]
- 객체(Object) Spread
let a = [{name:1}, {name:2}];
let b = [{name:3}, ...a];
console.log(b); // [ {name: 1}, {name: 2}, {name: 3} ]
🚀 react에 적용
const rootElement = document.getElementById("root")
const text = 'Hello,world'
const titleClassName = 'title'
const custom1 = <h1 className={titleClassName} children={text}></h1>
const custom1 = <h1 className={titleClassName} children={text}/>
- children으로 h1에 넣어주기
- 이 때, h1에 텍스트가 없으면 그냥 닫는 표시로도 표현이 가능함
🚀 element를 변수화해서 스프레드 연산자로 불러오기
const rootElement = document.getElementById("root")
const text = 'Hello,world'
const titleClassName = 'title'
const props = {className: titleClassName, children:text}
const custom1 = <h1 {...props}/>
const custom1 = (
  <h1 className={props.className} children={props.children}/>
  )
const element = custom1
ReactDOM.render(element, rootElement)
- 위와 같이 props 변수에 클래스네임과 칠드런 객체를 만들고 스프레드 연산자를 통해서도 적용이 가능하다.
- 스프레드 연산자를 안쓴다면 밑에 처럼 props.을 이용해서 하나씩 value값을 불러오는 것도 가능함.
4. 멀티 element 생성
🚀 children에 배열로 여러가지 element 만들기
const rootElement=document.getElementById('root');
const element = (
  <div
    className = "box"
    children = {[
        React.createElement("h1",null,"hi"),
        React.createElement("h1",null,"hi"),
        React.createElement("h1",null,"hi")
      ]}
    />
);
ReactDOM.render(element, rootElement);
const rootElement=document.getElementById('root'); const element = ( <div className = "box" children = {[ <h1>hi</h1>, <h3>hello</h3>,, <h5>bye</h5>, ]} /> ); ReactDOM.render(element, rootElement);
- react.createElement를 했을 때 children 안에는 몇 가지 element가 다 들어갈 수 있음
- children 내부 표현식은 아래와 같이 변경이 가능하다.
🚀 React.Fragment 활용해서 상속시키지 않고 각각의 요소로 만들기
  const rootElement=document.getElementById('root');
  const element = (
    <React.Fragment>
      <h1>hi</h1>
      <h3>hello</h3>
      <h5>bye</h5>
   	</React.Fragment>
  );
  ReactDOM.render(element, rootElement);
- React.Fragment를 활용하면 부모요소를 만들지 않고 개별 요소를 생성할 수 있음.
- <> </> 이렇게 그냥 빈태그로도 만들 수 있음.
🚀 tips
- 변수로 선언된 것을 jsx로 값을 부를 때는 무조건 {} 대괄호 표현식을 사용해야함
- React.creatElement는 chidren에 : 세미콜론을 붙이고(왜냐? 함수에 인자로 , jsx에서는 = 기호를 붙여야함
5. 함수로 element 생성하기
🚀 기초적인 구조
const rootElement = document.getElementById("root")
function paint(){
  return [<h1>hi</h1>,<h3>hi</h3>]
}
ReactDOM.render(paint(), rootElement);
>화살표함수 활용 및 변수 할당
```javascript
const rootElement = document.getElementById("root")
const paint = () => (
  <>
  <h1>hi</h1>
  <h3>hi</h3>
  </>
)

const element =
      <>
      {paint()}
      {paint()}
      {paint()}
</>
ReactDOM.render(element, rootElement);
🚀 인자받기
const rootElement = document.getElementById("root")
const paint = (feeling,emoji) => (
  <>
  <h1>{feeling}</h1>
  <h3>{emoji}</h3>
  </>
)
const element =
<>
{paint('good','😆')}
{paint('bad','😆')}
{paint('soso','😆')}
</>
ReactDOM.render(element, rootElement);
> 🚀 Custom Element(대문자 표현식)으로 엘리멘트 생성
```javascript
const rootElement = document.getElementById("root");
const Paint = ({ feeling,emoji,children }) => (
  <>
  <h1>{feeling}</h1>
  <h3>{emoji}</h3>
  {children}
  </>
);

const element = (
  <>
  <Paint feeling="Good" emoji="😆">
  <span>hihihi</span>
  </Paint>
  <Paint feeling="Good" emoji="😆"/>
  <Paint feeling="Good" emoji="😆"/>
  <Paint feeling="Good" emoji="😆"/>
  <Paint feeling="Good" emoji="😆"/>
  </>
);

console.log(element)
ReactDOM.render(element, rootElement);
6. jsx와 js 섞어쓰기
const rootElement = document.getElementById("root")

const NumsWorking = ({ num }) =>
num % 2 === 0 ? <h3>{num}</h3> : <h1>{num}</h1>

      const nums = [1,2,3,4,5,6,7,8,9,10]
const element = (
  <>
  {nums.map((number) => (
  <NumsWorking num = {number}/>
))}
  </>
);

ReactDOM.render(element, rootElement)
프로그래밍으로 지속가능한 세상을 꿈꾸며