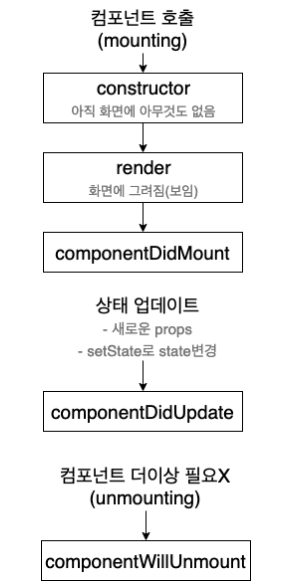
* component 의 lifecycle

render, componentDidMount, componentDidUpdate, componentWillUnmount 등의 함수는 React.Component class에서 제공하는 메서드 입니다.
컴포넌트를 만들 때 class로 생성하면 위의 메서드를 사용할 수 있고, 컴포넌트가 lifecycle에 따라 각자의 메서드가 호출됩니다.
간단한 예제를 통해 컴포넌트를 만들고, lifecycle에 따라 state를 관리할 수 있도록 코드를 수정해보겠습니다.
아래의 코드는 1초에 한 번 tick함수를 호출해서 현재시간을 초 단위로 업데이트합니다.
function tick() {
  const element = (
    <div>
      <h1>Hello, world!</h1>
      <h2>It is {new Date().toLocaleTimeString()}.</h2>
    </div>
  );
  ReactDOM.render(
    element,
    document.getElementById('root')
  );
}

setInterval(tick, 1000);
- 컴포넌트 만들기
원래 코드에서 tick은 일반적인 함수이며, 내부에서 ReactDom.render를 호출해서 React 요소를 그려줍니다.
화면으로 보여줄 부분을 함수를 사용해서 컴포넌트로 만들어보겠습니다.
function Clock(props) {
  return (
    <div>
      <h1>Hello, world!</h1>
      <h2>It is {props.date.toLocaleTimeString()}.</h2>
    </div>
  );
}

function tick() {
  ReactDOM.render(
    <Clock date={new Date()} />,
    document.getElementById('root')
  );
}

setInterval(tick, 1000);
최종적으로 이런형태가 되도록 만들어 보겠습니다.
(아래)
ReactDOM.render(
  <Clock />,
  document.getElementById('root')
);
매초 업데이트 될 내용이 Clock 함수 내에서 이루어져야 하므로 class로 component를 만들어 봅시다.
class Clock extends React.Component {
  render() {
    return (
      <div>
        <h1>Hello, world!</h1>
        <h2>It is {this.props.date.toLocaleTimeString()}.</h2>
      </div>
    );
  }
}- render() 함수는 꼭 필요하고! 화면에 그려줄 부분을 return합니다.
- Clock 함수에 있던 return을 그대로 render()의 return으로 가져옵시다.
props.date를this.props.date로 바꿔줍니다.
render 메서드는 ‘초’가 바뀔 때마다, 즉 1초마다 호출되어 내용을 변경해줘야 합니다.
그런데 Clock 컴포넌트(즉, Clock 인스턴스)는 mounting 동안은 본인 컴포넌트 내에서 값이 업데이트 되어야 하므로, state로 변경 값을 관리해야하고, lifecycle 메서드가 필요합니다.
- state 추가
Clock 컴포넌트에서 바뀌어야 하는 상태는 현재 시간입니다.
매 초마다 현재 시간을 새로 가져와야 하죠. props로 받던 date 정보를 state로 바꿔서 관리하겠습니다.
class Clock extends React.Component {
  render() {
    return (
      <div>
        <h1>Hello, world!</h1>
        <h2>It is {this.state.date.toLocaleTimeString()}.</h2>
      </div>
    );
  }
}
this.state로 바꾸어줬으니 초기 세팅이 필요합니다. constructor에서 합니다.
class Clock extends React.Component {
  constructor() {
    super();

    this.state = {
      date: new Date()
    };
  }

  render() {
    return (
      <div>
        <h1>Hello, world!</h1>
        <h2>It is {this.state.date.toLocaleTimeString()}.</h2>
      </div>
    );
  }
}

ReactDOM.render(
  <Clock />,
  document.getElementById('root')
);
원래 tick 함수 외부에 있던 setInterval를 Clock 컴포넌트 내부로 들여와서, 매 초마다 새로운 시간을 가져오도록 수정해야합니다.
- lifecycle 메서드 추가하기
앞으로 프로그래밍을 할 때, 사용하던 리소스가 더 이상 필요없다면 없애주는 과정이 항상 필요합니다.
그래서 Clock 컴포넌트가 mounting 될 때 timer를 추가하고, 더 이상 화면에서 나올 필요 없는 unmounting이 되는 순간 timer를 삭제해주겠습니다.
class Clock extends React.Component {
  constructor() {
    super();

    this.state = {date: new Date()};
  }

  componentDidMount() {

  }

  componentWillUnmount() {

  }

  render() {
    return (
      <div>
        <h1>Hello, world!</h1>
        <h2>It is {this.state.date.toLocaleTimeString()}.</h2>
      </div>
    );
  }
}
Clock 컴포넌트가 화면에 그려지자마자 componentDidMount 메서드가 호출되면 timer를 시작하는 것입니다.
componentDidMount() {
    this.timerID = setInterval(
      () => this.tick(),
      1000
    );
  }
1초마다 tick 함수를 호출하게 됩니다.
tick 함수는 아마 새로운 날짜를 가져와서 this.state.date 에 업데이트해주는 함수일 것입니다.
생성한 timer는 this.timerId에 저장합니다.
setInterval 함수를 호출해서 timer를 생성하면, 해당 timer 의 id를 리턴하기 때문에 저장했습니다.
unmount 될 때, clearInterval 함수를 사용해서 아까 만들었던 timer를 삭제해줍니다.
componentWillUnmount() {
  clearInterval(this.timerID);
}
이제 tick 함수를 구현할 차례입니다.
class Clock extends React.Component {

  constructor() {
    super();

    this.state = {
      date: new Date()
    };
  }

  componentDidMount() {
    this.timerID = setInterval(
      () => this.tick(),
      1000
    );
  }

  componentWillUnmount() {
    clearInterval(this.timerID);
  }

  tick() {
    this.setState({
      date: new Date()
    });
  }

  render() {
    return (
      <div>
        <h1>Hello, world!</h1>
        <h2>It is {this.state.date.toLocaleTimeString()}.</h2>
      </div>
    );
  }
}

ReactDOM.render(
  <Clock />,
  document.getElementById('root')
);
네 완성됐습니다! Clock 컴포넌트가 Mount 되고 -> Unmount 되기까지의 과정을 다시 한 번 훑어보겠습니다.
- ReactDOM.render() 에서 첫 인자로
<Clock />를 넘길 때, React는 Clock 컴포넌트의 constructor를 호출합니다. - Clock에서 초기 시간이 필요하므로 this.state에 현재 시간으로 초기화했습니다.
- 그리고나서 Clock 컴포넌트의 render() 메서드가 호출됩니다.
- DOM에 render()의 return된 요소가 추가 되면 componentDidMount함수가 호출됩니다.
- Clock 컴포넌트의 tick 메서드가 매 초 호출될 수 있도록 timer를 추가합니다.
- 매 초 브라우저가 tick 메서드를 호출하면서 this.state.date 값이 변합니다.
- state가 변경되면 원래 componentDidUpdate 함수가 호출되지만, 우리는 위에서 정의하지 않았으므로 render()가 다시 호출되면서 바뀐 부분이 변경됩니다.
- DOM에서 Clock 컴포넌트가 삭제될 때, componentWillUnmount 가 호출되고 timer도 같이 멈추게 됩니다.
