DB
- 여러 자료를 동시에 여러 사람이 공유하여 사용할 수 있도록 체계화한 데이터 집합
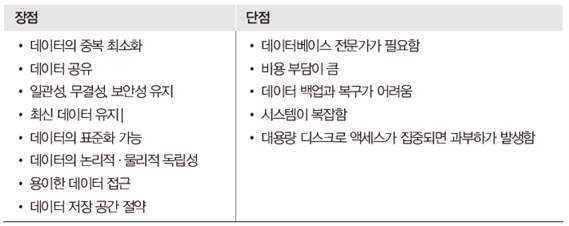
특성
- 똑같은 자료를 중복해서 저장하지 않는 통합된 자료
- 컴퓨터가 액세스 하여 처리할 수 있는 저장 장치레 수록된 자료
관리 시스템
- DB를 관리 하는 소프트 웨어
- 다수의 사용자와 DB 사이에서 사용자의 요구에 따라 정보를 생성하는 역할을 한다
- 응용 프로그램들이 DB를 공유하며 사용할 수 있는 환경을 제고
- 사용자들이 DB 안에 데이터를 기록하거나 접근할 수 있게 함
- 사용자의 요구 사항을 처리할 때 데이터의 무결성과 허가된 사용자만 데이터에 접근할 수 있는 보안성을 보장
MySQL
- 오픈 소스 관계형 DB 관리 시스템
- 오픈 소스 라이센스에 따라 배포되므로 무료로 사용할 수 있다
- 빠르고 유연하고 사용하기 쉽기 때문에 많은 기업에서 다양한 웹 기반 APP을 개발하는 데 사용
- 잘 알려진 SQL 데이터 언어의 표준 형식을 사용
- PHO, Perl, C, C++, java 등 많은 언어로 운영되고 있음
- 웹 개발에서 가장 높이 평가되는 PHP에 매우 친숙하다
- 사용자 정의가 가능하다.
WorkBench 를 이용해 접속하기
- MySQL 다운로드 사이트에 접속해 [MySQL on Windows]-[MySQL Installer] 선택 -> Microsoft Windows 선택한 후 다운로드 클릭
- 설치 유형에서 Custom 선택하고 next
- 설치 대상에서
MySQL Server -x64와Connection/ODBC -x64선택한 후Applications에서 워크밴치를 선택해 next 한다. - 기본값으로 진행하다 root 비밀번호 설정 후 설치까지.
Database 생성하기
create 명령어를 사용한다.
기본 모양 : create database (DB명);
초기에 언어를 utf8로 잡아주고 설정하는 모양 : create database (DB명) character set utf8 collate utf8_general_ci;
Database 보기
show databases;
Database 선택(사용)하기
처음에 연습 중 가장 먼저 실수한 내용이다. 테이블을 만들거나 뭔가를 하려면 Database가 필수로 선택된 다음이여야 한다. 그렇지 않으면 허공에 뭔가를 생성하려 하는 것이니 될리가..
DB 선택하기 : use (사용하려는 DB명)
예를 들어 sys 데이터베이스를 사용하려면 use sys; 작성 후 실행시켜주고, 그렇게 하면 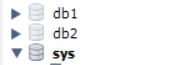 이런식으로 다른 DB들 보다 진하게 표시된다
DB 삭제하기
Drop 해주면 된다.
drop database (삭제하려는 DB명);
예를 들어 drop database db2; 해주면 아까 있던 db2가  이렇게 사라진다.
간단하게 사용해보기
/*auto_increment : 자동 증가*/
create table member(
    id int not null auto_increment,
    name varchar(100) not null,
    passwd varchar(50) not null,
    primary key (id) );


/*테이블 구조 보기*/
desc member;


/*테이블 종류 보기*/
show tables;


/*테이블 구조 변경하기*/
/*추가하기 : alter table 테이블명 add 컬럼명 컬럼타입*/
alter table member add phone varchar(100);
/*컬럼 변경하기 : alter table 테이블명 change column 기존컬럼명 새컬럼명 컬럼타입*/
alter table member change column passwd passwd varchar(35);
/*컬럼 삭제하기 : alter table 테이블명 drop colmn 컬럼명*/
alter table member drop column phone;


/*테이블 이름 변경하기 : rename table 기존테이블명 to 새테이블명*/
rename table member to student;


/*데이터 삽입*/
insert into student values(1, '홍길동1', '123');
insert into student values(2, '홍길동2', '123');
insert into student values(3, '홍길동3', '123');

/*id가 3이거나 이름이 홍길동2 인 컬럼 보기*/
select * from student where id=3 or name='홍길동2';
/*id기준 오름차순 순으로 정렬해랴*/
select * from student order by id asc;


/*아이디가 1인 사람의 비밀번호를 321로 고치기*/
Update student set passwd='321' where id='1';
/*확인해보기*/
select * from student where id='1';


/*id가 2인 사람의 이름을 바꾸기*/
Update student set name='김유신' where id='2';
select * from student where id='2';


/*id가 3 인 사람 삭제하기*/
Delete from student where id='3';
select * from student;


/*테이블 전체 삭제하기*/
Drop table student;
JDBC(Java DataBase Connectivity)
- 자바/jsp 프로그램 내에서 DB와 관련된 작업을 처리할 수 있도록 도와주는 자바 표준 인터페이스
- JDBC API를 사용하면 DBMS의 종류에 상관없이 데이터베이스 작업을 처리할 수 있다.
JDBC 드라이버 로딩 및 DBMS 접속
<%@ page language="java" contentType="text/html; charset=utf-8"%>
<!-- 1. 임포트 하기 -->
<%@ page import = "java.sql.*" %>
<!DOCTYPE html>
<html>
<head>

<title>데이터 베이스 연동하기</title>
</head>
<body>
	<%
		// 연결하기
		Connection conn = null;
		String url="jdbc:mysql://localhost:3306/jspbook_db";
		String user="root";
		String password="";


		try {
			// 2. jdbc 드라이버 로딩
			// 로딩되면 자동으로 객체가 생성되고 DriverManager 클래스에 등록된다
			Class.forName("com.mysql.jdbc.Driver");

			// 3. conn 객체 생성하기
			conn = DriverManager.getConnection(url, user, password);
			out.print("<br> 데이터 베이스 연결에 성공했습니다 <br>");
		} catch(SQLException e){
			out.print("<br>데이터 베이스 연결에 실패했습니다 <br>");
			out.print("SQLException : "+e.getMessage());
		} finally {
			// 만약 conn이 null이아니라면 = conn 연결이 제대로 되었다면
			if(conn != null) {
				conn.close();
			}
		}
	%>
</body>
</html>
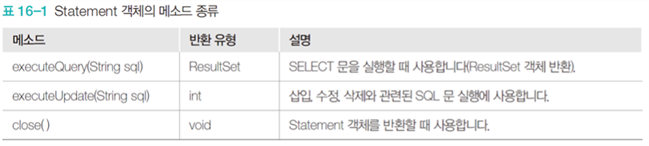
Statement 사용해보기
1. DB 안에 테이블 만들기 
2. 응용 프로그램에서 삽입할 내용 입력하기
3. DB 연결해서
4. 자료 보내기
5. 확인 (DB 안에서 테이블 검색하기)
1) 폼 만들기
<%@ page language="java" contentType="text/html; charset=utf-8"%>
<!DOCTYPE html>
<html>
<head>

<title>삽입할 폼</title>
</head>
<body>
	<h2> 새로운 회원을 입력하세요 </h2>

	<form action="1_insert_process.jsp" method="post">
		<p> 아이디 : <input type="text" name="id">
		<p> 비밀번호 : <input type="password" name="pw">
		<p> 이름 : <input type="text" name="name">
		<p> <input type="submit" value="전송">
	</form>

</body>
</html>
2) DB연결할 기본모양 만들어 저장하기(DB_Conn.jsp)
<%@ page language="java" contentType="text/html; charset=utf-8"%>
<!-- 1. 임포트 하기 -->
<%@ page import = "java.sql.*" %>
<!DOCTYPE html>
<html>
<head>
<title>데이터 베이스 연결 기본 모양</title>
</head>
<body>
	<%
		// 연결하기
		Connection conn = null;
		String url="jdbc:mysql://localhost:3306/jspbook_db";
		String user="root";
		String password="$^!423*^&";

		Class.forName("com.mysql.jdbc.Driver");
		conn = DriverManager.getConnection(url, user, password);
	%>
</body>
</html>
3) process 파일 작성
<%@ page language="java" contentType="text/html; charset=utf-8"%>
<%@ page import = "java.sql.*" %>
<!DOCTYPE html>
<html>
<head>

<title>데이터 베이스 연동하기</title>
</head>
<body>
	<!-- 파일 가져오기 -->
	<%@ include file="DB_conn.jsp" %>
	<%
		// 폼에서 넘어온 자료 받기
		request.setCharacterEncoding("utf-8");
		String id = request.getParameter("id");
		String pw = request.getParameter("pw");
		String name = request.getParameter("name");

		Statement stmt = null;

		try {
			String sql = "insert into member(id, passwd, name) values('"+id+"','"+pw+"','"+name+"')";
			stmt = conn.createStatement();
			// 삽입 수정 삭제는 update로 실행해준다
			stmt.executeUpdate(sql);
			out.print("member 테이블 삽입에 성공했습니다");
		} catch (SQLException e) {
			out.print("member 테이블에 삽입이 실패하였습니다 <br>");
			out.print("SQLException: " + e.getMessage());
		} finally {
			if (stmt != null) {
				stmt.close();
			}
			if (conn != null) {
				conn.close();
			}
		}
	%>
</body>
</html>
입력을 하면
화면에는 이런식으로 출력이되고
실제 DB 테이블을 확인해보면 아래와 같이 들어간 모습을 확인할 수 있었다.

PrepareStatement 사용해보기
방법은 위의 Statement와 크게 다르지않다. process 부분만 확인해보자면
<%@ page language="java" contentType="text/html; charset=utf-8"%>
<%@ page import = "java.sql.*" %>
<!DOCTYPE html>
<html>
<head>

<title>데이터 베이스 연동하기</title>
</head>
<body>
	<p> PrepareStatement 객체 사용 </p>

		<!-- 파일 가져오기 -->
	<%@ include file="DB_conn.jsp" %>
	<%
		// 폼에서 넘어온 자료 받기
		request.setCharacterEncoding("utf-8");
		String id = request.getParameter("id");
		String pw = request.getParameter("pw");
		String name = request.getParameter("name");

		// PreparedStatement 를 불러오고
		PreparedStatement pstmt = null;

		try {
        		// 여기 모양이 다르다. 위에서는 ?를 보내고
			String sql = "insert into member(id, passwd, name) values(?,?,?)";
			pstmt = conn.prepareStatement(sql);
            		// 첫번째 ? 에는 id가 들어갈 것이다
			pstmt.setString(1, id);
            		// 두번째 ? 에는 pw가 들어갈 것이다
			pstmt.setString(2, pw);
            		// 세번째 ? 에는 name이 들어갈 것이다
			pstmt.setString(3, name);
			pstmt.executeUpdate();

			out.print("member 테이블 삽입에 성공했습니다");
		} catch (SQLException e) {
			out.print("member 테이블에 삽입이 실패하였습니다 <br>");
			out.print("SQLException: " + e.getMessage());
		} finally {
			if (pstmt != null) {
				pstmt.close();
			}
			if (conn != null) {
				conn.close();
			}
		}
	%>
</body>
</html>
실행화면에서 값을 넣어주고
전송하면 안내문구가 나온다
삽입에 성공했다 하니 DB 에서 확인해보자
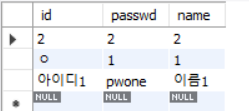
DB에 있는 내용 출력하기
<%@ page language="java" contentType="text/html; charset=utf-8"%>
<%@ page import = "java.sql.*" %>
<!DOCTYPE html>
<html>
<head>

<title>검색</title>
</head>
<body>
	<p> 서버쪽에서 받은 내용을 검색해 가져오기 </p>
	<%@ include file="DB_conn.jsp" %>

	<table width="300" border="1">
		<tr>
			<th> 아이디 </th>
			<th> 비밀번호 </th>
			<th> 이름 </th>
		</tr>
		<%
			ResultSet rs = null;
			PreparedStatement pstmt = null;

			try{
				String sql = "select * from member";
				pstmt = conn.prepareStatement(sql);
				rs = pstmt.executeQuery();

				while(rs.next()){
					String id = rs.getString("id");
					String passwd = rs.getString("passwd");
					String name = rs.getString("name");
		%>
		<tr>
			<td><%= id %></td>
			<td><%= passwd %></td>
			<td><%= name %></td>
		</tr>
		<%
					}
				} catch (SQLException e) {
					out.print("member 테이블 호출에 실패 <br>");
					out.print("SQLException: " + e.getMessage());
				} finally {
					if (rs != null) rs.close();
					if (pstmt != null) pstmt.close();
					if (conn != null) conn.close();
				}
		%>
	</table>
</body>
</html>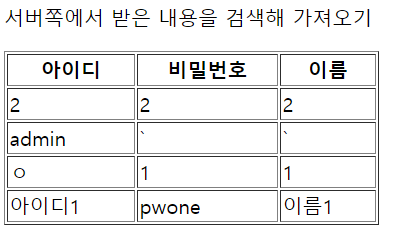
id로 업데이트 하기
1) 삽입 폼
<%@ page language="java" contentType="text/html; charset=utf-8"%>
<!DOCTYPE html>
<html>
<head>

<title>폼</title>
</head>
<body>
	<h2> 정보를 수정합니다 </h2>

	<form action="4_update_process.jsp" method="post">
		<p> 아이디 : <input type="text" name="id">
		<p> 비밀번호 : <input type="password" name="pw">
		<p> 이름 : <input type="text" name="name">
		<p> <input type="submit" value="전송">
	</form>

</body>
</html>
2) Statement를 사용해 수정하고 확인
<%@ page language="java" contentType="text/html; charset=utf-8"%>
<%@ page import = "java.sql.*" %>
<!DOCTYPE html>
<html>
<head>

<title>수정하기</title>
</head>
<body>
	<%@ include file="DB_conn.jsp" %>
	<%
		// 폼에서 넘어온 자료 받기
		request.setCharacterEncoding("utf-8");
		String id = request.getParameter("id");
		String pw = request.getParameter("pw");
		String name = request.getParameter("name");

		Statement stmt = null;

		try {
			String sql = "Update member set passwd='"+pw+"', name='"+name+"' where id='"+id+"'";

			stmt = conn.createStatement();
			int n = stmt.executeUpdate(sql);

			out.print("member 테이블이 " + n + "번 수정되었습니다");
		} catch (SQLException e) {
			out.print("member 테이블에 삽입이 실패하였습니다 <br>");
			out.print("SQLException: " + e.getMessage());
		} finally {
			if (stmt != null) {
				stmt.close();
			}
			if (conn != null) {
				conn.close();
			}
		}
	%>
</body>
</html>
실행 화면에서 수정하려는 id와 수정 내용을 입력
전송 결과 확인
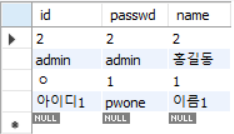
테이블을 확인해보기
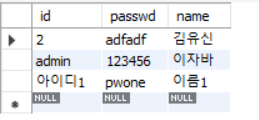
이랬던 테이블이
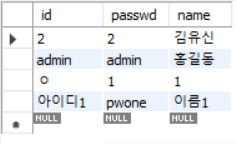
아래와 id=2의 내용이 바뀐 것을 확인 할 수 있었다.
-> 만약 PreparedStatement를 사용해보고 싶다면
<%@ page language="java" contentType="text/html; charset=utf-8"%>
<%@ page import = "java.sql.*" %>
<!DOCTYPE html>
<html>
<head>

<title>수정하기</title>
</head>
<body>
	<%@ include file="DB_conn.jsp" %>
	<%
		// 폼에서 넘어온 자료 받기
		request.setCharacterEncoding("utf-8");
		String id = request.getParameter("id");
		String pw = request.getParameter("pw");
		String name = request.getParameter("name");

		PreparedStatement pstmt = null;

		try {
			String sql = "Update member set passwd = ?, name = ? where id = ?";
			pstmt = conn.prepareStatement(sql);
			pstmt.setString(1, pw);
			pstmt.setString(2, name);
			pstmt.setString(3, id);

			int n = pstmt.executeUpdate();

			out.print("member 테이블이 " + n + "번 수정되었습니다");
		} catch (SQLException e) {
			out.print("member 테이블에 삽입이 실패하였습니다 <br>");
			out.print("SQLException: " + e.getMessage());
		} finally {
			if (pstmt != null) {
				pstmt.close();
			}
			if (conn != null) {
				conn.close();
			}
		}
	%>
</body>
</html>
id로 삭제하기
1) 정보 보내기
<%@ page language="java" contentType="text/html; charset=utf-8"%>
<!DOCTYPE html>
<html>
<head>

<title>삽입할 폼</title>
</head>
<body>
	<h2> 정보를 삭제합니다 </h2>

	<form action="5_delete_process.jsp" method="post">
		<p> 아이디 : <input type="text" name="id">
		<p> <input type="submit" value="전송">
	</form>

</body>
</html>
2) 받아서 처리하기
<%@ page language="java" contentType="text/html; charset=utf-8"%>
<%@ page import = "java.sql.*" %>
<!DOCTYPE html>
<html>
<head>

<title>삭제하기</title>
</head>
<body>
	<%@ include file="DB_conn.jsp" %>
	<%
		request.setCharacterEncoding("utf-8");

		String id = request.getParameter("id");
		String pw = request.getParameter("pw");
		String name = request.getParameter("name");

		Statement stmt = null;

		try {
			String sql = "delete from member where id='"+id+"'";
			stmt = conn.createStatement();
			stmt.executeUpdate(sql);
			out.print("해당 id의 테이블을 삭제했습니다");
		} catch (SQLException e){
			out.print(e.getMessage());
		} finally {
			if (stmt != null) stmt.close();
			if (conn != null) conn.close();
		}
	%>
</body>
</html>
이렇게 있던 테이블이
이렇게 입력 후 전송 버튼을 누르니
화면에는 이렇게 출력되고
실제 테이블의 내용도 변화되었다