
세상에 Flutter수업 들은지 얼마나 되었다고...
회사에서 앱개발자가 퇴사하면서 비슷하다며 해보라던... 그분..
다행인건 공부할 시간을 좀 줘서 우찌우찌 나름 만들었던거 같다!!
( 이런 나라도 괜찮다면... )😏
그래서 틈나는 시간에 이렇게 간단 설명을 끄적여본다
그래야 안까묵징..
1. "match_parent" : 구성요소의 풀화면의 최대한 크게 확장 너비와 높이
*감싸고 있는 뷰만큼
android:layout_width="match_parent"
2. "wrap_content" : 뷰 내의 콘텐츠에 맞게 크기를 설정 *사용하는영역만
android:layout_height="wrap_content"
3. "vertical" : 레이아웃 정렬 세로 방향 설정
android:orientation = "vertical"
4. "horizontal" : 레이아웃 정렬 가로 방향 설정
android:orientation = "horizontal"
5. "layout_gravity", "gravity" : 뷰 정렬
5-1 android:layout_gravity="center" 자기 자신을 움직인다.
TextView에 layout_gravity를 center 지정하면
TextView 자체가 center로 이동
5-2 android:gravity="center" 내용물이 움직인다.
gravity를 center로 지정하면
TextView 에 w, h 의 기준으로 center로 온다.
layout_gravity 에는 다양한 옵션이 존재
center_horizontal (가로로만 가운데 정렬)
center_vertical (세로로만 가운데 정렬)
top (꼭대기로)
bottom (바닥으로)
start (왼쪽으로)
end (오른쪽으로) 등 다양한 옵션이 존재
**오른쪽, 바닥 으로 설정시 |를 이용하여 end|bottom을 쓰면 동시 사용 가능하다.
여기서 잠깐!!
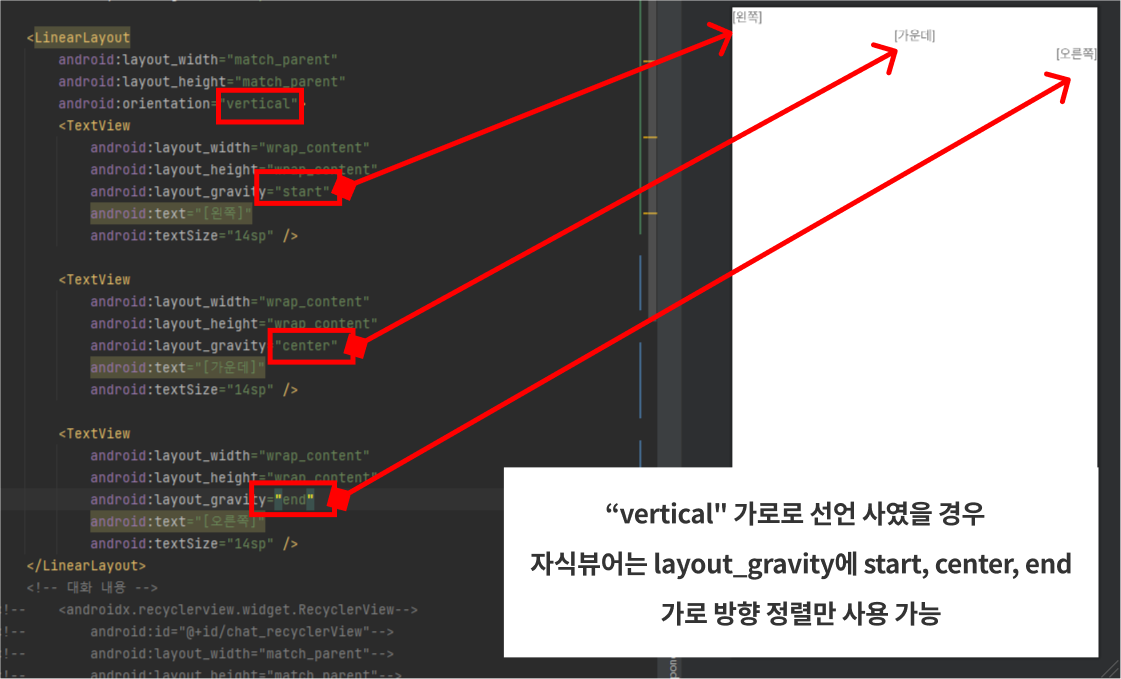
LinearLayout 안에 android:orientation="vertical" 세로로 선언 하였을 경우
자식뷰어는 layout_gravity에 start, center, end 가로 방향 정렬만 사용 가능
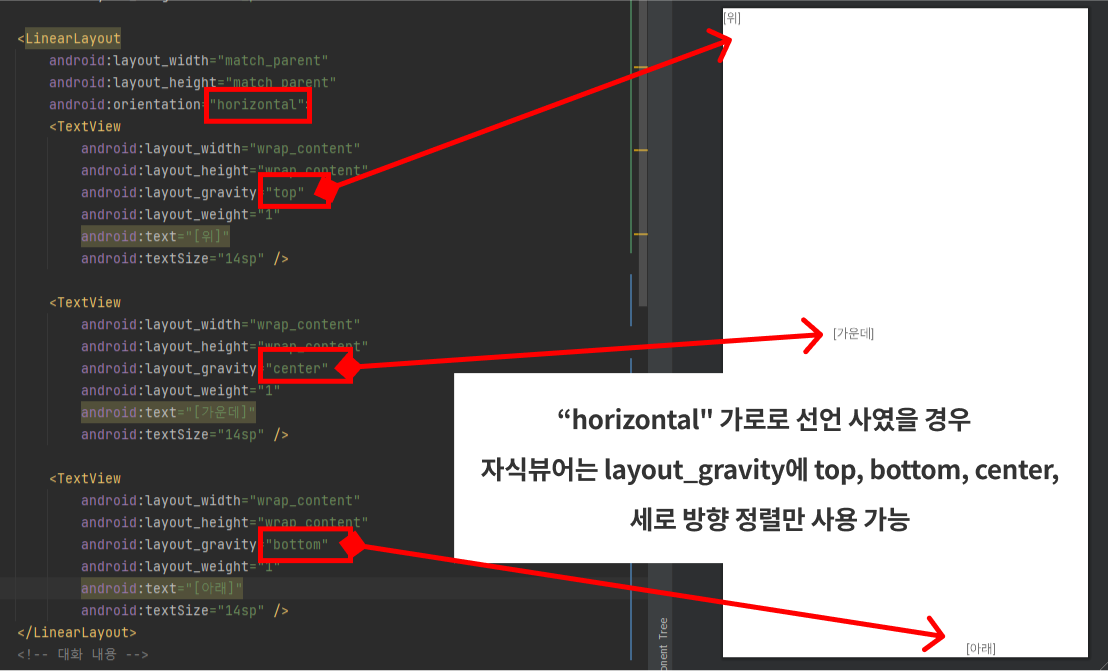
LinearLayout 안에 android:orientation="horizontal" 가로로 선언 사였을 경우
자식뷰어는 layout_gravity에 top, bottom, center,세로 방향 정렬만 사용 가능
쉽게 생각하면
부모가 가로면 자식은 세로
부모가 세로면 자식은 가로만 가능
6. layout_margin : 콘텐츠의 바깥 여백
7. layout_padding : 콘텐츠의 안쪽 여백
8. dp, sp : 사용할 수 있는 단위 핸드폰 설정창에 접근성과 비례
정상적인 크기를 사용하는 사용자한테는 글자가 그대로 보이지만, 글자크기를 크게 설정하면 크게 보여짐
sp는 글자크기에 주로 사용 dp는 어느 해상도에서 같은 크기
9. android:layout_weight="1" <- 균등한 비율로 나눠줌 (displey:flex 랑 비슷)
height를 꼭 0으로 설정해야함
10. android:layout_width="fill_parent"
가로 방향의 빈 공간에 대해 가중치를 주어 화면 비율에 따라 5:5 비중을 고정으로 만들 수 있다.
단 자식의 android:layout_width="0px" 는 0으로 설정
만약 테이블 기준
이정도만 보고 아래 코드를 보면 오느정도 이해 할 수 있다.
        <TableRow
            android:layout_width="fill_parent"
            android:layout_height="wrap_content">
            <TextView
                android:layout_width="0px"
                android:layout_height="match_parent"
                android:gravity="left|center"
                android:padding="5sp"
                android:textColor="#333"
                android:text="값 단위"
                android:fontFamily="@font/bold"
                android:textSize="14sp" />
            <TextView
                android:layout_width="0px"
                android:layout_height="match_parent"
                android:gravity="right|center"
                android:padding="5sp"
                android:textColor="#333"
                android:text="0mm"
                android:textSize="14sp" />
        </TableRow>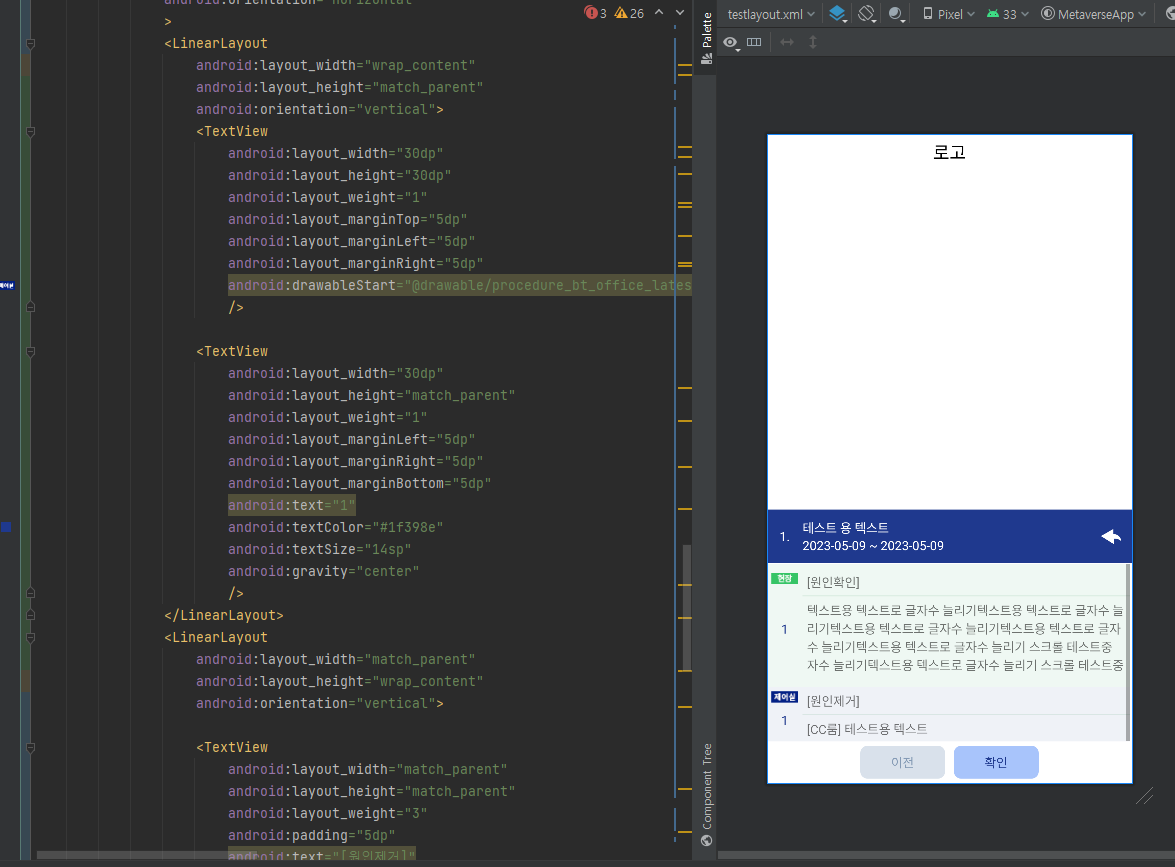
그래도 Flutter를 들었던 덕분에 생각보다 쉽게 만들 수 있었던거 같다