서론
회사에서 진행하는 프로젝트에서 10,000개 이상의 데이터를 표출하는 일이 생겼었다.
기존에 개발된 코드에는 데이터의 개수만큼 tr 요소를 innerHTML로 삽입해 주고 있었고,
// Example
const $tableBody = document.querySelector('table tbody')
$tableBody.innerHTML = datas.map((data, index) => {
  `<tr>
     <td>${index}</td>
     <td>${data}</td>
   </tr>`
}).join('')
이로 인해 DOM을 그리는 과정에서 시간이 5초 이상 걸리거나 심할 경우 브라우저 탭이 먹통이 되어 고생했던 적이 있었다.
위의 문제를 해결하기 위한 방법으로는 Paging, Virutal Scroll이 있었고 다행히도 회사에서 구매한 라이브러리 중에 가상스크롤을 지원하는 DataGrid가 있어서 빨리 해결할 수 있었고 나중에는 직접 구현해 봐야겠다는 마음을 먹고 구현하게 되었다.
🤔 Virtual Scroll?
Virutal scroll은 많은 데이터에서 사용자가 볼 수 있는 영역내에서 볼 수 있을만큼의 데이터만 표출하여 DOM을 그리는데 사용되는 리소스를 줄이는 기법이다.
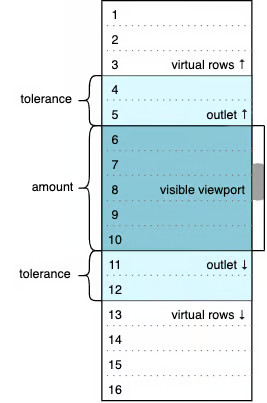
[이미지출처: Virtual scrolling: Core principles and basic implementation in React]
📝 용어 정의
구현에 앞서 사용할 변수들의 명칭을 다음과 같이 정의하였다.

| 변수명 | 설명 |
|---|---|
| rowHeight | 한개의 행(로우) 높이 |
| totalRowHeight | 전체 데이터가 렌더링되었을 때의 높이 |
| scrollHeight | = totalRowHeight |
| scrollTop | 현재 지나온 높이 |
| viewport | 사용자에게 보이는 영역 |
| nodeCount | viewport 내에서 최대로 보여질 수 있는 행(로우) 개수 |
| nodePadding | nodeCount와 함께 추가로 함께 보여질 행(로우) 개수 |
| visibleNodeCount | nodePadding을 포함한 보여질 개수 |
| scrollThumbHeight | 스크롤막대 높이 |
| translateY | 스크롤 막대가 지나온 높이 |
| scrollbarHeight | 스크롤바의 높이 |
| startIndex | visibeNodeCount에 속하는 처음 데이터의 인덱스 |
| endIndex | visibleNodeCount에 속하는 마지막 데이터의 다음 인덱스 |
🔧 구현
이제 Virtual scroll을 구현하기 위해서 우리는 scrollTop값의 변화에 따라 offset(startIndex, endIndex)를 구하여 데이터를 표출할 것이다.
필자는 스크롤 또한 div 태그를 통하여 별도로 구현했기에 scrollTop값 변화에 따른 translateY, scrollThumbHeight, startIndex, endIndex 등의 값을 직접 계산하였음
템플릿
구현에 앞서 우선 템플릿 만든다.
HTML
<!-- Virtual scroll wrapper -->
<div class="wrapper">
  <!-- Scrollable container -->
  <div class="container">
    <div class="scroll-content">
      <div class="content">
        <table>
          <!-- Virtual top area -->
          <thead></thead>
          <!-- Data area -->
          <tbody></tbody>
          <!-- Virtual bottom area -->
          <tfoot></tfoot>
        </table>
      </div>
    </div>
  </div>
</div>
CSS
*,
*::before,
*::after {
  box-sizing: border-box;
}

table {
  border-collapse: collapse;
  border-spacing: 0;
  table-layout: fixed;
  width: 100%;
}

td,
th {
  padding: 0;
}

td {
  padding: 3px 6px;
}

[aria-hidden='true'] {
  display: none !important;
}

/* Table border */

table tr,
table td {
  border: 1px solid #d3d3d3;
  color: #333;
  font-size: 14px;
}

/* Body */

.wrapper {
  position: relative;
  width: 300px;
  height: 320px;
}

.container {
  height: calc(100% + 1px);
  margin-top: -1px;
  overflow: auto;
  width: 100%;
  border: 1px solid #d3d3d3;
  border-left-width: 0;
  border-right-width: 0;
}

.scroll-content {
  position: relative;
  overflow-anchor: none;
  min-width: 100%;
  min-height: 100%;
  display: block;
  float: left;
}

.scroll-content::before,
.scroll-content::after {
  display: table;
  content: '';
  line-height: 0;
}

.scroll-content::after {
  clear: both;
}

.content {
  min-height: 100%;
  overflow-anchor: none;
  position: relative;
}
불변값 설정
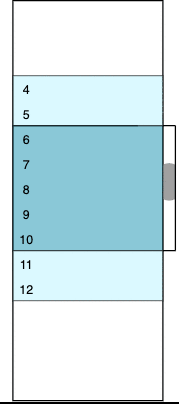
너비와 높이가 고정된 템플릿을 기준으로 구할 수 있는 불변값을 먼저 설정한다. (데이터의 개수는 원하는데로 설정)
const viewportHeight = 320 // rowHeight * 10
const rowHeight = 32	// 로우 높이
const nodePadding = 5	// 위아래에 추가로 같이 렌더링할 로우 개수

const datas = Array.from({ length: 100 }, (_, i) => i)
const dataSize = datas.length // 100
const totalRowHeight = rowHeight * dataSize // 3200
const scrollHeight = totalRowHeight

// 최대 scrollTop
const maxScrollTop = Math.max(scrollHeight - viewportHeight, 0)

// 화면에 보이는 개수
const nodeCount = Math.ceil(viewportHeight / rowHeight) // 10
// 실제 보여지는 개수
const visibleNodeCount = nodeCount + nodePadding * 2 // 20
scrollTop에 따른 offsets 구하기
scrollTop은 내가 지나온 영역의 높이와 같다.
따라서 지나온 데이터의 개수를 구하는 공식은 다음과 같다.
지나간 데이터의 개수 = 지나온 영역의 높이 / 한개의 행 높이
이를 통해 다음과 같이 offsets을 구하는 함수를 구현하였다.
/**
 * @param {number} scrollTop
 */
function calculateOffsets(scrollTop) {
  const passNodeCount = Math.floor(scrollTop / rowHeight) // 지나온 노드의 개수
  const maxStartIndex = dataSize - visibleNodeCount // startIndex의 최대값

  // 인덱스 계산
  let startIndex = Math.min(Math.max(passNodeCount - nodePadding, 0), maxStartIndex)
  const endIndex = startIndex + visibleNodeCount
  const offsets = [startIndex, endIndex]

  return offsets
}
DOM에 데이터 렌더링
위의 과정으로 계산한 offsets를 사용하여 DOM에 데이터를 표출할 수 있어야한다.
나는 그려지지 않는 데이터들에 대해서 높이값을 설정해주고, 변화하는 offsets에 대응하여 로우를 동적으로 추가해주는 함수를 작성하였다.
const $tbody = document.querySelector('table tbody')
const $thead = $tbody.previousElementSibling
const $tfoot = $tbody.nextElementSibling

const rowMap = {} // 렌더링 된 요소를 저장할 변수

/**
 * @param {[number, number]} offsets
 */
function render(offsets) {
  const [startIndex, endIndex] = offsets

  // 상단 하단 여백 설정
  const virtualTopHeight = Math.max(startIndex * rowHeight, 0)
  const virtualBottomHeight = Math.max((dataSize - endIndex) * rowHeight, 0)

  if (virtualTopHeight === 0) $thead.innerHTML = ''
  else $thead.innerHTML = `<tr role="row" style="height:${virtualTopHeight}px"><td></td></tr>`
  if (virtualBottomHeight === 0) $tfoot.innerHTML = ''
  else $tfoot.innerHTML = `<tr role="row" style="height:${virtualBottomHeight}px"><td></td></tr>`

  // 데이터 로우 렌더링
  datas.forEach((data, index) => {
      const rowindex = index + 1
      const mapItem = rowMap[rowindex]
      if (startIndex < rowindex && index < endIndex) {
          // 보여질 데이터인 경우
          if (!mapItem) {
              // DOM에 추가되지 않았다면 추가해준다.
              const $tr = document.createElement('tr')
              $tr.role = 'row'
              $tr.ariaRowIndex = `${rowindex}`
              $tr.style.height = `${rowHeight}px`
              $tr.innerHTML = `<td role="gridcell">Row ${rowindex}</td>`

              const $after = document.querySelector(`tr[aria-rowindex="${rowindex}"]`) // 그려질 로우의 다음에 올 노드
              if ($after) $tbody.insertBefore($tr, $after)
              else {
                  // 가장 가까운 인덱스가 큰 요소를 찾아 해당 요소 전에 삽입
                  const $next = Array.from($tbody.childNodes).find(($row) => rowindex < Number($row.ariaRowIndex))
                  $tbody.insertBefore($tr, $next ?? null)
              }
              rowMap[rowindex] = $tr // 맵에 요소 저장
          }
      } else if (mapItem) {
          // 보이지 않는 데이터인 경우
          mapItem.remove() // DOM에 그려진 요소가 있다면 삭제
          delete rowMap[rowindex] // 맵에서 삭제
      }
  })
}

render(calculateOffsets(0)) // 초기 화면 렌더링
Scrollbar와 연동
마지막으로 스크롤영역에 스크롤 이벤트를 통하여 scrollTop 변화에 따라 데이터를 렌더링 할 수 있도록 해준다.
const $container = document.querySelector('.container')
$container.addEventListener('scroll', (event) => {
  render(calculateOffsets(event.currentTarget.scrollTop))
});
✨ 데모
♻️ Next?
이렇게 그리 길지 않은 코드로 virtual scroll을 구현할 수 있었다.
이 글에서는 container의 scrollTop을 연동하여 사용하였지만 스크롤을 따로 두고 컨텐츠의 translate를 조정하여 데이터를 표현하는 방법도 있고 다양한 구현방식이 존재할 것이다. 더 좋은 방식이 찾으면 그걸로도 구현해볼 예정이다...
중간에도 언급하였듯이 나는 스크롤바 또한 가상으로 만들어 구현하였기에 다음글에는 virtual scroll + virtual scrollbar를 구성하는 방법에 대해 올리도록 하겠다.
[참조]

안녕하세요, 가상스크롤에 대해서 상세하게 설명해주셔서 감사합니다.
작성하신 코드를 바탕으로 제 테스트 페이지에 적용해보았습니다.
다만, 위로 스크롤 시에는 문제가 없는데,
아래로 스크롤 시에는 연쇄적으로 스크롤 이벤트가 발생해서
멈추지 않고 계속 스크롤되는 현상이 확인되었습니다.
혹시 구현 과정에서 위와 동일한 현상을 보셨다면
어떻게 해결하셨는지 공유해주시면 감사하겠습니다.