✨위코드에서의 작지만 소중한 첫 프로젝트✨
진행기간
08.23 - 08.27
Used skills
- 바닐라 자바스크립트
- HTML
- CSS
구현 기능
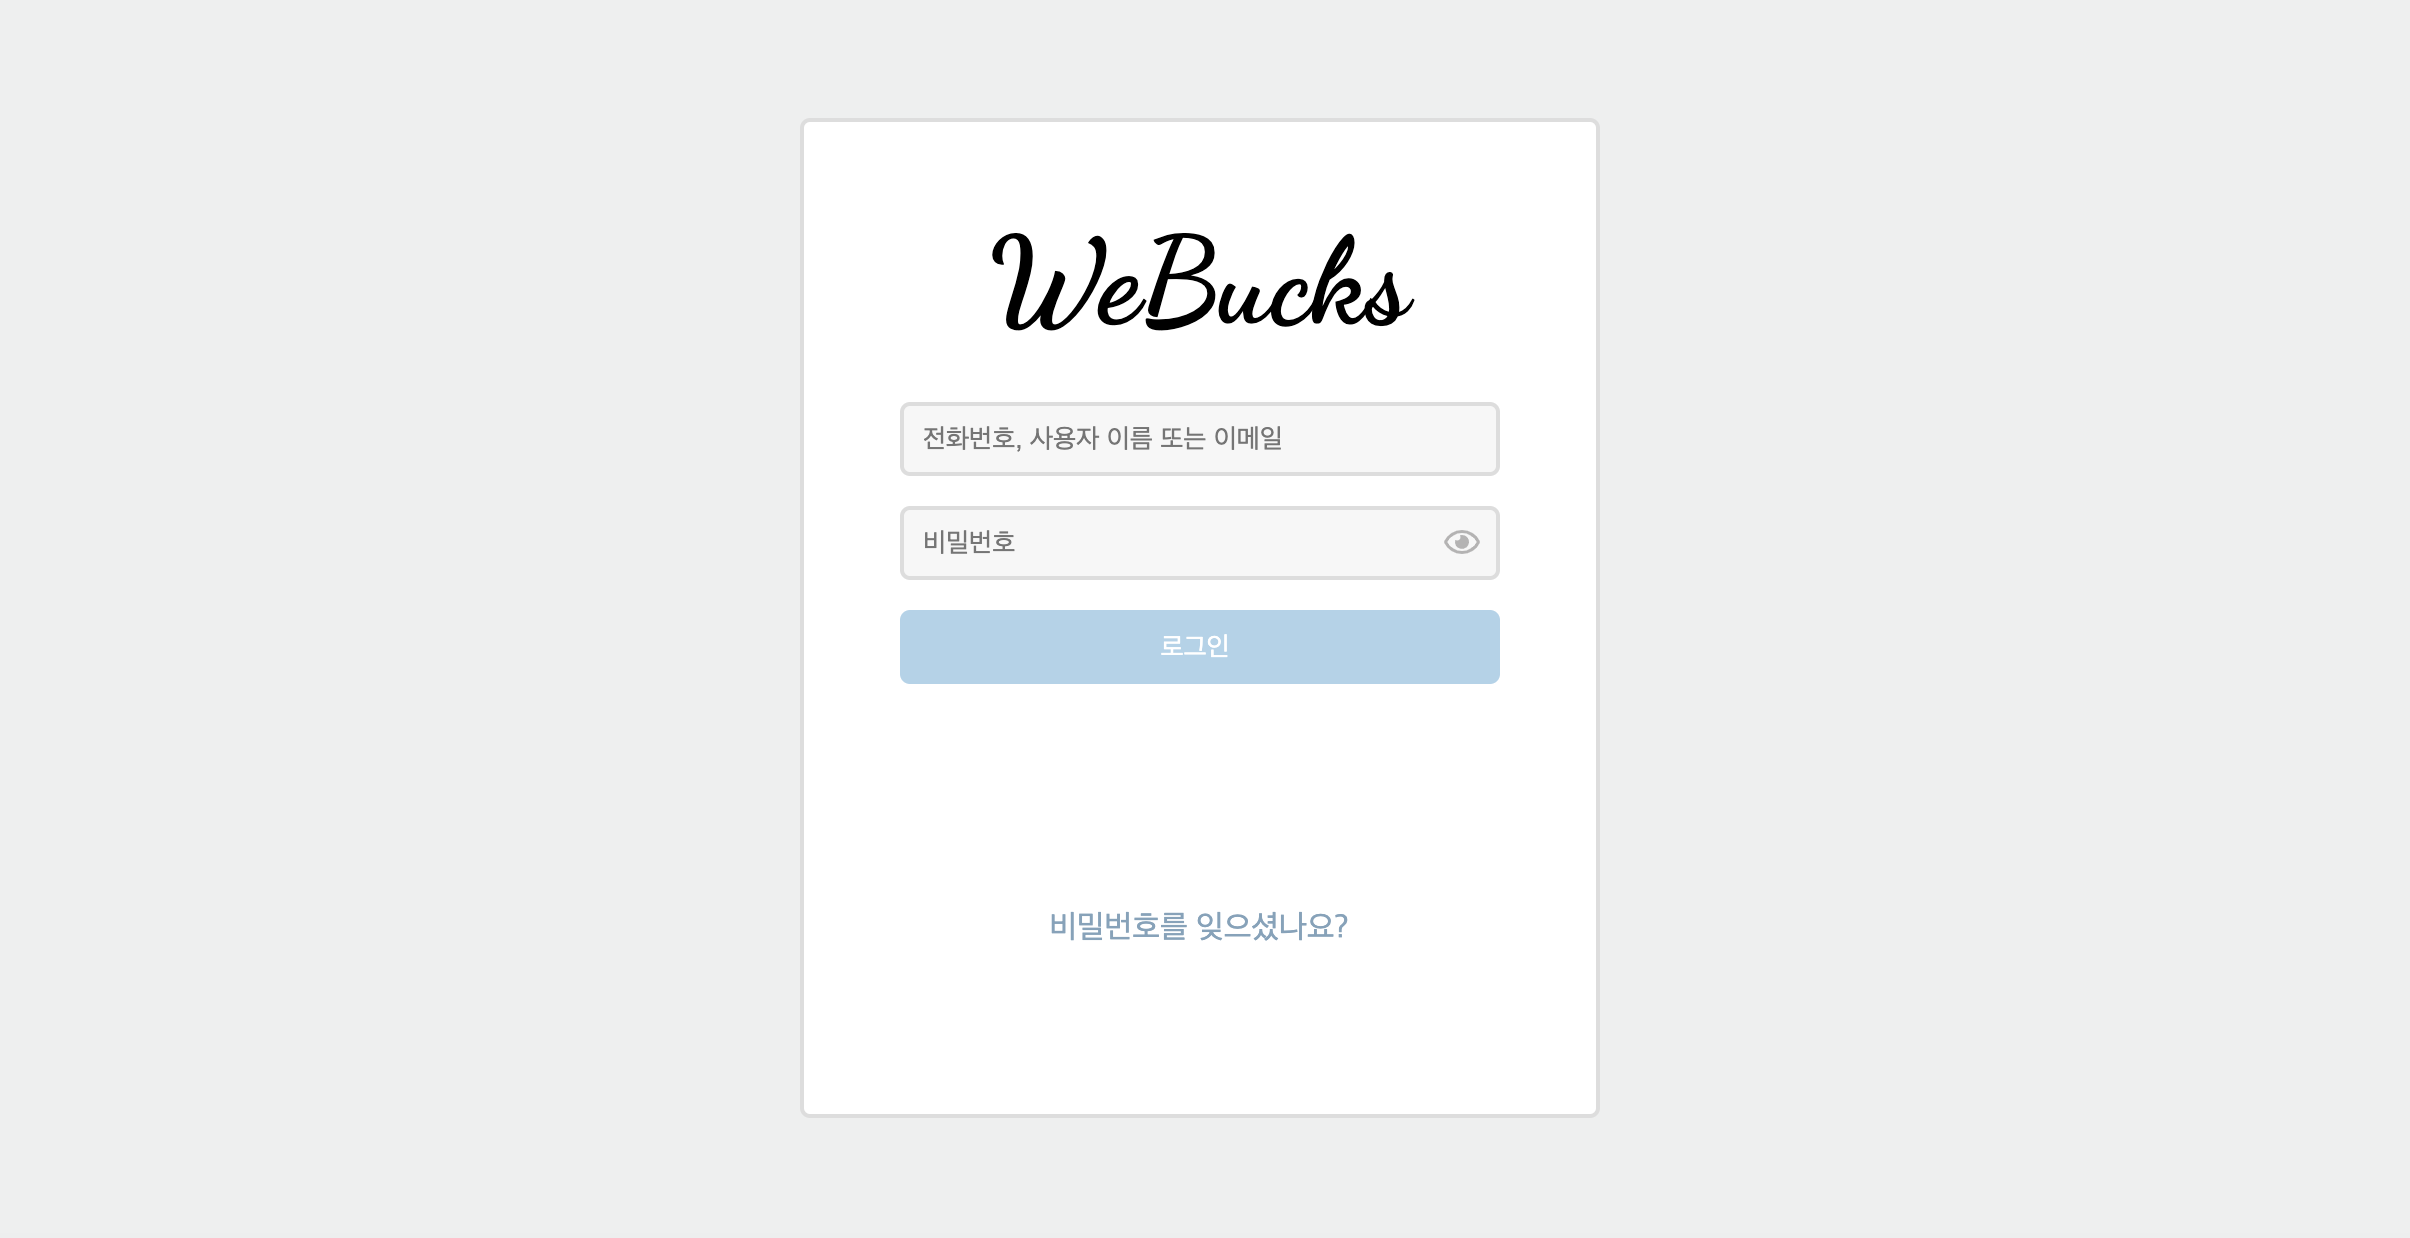
로그인 유효성 검증
정규표현식으로 아이디와 비밀번호의 유효성을 검증하는 기능이다. 유효할 시 테두리가 초록색으로 경된다.

비밀번호 hide-show 기능을 구현했다.
커피 리스트
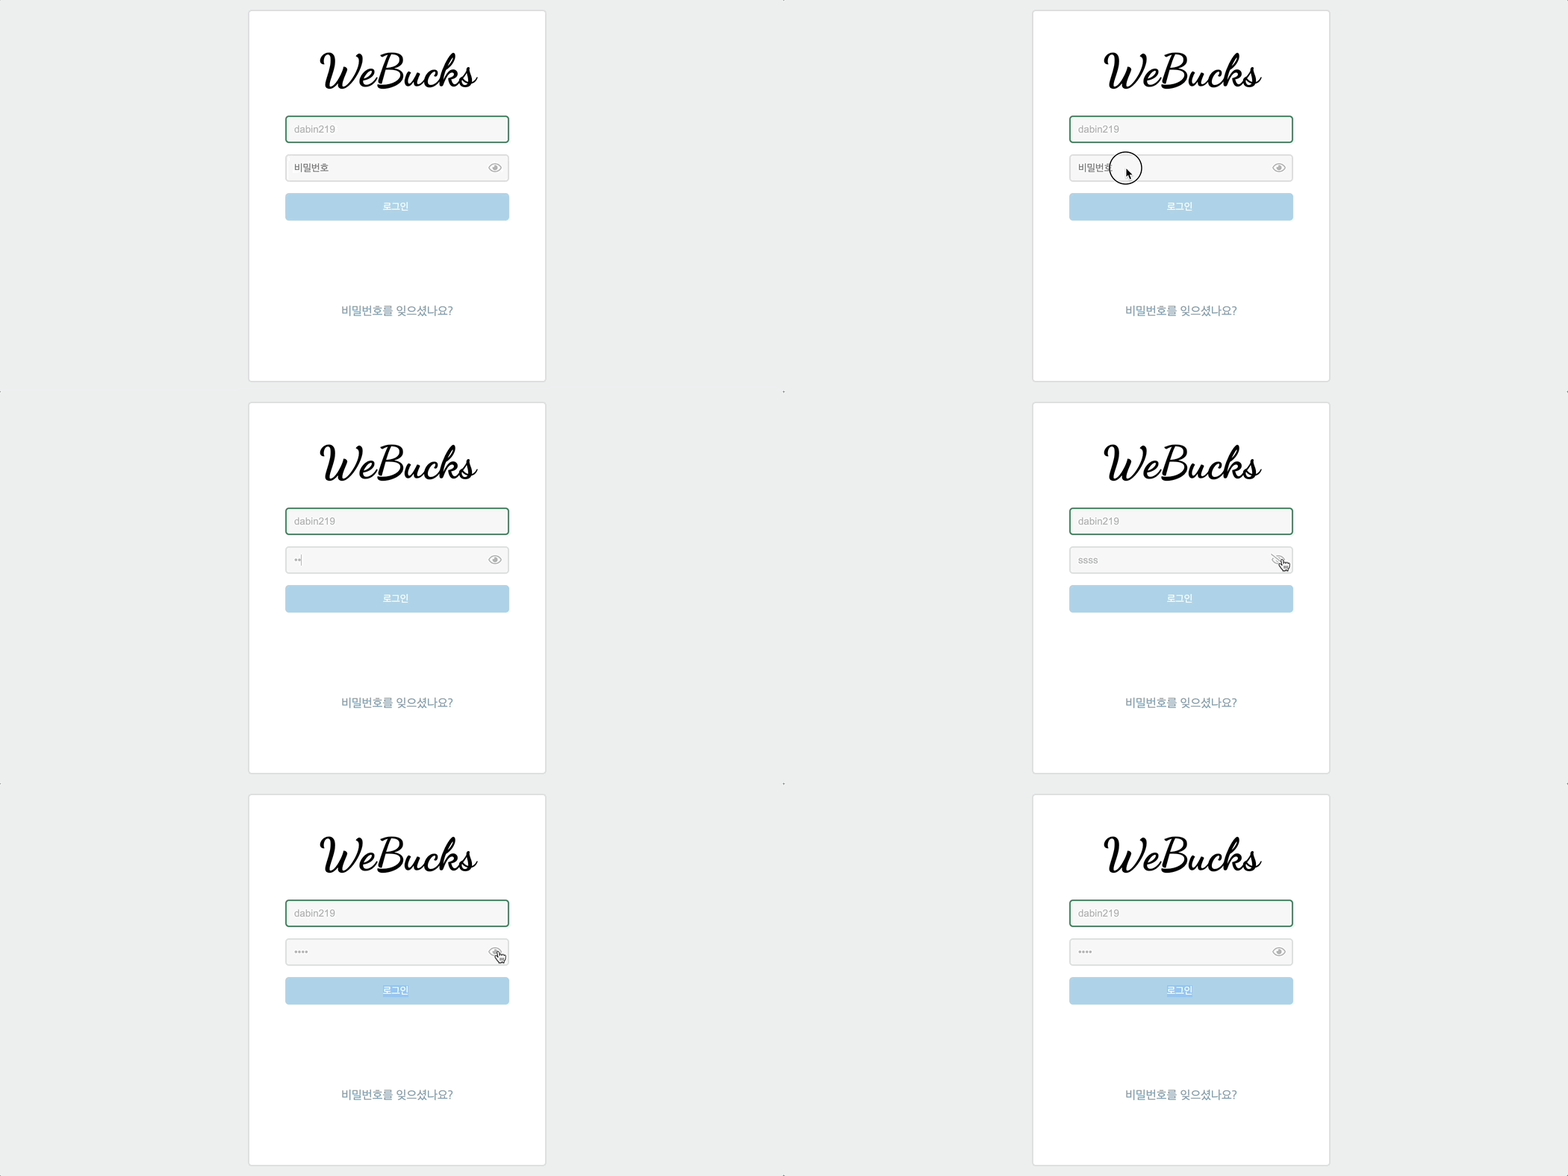
플렉스와 미디어쿼리로 반응형을 고려했다.

좋아요 버튼을 html과 css만으로 만들었다.

커피 상세페이지
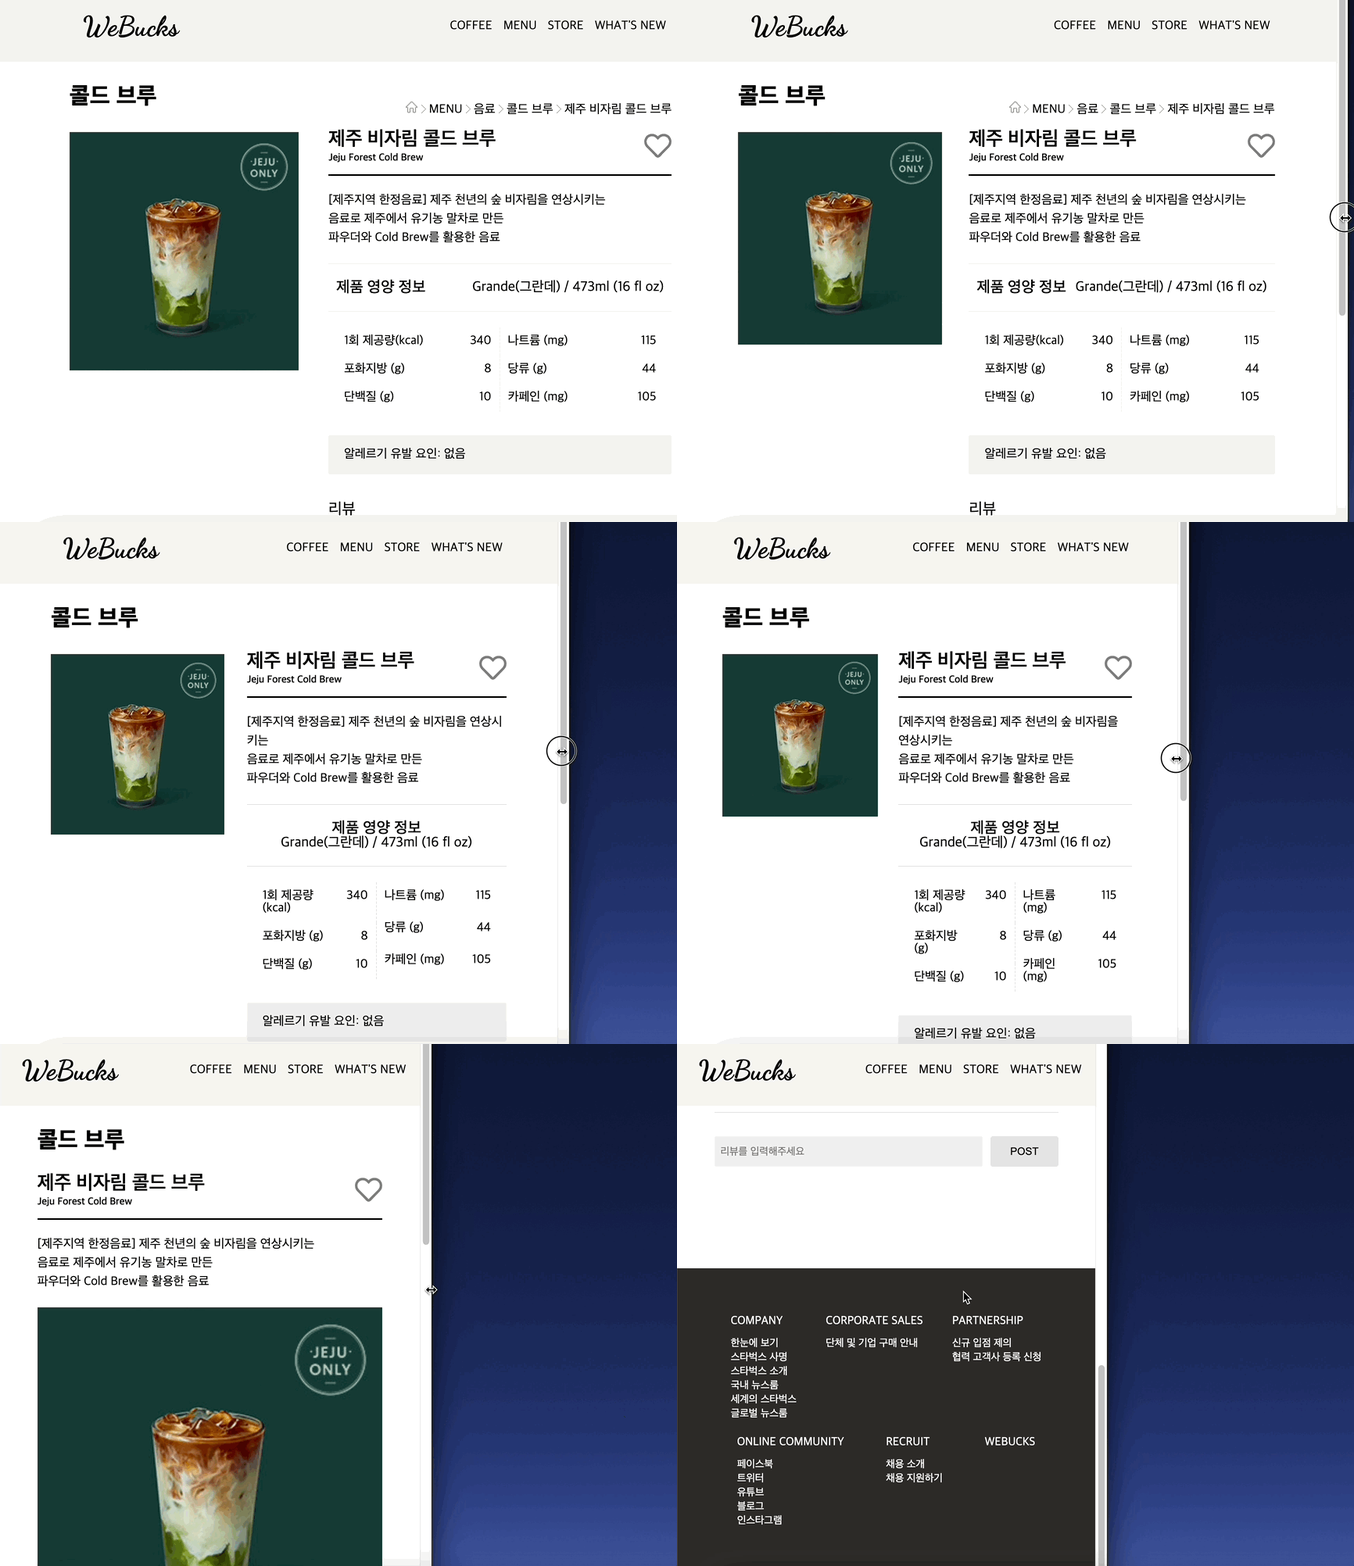
반응형으로 만들었고, 특정 스크린 크기에서는 세로로 플렉스의 배열이 바뀌도록 설정하고 태그의 순서를 바꿨다. 반응형은 리팩토링 때 추가했기 때문에 태그의 순서를 전부 바꾸는 작업 대신 이미지를 추가해 display: none으로 설정해놓고 미디어 쿼리로 display: inline-block이 되도록 설정했다.
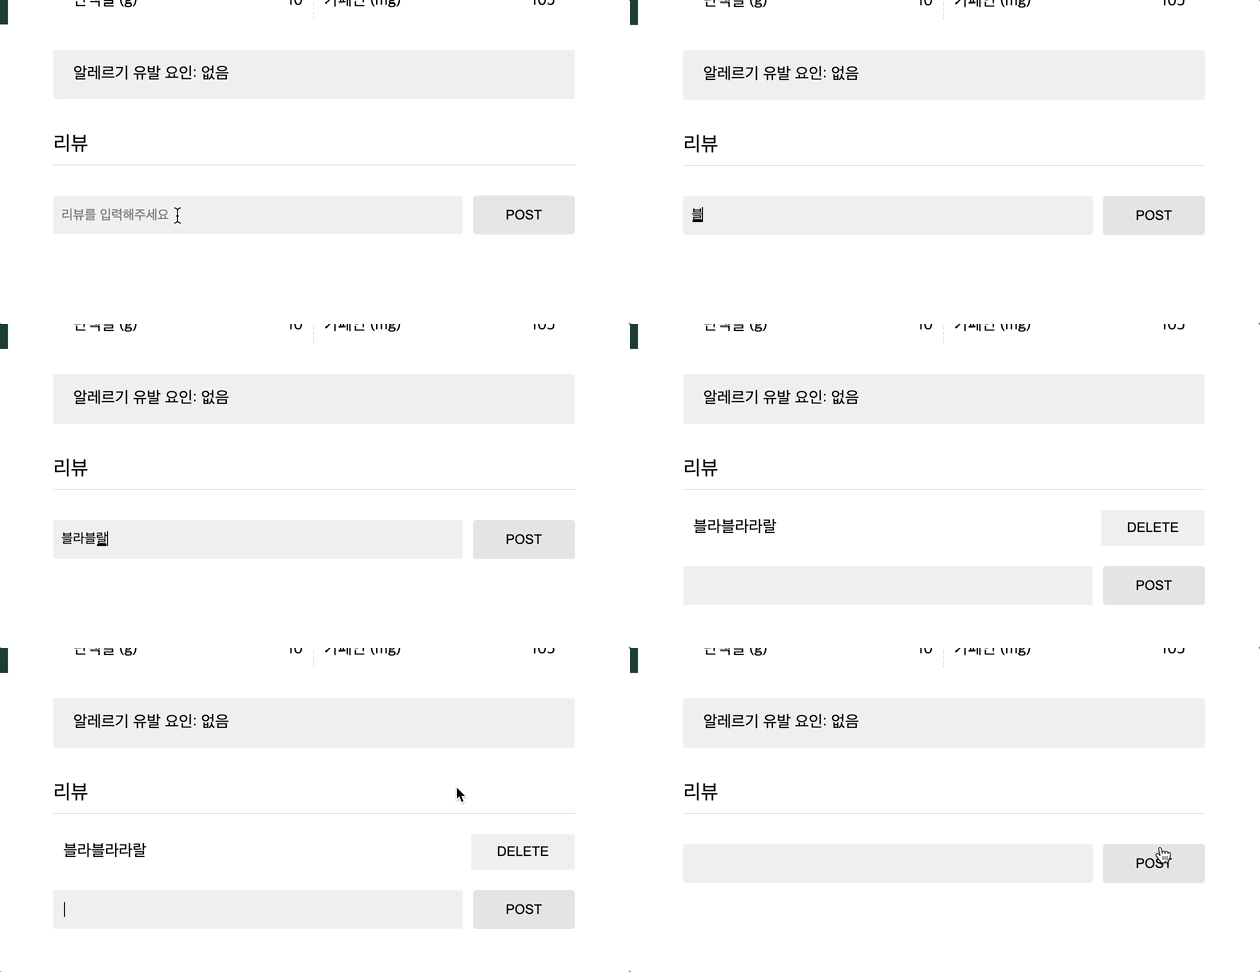
댓글 추가와 삭제 기능을 구현했다. 리팩토링을 마치고 테스트 하던 중 input에 아무 것도 입력하지 않아도 포스팅 되는 것을 발견했는데, 이 부분은 코드를 수정해야 한다.
What l Learned
HTML
form 태그
<form class="loginForm">
            <input class="box" id="user" type="text" placeholder="전화번호, 사용자 이름 또는 이메일" required>
            <div class="pwdBox">
                <input class="box" id="pwd" type="password" placeholder="비밀번호" required>
                <div class="icon">
                    <i class="far fa-eye" id="eye"></i>
                </div>
            </div>
            <button class="box loginBtn">로그인</button>
            <a class="forgetPwd" href="">비밀번호를 잊으셨나요?</a>
        </form>
    </section>
form은 입력 양식 전체를 감싸는 태그다. 로그인 창, 회원가입 폼 등이 해당된다. 제출을 하면 백엔드 서버에 전달되게 되는데, 백엔드 코드와 함께 사용하기 위해 name, action, method 등의 속성들이 사용된다. form은 추상적 태그이며, 입력을 위해 input 등의 태그를 사용한다.
- input의 여러가지 type : text, password, button, submit, reset, radio(한 개만 선택할 수 있는 컴포넌트), checkbox, file, hidden 등
- select/option : 드롭 다운 리스트를 만드는 태그
<select>
  <option>짜장면</option>
  <option>짬뽕</option>
  <option>탕수육</option>
<select>- fieldset : 연관된 요소들을 하나의 그룹으로 묶을 때 사용한다. 하나의 그룹으로 묶은 요소들 주변으로 박스 모양의 선을 그린다.
<legend>를 사용하면 fieldset 요소의 캡션을 정의할 수 있다.
<form>
  <fieldset>
    <legend>개인정보</legend>
    	<label>이름</label>
    	<input type="text">
    	<label>이메일</label>
    	<input type="email">
  </fieldset>
</form>
label 태그
label 태그는 UI 요소의 라벨을 정의할 때 사용하며, 폼의 양식에 이름을 붙이는 태그이다. for 속성을 사용하여 다른 요소와 결합할 수 있다는 것이 특징이다. for 속성 값은 결합하고자 하는 요소의 id 속성값과 같아야 한다. 또한 label 요소를 결합하자 하는 요소 내부에 두면 for을 사용하지 않고 해당 요소와 결합할 수 있다. 사용자가 마우스로 라벨의 텍스트를 클릭할 경우 label요소와 연결된 요소를 곧바로 선택할 수 있다.
//Text를 클릭하면 input 작성칸이 선택된다.
<label for="a">Text</label>
<input type="text" id="a">
input등의 양식을 라벨로 감싸면 id/for 없이 같은 결과를 얻을 수 있다.
<label class="checkbox-wrap">
	<input type="checkbox">
	<i class="far fa-heart"></i>
	<i class="fas fa-heart heartChecked"></i>
</label>
http://tcpschool.com/html-tags/label
이 밖에도 form 태그에서 활용되는 태그로는 textarea, button, optgroup, fieldset 등이 있다.
<input type="submit/reset/button">과<button>이 다른 점 : button 요소 안에는 텍스트나 이미지를 넣을 수 있다. 주의할 점은 button태그 사용시 type을 정해야 한다는 것이다. 정하지 않으면 브라우저마다 다른 기본값을 사용하게 된다. 따라서 form 양식에서는 되도록 input type=""을 사용하도록 하자. button태그에는 disabled를 지정해 비활성화 시킬 수도 있다.- optgroup : 드롭다운 리스트에서 사용되는 옵션들의 그룹을 정의할 때 사용
<select>
  <optgroup>
    <option></option>
  </optgroup>
</select>
CSS
min-width / max-width
반응형 웹에서 크기를 조절할 때 사용한다. 최대, 최솟값을 정할 수 있다. 예를 들어 이미지가 작아지다 어느 시점(화면크기)에서 더이상 작아지는 것을 원하지 않을 때 사용하면 된다.
width: 20%;
min-width: 200px;
max-width는 어떤 이미지가 부모 요소보다 커서 라인 밖으로 나갈 때 유용하게 쓸 수 있다.
ul {
width: 100px;
}
li {
width: 100px;
}
z-index
더 큰 z-index 값을 가진 요소가 작은 값의 요소 위를 덮는다. 즉, 가장 위로 올라오게 할 태그에 z-index 값을 높게 주면 되는 것!
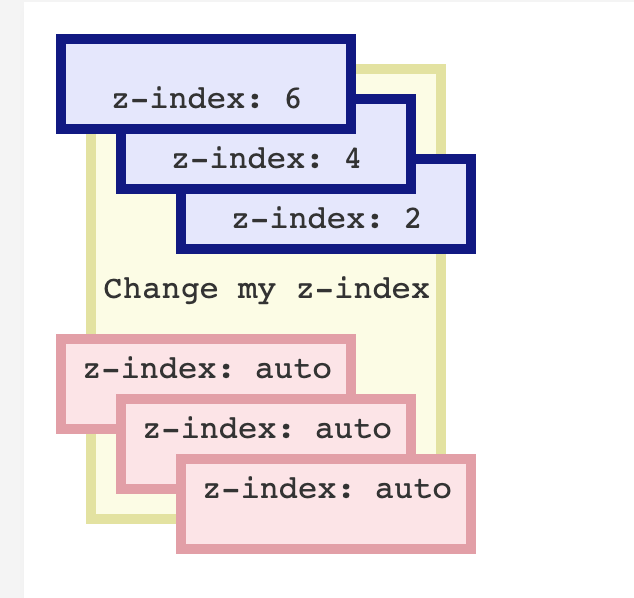
https://developer.mozilla.org/ko/docs/Web/CSS/z-index
클릭시 아이콘 변경(좋아요 버튼)
아래 JS 파트에 작성한 것과 마찬가지로 JS를 통해 좋아요 버튼을 구현했으나, input 태그의 checkbox type과 CSS로 이 기능을 구현할 수 있다는 말을 듣고 너무 놀랍고 충격이길래 바로 달려가서 코드를 수정했다.
<label class="checkboxWrap">
	<input type="checkbox">
	<i class="far fa-heart"></i>
	<i class="fas fa-heart heartChecked"></i>
</label>
label 태그 안에 input 태그를 담아 label이 클릭되었을 시 input에도 접근이 가능하도록 해주고, 사용할 두개의 아이콘을 같은 label 안에 담아 둔다.
.checkboxWrap {
    color: rgb(126, 125, 125);
    cursor: pointer;
    font-size: 35px;
}

input[type='checkbox'] {
    display: none;
}

.heartChecked {
    opacity: 0;
}

label,.checkbox,.fa-heart {
    position: absolute;
    right: 0;
}

label>input[type="checkbox"]:checked~.heartChecked {
    display: block;
    opacity: 1;
} - label, input, 하트 두 개의 위치를 겹치게 만들어 준다.
- 체크 표시가 가능한 input은 display: none으로 보이지 않게 만들어 준다.
- 꽉찬 하트의 opacity를 0으로 두면 투명해진다.
- checkbox의 checked 속성을 이용해 input과 연결된 label을 클릭하면(체크하면) 꽉찬 하트의 opacity를 1로 바꿔 불투명하게 만든다.
outline: none
input 태그는 브라우저에 따라 아웃라인(테두리) 디폴트 컬러를 갖는다. chrome 브라우저에서는 blue로 설정이 되어 있었는데, outline:none을 지정하면 input 창을 클릭해도 테두리 색이 변경되지 않는다.
미디어쿼리
min-width를 사용하는 경우는 주로 스마트폰 등 작은 스크린을 기준으로 레이아웃을 작성하고 점차 확장되는 형태로 작성할 때 사용하고, max-width는 pc 등 큰 화면을 기준으로 레이아웃을 작성하고 점차 축소하는 형태로 레이아웃을 작성한다.
@media screen and (max-width: 800px) {
    li {
        font-size: smaller;
    }
    .category {
        flex-wrap: wrap;
    }
    .coffeeList {
        grid-template-columns: 1fr 1fr ;
    }
}
[미디어 쿼리 구문]
@media media-type and (media-feature-rule) {
  /* CSS rules go here */
}- 미디어 타입에는 all, print, screen, speech가 있다.
- 조건에 orientation을 통해 세로인지 가로인지 검사할 수 있다.(가로는 landscape, 세로는 portrait)
- 조건 hover:hover를 통해 사용자가 마우스를 사용하는지 검사할 수 있다. 터치/마우스 구분할 때 사용한다.
margin: 0 auto;
대표적인 중앙정렬 속성이다. 위 아래 여백이 없이 가로 중앙에 배치된다. inline 속성의 태그는 block으로 만들어준 뒤 사용해야 적용이 된다. 또는 span 대신 div 태그를 사용해준다.
이미지에 mouseover시 이미지 확대
<div class="coffeeImg">
	<img alt="오늘의 커피" src="">
</div>
.coffeeImg {
position: relative;
width: 100%;
padding-bottom: 100%;
overflow: hidden;
}
.coffee img {
position: absolute;
left: 0;
top: 0;
width: 100%;
}
.coffeeImg img {
transition: all 0.7s;
transform: scale(1);
}
.coffeeImg:hover img {
transform: scale(1.1);
}
- 확대 기능 : 기존 이미지에 transform: scale(1);
- hover시 이미지에 transfor: scale(1.1);
- 이미지가 확대될 때 기존 이미지 크기 내에서 확대가 되도록 이미지의 부모태그에 overflow:hidden을 적용(넘어가면 숨긴다)
- 이미지 부모태그와 이미지의 width를 동일하게 설정
- height도 동일하게 부모태그와 이미지에 적용해도 된다. 하지만 반응형을 고려해서 padding-bottom: 100%을 적용하면 width와 height의 크기가 동일해진다. 이게 가능한 이유는 padding이 부모 요소의 width 값을 기준으로 계산되기 때문이다. 부모 요소가 정사각형이 되는 것! 부모 요소를 넘어가는 것은 보이지 않게 설정을 해뒀으니 이미지의 세로값은 생각하지 않아도 된다. (반응형 정사각형)
JS
정규표현식
const validateEmail = (id) => {
    let letters = /^([a-z0-9_]){6,}$/;
    if (letters.test(id)) {
        return true;
    } else {
        return false;
    }
};
정규표현식은 문자열을 특정 문자 조합과 대응시키기 위해 사용되는 패턴(&객체)이다. 이 패턴은 exec, test, match, replace, search, split 메소드와 함께 쓰인다. 정규식은 두 가지 방법으로 만들 수 있다.
const re = /ab+c/; //슬래쉬로 감싸는 방법
const re = new RegExp("ab+c"); //RegExp 객체 생성자 함수를 호출하는 방법
정규식의 패턴이 변경될 수 있는 경우나 다른 출처로부터 패턴을 가져와야 하는 경우에는 생성자 함수를 사용하면 된다.
[메서드 종류]
- exec: 대응되는 문자열 찾기, 정보를 가지고 있는 배열 반환, 없으면 null
- test: 대응되는 문자열이 있나 검사, true or false
- match: 대응되는 문자열을 찾는 string 메소드. 정보를 가지고 있는 배열 반환, 없으면 null
- search: 대응되는 문자열 검사하는 string 메소드. 대응되는 부분의 인덱스를 반환. 없으면 -1.
- replace: 대응되는 문자열 찾아 다른 문자열로 치환
- split: 정규식 혹은 문자열로 대상 문자열을 나누어 배열로 반환하는 string 메소드.
로그인 버튼 활성화
const enableButton = (arr) => {
    if (arr[0] && arr[1]) {
    btn.removeAttribute("disabled");
    btn.style.backgroundColor = "#2F8BE9";
  } else {
    btn.setAttribute("disabled", true);
    btn.style.backgroundColor = "#add3ea";
  }
};
요소에서 주어진 이름의 특성을 이용한 메서드에는 여러가지가 있다.
- getAttribute(attributeName) : 해당 요소에 지정된 값을 반환, 없으면 null이나 빈 문자열 반환
- hasAttribute : boolean 반환
- setAttribute(name, value) : 추가
- removeAttribute : 요소의특성 제거
삼항 연산자/ addEventListener - input
삼항연산자 사용법을 먼저 보자.
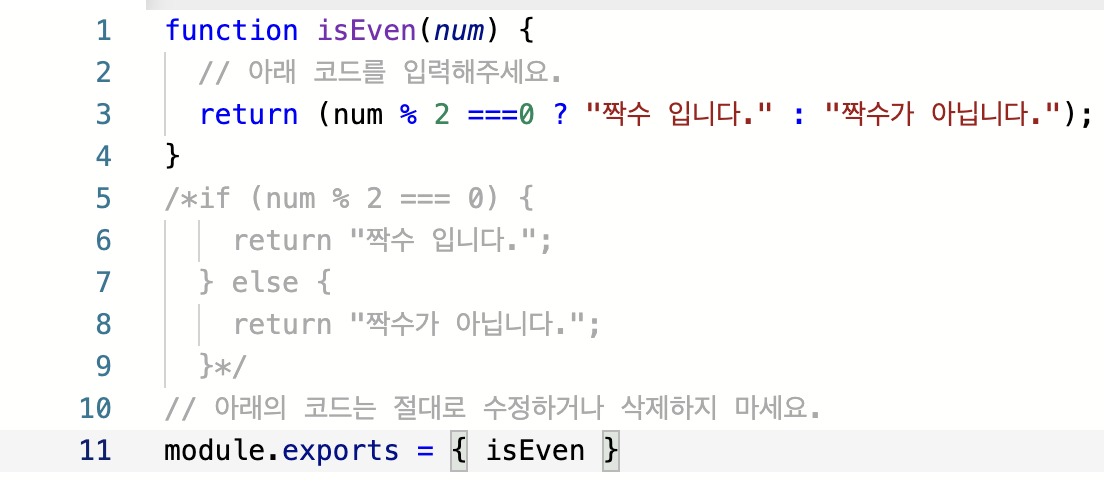
삼항연산자를 사용한 코드는 아래 코드와 동일하다.
[조건 ? true일 때 return값 : false일 때 return 값]
아래 코드는 위벅스 로그인 페이지에서 삼항 연산자를 사용해 작성한 코드이다.
document.addEventListener('input', () => {
    isValid[0] = validateEmail(user.value) ? true : false;
    isValid[1] = validatePassword(pwd.value) ? true : false;
    enableButton(isValid);
    green(isValid[0], user);
    green(isValid[1], pwd);
});
addEventListener에는 input 이벤트도 있다. input 이벤트는 input, select, textarea 요소의 value 속성이 바뀔 때마다 발생한다.
e.preventDefault();
btn.addEventListener('click',(e)=>{
    e.preventDefault();
    window.location.href = "/list.html";
});
버튼 태그에는 button/submit/reset의 속성을 지정할 수 있으며 기본 값은 submit이다. form 태그 안에서 이 속성을 지정하지 않으면 버튼 사용시 자동으로 submit이 된다. 따라서 클릭 시 페이지 이동을 하기 위해서는 .preventDefault();로 디폴트 값을 막고, 원하는 동작의 코드를 넣어준다.
또한 .location.href보다 .location.replace를 쓰는 방법이 권장되는데, href를 사용하는 경우 이미 접속했던 페이지일 때 cache된 페이지를 보여줄 가능성이 있기 때문이다. href를 사용할 때 최신의 정보가 저장되지 않을 가능성이 있으니 되도록 replace를 사용하자. 가능한 경우 html에서 a태그를 사용해 페이지 이동을 하게 만들자.
비밀번호 hide-show
html/css만을 이용해서 버튼을 바꿀 수 있지만, 이 방법을 몰랐을 때 JS로 이 기능을 구현했다.
const icon = document.querySelector('.icon');

let click = 0;

icon.addEventListener('click', () => {

    const eye = document.querySelector('#eye');

    click += 1;

    if (pwd.type === "password") {
        pwd.setAttribute("type", "text");
        eye.classList.remove('fa-eye');
        eye.classList.add('fa-eye-slash');
    } else {
        pwd.setAttribute("type", "password");
        eye.classList.add('fa-eye');
        eye.classList.remove('fa-eye-slash');
    }
});
remove와 add를 합친 toggle 메서드를 사용할 수도 있다. toggle()은 클래스값이 있는지 체크하고 없으면 더하고 있으면 제거한다.
댓글 추가/삭제 기능(업데이트 필요)
- posting이라는 함수 안에 댓글 입력과 삭제 기능을 한 번에 정의했다. 이런 경우 유지보수가 어려워지니 함수를 자잘자잘하게 나누어 담자.
- css와 html, javascript는 각자의 목적에 부합해야한다. 되도록이면 css를 javascript에서 조작하지 말고 javascript에서 class를 부여하고 각 class명을 사용해 css 파일에서 디자인 관련한 코드를 넣어두자.
- span, list, i 태그 등 여러 가지 태그를 만들어야 하는 경우 백틱을 사용해 한꺼번에 만들 수 있다. 예를 들면,
document.querySelector('').innerHTML = `<span><li><i></i></li></span>`//댓글 입력 + 삭제 기능
const reviewText = document.querySelector('.reviewText');
const pushBtn = document.querySelector('.push');
const commentsBox = document.querySelector('.commentsBox');
const posting = () => {
//입력된 댓글 : string length가 0이면 delete버튼 안눌리게 만들어야 함!(미완)
const text = reviewText.value;
if (reviewText.value === '') {
reviewText.focus();
return;
};
//댓글창 리스트로
const comment = document.createElement('li');
comment.setAttribute('class', 'comment');
//스타일
comment.style.display = "flex";
comment.style.marginBottom = "10px"
//댓글창
const commentText = document.createElement('span');
commentText.setAttribute('class', 'commentText');
commentText.innerHTML = text;
//스타일
commentText.style.width = "80%";
commentText.style.padding = "10px";
//삭제 버튼
const deleteComment = document.createElement('button');
deleteComment.setAttribute('class', 'deteleComment');
deleteComment.innerHTML = 'DELETE';
deleteComment.addEventListener('click', () => {
commentsBox.removeChild(comment);
});
//스타일
deleteComment.style.borderStyle = "none";
deleteComment.style.cursor = "pointer";
deleteComment.style.borderRadius = "3px";
deleteComment.style.padding = "5px";
deleteComment.style.width = "20%";
commentsBox.appendChild(comment);
comment.appendChild(commentText);
comment.appendChild(deleteComment);
reviewText.value = " ";
reviewText.focus();
};
//클릭
pushBtn.addEventListener('click', () => {
posting();
});
//엔터
reviewText.addEventListener('keypress', (event) => {
if (event.key === 'Enter') {
posting();
}
return;
});- 댓글을 posting하면 댓글 입력창을 비워야 하니까 reviewTex.value= " "로 재설정해준다. focus()는 텍스트창의 경우 커서를 위치시켜 바로 입력이 가능하게 하고 버튼의 경우 엔터 키를 눌렀을 때 클릭 효과를 내게 만든다. 이 기능으로 텍스트를 바로 입력할 수 있게 만들었다. 반대 기능은 blur()라는 점을 참고하자.
- button 태그의 type은 기본적으로 submit이다. enter치면 작동하게끔 설정되어 있다. 이 기능을 원하지 않으면 type=button을 설정해주면 된다. 이를 참고해서 효율적으로 코드 작성을 하자.
라이브 코딩을 통해 알게된 것
- 레이아웃은 큰틀부터. 큰그림부터 짜보자.
- layout 단계에서 눈에 잘 보이는 color(red 등)를 설정해 확인해가며 변경하자.
- vs code (tap x 2) 들여쓰기를 설정하자.
- document. : 브라우저에서 제공하는 것! DOM
- event가 일어난 곳은 event.target, 값은 event.target.value.
- css는 bottom-up방식으로 구성하자. 부모요소에 height를 주고, 다른 요소가 추가되면 그 요소가 바깥으로 나갈 수도 있으니까!
- 변수 선언은 우선 const로 하고 바꿔야 하는 경우에만 let으로 바꾸자.
로그인/패스워드 감지 코드
const emailInput = document.getElementsByClassName(emailInput)[0];
const passwordInput = document.getElementsByClassName(passwordInput)[0];
const loginButton = document.getElementsByClassName(loginButton)[0];

const isValidInput = () => {
      return emailInput.value.includes('@') && passwordInput.value.length >= 8
    }

const changeButtonColor = () => {
  const isValid = isValidInput()
  if(isValid) {
      loginButton.style.backgroundColor = "blue";
  } else {
      loginButton.style.backgroundColor = "gray";
  }


emailInput.addEventListener('input', changeButtonColor)
passwordInput.addEventListener('input', changeButtonColor)

//자바스크립트에서 색상을 변경하는 경우 유지 보수가 복집해진다. 이 경우 css에 class 식별자를 따로 만들고 속성 부여를 하면 된다.
button {
  backgroundColor = "blue";
}

button.active {
  backgroundColor = "gray";
}

//html
if(isValid) {
      loginButton.classList.add('active');
} else {
      loginButton.classList.remove('active');
}
제대로 확실히 알고 있지 않으면 뭐하나 제대로 작동하는 것이 없었다. 모르는 기능을 검색해가며 얻은게 정말 많고, 한 가지 기능을 구현하기 위해 정말 다양한 방법이 있다는 것을 알게 되었다. 리팩토링을 혼자 진행하며 놓친 부분도 많은데, 앞으로 코드명을 누구나 알아볼 수 있도록 쉽게 작성하고 함수 하나가 하나의 기능만 담당하도록 열심히 달려보즈앗 🏃♀️ 레플릿만 풀던 지난주에 비해 너무너무너무너무 힘들지만 재밌고 값진 한주를 보냈다. 리팩토링 & 리액트 공부하러 꼬 -!
