진행기간
9/13 - 9/17, 9/27 - 9/30
Used Skills
- Node.js
- Express
- Mysql
- Prisma
React 프로젝트인 webucks가 필요로 하는 모든 기능을 수행하지는 않지만, CRUD를 연습할 수 있는 대표적인(?) 기능을 넣어 API를 만들었다. RESTful API까지 고려해 URI가 다르지만, 다음 프로젝트에서 백엔드를 수월하게 할 수 있도록 연습하는데 목적을 두고 열싐히... 했다! 에러처리가 아직 많이 미흡하다. 공부하며 보완해나가는걸로!
👉🏻 배운 것
A부터 Z까지.. 모두 다 처음 배웠지만 다음 프로젝트시 기억하고 있어야 할 것들에 대해 정리해보자.
레이어드 패턴 최종
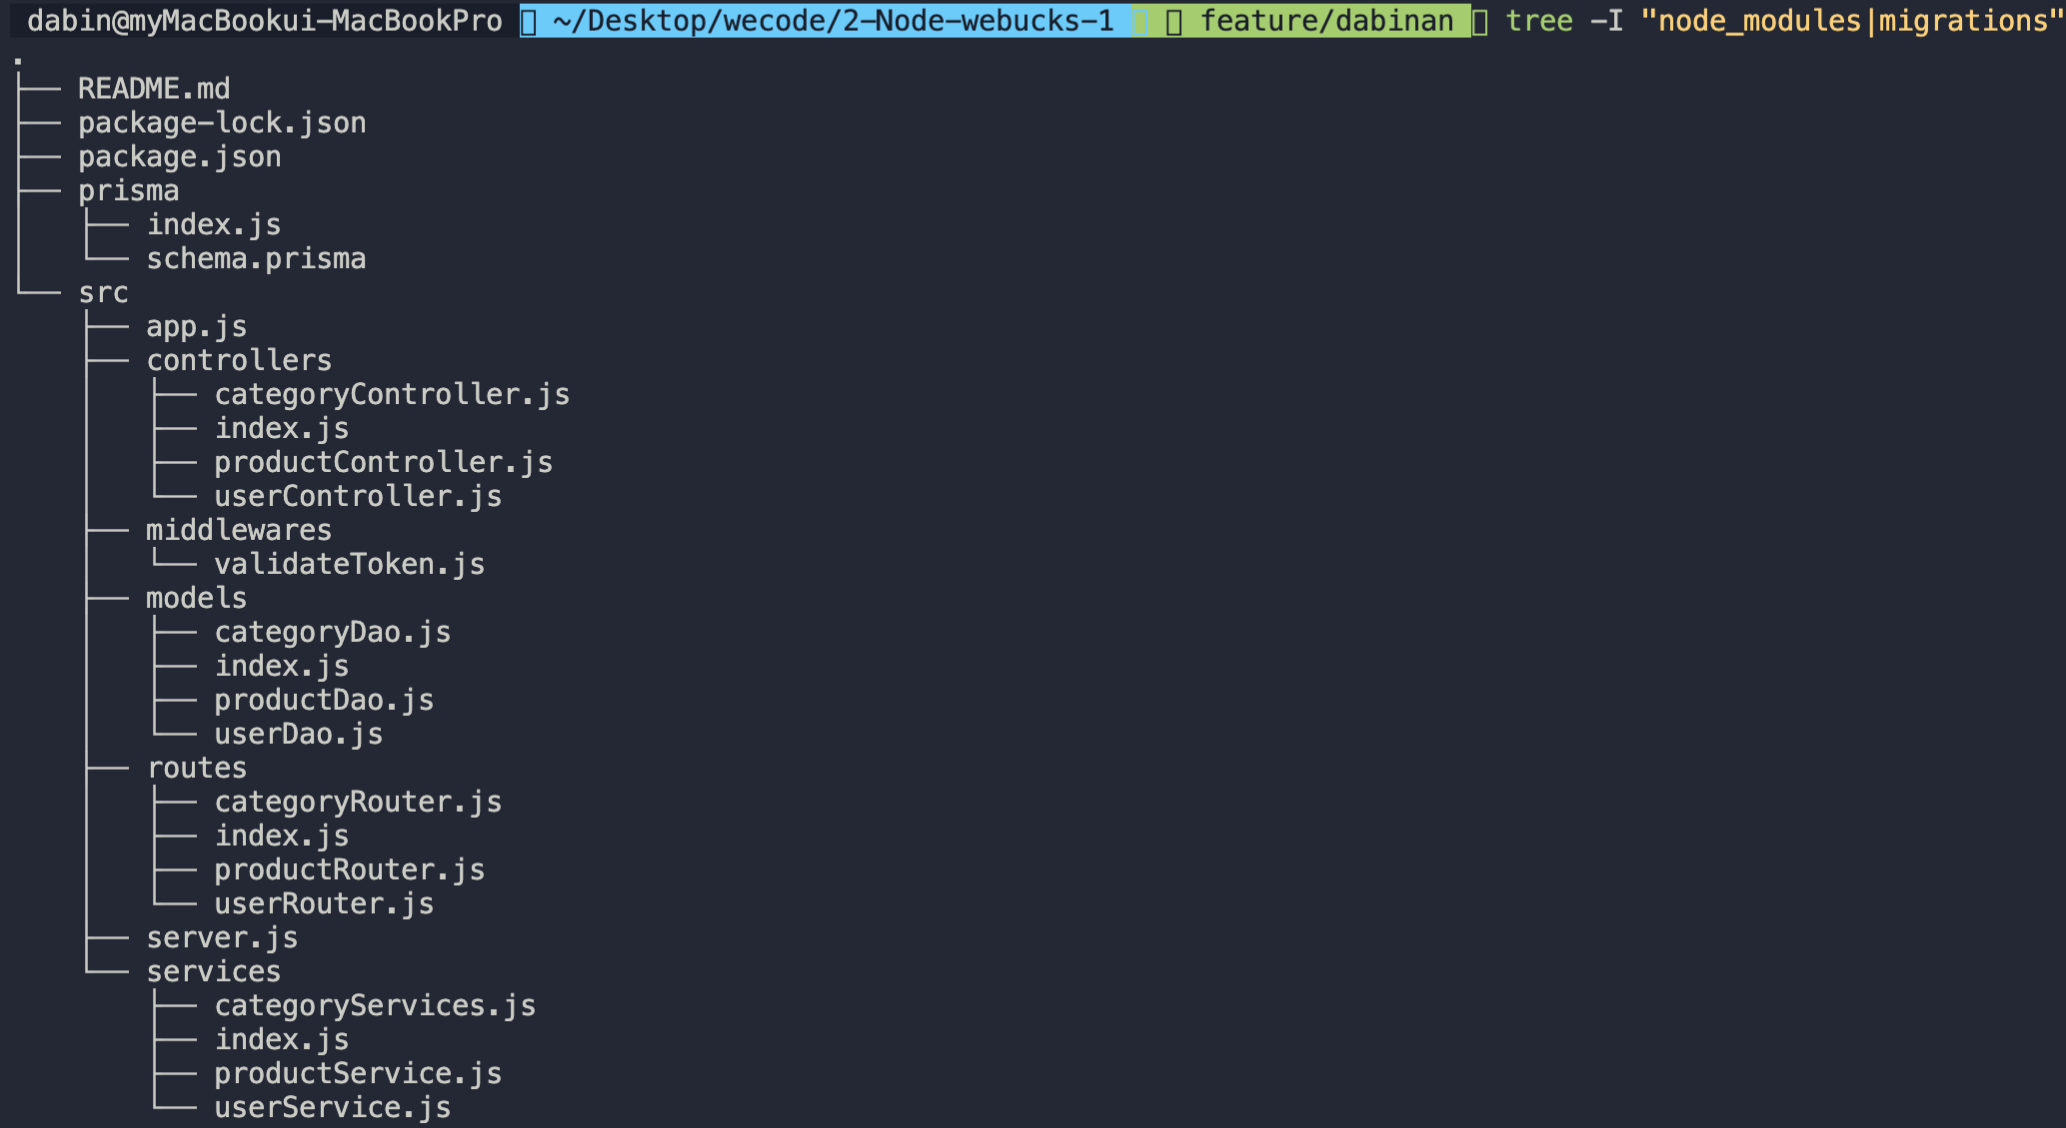
- prisma폴더의 index.js에서 prismaClient를 선언해 prisma가 사용되는 파일(models폴더 내)에서 import한 뒤 prisma의 메서드를 사용할 수 있도록 했다.
- server.js에서는 server만 open하고 app.js에서 express를 import하고 app.use가 필요한 코드를 작성했으며 마지막으로 에러를 핸들링하는 함수를 작성했다.
- 레이어드 패턴을 적용하며 각 폴더에 index.js파일을 생성해 패키지처럼 작동할 수 있도록 했다.
- 재사용할 함수가 많을 경우 utils.js 파일을 만들어 함수를 관리하면 좋을 것 같다.
[ tree 사용 주요 옵션 ]
- -d : 디렉터리만
- -I : 특정 디렉토리 제외
- -L : level 지정 ex)-L 2는 depth2까지만
- -N : 한글이 포함될 때 사용하면 한글 깨지지 않습니다!
프리즈마 스키마 작성
model Image {
  id        Int     @id @default(autoincrement())
  imageUrl  String  @map("image_url") @db.VarChar(2000)
  productId Int     @map("product_id")
  product   Product @relation(fields: [productId], references: [id])

  @@map("images")
}

model User {
  id            Int         @id @default(autoincrement())
  email         String      @unique
  password      String
  username      String?
  address       String?
  phone_number  String?
  policy_agreed Boolean     @default(true)
  createdAt     DateTime    @default(now()) @map("created_at")
  updatedAt     DateTime?   @updatedAt @map("updated_at")
  deletedAt     DateTime?   @map("deleted_at")
  isDeleted     Boolean     @default(false) @map("is_deleted")
  like          Like[]
  comment       Comment[]
  reComment     ReComment[]

  @@map("users")
}- prisma 문법으로 작성하고 migrate하면 mysql문법으로 변환되어 데이터베이스에 테이블들이 형성된다.
- node.js와 database에서 각각 카멜케이스와 파스칼케이스를 사용했기 때문에 mapping으로 데이터베이스에 알맞은 컨벤션으로 바꿨다.
- 이미지 Url의 경우 매우 길 수 있어 2000자로 설정했다.
- prisma에서 foreign key를 설정할 때 @relation을 작성해줘야 하며 참조되고 있는 model에도 이를 알려주어야 한다! 1:1 관계는 ?, 1:many 관계는 []로 표시한다.
- CRUD가 가능한 데이터에는 createdAt, updatedAt, deletedAt을 두고 관리해주자!
- delete를 하드하게(?) 한다면 요청이 있을 때 그냥 데이터를 삭제한다. 하지만 보통 isDeleted를 boolean값으로 설정하고 데이터 필터링을 통해 화면에 보여주는 방식을 채택하고 있다.
대댓글 모델링
model ReComment {
  id        Int       @id @default(autoincrement())
  contents  String
  userId    Int       @map("user_id")
  commentId Int       @map("comment_id")
  createdAt DateTime  @default(now()) @map("created_at")
  updatedAt DateTime? @updatedAt @map("updated_at")
  deletedAt DateTime? @map("deleted_at")
  isDeleted Boolean   @default(false) @map("is_deleted")
  user      User      @relation(fields: [userId], references: [id])
  comment   Comment   @relation(fields: [commentId], references: [id])

  @@map("re_comments")
}- comment 안에 계층형으로 만들어 요청에 따라 데이터를 전송할 때 JOIN 등으로 계층형 객체를 만들어 내보내도 되지만, 댓글의 depth를 2까지만 허용한다고 가정했을 때 하나의 테이블을 더 만들어서 관리하는 것이 편리할 것 같았다. 따라서 상위 comment의 id를 참조하는 대댓글 테이블을 만들었다. (모델링만 하고, CRUD는 구현하지 않은 상태다.)
환경변수 파일
//.env에 작성한다.
DATABASE_URL="mysql://유저이름:비밀번호@localhost:3306/데이터베이스이름"
PORT = 포트번호
secret="원하는secret key"

//사용법
import dotenv from 'dotenv';
dotenv.config();
const { PORT } = process.env;

app.listen(PORT, () => console.log(`server on ${PORT}`));
valideToken 미들웨어
댓글 작성이나 회원 정보 수정 등의 기능에는 지금 요청을 보낸 이 사용자가 우리의 user인지!를 인증하는 과정이 필요하다. 정말 많이 사용되는 함수이기 때문에 미들웨어로 만들어 여기저기 가져다 쓸 수 있도록 만들었다.
//valideToken.js
import jwt from 'jsonwebtoken';
import dotenv from 'dotenv';
import { userService } from '../services';

dotenv.config();
const { secret } = process.env;

const validateToken = async (req, res, next) => {
  try {
    const token = req.headers.cookie;
    if (!token) {
      return res.status(401).json({
        message: 'NOT_LOGGED_IN',
      });
    }
    const decoded = jwt.verify(token.split('=')[1], secret);
    const id = decoded.id;
    const foundUser = await userService.findUser(id);
    if (foundUser === 0) {
      return res.status(401).json({
        message: 'USER_NOT_FOUND',
      });
    }

    req.decoded = decoded;
    //decoded안에 user정보가 담겨있기 때문에 다음 함수에서 꺼내 쓸 수 있다.
    next();
  } catch (err) {
    next(err); //마지막에 app.js에 있는 에러 핸들링 함수가 실행되어 어떤 에러가 났는지 전송된다.
  }
};

export default validateToken;
RESTful API
원래는 동사(delete, update 등)로 작성되어 있던 URI를 명사로 수정하고, 알맞은 메서드를 사용하도록 바꾸었다.
router.get('/user', validateToken, userController.getUsers);
router.post('/user/login', userController.loginUser);
router.post('/user', userController.createUser);
router.delete('/user', validateToken, userController.deleteUser);
signup
//router
router.post('/user', userController.createUser);

//controller
const createUser = async (req, res, next) => {
  try {
    const userData = req.body;
    const newUser = await userService.createUser(userData, next);
    //마지막 데이터베이스 접근 함수에서 에러를 잡아내기 위해 next를 계속 전달
    if (!newUser) {
      next(); //app.js의 에러 핸들링 함수 실행
    } else {
      return res.status(201).json({
        message: 'CREATED',
        newUser,
      });
    }
  } catch (err) {
    next(err); //app.js의 에러 핸들링 함수 실행
  }
};

//service
const createUser = async (userData, next) => {
  const { password } = userData;
  const hash = await bcrypt.hash(password, 10); //암호화
  return await userDao.createUser(userData, hash, next);
};

//model
const createUser = async (userData, hash, next) => {
  try {
    const { email, username, address, phone_number } = userData;
    await prisma.$queryRaw`
    INSERT INTO
      users(
        email,
        password,
        username,
        address,
        phone_number
      )
      VALUES (
        ${email},
        ${hash},
        ${username},
        ${address},
        ${phone_number}
      );
    `;
    const [newUser] = await prisma.$queryRaw`
    SELECT email, username
    FROM users
    WHERE email=${email};
  `;
    return newUser;
  } catch (err) {
    next(err);
  }
};
INSERT INTO문은 반환하는 데이터가 없다. 회원가입을 하고 나면 가입한 이메일을 보여주고 성공적으로 가입되었다고 하는 경우를 생각하고 이름과 이메일만 담아 데이터를 반환하도록 만들었다.
에러 핸들링
이메일은 unique key이기 때문에 이미 데이터베이스에 있는 이메일을 입력하게 되면 오류가 난다. 이 에러를 알려주기 위해 next를 model까지 전달해서 app.js에 있는 에러 핸들링 함수가 작동될 수 있도록 했다.app.use((err, req, res, next) => { const { status } = err; console.error(err); res.status(status || 500).json({ message: err.meta.message }); });console.log를 찍어 보니 오류가 나면 err.meta.message에 그 내용이 담겨있었다. 요청을 보내 확인해보니 응답에는 아래와 같은 메세지가 담겨있다.
{
    "message":
  	"Duplicate entry 'dabin219@hohoho.com' for key 'users.users_email_key'"
}
업데이트된 회원가입 에러핸들링 코드
https://velog.io/@vraimentres/async-%ED%95%A8%EC%88%98%EC%99%80-try-catch
- 이 블로그 게시글에 따르면 에러가 발생한 뒤의 코드는 실행되지 않고, 발생한 에러는 Promise.reject 처리되어 상위 컨텍스트에서 비동기 에러로 처리된다. 비동기 코드의 결과에 상관 없이 클라이언트에게 응답을 해줘야 한다. 따라서 서비스 로직까지는 비동기에러를 계속 try-catch 없이 보내고, 컨트롤러에선 try-catch를 통해 에러내용을 정리해 응답을 해주면 된다.
https://jeonghwan-kim.github.io/node/2017/08/17/express-error-handling.html
- 이 게시글에 따르면 익스프레스로 에러를 알리는 방법은 세번째 인자로 next()를 사용하는 것이다. 비동기 오류를 보고하려면 반드시 next()를 통과해야 하고, 통과하면 마지막 오류 처리 미들웨어에서 에러를 클라이언트에게 보내줄 것이다.
- 컨트롤러에 try-catch를 통해 오류를 잡는 코드가 계속 반복된다. 이를 효율적으로 하기 위해 wrapper 함수를 사용해 무조건 next()를 통과할 수 있도록 전체 함수를 감싸줄 수 있다.
function wrapAsync(fn) {
  return function (req, res, next) {
    // 모든 오류를 .catch() 처리하고 체인의 next() 미들웨어에 전달하세요
    // (이 경우에는 오류 처리기)
    fn(req, res, next).catch(next)
  }
}
//utils.js
const wrapAsync = fn => {
  return (req, res, next) => {
    fn(req, res, next).catch(next);
  };
};

export { wrapAsync };

//Controller
const createUser = wrapAsync(async (req, res) => {
  const userData = req.body;
  const newUser = await userService.createUser(userData);
  res.status(201).json({
    message: 'CREATED',
    newUser,
  });
});

//Service
const createUser = async userData => {
  const { email, password } = userData;
  const foundUser = await userDao.findUserByEmail(email);
   if (foundUser) {
    const err = new Error('ALREADY_EXISTED_USER');
    err.status = 401;
    throw err;
  }
  const hash = await bcrypt.hash(password, 10);
  const newUser = await userDao.createUser(userData, hash);
  return newUser;
};

//가입된 이메일이라면??
{
    "message": "ALREADY_EXISTED_USER"
}
login
//router
router.post('user/login', userController.loginUser);

//controller
const loginUser = async (req, res) => {
  try {
    const { email, password } = req.body;
    const token = await userService.loginUser(email, password);
    if (!token) {
      res.status(401).json('PLEASE_CHECK_EMAIL_OR_PASSWORD');
    } else {
      res.cookie('user', token, {
        httpOnly: true,
      });
      //쿠키에 토큰을 저장해 나중에 인증을 진행할 때 사용할 수 있도록 했다.
      //보안 측면에서 어떻게 저장해야 좋을까? 깊이 공부해보는 시간을 꼭 갖자!!!!
      return res.status(200).json({
        message: 'SUCCESS',
        token,
      });
    }
  } catch (err) {
    console.log(err);
  }
};

//service
const loginUser = async (email, password) => {
  const user = await userDao.loginUser(email);
  if (user) {
    const validPassword = await bcrypt.compare(password, user.password);
    if (validPassword) {
      const token = jwt.sign({ id: user.id }, secret, { expiresIn: '7d' });
      return token;
    }
  }
};

//model
const loginUser = async email => {
  const [user] = await prisma.$queryRaw`
    SELECT
      password
    FROM
      users
    WHERE
    email=${email};
    `;
  return user;
};
//password를 반환해야 bcrypt.compare을 할 수 있다.
comment(UD)
Update
//router
router.put(
  '/product/:id/comment',
  validateToken,
  productController.updateCommentProduct
);
//내용 전부 업데이트는 PUT메서드를 사용하고, 일부 업데이트는 PATCH를 사용한다.

//controller
const updateCommentProduct = async (req, res) => {
  try {
    const productId = req.params.id;
    const userId = req.decoded.id;
    const { comment } = req.body;
    await productService.updateCommentProduct(productId, userId, comment);
    res.status(200).json({
      message: 'UPDATED',
    });
  } catch (err) {
    console.log(err);
  }
};

//service
const updateCommentProduct = async (productId, userId, comment) => {
  return await productDao.updateCommentProduct(productId, userId, comment);
};

//model
const updateCommentProduct = async (productId, userId, comment) => {
  return await prisma.$queryRaw`
  UPDATE comments
  SET
    contents=${comment},
    updated_at=now()
  WHERE
    product_id=${productId}
  AND
    user_id=${userId};
  `;
};
Delete
//router
router.delete(
  '/product/:id/comment',
  validateToken,
  productController.deleteCommentProduct
);

//controller
const deleteCommentProduct = async (req, res) => {
  try {
    const productId = req.params.id;
    const userId = req.decoded.id;
    await productService.deleteCommentProduct(productId, userId);
    res.status(200).json({
      message: 'DELETED',
    });
  } catch (err) {
    console.log(err);
  }
};

//service
const deleteCommentProduct = async (productId, userId) => {
  return await productDao.deleteCommentProduct(productId, userId);
};

//model
const deleteCommentProduct = async (productId, userId) => {
  return await prisma.$queryRaw`
    UPDATE comments
    SET
      deleted_at=now(),
      is_deleted=true
    WHERE
      product_id=${productId}
    AND
      user_id=${userId}
  ;`;
};
like
참조 관계가 다대다 관계라면 새로운 테이블이 필요하다.
//prisma model
model Like {
  id        Int     @id @default(autoincrement())
  userId    Int     @map("user_id")
  productId Int     @map("product_id")
  user      User    @relation(fields: [userId], references: [id])
  product   Product @relation(fields: [productId], references: [id])

  @@map("likes")
}

//router
router.get('/:id/like', validateToken, productController.likeProduct);

//controller
const likeProduct = async (req, res) => {
  try {
    const productId = req.params.id;
    const userId = req.decoded.id;
    const isLiked = await productService.likeProduct(productId, userId);
    res.status(200).json({
      message: isLiked ? 'LIKED' : 'DISLIKED',
    });
  } catch (err) {
    console.log(err);
  }
};

//service
const likeProduct = async (productId, userId) => {
  return await productDao.likeProduct(productId, userId);
};

//model
const likeProduct = async (productId, userId) => {
  const [isLiked] = await prisma.$queryRaw`
    SELECT * FROM likes WHERE product_id=${productId} and user_id=${userId}
    `;
  if (isLiked) {
    await prisma.$queryRaw`
		DELETE FROM
		  likes
		WHERE
		  product_id=${productId} and user_id=${userId}`;
    return false;
  } else {
    await prisma.$queryRaw`
      INSERT INTO
		likes (product_id, user_id)
	  VALUE
		(${productId}, ${userId})
    `;
    return true;
  }
};
model단에서 false, true를 반환해도 되는가에 대해서는 확신이 없다. 더 좋은 방법이 있을 것 같으니 좋아요 버튼에 대한 예제를 많이 보고 공부해보자. 사용자 중에는 라이크 버튼을 연속으로 우다다다다다 누르는 경우가 분명 있을 것이다. 이 경우 setTimeout등의 함수로 프론트에서 최종 데이터를 전송하는 등의 방식을 통해 비효율을 줄일 수 있다. 다음 프로젝트시 프론트/백엔드를 만지며 어디서 어떠한 처리를 해주는 것이 좋을지 고민해보자.
ZERO CHO님의 유튜브 영상 참고
링크 :router.post('/product/:id/like, userController.addLike); router.delete('/product/:id/like, userController.removeLike); //프론트에서 버튼에 따라 like/unlike 처리해서 post or delete 메서드로 호출
query parameter(filtering, sorting 할 때 사용)
//router
router.get('/product', validateToken, productController.getProducts);
//GET http://localhost:8000/product?categoryId=숫자

//controller
const getProducts = async (req, res) => {
  try {
    const categoryId = req.query.categoryId;
    const products = await productService.getProducts(Number(categoryId));
    res.status(200).json({
      message: 'SUCCESS',
      products,
    });
  } catch (err) {
    console.log(err);
  }
};

//service
const getProducts = async categoryId => {
  return await productDao.getProducts(categoryId);
};

//model
const getProducts = async categoryId => {
  const products = await prisma.$queryRaw`
  SELECT
    p.id,
    p.korean_name,
    p.english_name,
    c.name,
    c.id,
    i.image_url
  FROM products p
  JOIN categories c
  ON c.id = p.category_id
  JOIN images i
  ON i.product_id = p.id
  WHERE c.id=${categoryId}
  `;
  return products;
};
헐 다빈님 2주를 통으로 요약해두셨네요 진짜 정리 잘하십니다