Spring을 이용해서 API의 제약사항을 표현할때 Bean Validation을 많이 사용한다. 필드에 표현은 쉽게 되는데, 이걸 REST Docs에 표현하자니 description에 적어줘야 할지... 애매해진다.
Validation 정보를 담기 위한 커스텀 템플릿과 ConstraintDescriptions을 이용해서 Bean Validation 정보를 가져오는 방법에 대해 알아보자.
REST Docs에 대한 사용법은 시리즈의 이전 포스팅을 참고해주세요!
커스텀 템플릿 만들기
일단은 스니펫 템플릿을 개조해본다.
// request-fields.snippet
|===
|Path|Type|Description|Constraints

{{#fields}}
|{{#tableCellContent}}`+{{path}}+`{{/tableCellContent}}
|{{#tableCellContent}}`+{{type}}+`{{/tableCellContent}}
|{{#tableCellContent}}{{description}}{{/tableCellContent}}
|{{#tableCellContent}}{{constraints}}{{/tableCellContent}}

{{/fields}}
|===
requestFields(
    fieldWithPath("name")
      .type(JsonFieldType.STRING)
      .description("이름")
      .attributes(key("constraints").value("not null"))
);
하지만 이걸로는 안 된다. not null 이라고 직접 입력한 것 뿐이다.

필드 개수가 얼마 안 되면 어떻게 해보겠지만, 이렇게 필드가 많아지면 너무 힘들어진다. 자동화 시켜보자.
Validation 정보 불러오기
ConstraintDescriptions
spring-restdocs-core에 ConstraintDescriptions가 들어있다. 특정 클래스에 제약사항이 있는지 확인해준다.

ConstraintDescriptions simpleRequestConstraints = new ConstraintDescriptions(SimpleRequest.class);
List<String> nameDescription = simpleRequestConstraints.descriptionsForProperty("name");
이렇게 하면 SimpleRequest의 필드에 붙은 제약사항을 불러온다. 이대로 넣어주기만 하면 된다.
requestFields(
    fieldWithPath("name")
      .type(JsonFieldType.STRING)
      .description("이름")
      .attributes(key("constraints").value(nameDescription))
)
다만, attributes에 constraint가 없을 경우 `MustacheException$Context 예외가 발생할 수 있다. 스니펫 템플릿을 아래처럼 변경해주면 된다.
// request-fields.snippet
|===
|Path|Type|Description|Constraints

{{#fields}}
|{{#tableCellContent}}`+{{path}}+`{{/tableCellContent}}
|{{#tableCellContent}}`+{{type}}+`{{/tableCellContent}}
|{{#tableCellContent}}{{description}}{{/tableCellContent}}
|{{#tableCellContent}}{{#constraints}}{{.}} +
{{/constraints}}{{/tableCellContent}}

{{/fields}}
|==={{.}}은 필드가 존재할때만 출력을 해주는 문법이다. +는 강제 개행인데, 한 줄씩 띄어준다. 쉼표같이 선호하는 표현 방식이 있으면 바꿔서 쓰면 된다.
내부 동작
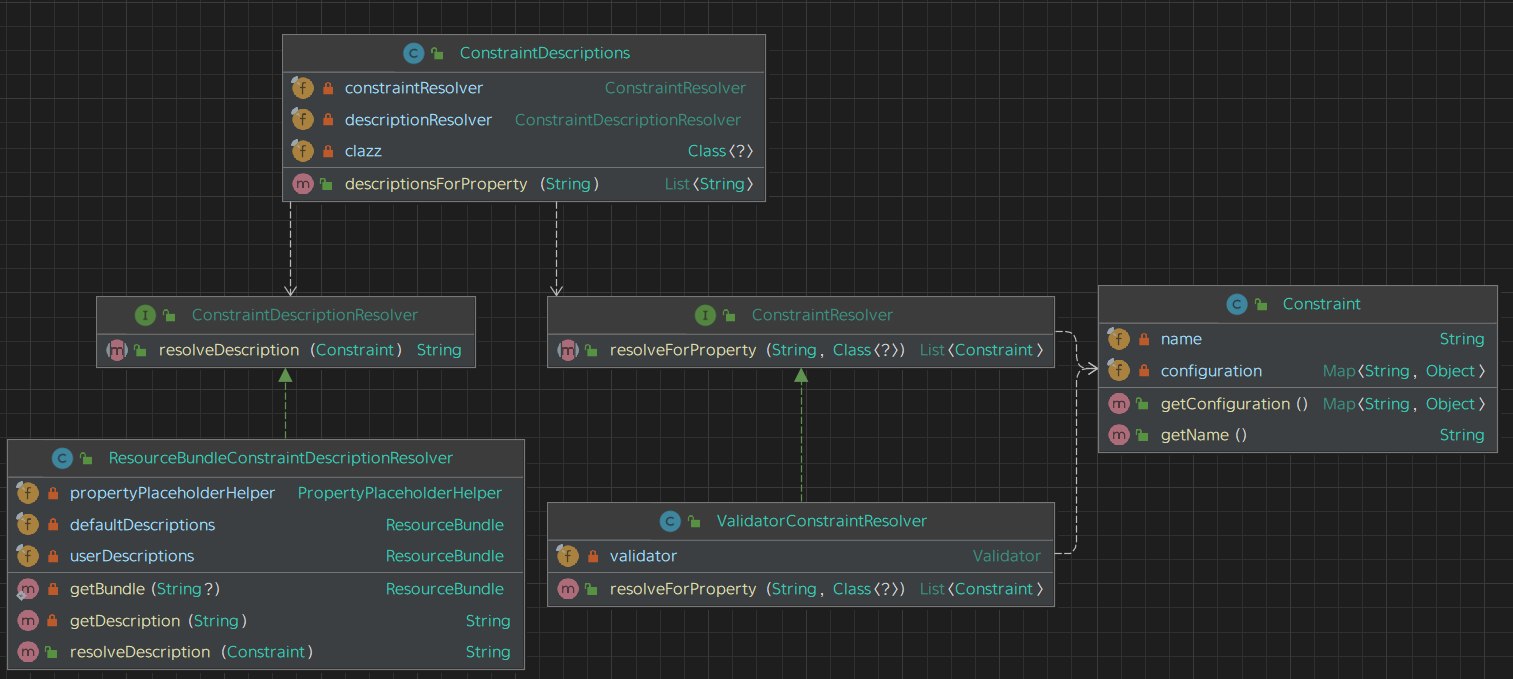
org.springframework.restdocs.constraints 패키지 안은 아래와 같이 구성된다.

ConstraintDescriptions.descriptionsForProperty에 프로퍼티 명을 매개변수로 넣으면 ConstraintResolver는 해당 프로퍼티에 맞는 Constraint를 가져온다. 기본 구현인 ValidatorConstraintResolver는 내부적으로 Bean Validation의 Validator 객체를 사용한다.
Bean Validation을 이용해서 해당 클래스의 필드에 붙은 @NotNull과 같은 constraint를 가져온다. Java Bean 규격을 따르기 때문에 필드명과 json field의 이름이 일치하지 않는 경우 주의해야 한다.
만약 json field가 user_id일 경우 카멜케이스로 변경해서 넣어줘야 한다. 내부에 있는
PropertyDescriptor가 Java Bean 컨벤션에 따라 프로퍼티를 찾기 때문이다.
ConstraintDescriptionResolver는 ConstraintResolver가 찾아온 Constraint을 문자열로 변환해준다. 기본적으로 Bean Validator 2.0과 Hibernate Validator 스펙에 맞게 지원한다. 커스텀 제약사항이 있다면 해당 프로퍼티를 객체 생성시에 넣어주면 된다.
참고 - 기본 지원 constraints
마치며
공식문서에 깃허브 링크만 덜렁 보여주면서 따라해라고 돼있어 가이드를 작성해봤다. Attribute를 직접 넣어주는게 단점이지만, 반대로 Bean Validation을 사용하는 DTO라면 어디에든 넣어줄 수 있기 때문에 request parameter에도 똑같이 적용할 수 있다.
ConstraintDescriptions도 쓰기 쉽게 잘 만들어 놓아서 Java Bean을 사용해야 한다는 사실만 숙지하면 쉽게 사용할 수 있다. 반복될 가능성이 높기 때문에 래핑해서 쓰는 것도 좋아보인다.
그럼에도 고민 되는 부분은 컬럼 항목이 많아지다보니 표가 복잡해진다는 것인데, [%autowidth.stretch]를 표에 붙여 타협하고 있다. 여유가 있으면 스니펫을 새로 만들면 되지만 시간을 꽤 투자해야 할 것 같아 망설여진다.
혹시 좋은 아이디어가 있으면 공유 부탁드립니다 ㅎㅎ
References
- https://docs.spring.io/spring-restdocs/docs/2.0.5.RELEASE/reference/html5/#documenting-your-api-constraints
- https://github.com/spring-projects/spring-restdocs/blob/main/samples/rest-notes-spring-hateoas/src/test/java/com/example/notes/ApiDocumentation.java
- https://github.com/spring-projects/spring-restdocs/blob/main/spring-restdocs-core/src/test/java/org/springframework/restdocs/constraints/ResourceBundleConstraintDescriptionResolverTests.java

덕분에 잘 활용했습니다.
.attributes(key("constraint")에 오타있네요. constraint를 constraints로 바꿔줘야할것 같습니다.