
테스트 환경
- Ubuntu Server 24.04(LTS) 운영체제
- JBang Camel Ver 4.13.0
- Jdk 21(temurion)
설치법
sudo apt update && sudo apt upgrade -y
sudo apt install zip unzip -y
sudo curl -s "https://get.sdkman.io" | bash

# exit 하고 다시 ssh 로그인

sdk list java # java 설치 목록조회 및 "tem" 으로 끝나는 21 버전 조회
sdk install java 21.0.8-tem # 조회된 것의 명칭을 통해서 설치
sdk install jbang
jbang app install camel@apache/camel

# exit 하고 다시 ssh 로그인

camel --version # 가볍게 버전확인. 저는 4.13.0 나오네요.

# 자동완성기능 활성화
echo 'source <(camel completion)' >> ~/.bashrc
저는 설치를 다하고 보니 Jbang Camel 버전이 4.13.0 이더군요.
여러분들은 저랑 다를 수도 있으니 조금 유의하시기 바랍니다.
Camel DSL 작성과 실행법
apache camel 을 통해서 route 를 실행시키려면,
route 정보를 작성한 DSL 파일이 필요합니다.
이 목차에서는 DSL 을 작성할 수 있는 3가지 방법
(Java ,Yaml, XML)을 하나씩 예시로 작성해보겠습니다.
1. java
DSL 파일 작성: TimerLogRoute.java
import org.apache.camel.builder.RouteBuilder;

public class TimerLogRoute extends RouteBuilder {

    @Override
    public void configure() throws Exception {
        from("timer:java?period=1000")
            .setBody().simple("Hello Camel from ${routeId}")
            .log("${body}");
    }
}
실행 방법:
camel run TimerLogRoute.java
2. yaml
DSL 파일 작성: route.yaml
- route:
    from:
      uri: timer:yaml
      parameters:
        period: "1000"
      steps:
        - setBody:
            simple: Hello Camel from ${routeId}
        - log: ${body}
실행 방법:
camel run route.yaml
3. xml
<?xml version="1.0" encoding="UTF-8"?>
<camel>
    <route>
        <from uri="timer:xml?period=1000"/>
        <setBody>
            <simple>Hello Camel from ${routeId}</simple>
        </setBody>
        <log message="${body}"/>
    </route>
</camel>
<!-- 여기서는 camel 태그 대신 routes 태그를 사용해도 똑같이 동작합니다. -->
실행 방법:
camel run route.xml
참고: xml 의 경우
camel 3.9부터 나온 XML IO DSL (= Camel optimized XML DSL) 을
통해서 동작합니다.
보충(1): background 실행
위에서는 단순히 실행을 위해서 camel run ~~ 처럼만 작성했지만,
이러면 기본적으로 포어그라운드로 동작하기 때문에 다른 작업을 못합니다.
백그라운드로 실행시키고 싶다면 아래처럼 명령어 옵션을 추가하면 됩니다.
camel run some.yaml --background
보충(2): camel init
위에서 본 DSL 파일들은 처음부터 작성하기 막막할 때는
camel init 명령어를 통해서 쉽게 샘플 DSL 을 생성할 수 있습니다.
camel init hello.yamlcamel init hello.xmlcamel init Hello.java
위 명령어 처럼 입력하면 각 포맷에 맞는 DSL 파일이 생성됩니다.
이 파일들은 camel run 으로 곧바로 실행할 수 있는 샘플들입니다!
관리 기능
실행된 Camel 목록조회
camel ps
실행된 Camel 종료하기
camel ps # 종료하고자 하는 camel 프로세스의 PID (또는 NAME) 확인
camel stop ${앞서_확인한_PID_또는_NAME}
# 만약 모두 종료하고 싶으면 "camel stop" 만 입력하면 됩니다.
실행된 Camel 로그 보기
camel run ??.xml --background 처럼 실행하면 백그라운드에서 실행되는데,
이런 것들은 로그를 어떻게 볼까요? 아래처럼 하면 됩니다.
camel ps # 로그를 보려는 camel 프로세스의 PID (또는 NAME) 확인
camel log ${앞서_확인한_PID_또는_NAME}
camel log 에는 --tail, --follow 등 옵션들이 다양하니 잘 활용하시기 바랍니다.
더 자세한 사항들은 camel log --help 로 확인 바랍니다.
현재
jbang camel 4.13.0의 버그인지--follow옵션의 경우에는 추가를 안해야
적용이되는 버그가 있습니다.--follow를 주면 오히려 동작을 안합니다! 😂
Camel 메모리 사용량
camel top
Hot Reload
이미 camel run 으로 실행한 dsl 파일의 내용을 바꿔서 적용하고 싶을 수 있습니다.
이럴 때는 camel run 에 --dev 옵션을 주면 됩니다.
간단한 예시를 보죠.

camel run some.xml --dev로 camel 프로세스 실행vim some.xml을 통해서 dsl 의 내용을 변경하고 저장- 동작중이던 camel 프로세스에서 하던 걸 멈추고, Routes Reload 발생
- 변경된 내용을 기반으로 다시 camel 프로세스 실행
커스텀 java source 적용
기본 camel 기능이 많다고 해도, 가끔은 저희들만의 커스텀한 Java 코드를
작성하고, 이것을 camel 에 적용하고 싶을 때가 있습니다.
지금부터 그 방법을 알아보죠.
디렉토리 구조
제일 먼저 지켜야할 것은 디렉토리 구조입니다.
저는 아래와 같이 구조를 잡았습니다.
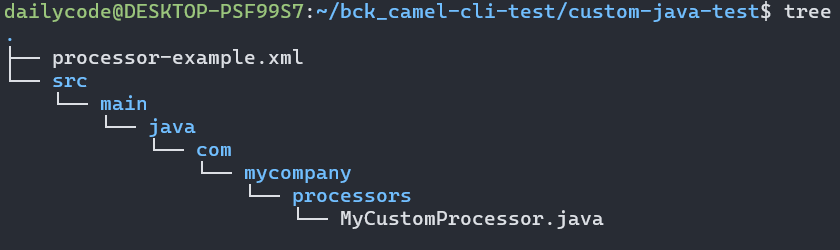
xml dsl파일이 최상위 디렉토리(camel run 이 실행될 위치)에 있고,src/main/java디렉토리가 최상위 디렉토리 하부에 위치하며,com/mycompany/processors디렉토리를 다시src/main/java하부에 생성.
이com/mycompany/processors디렉토리명은 추후 패키지 경로로 사용됩니다.
<?xml version="1.0" encoding="UTF-8"?>
<camel>
  	<!-- bean 적용 방법은 2가지 입니다. -->
  	<!-- spring style -->
    <!--
	<beans xmlns="http://www.springframework.org/schema/beans">
        <bean id="MyCustomProcessor" class="com.mycompany.processors.MyCustomProcessor"/>
    </beans>
	-->

  <!-- camel style -->
  <bean name="MyCustomProcessor"
        type="com.mycompany.processors.MyCustomProcessor"/>

  <route id="java-processor-route">
    <from uri="timer:runOnce?period=3000"/>
    <setBody>
      <constant>Initial Message</constant>
    </setBody>
    <log message="Before Processor: ${body}"/>

    <!-- 직접 작성한 java 코드로 만든 프로세스 적용 -->
    <process ref="MyCustomProcessor"/>

    <log message="After Processors: Body is '${body}'\nand headers are [processedBy=${header.processedBy}"/>
  </route>

</camel>
커스텀 클래스 작성
위 xml dsl 에서 사용한 MyCustomProcessor.java 내용은 다음과 같습니다.
package com.mycompany.processors;
// 패키지 경로가 `src/java/main` 하부에 있던
// 디렉토리 명과 일치시키는 게 중요합니다!


import org.apache.camel.Exchange;
import org.apache.camel.Processor;

public class MyCustomProcessor implements Processor {

    @Override
    public void process(Exchange exchange) throws Exception {
        // Get the original message body
        String originalBody = exchange.getIn().getBody(String.class);

        // Add a new header
        exchange.getIn().setHeader("processedBy", "MyCustomProcessor");

        // Create a new body
        String newBody = "Transformed Body: [" + originalBody + "]";

        // Set the new body
        exchange.getIn().setBody(newBody);
    }
}
실행 방법
실행 방법은 다음과 같습니다 (참고로 리눅스 환경에서 한 겁니다!)
# 당연하지만, 먼저 processor-example.xml 파일이 있는 곳으로 cd 하세요~

# 이후에 camel run 합니다.

# 방법1: java 소스 경로를 명시적으로 파라미터로 넣어주는게 핵심입니다!
camel run $(find ./src/main -name "*.java" -type f) processor-example.xml

# 방법2: --source-dir 옵션 사용
camel run --source-dir=.
외부 설정값 사용법
dsl 을 작성하다보면 설정값(ex: db connection 정보)들을 외부의
properties 파일이나, 전역변수에서 읽어오고 싶을 때가 있습니다.
지금부터 그 방법을 알아보겠습니다.
방법(1): application.properties
먼저 프로퍼티 파일의 설정값 사용 방법입니다.
먼저 xml dsl 파일 주변에 application.properties 파일을 생성하고
설정값들을 아래와 같이 작성합니다.
db.host=localhost
db.port=5433
db.name=postgres
db.user=postgres
db.password=postgres
이후에 xml dsl 내용 중에서 bean 의 내용을 다음과 같이 바꿉니다.
<bean name="postgres" type="org.postgresql.ds.PGSimpleDataSource">
  <properties>
    <property key="serverName" value="{{db.host}}"/>
    <property key="portNumber" value="{{db.port}}"/>
    <property key="databaseName" value="{{db.name}}"/>
    <property key="user" value="{{db.user}}"/>
    <property key="password" value="{{db.password}}"/>
  </properties>
</bean>
참고로 기본값을 주고 싶다면 아래처럼 작성하면 됩니다.
<!-- key:{기본값} ... 처럼 작성하면 됩니다. -->
<property key="serverName" value="{{db.host:localhost}}"/>
그리고 실행할 때 다음과 같이 옵션을 하나만 더 주면 됩니다.
camel run mqtt-client.xml --property application.properties실행 초반에 나오는 로그를 통해서 properties 가 잘 적용된 것을 확인할 수 있습니다.
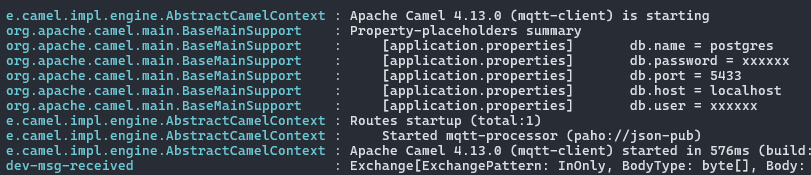
- 똑똑하게 key 에
password,user라는 키워드를 보고xxxx표기해주네요!
방법(2): 전역변수 사용
xml dsl 에서 전역변수를 사용할 수도 있습니다.
먼저 xml 의 내용을 수정합니다.
<bean name="postgres" type="org.postgresql.ds.PGSimpleDataSource">
  <properties>
    <property key="serverName" value="{{env:DB_HOST}}"/>
    <property key="portNumber" value="{{env:DB_PORT}}"/>
    <property key="databaseName" value="{{env:DB_NAME}}"/>
    <property key="user" value="{{env:DB_USER}}"/>
    <property key="password" value="{{env:DB_PASSWORD}}"/>
  </properties>
</bean>
참고: 기본값 설정방법
<property key="serverName" value="{{env:DB_HOST:localhost}}"/>
이후 실행을 아래처럼 실행하면 됩니다.
export DB_HOST=localhost
export DB_PORT=5433
export DB_NAME=postgres
export DB_USER=postgres
export DB_PASSWORD=postgres

camel run mqtt-client.xml
참고한 링크