
VirtualBox / Ubuntu 24.04(LTS) 설치
설치하는 방법은 너무 쉽기 때문에 Skip 하겠습니다. 링크만 남길게요~
다만 Ubuntu 서버 설치 과정에서
open-ssh서버 설치 여부를 묻는데
이건 추후에 설치가 귀찮으니, 설치 여부에 체크하시고 설치를 진행하시기 바랍니다.
-
virtualbox 설치 링크
https://www.virtualbox.org/wiki/Downloads -
ubuntu 24.04(LTS) 설치 링크
https://ubuntu.com/download/server -
(만약 시간이 지나서 24.04 가 아니면 아래 링크 사용)
https://ubuntu.com/download/server/thank-you?version=24.04.2&architecture=amd64<s=true
참고: Host Only Network 세팅
VirtualBox 로 작업을 할 때는 Host Only Network 하나를 생성하는 게 좋습니다.
Host Only Network 를 통해서 Host PC <-> VirtualBox OS 통신이 가능하거든요.
혹시 이런 방식의 통신이 필요한 분들은 제가 이전에 작성한 글을 참고해주시기 바랍니다.
Mosquitto 설치
# 기본 업데이트
apt-get update

# 필요한 것들 설치
apt-get install curl gnupg2 wget git apt-transport-https ca-certificates -y

# Mosquitto PPA (Personal Package Archive) 추가
add-apt-repository ppa:mosquitto-dev/mosquitto-ppa -y
apt install mosquitto mosquitto-clients -y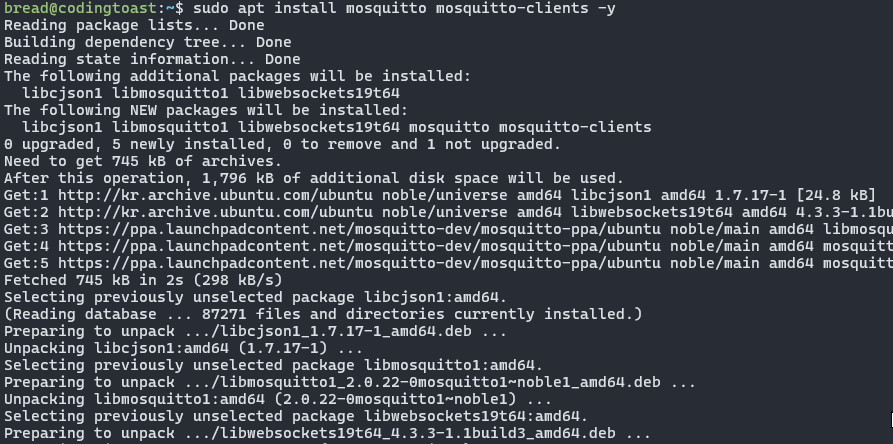
# 제대로 설치/실행됐는지 확인
systemctl status mosquitto.service

# 이 명령어로 현재 mosquitto 버전뿐만 아니라 listening 하는 port 번호 확인
mosquitto -v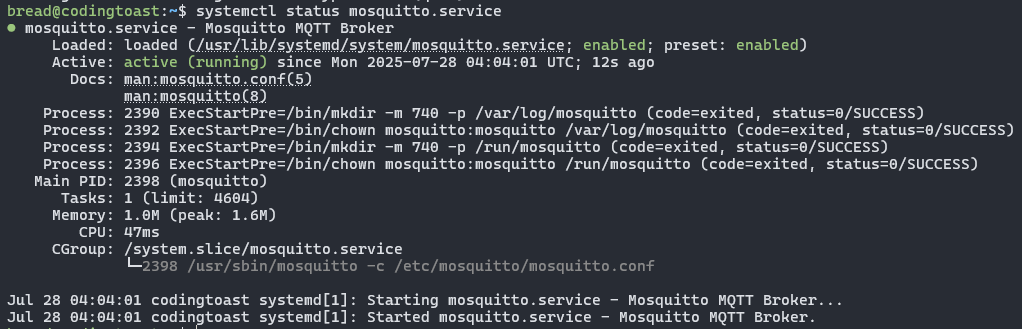

- 포트 번호 1883 을 사용중인 것을 확인할 수 있습니다.
Mosquitto 테스트
정말 간단하게 Pub/Sub 테스트를 해봅니다.
먼저 subscriber 를 준비합니다.
mosquitto_sub -h localhost -t "my/topic"이후에 subscriber 가 지정한 topic 에 pub 을 합니다.
mosquitto_pub -h localhost -t "my/topic" -m "Hello World"그러면 아래처럼 출력됩니다.

sdkman & jbang camel install
sudo apt install zip unzip
sudo curl -s "https://get.sdkman.io" | bash

# exit 하고 다시 ssh 로그인

sdk list java # java 설치 목록조회 및 "tem" 으로 끝나는 21 버전 조회
sdk install java 21.0.8-tem # 조회된 것의 명칭을 통해서 설치
sdk install jbang
jbang app install camel@apache/camel

# exit 하고 다시 ssh 로그인

camel --help # 입력해서 정상 설치됐는지 확인

# 자동완성기능 활성화
source <(camel completion)
echo 'source <(camel completion)' >> ~/.bashrc
https://sdkman.io/usage/
https://camel.apache.org/manual/camel-jbang.html
Apache Camel 통신 테스트
간단 통신 테스트
# 테스트 디렉토리 생성
mkdir -p ~/camel-cli-test/mqtt-logger && cd  ~/camel-cli-test/mqtt-logger

# apache camel - xml dsl(=xml io dsl) 을 작성
vim mqtt-logger.xml
mqtt-logger.xml 은 다음과 같이 내용 작성합니다.
<?xml version="1.0" encoding="UTF-8"?>
<routes>
  <route id="mqtt-to-log">
    <from uri="paho:my/topic?brokerUrl=tcp://localhost:1883"/>
    <log message="📥 MQTT Received: ${body}" loggingLevel="INFO"/>
  </route>
</routes>my/topic: topic 을 지정한 겁니다.localhost: 현재 localhost 에 mosquitto 와 camel 모두 설치된 상태라서 이렇게 했습니다.:1883: mosquitto 서버가 기본적으로 :1833 포트를 사용합니다.
이는mosquitto -v를 입력하면 나오는Opening ipv4 listen socket on port 1883.
라는 문구를 통해서 알 수 있습니다.
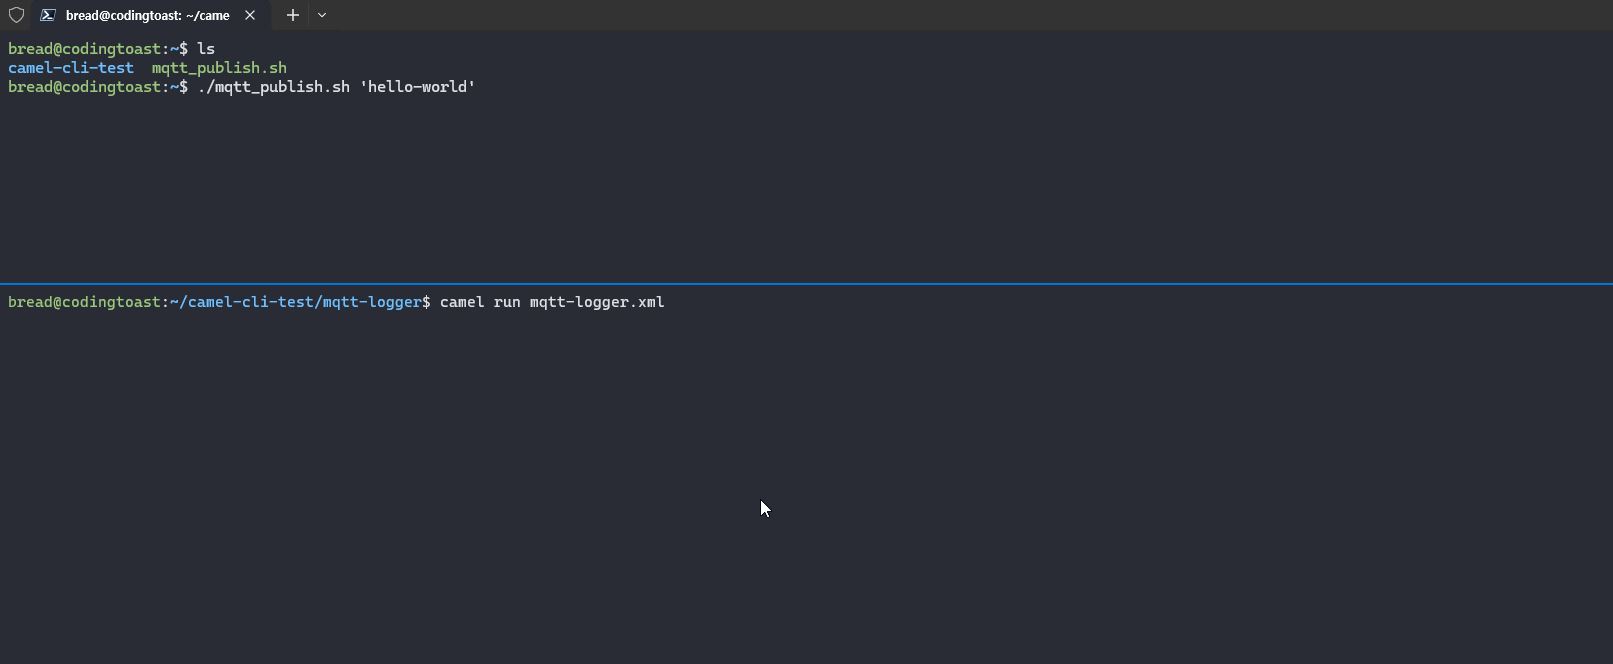
위에 작성한 내용을 이제 jbang camel 을 통해서 실행해보겠습니다.
camel run mqtt-logger.xml
이후에 mosquitto 에 message 를 0~3 초의 랜덤한 간격으로 publish 하는
shell script (mqtt_publish.sh) 를 작성해보겠습니다.
vim mqtt_publish.sh#!/bin/bash
TOPIC=$1
# Infinite Loop
while true; do
# Generate timestamp message
message="Sending Hello at $(date +'%Y-%m-%d %H:%M:%S')"
# Publish to Mosquitto topic
mosquitto_pub -h localhost -t "$TOPIC" -m "$message"
echo "Sent Message [ $message ] / Topic [ '$TOPIC' ]"
#sleep random time between 0 ~ 3 seconds
sleep_time=$(awk -v min=0 -v max=3 'BEGIN { srand(); print min + rand() * (max - min)}')
sleep "$sleep_time"
donechmod u+x mqtt_publish.sh
./mqtt_publish.sh 'hello-world' # 'hello-world' 라는 topic 에 publish 시작!이러면 아래와 같은 화면을 볼 수 있습니다. (클릭하면 크게 볼 수 있습니다)
- 참고로
ctrl + c를 입력하면 멈출 수 있습니다.
응용하기
단순하게 통신 테스트만 하지 말고, 조금 더 응용해보겠습니다.
1. Subscribe 메시지를 파일로 저장
<?xml version="1.0" encoding="UTF-8"?>
<camel>
  <route id="mqtt-to-file">
    <from uri="paho:hello-world?brokerUrl=tcp://localhost:1883"/>
    <log message="${body}"/>
    <to uri="file:./save_dir?fileName=message-${date:now:yyyyMMddHHmmssSSS}.txt"/>
  </route>
</camel>
이러고 실행하면, camel run 을 실행한 경로에 save_dir 이라는 directory 가 생기고,
mqtt subscribe 메세지의 내용들이 파일로 저장됩니다.

2. 메시지 전처리
<?xml version="1.0" encoding="UTF-8"?>
<camel>
  <route id="mqtt-processor">
    <from uri="paho:hello-world?brokerUrl=tcp://localhost:1883"/>
    <transform>
      <simple>REFINED DATA ${body}</simple>
    </transform>
    <!-- 중간 체크용 로깅 -->
    <log message="REFINED DATA ==> [ ${body} ]"/>
    <to uri="paho:refined-topic?brokerUrl=tcp://localhost:1883"/>
  </route>
</camel>- transform 을 통해서 body 의 내용을 바꾸고,
- 그 Body 를 다시 broker 에 넣습니다.
대신 topic 은 기존과 다르게refined-topic사용
테스트 결과:

- 좌측 상단에는 앞서 작성한
mqtt_publish.sh실행 - 우측 상단에는 정제된 메시지를 받는 subscriber 실행
- 하단에는 camel 실행
3. 받은 메시지 RDBMS 저장
이번에는 MQTT 로 받은 JSON 형태의 메시지를 Postgresql DB 에 넣는 작업을 해보죠.
먼저 센서가 무작위로 MQTT 에 publish 하는 듯한 느낌으로 동작하는 shell script 를
새로 작성하겠습니다.
스크립트 작성
vim mqtt_publish_json.sh#!/bin/bash
set -e
TOPIC=$1
# Define city names (필요하시면 사용하세요~)
# cities=("Seoul" "Busan" "Tokyo" "Osaka" "Beijing" "Shanghai")
# Infinite Loop
while true; do
# Generate random temperature (-10 to 50)
temperature=$(awk 'BEGIN { srand(); printf "%.1f", -10 + rand() * 60 }')
# Generate random humidity (0 to 100)
humidity=$(awk 'BEGIN { srand(); printf "%.1f", rand() * 100 }')
# Pick a random city (필요하시면 사용하세요~)
# city=${cities[$RANDOM % ${#cities[@]}]}
# Timestamp
timestamp=$(TZ=Asia/Seoul date -Iseconds)
# Create JSON message
message="{\"type\":\"sensor\",\"temperature\":$temperature,\"humidity\":$humidity,\"timestamp\":\"$timestamp\"}"
mosquitto_pub -h localhost -t "$TOPIC" -m "$message"
echo "Sent Message [ $message ] (TOPIC: $TOPIC)"
#sleep random time between 0 ~ 3 seconds
sleep_time=$(awk -v min=0 -v max=3 'BEGIN { srand(); print min + rand() * (max - min)}')
sleep "$sleep_time"
done# 파일 permission 변경
chmod u+x mqtt_publish_json.sh
# Topic [json-pub] 에 json 메시지 publish 시작!
./mqtt_publish_json.sh 'json-pub'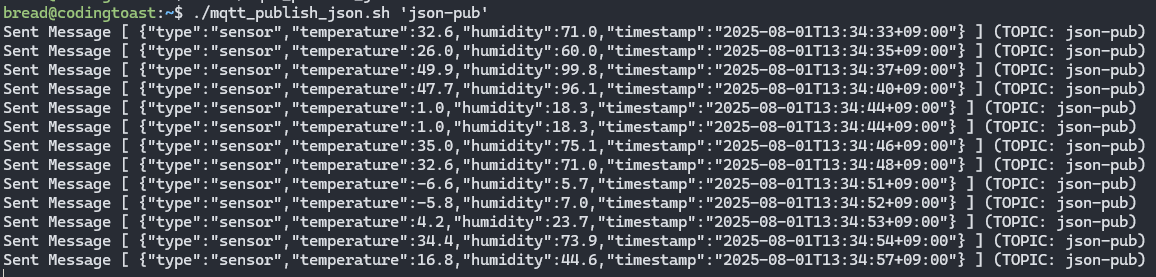
메세지를 저장한 테이블 생성
이제 저 JSON 메시지를 받은 테이블을 하나 만듭니다.
create table public.mqtt_messsage(
	type varchar(30),
    temperature double precision,
    humidity double precision,
    timestamp timestamp
);
xml dsl 작성
마지막으로 아래처럼 xml 을 하나 작성하면 끝입니다!
<?xml version="1.0" encoding="UTF-8"?>
<!-- 파일명: mqtt-msg-db-save.xml -->
<camel>
  <!-- 참고로 postgres 라이브러리는 camel run 하면 자동 다운로드 됩니다! -->
  <!-- db 정보는 본인에게 맞게 정확히 입력해주세요! -->
  <bean name="postgres" type="org.postgresql.ds.PGSimpleDataSource">
    <properties>
      <property key="serverName" value="192.168.56.1"/>
      <property key="portNumber" value="5432"/>
      <property key="databaseName" value="postgres"/>
      <property key="user" value="postgres"/>
      <property key="password" value="postgres"/>
    </properties>
  </bean>

  <route id="mqtt-processor">
    <from uri="paho:json-pub?brokerUrl=tcp://192.168.56.5:1883"/>

    <!-- 받은 메시지 확인용 로그 -->
    <to uri="log:dev-msg-received"/>

    <!-- json 형태의 문자열을 Java Map 인스턴스로 UnMarshalling! -->
    <unmarshal>
        <json library="Jackson"/>
    </unmarshal>

    <!-- 중간 체크 로깅 -->
    <log message="message => ${body[type]} , ${body[temperature]} , ${body[humidity]}, ${body[timestamp]}"/>

    <!-- sql component 로 데이터 입력! -->
    <to uri="sql:INSERT INTO public.mqtt_message (type, temperature, humidity, timestamp)
             VALUES (
             :#type,
             :#temperature,
             :#humidity,
             CAST(:#timestamp AS timestamptz))?dataSource=#postgres"/>
  </route>
</camel>
다 작성하고 나서 camel run mqtt-msg-db-save.xml 를 입력해서 실행시킵니다.
실행을 하고 나서 DB 에 가서 확인을 해보면 아래처럼 잘 적재된 것을 확인할 수 있습니다.

4. 받은 메시지 NoSQL 저장
NoSQL 로는 MongoDB 를 사용했습니다.
<camel>
<route>
<!--
From: Subscribe to the paho (MQTT) topic 'sensor/data'.
-->
<from uri="paho:sensor/data?brokerUrl=tcp://localhost:1883"/>
<log message="Received from MQTT: ${body}"/>
<!--
Convert body [ byte array -> unmarshal -> Java Map Object ]
-->
<!--<convertBodyTo type="java.lang.String"/>-->
<unmarshal>
<json/>
</unmarshal>
<to uri="mongodb:dummy?hosts=localhost:27017&database=camel&collection=sensorData&operation=insert&username=admin&password=secret"/>
</route>
</camel>결과적으로 아래처럼 잘 저장됩니다.

보충: Mosquitto 설정
Mosquitto 는 설정파일을 통해서 많은 설정을 할 수 있습니다.
이 글에서는 자세히 다루지는 않을 겁니다.
하지만 최소한 어떻게 하는지는 알아보고 글을 마치겠습니다.
설정파일 작성 위치
먼저 저희의 Mosquitto 설정파일의 작성 위치부터 알아보겠습니다.
mosquitto 기본 설정파일인 /etc/mosquitto/mosquitto.conf 파일을 읽어보죠.
cat /etc/mosquitto/mosquitto.conf
여기서 보면 맨 아래에 include_dir 이 있습니다.
해당 경로에 가면 README 가 있는데 읽어보면...
cat /etc/mosquitto/conf.d/README
/etc/mosquitto/conf.d 에 자신만의 설정 파일(*.conf) 을 작성하라고 하네요!
위치가 파악됐습니다. 이제 설정파일을 작성하죠.
conf 파일 작성
저는 /etc/mosquitto/conf.d 디렉토리에 listener.conf 라는 설정 파일을
하나 작성해보겠습니다 (sudo 권한 필요!).
sudo vim /etc/mosquitto/conf.d/listener.conflistener 1883
allow_anonymous true
allow_anonymous true설정은 VirtualBox 외부에서 이 Mosquitto server 와
통신 테스트를 할 예정이어서 지정해준거고,listener 1883은 포트번호를 지정한 겁니다.
이렇게 설정을 하고 나서, mosquitto 서버를 재실행해야 합니다.
다만 주의할 점이 있는데, systemctl restart 를 사용하면 에러가 날 수 있습니다.
bread@codingtoast:~$ systemctl status mosquitto.service
× mosquitto.service - Mosquitto MQTT Broker
     Loaded: loaded (/usr/lib/systemd/system/mosquitto.service; enabled; preset: enabled)
     Active: failed (Result: exit-code) since Fri 2025-08-01 01:34:11 UTC; 1s

// ... 중간 생략 ...
Aug 01 01:34:11 codingtoast systemd[1]: mosquitto.service: Failed with result 'exit-code'.
Aug 01 01:34:11 codingtoast systemd[1]: Failed to start mosquitto.service - Mosquitto MQTT Broker.
Aug 01 01:34:11 codingtoast systemd[1]: mosquitto.service: Scheduled restart job, restart counter is at 5.
Aug 01 01:34:11 codingtoast systemd[1]: mosquitto.service: Start request repeated too quickly.
Aug 01 01:34:11 codingtoast systemd[1]: mosquitto.service: Failed with result 'exit-code'.
Aug 01 01:34:11 codingtoast systemd[1]: Failed to start mosquitto.service - Mosquitto MQTT Broker.
mosquitto.service: Start request repeated too quickly. 라는게 보이죠?
이럴 때는 아래처럼 수동으로 천천히 재실행하면 됩니다.
# mosquitto 서버 정지
sudo systemctl stop mosquitto

### 5초 정도만 기다리세요. 곧바로 재실행하면 에러가 나더군요.

# mosquitto 서버 실행
sudo systemctl start mosquitto
참고 링크