
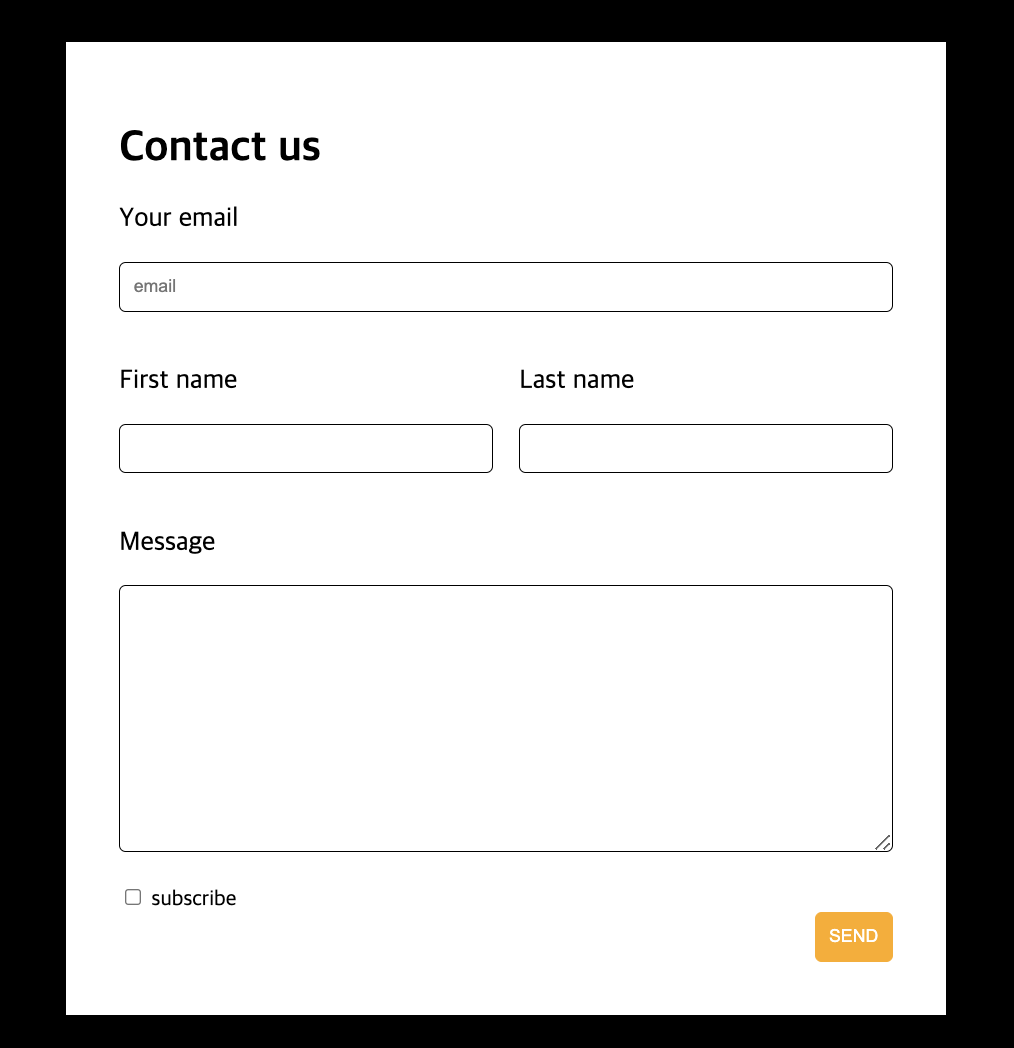
HTML
<!DOCTYPE html>
<html>
<head>
    <meta charset="UTF-8">
    <title>contactus2</title>
    <link href = "contactus2.css" rel = "stylesheet">
</head>
<body>
    <div class = "black">
        <div class = "white">
            <form>
                <div class = "wid-100">
                    <h1>Contact us</h1>
                    <p class = "letter">Your email</p>
                    <input class = "form-input" type = "email" placeholder = "email">
                </div>
                <div class = "wid-50">
                    <p class = "letter">First name</p>
                    <input class = "form-input" type = "text">
                </div>
                <div class = "wid-50">
                    <p class = "letter">Last name</p>
                    <input class ="form-input" type = "text">
                </div>
                <div style="clear:both; float:none;"></div>
                <div class = "wid-100">
                    <p class = "letter">Message</p>
                    <textarea class = "form-input form-long"></textarea>
                </div>
                <div class = "wid-100">
                    <input id = "subscribe" type = "checkbox">
                    <label for="subscribe">subscribe</label>
                    <button class = "button">SEND</button>
                </div>
            </form>
        </div>
    </div>
</body>
</html>
- form 태그와 input, textarea 등
<form action="/submit-form" method="post">
  <label for="name">이름:</label>
  <input type="text" id="name" name="name"><br><br>
  <label for="email">이메일:</label>
  <input type="email" id="email" name="email"><br><br>
  <input type="submit" value="제출">
</form>이메일:
form 태그는 웹페이지에서 사용자로부터 정보 수집하는데 사용되며 여러 구성요소로 이루어짐
- action : form이 제출되었을 때 데이터를 보낼 url 지정
- method: form 데이터를 서버로 보내는 방법을 정의(GET 혹은 POST)**
- input: form 안에 입력 필드 지정, 예를 들어 텍스트 상자, 라디오 버튼, 체크 박스 등
- submit: form을 제출하는 버튼
1. GET은 url**에 데이터 포함해서 요청을 전송하는 방식
url끝에 ?를 데이터를 전송, 데이터는 "key-value" 형태로 전송됨
예시)
http://www.example.com/search?q=apple
2. POST는 HTTP 요청 본문**에 데이터를 포함시켜서 요청을 전송하는 방식
따라서, GET 방식과는 달리 URL에 데이터가 포함되지 않음. 보안에 필요한 정보를 전송할 때 주로 사용됨.
예시)
POST /login HTTP/1.1
Host: www.example.com
Content-Type: application/x-www-form-urlencoded
Content-Length: 25

username=john&password=1234
CSS
.black {
    background-color: black;
    padding: 40px;
}

.white {
    background-color: white;
    padding: 30px;
    margin: auto;
    width: 80%;
    max-width: 600px;
}

.letter {
    font-size: 20px;
}

.form-input {
    width: 100%;
    padding: 10px;
    margin:auto;
    border-radius: 5px;
    border: 1px solid black;
    box-sizing: border-box;
}

.form-long {
    height: 200px;
}

.wid-100 {
    padding: 10px;
}

.wid-50 {
    width: 50%;
    float: left;
    padding: 10px;
    box-sizing: border-box;
}

.button {
    padding: 10px;
    background-color: rgb(255, 170, 0);
    border: 1px solid rgb(255, 170, 0);
    border-radius: 5px;
    color: white;
    display: block;
    margin-left: auto;
}

.button:hover{
    color: black;
}
박스 모델

content = 태그가 차지하는 공간
width와 height가 차지하는 공간
padding = 여백
원하는 곳에만 패딩을 줄 수도 있음
- 4곳 모두 패딩 넣기 -> padding: 10px;
- 오른쪽만 패딩 넣기 -> padding-right: 10px;
- 시계방향(위 오른쪽 아래 왼쪽)으로 패딩 넣기 -> padding: 10px 0px 20px 5px;
border = 테두리
-
border: 픽셀 선방식 색상;
기본적인 border 설정
예시) border: 1px solid black; -
border-radius: 픽셀;
박스 테두리 둥굴기에 대한 설정이 가능
예시) border-radius: 20px; -
box-sizing: border-box
원래 기본적인 박스 사이즈에 대한 설정은 box-sizing: content-box로, width, height계산에 padding이나 border의 픽셀 수가 포함되지 않음. 포함해서 계산하기 위해서는 박스 사이즈에 대한 설정을 border-box로 변경해야 함. 이렇게 하면, 놓치는 픽셀수가 없어서 추후 박스 디자인에 있어 편리함
margin = 다른 태그와의 여백
box-sizing 설정 여부와 관계 없이 width에 포함되지 않음.
