
혼공단 마지막 6주차 미션...시작!!
6주차 미션_Chapter 07 ~ 08

기본미션_p.315의 <직접 해보는 손코딩>을 실행한 후 출력되는 고양이 이미지 캡쳐하기.
<!DOCTYPE html>
<html lang="en">
<head>
    <meta charset="UTF-8">
    <title>혼공JS_6주차 기본미션</title>
    <script>
        document.addEventListener('DOMContentLoaded', () => {
            const rects = document.querySelectorAll('.rect')

            rects.forEach((rect, index) => {
                const width = (index + 1) * 100
                const src = `http://placekitten.com/${width}/250`
                rect.setAttribute('src', src)
            })
        })
    </script>
</head>
<body>
    <img class="rect">
    <img class="rect">
    <img class="rect">
    <img class="rect">
</body>
</html>
귀여운 고양이가 나오는 간단한 예제이다.
선택미션_p.352 누적 예제를 활용하여 본인의 할 일 목록을 만들어 캡쳐하기
<!DOCTYPE html>
<html lang="en">
<head>
    <meta charset="UTF-8">
    <meta http-equiv="X-UA-Compatible" content="IE=edge">
    <meta name="viewport" content="width=device-width, initial-scale=1.0">
    <title>혼공JS_6주차 선택미션</title>
</head>
<body>
    <h1>할 일 목록</h1>

    <input id="todo" />
    <button id="add-button">추가하기</button>
    <div id="todo-list"></div>

    <script>
      document.addEventListener("DOMContentLoaded", () => {
        const input = document.querySelector("#todo")
        const addButton = document.querySelector("#add-button")
        const todoList = document.querySelector("#todo-list")

        let keyCount = 0

        const addTodo = () => {
          if (input.value.trim() === "") {
            alert("할 일을 입력해 주세요")
            return
          }

          const item = document.createElement("div")
          const checkbox = document.createElement("input")
          const text = document.createElement("span")
          const button = document.createElement("button")

          const key = keyCount
          keyCount += 1

          item.setAttribute("data-key", key)
          item.appendChild(checkbox)
          item.appendChild(text)
          item.appendChild(button)
          todoList.appendChild(item)

          checkbox.type = "checkbox"
          checkbox.addEventListener("change", (event) => {
            item.style.textDecoration = event.target.checked ? "line-through" : ""
          })

          text.textContent = input.value;

          button.textContent = "제거하기"
          button.addEventListener("click", () => {
            removeTodo(key)
          });

          input.value = ""
        };

        const removeTodo = (key) => {
          const item = document.querySelector(`[data-key="${key}"]`);
          todoList.removeChild(item)
        };

        addButton.addEventListener("click", addTodo)

        input.addEventListener("keyup", (event) => {
          const ENTER = 13

          if (event.keyCode === ENTER) {
            addTodo()
          }
        });
      });
    </script>
  </body>
</html>
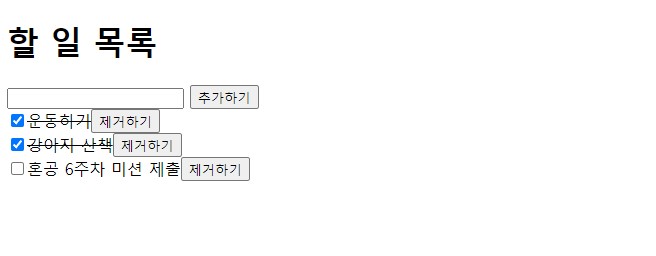
자신이 할 일을 추가와 삭제하고 한 일을 체크할 수 있는 예제를 따라해봤다.
벌써 6주차 미션 끝!!! 생각보다 빨리 끝난 느낌이라서 좀 아쉬운 감이 있지만 혼공단 하면서 재미있었던 거 같다! 내년에도 또 신청해서 다른 거 더 배워봐야짐 ><

우당탕 프로그래밍 스터디