📕 Pagination
웹 사이트를 이용하며 게시판을 둘러볼 때, 게시글 목록 하단에 게시글을 일정 수로 나누어 페이지화 시켜놓은걸 볼 수 있는데 이를 Pagination(페이지네이션) 이라고 한다.
💻 예시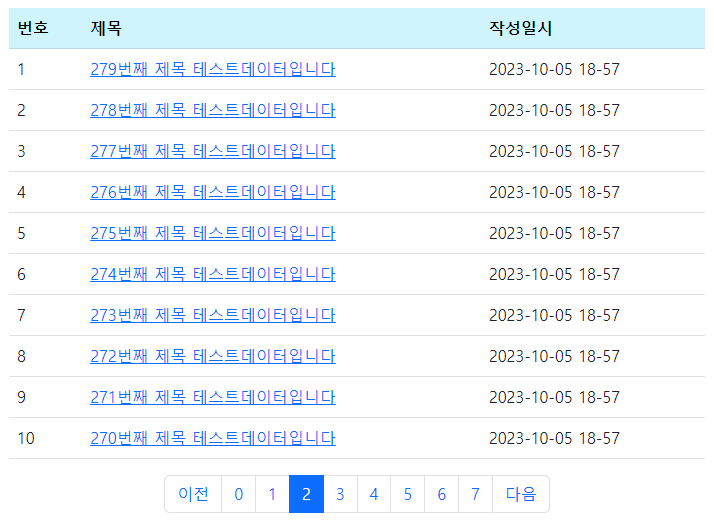
페이지네이션을 구현하기 위해 테스트 프레임 워크를 이용하여 대량의 데이터를 만들어 보자
💻 대량 테스트 데이터 만들기
💾 SbbApplicationTests.java 파일 이용
package com.mysite.sbb;

import org.junit.jupiter.api.Test;
import org.springframework.beans.factory.annotation.Autowired;
import org.springframework.boot.test.context.SpringBootTest;

import com.mysite.sbb.question.QuestionService;


@SpringBootTest
class SbbApplicationTests {

    @Autowired
    private QuestionService questionService;

    @Test
    void testJpa() {
    	for(int i=1; i<300; i++) {
    		this.questionService.create(String.format("%d번째 제목 테스트데이터입니다", i), String.format("%d번째 내용 테스트데이터입니다", i));
    	}
    }
}
💻 실행결과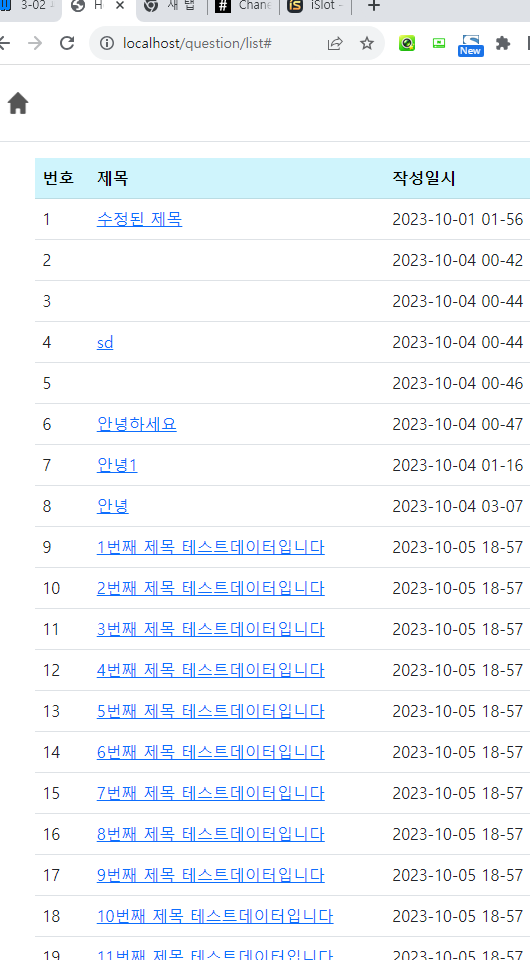
300개의 게시물이 등록되었다! 그러나, 최신 순이 아니라 역순으로 등록되었다! 최신 순이었다면 299번째 게시물이 위로 올라와야 한다!
299개의 데이터는 만들었지만, 페이징 기능이 구현되어 있지 않아 모든 데이터가 한 페이지에 보여지게 된다. 이 때, 페이징을 이용하여 몇 개의 게시물까지 한 페이지에 나오게 할 것인지 구현할 수 있다.
💬 페이징을 구현하기 위한 요소들
페이징을 구현하기 위해서는 전체 데이터 개수를 가져와서 전체 페이지를 계산해야하고, 현재 페이지가 첫번째 페이지인지, 마지막 페이지인지도 계산해야하고, 예상치 못한 페이지 범위를 요청받았을 때 예외처리도 해야한다.
이 데이터들을 얻으려면 최소 2번의 API 요청(데이터 요청, 데이터 카운트 콜)을 통해 데이터를 가져와야 한다. 2번의 요청이 싫다면, 한번의 요청으로 모든 데이터를 가져와야 하는데 이 경우에는 데이터가 매우 많을 경우에 성능 이슈가 생길 수 있다.
Spring 프레임워크에서는 이러한 고민을 해결 할 수 있는 방법 중 하나가, Spring-Data-JPA 라이브러리의 Page와 Pageable을 이용하는 것이다. Spring Data JPA은 이런 페이지네이션도 추상화되어 있다. 페이지 크기와 페이지 순서만 전달하면, 데이터베이스에서 해당 페이지에 해당하는 데이터만 가져올 수 있다.
💡 Spring Data Jpa의 제공 메서드
- Pageable
Pageable은 Spring JPA에서 DB 쿼리에 쉽고 유연하게 limit 쿼리를 사용할 수 있게 해준다. 특히 JPA를 사용할 때, 자동으로 Pageable 타입의 변수를 넘겨주면 JPA가 DB에 접근해 데이터를 가져올 때 자동으로 limit 조건을 붙여 데이터를 가져온다.- Page
Pageble을 파라미터로하여 가져온 결과물은Page<SomeObject>형태로 반환 되며, Page를 사용한다면 대부분 다수의 row를 가져오기 때문에Page<List<SomeObject>>의 형태로 반환을 한다.
📝 Pageable과 PageRequest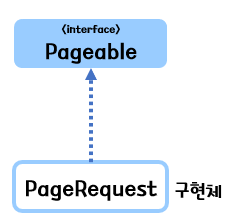
Pageable 과 PageRequest 는 Spring Data에서 제공하는 페이지네이션 정보를 담기 위한 인터페이스와 구현체이다. 페이지 번호와 단일 페이지의 개수를 담을 수 있다.
이를 Spring Data JPA 레포지토리의 파라미터로 전달하여, 반환되는 엔티티의 컬렉션에 대해 페이징할 수 있다.
✅ 페이징을 구현해보자!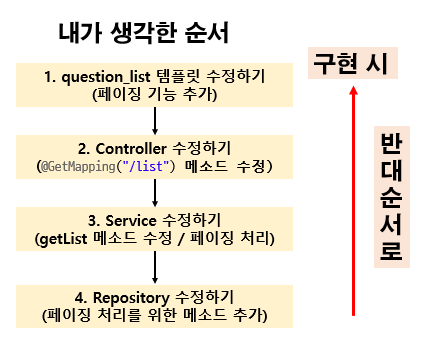
페이징을 구현하기 위해 다음과 같은 클래스를 이용할 수 있다.
org.springframework.data.domain.Page
org.springframework.data.domain.PageRequest
org.springframework.data.domain.Pageable
🔍 Page 인터페이스의 구조
public interface Page<T> extends Slice<T> {


	static <T> Page<T> empty() {
		return empty(Pageable.unpaged());
	} // 빈 페이지를 생성하여 반환한다

	static <T> Page<T> empty(Pageable pageable) {
		return new PageImpl<>(Collections.emptyList(), pageable, 0);
	} // Pageable을 받아 빈 페이지를 생성하고 반환

	int getTotalPages(); // 전체 페이지 개수를 반환

	long getTotalElements(); // 전체 데이터 개수를 반환

	<U> Page<U> map(Function<? super T, ? extends U> converter);
}
Page 인터페이스는 부모 인터페이스인 Slice를 상속한다. 따라서, Slice 인터페이스 외에 getTotalPages(), getTotalElements() 메소드를 추가로 가지고 있다.
이를 통해, Slice 와 Page의 차이는 전체 페이지 수와 전체 데이터 개수를 조회하는지 안하는지에 대한 차이가 있다.
전체 페이지 개수와 전체 데이터 수를 이용하는 실제 게시판 형식의 페이징 처리를 구현해야한다면 Page를 이용하고, 요즘 많이 사용하는 무한 스크롤 방식을 사용한다면 전체 페이지와 데이터 개수가 필요없기 때문에 Slice 방식을 이용하는 것이 효율적이라 판단된다.
💡 Page 객체에 있는 속성
| 항목 | 설명 |
|---|---|
| .isEmpty | 페이지 존재 여부 (게시물이 있으면 false, 없으면 true) |
| paging.totalElements | 전체 게시물 개수 |
| paging.totalPages | 전체 페이지 개수 |
| paging.size | 페이지당 보여줄 게시물 개수 |
| paging.number | 현재 페이지 번호 |
| paging.hasPrevious | 이전 페이지 존재 여부 |
| paging.hasNext | 다음 페이지 존재 여부 |
💾 QuestionRepository에 메서드 추가하기
package com.mysite.sbb.question;

import java.util.List;

import org.springframework.data.domain.Page;
import org.springframework.data.domain.Pageable;
import org.springframework.data.jpa.repository.JpaRepository;

public interface QuestionRepository extends JpaRepository<Question, Integer> {
    Question findBySubject(String subject);
    Question findBySubjectAndContent(String subject, String content);
    List<Question> findBySubjectLike(String subject);
    Page<Question> findAll(Pageable pageable);
}
✅ 추가 : import org.springframework.data.domain.Page;
✅ 추가 : import org.springframework.data.domain.Pageable;
✅ 추가 : Page<Question> findAll(Pageable pageable);
✅ Pageable 인터페이스를 매개값으로 이용하여
Page<Question>타입으로 반환하는 findAll 메서드를 추가 했다.
💾 QuestionService에 getList()메서드 수정하기
🔴 수정 전
public List<Question> getList() {
		return this.questionRepository.findAll();
	}
🔵 수정 후
import org.springframework.data.domain.Page;
import org.springframework.data.domain.PageRequest;
import org.springframework.data.domain.Pageable;
import java.util.ArrayList;
import java.util.List;
import org.springframework.data.domain.Sort;


public class QuestionService {

    (......)

    public Page<Question> getList(int page){
		List<Sort.Order> sorts = new ArrayList<>();
		sorts.add(Sort.Order.desc("createDate"));
		Pageable pageable = PageRequest.of(page, 10, Sort.by(sorts));
		return this.questionRepository.findAll(pageable);
	}
	(......)
}
🔴 List<Question> -> 🔵Page<Question> 반환타입 수정
✅ 추가 : List<Sort.Order> sorts = new ArrayList<>(); Sort.Order 객체로 구성된 리스트에
✅ 추가 : sorts.add(Sort.Order.desc("createDate")); Sort.Order 객체를 추가하고
✅ 추가 : PageRequest page = PageRequest.of(page, 10, Sort.by(sorts)); 정적 팩토리 메소드를 사용하여 PageRequest 를 생성하였다.
이때 첫번째 파라미터는 조회할 페이지의 번호이고, 두번째 파라미터는 단일 페이지의 크기를 의미, 세번째 파라미터는 Sort.by(소트리스트)로 소트 객체를 의미한다. 또한 페이지 순서는 0부터 시작함에 유의하자. (만약 작성일시 외에 추가로 정렬조건이 필요할 경우에는 sorts 리스트에 추가하면 된다.)
🔍 PageRequest of 정적 메소드의 구조
public static PageRequest of(int pageNumber, int pageSize) {
		return of(pageNumber, pageSize, Sort.unsorted());
	}
💾 QuestionController 수정하기
package com.mysite.sbb.question;

(......)
import org.springframework.web.bind.annotation.RequestParam;
import org.springframework.data.domain.Page;
(......)
public class QuestionController {

    (......)

    @GetMapping("/list")
    public String list(Model model, @RequestParam(value="page", defaultValue="0") int page) {
        Page<Question> paging = this.questionService.getList(page);
        model.addAttribute("paging", paging);
        return "question_list";
    }

    (......)
}
🔴 수정 전 : public String list(Model model)
🔵 수정 후 : public String list(Model model, @RequestParam(value="page", defaultValue="0") int page)
✅ http://localhost:8080/question/list?page=0 처럼 GET 방식으로 요청된 URL에서 page값을 가져오기 위해 @RequestParam(value="page", defaultValue="0") int page 매개변수가 list 메서드에 추가되었다. URL에 페이지 파라미터 page가 전달되지 않은 경우 디폴트 값으로 0이 되도록 설정했다.
🔴 수정 전 : List<Question> questionList = this.questionService.getList();
🔵 수정 후 : Page<Question> paging = this.questionService.getList(page);
🔴 수정 전 : model.addAttribute("questionlist", questionlist);
🔵 수정 후 : model.addAttribute("paging", paging);
✅ 리스트 타입을 페이지타입으로 수정하였다.
컨트롤러에서 기존에 전달했던 이름인 "questionlist" 에서 "paging"으로 변경되었으니 템플릿을 변경해보자!
💾 question_list.html 수정하기
1 <html layout:decorate="~{layout}">
2 <div layout:fragment="content" class="container my-3">
3 	<table class = "table">
4     	<thead class = "table-info">
5         	<tr>
6 				<th>번호</th>
7            	<th>제목</th>
8            	<th>작성일시</th>
9        	</tr>
10    	</thead>
11    	<tbody>
12     		<tr th:each="questionlist, loop : ${paging}">
13				<td th:text="${loop.count}"></td>
14            	<td>
15					<a th:href="@{|/question/detail/${questionlist.id}|}" th:text="${questionlist.subject}"></a>
16				</td>
17            	<td th:text="${#temporals.format(questionlist.createDate, 'yyyy-MM-dd HH-mm')}"></td>
18        	</tr>
19    	</tbody>
20	</table>
21	<a th:href="@{/question/create}" class="btn btn-primary">질문 등록하기</a>
</div>
</html>
🔴 수정 전 : 12 <tr th:each="questionlist, loop : ${questionlist}">
🔵 수정 후 : 12 <tr th:each="questionlist, loop : ${paging}">
💻 실행결과 http://localhost:8080/question/list?page=0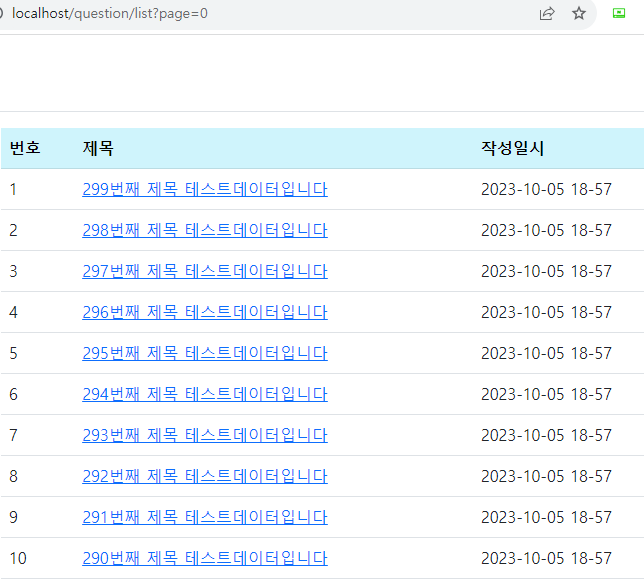
게시물 10개씩 한 페이지에 나오도록 구현되었다! 이제 페이지 이동 기능을 추가해 보자!
💾 question_list.html에 페이지 이동 기능 추가하기
<html layout:decorate="~{layout}">
<div layout:fragment="content" class="container my-3">
	<table class = "table">
      <!-- 생략 -->
	</table>

  	<!-- 페이징처리 시작 -->
1    <div th:if="${!paging.isEmpty()}">
2        <ul class="pagination justify-content-center">
3            <li class="page-item" th:classappend="${!paging.hasPrevious} ? 'disabled'">
4                <a class="page-link"
                    th:href="@{|?page=${paging.number-1}|}">
5                    <span>이전</span>
6                </a>
7            </li>
8            <li th:each="page: ${#numbers.sequence(0, paging.totalPages-1)}"
                th:if="${page >= paging.number-5 and page <= paging.number+5}"
                th:classappend="${page == paging.number} ? 'active'"
                class="page-item">
9                <a th:text="${page}" class="page-link" th:href="@{|?page=${page}|}"></a>
10            </li>
11            <li class="page-item" th:classappend="${!paging.hasNext} ? 'disabled'">
12                <a class="page-link" th:href="@{|?page=${paging.number+1}|}">
13                    <span>다음</span>
                </a>
            </li>
        </ul>
    </div>
    <!-- 페이징처리 끝 -->

	<a th:href="@{/question/create}" class="btn btn-primary">질문 등록하기</a>
</div>
</html>
✅ 이전, 다음 페이지가 없는 경우에는 "이전", "다음" 링크가 비활성화(disabled)
- 3
<li class="page-item" th:classappend="${!paging.hasPrevious} ? 'disabled'"> - 11
<li class="page-item" th:classappend="${!paging.hasNext} ? 'disabled'">
✅ 이전, 다음 페이지 링크
- 4
<a class="page-link" th:href="@{|?page=${paging.number-1}|}"> - 12
<a class="page-link" th:href="@{|?page=${paging.number+1}|}">
✅ 페이지 리스트를 루프 돌면서 해당 페이지로 이동할 수 있는 링크를 생성, 이때 루프 도중의 페이지가 현재 페이지와 같을 경우에는 active클래스를 적용하여 강조표시(선택표시)도 해 주었다.
8 <li th:each="page: ${#numbers.sequence(0, paging.totalPages-1)}"
                th:if="${page >= paging.number-5 and page <= paging.number+5}"
                th:classappend="${page == paging.number} ? 'active'"
                class="page-item">
th:each="page: ${#numbers.sequence(0, paging.totalPages-1)}"페이지 리스트 루프#numbers.sequence(시작, 끝)은 시작 번호부터 끝 번호까지의 루프를 만들어 내는 타임리프의 유틸리티이다.
th:classappend="${page == paging.number} ? 'active'"현재페이지와 같으면 active 적용th:if="${page >= paging.number-5 and page <= paging.number+5}"페이지 리스트가 현재 페이지 기준으로 좌우 5개씩 보이도록 만든다.
pagination, page-item, page-link 등이 부트스트랩 pagination 컴포넌트의 클래스이며,
th:classappend="조건식 ? 클래스값" 속성은 조건식이 참인 경우 클래스값을 class 속성에 추가한다.
참고 : 부트스트랩 pagination - https://getbootstrap.com/docs/5.2/components/pagination/
💬 그저 나의 참고리스트
- https://wearegolden.tistory.com/entry/SPRINGJPA-PagingPagination-Pageable-%EA%B0%9D%EC%B2%B4-%EB%B0%9B%EC%95%84-%EC%82%AC%EC%9A%A9%ED%95%98%EA%B8%B0
- https://wonit.tistory.com/483
- https://velog.io/@albaneo0724/Spring-Pagination%EA%B3%BC-Page-%EA%B7%B8%EB%A6%AC%EA%B3%A0-Pageable
- https://steady-learner.tistory.com/entry/Springboot-%ED%8E%98%EC%9D%B4%EC%A7%80%EB%84%A4%EC%9D%B4%EC%85%98-Pageable-%EA%B0%9D%EC%B2%B4%EC%97%90-%EB%8C%80%ED%95%B4-%EC%95%8C%EC%95%84%EB%B3%B4%EC%9E%90
- https://zayson.tistory.com/entry/Spring-Data-JPA%EC%9D%98-Page%EC%99%80-Slice
- https://gaemi606.tistory.com/entry/Spring-Boot-PageRequest
- https://velog.io/@albaneo0724/Spring-Pagination%EA%B3%BC-Page-%EA%B7%B8%EB%A6%AC%EA%B3%A0-Pageable
- https://zayson.tistory.com/entry/Spring-Data-JPA%EC%9D%98-Page%EC%99%80-Slice
- https://velog.io/@gsw05018/SortSort.Order
- https://itmining.tistory.com/139
💻 실행결과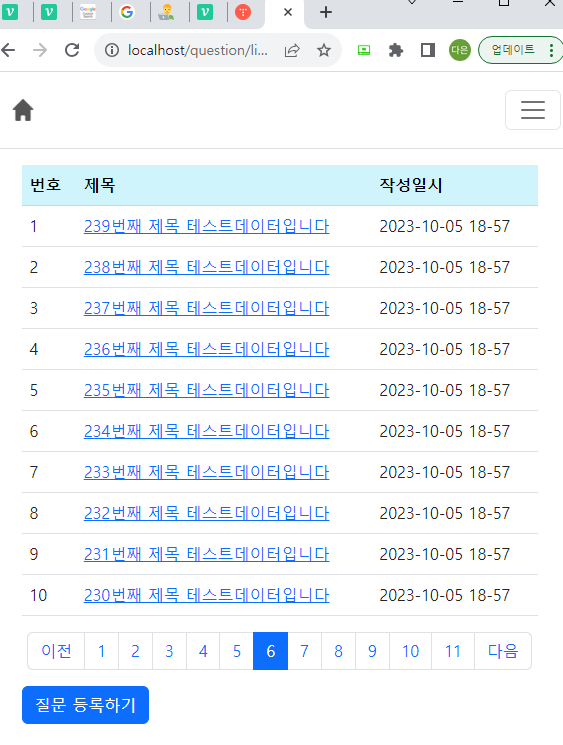
처음과 끝 기능도 구현해보자!
